Have you ever looked at a photo and wished you could just smooth out a wrinkle, reshape a stray hair, or add a touch of whimsy? Well, fret no more! Photoshop’s Liquify tool is your one-stop shop for transforming your images. From subtle retouching to artistic distortions, Liquify offers a world of creative possibilities.
In this comprehensive guide, we’ll not only teach you how to master Liquify in Photoshop, but we’ll also introduce you to a fantastic alternative photo editor with similar capabilities. So, buckle up and get ready to take your photo editing skills to the next level!
Master the Liquify on Photoshop
Now that you’re excited to unleash the power of Liquify, let’s explore its inner workings! To access this magical tool, head over to the Filter menu in Photoshop and select “Liquify.” This opens a dedicated workspace with a whole new set of tools at your disposal.
Warped and Wonderful: Essential Liquify Tool Photoshop
Liquify offers a variety of tools, each with unique effects on your image. Here are some of the key players:
- Forward Warp Tool: This is your go-to tool for pushing and pulling pixels around. Click and drag to nudge elements in your image, like smoothing out wrinkles or subtly reshaping objects.
- Reconstruct Tool: Did you make a mistake? Don’t sweat it! The Reconstruct Tool helps you rebuild areas you might have over-manipulated. It analyzes the surrounding pixels and restores a more natural look.
- Twirl Clockwise Tool: Feeling artistic? This tool lets you create swirling distortions, perfect for adding a touch of whimsy or drama to your photos.
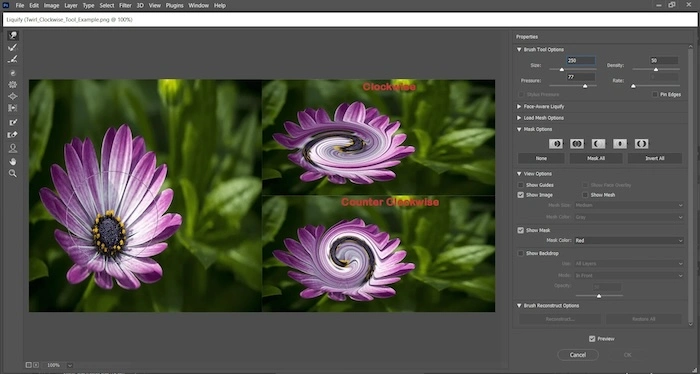
- Pucker Tool: Want to make something smaller? The Pucker Tool pulls pixels toward the center of your brush, effectively shrinking areas of your image.
- Bloat Tool: The opposite of Pucker, the Bloat Tool pushes pixels outwards, allowing you to enlarge specific areas.
- Push Left/Right Tool: As the name suggests, these tools move pixels horizontally, letting you nudge objects slightly to the left or right.
Fine-Tuning Your Liquify Experience
Beyond the tools themselves, Liquify provides several brush options that further refine your edits. You can adjust the Brush Size to target specific areas, the Brush Density to control the intensity of the effect, and the Brush Pressure to determine how much the effect builds with each stroke. For those using a drawing tablet, Stylus Pressure allows pressure-sensitive control over the Liquify effect.
While Liquify offers endless possibilities, it’s crucial to use it subtly for realistic edits. A heavy hand can quickly turn a beautiful photo into a distorted mess. So, take your time, experiment with different tools and settings, and always aim for natural-looking enhancements.
Best Alternative Liquify Photo Editor to Photoshop 2024
While Photoshop’s Liquify tool is a powerhouse, there are excellent alternatives worth considering, especially for those seeking a user-friendly experience. One such option is Evoto AI, a powerful AI photo editor that offers a robust Liquify tool with an intuitive interface.
Evoto’s approach is particularly interesting. It recommends using their AI function under the Feature Module first. This AI can automatically enhance your image, potentially reducing the need for extensive manual adjustments later. Once you’re happy with the AI’s work, you can then dive into the Liquify module for precise control.
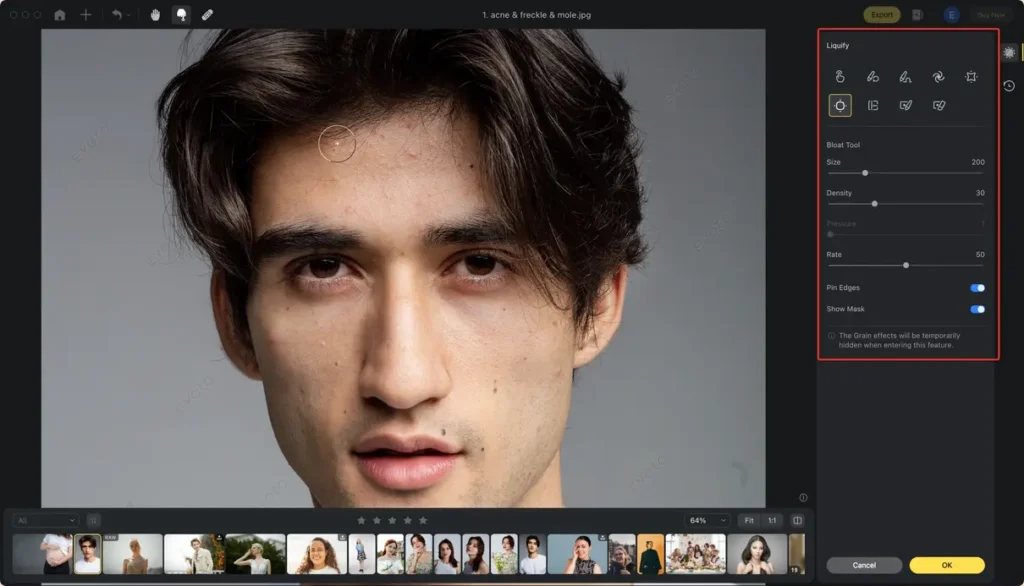
Here’s a breakdown of Evoto’s Liquify tools and functionalities, mirroring the familiar features found in Photoshop:
- Forward Warp Tool
- Reconstruct Tool
- Smooth Tool: The Smooth Tool on Evoto AI helps eliminate imperfections and create a more even, polished appearance.
- Twirl Clockwise Tool
- Pucker Tool
- Bloat Tool
- Push Left/Right
Evoto’s Additional Features
Evoto goes beyond replicating Photoshop’s functionalities. Here are some additional features that enhance the user experience:
- Freeze Mask and Thaw Mask Tools: Just like in Photoshop, Evoto offers Freeze and Thaw Mask tools to protect specific areas from adjustments or restore previously frozen areas.
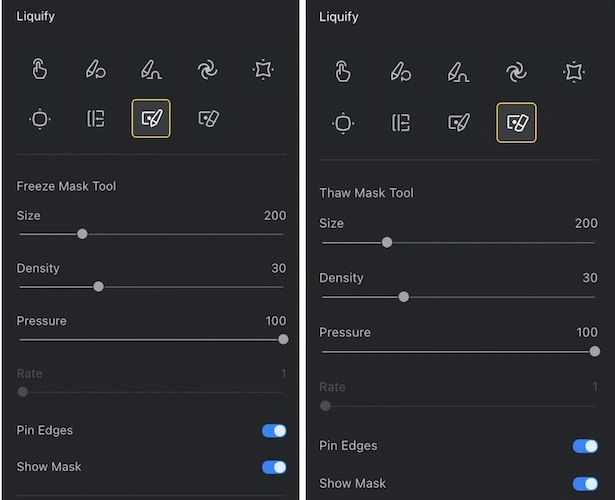
- Adjustable Brush Settings: Evoto provides sliders for Size, Density, Pressure, and Rate, allowing you to fine-tune the Liquify effect for optimal results.
- Pin Edge Enable: This unique feature lets you lock specific areas of your image, preventing unwanted distortions. This is helpful for maintaining the integrity of important details during the Liquify process.
- Show Mask Enable: Similar to Photoshop, Evoto allows you to toggle the visibility of the mask created by the Freeze Mask tool.
Evoto – The Most Efficient AI Photo Editor
The Benefits of Evoto AI Liquify
Evoto’s Liquify tool offers several advantages, making it a compelling alternative to Photoshop:
- AI-powered Enhancements: The AI function can pre-enhance your image, potentially reducing the need for extensive manual Liquify adjustments.
- User-friendly Interface: Evoto presents a clean and intuitive interface, making it easier for beginners to master Liquify techniques.
- Non-destructive Editing: Evoto allows for non-destructive editing, ensuring you can always revert to the original image if needed.
Whether you’re a seasoned Photoshop pro or a complete editing novice, Evoto’s Liquify tool offers a powerful and user-friendly alternative for manipulating your photos with ease.
Guide to Use the Liquify on Photoshop
Ready to put your Liquify knowledge into action? Here’s a detailed guide on using the Liquify tool in Photoshop:
1. Getting Started: Duplicating Your Layer
Before diving in, it’s crucial to protect your original image. We achieve this by creating a duplicate layer. Here’s how:
- On a Mac, use the keyboard shortcut ⌘ + Option + Shift + N to create a new layer. Then, use ⌘ + Option + Shift + E to duplicate your image into that new layer.
- For PC users, replace ⌘ + Option with Ctrl + Alt.
2. Accessing Liquify
With your duplicate layer selected, it’s time to unleash Liquify’s power! Navigate to the top menu bar and click on “Filter.” From the dropdown menu, select “Liquify.” Alternatively, you can use the keyboard shortcut Shift + ⌘ + X (Mac) or Shift + Ctrl + X (PC).
3. Distorting the Image
Liquify allows you to manipulate your image in various ways. Here’s how to distort specific areas:
- Select the layer you want to distort. If you only want to alter a specific part, use selection tools to define that area.
- Go to “Filter” and choose “Liquify.”
- Freeze any areas you don’t want to modify using the “Freeze Mask” tool (explained later).
- Choose the appropriate Liquify tool (Forward Warp, Pucker, Bloat, etc.) to achieve your desired distortion.
- Click “OK” to finalize and apply the distortion to your image.
4. Using Freeze and Thaw Masks
Freeze and Thaw Masks help you control which areas Liquify affects. Here’s a breakdown of each:
- Freeze Mask: Protects specific areas from adjustments. Simply select the “Freeze Mask” tool and paint over the areas you want to remain untouched. Holding Shift while clicking creates straight lines.
- Thaw Mask: Reverses the Freeze Mask effect. You can use it to:
a. Invert frozen areas: Click “Mask All” in the “Mask Options” section.
b. Show/Hide frozen areas: Select/deselect “Show Mask” in the “View Options” section.
c. Change the color of frozen areas: Choose a new color from the “Mask Color” menu.
To thaw a frozen area, select the “Thaw Mask” tool and paint over the frozen section. Similar to Freeze Mask, hold Shift while clicking to create straight lines.
5. Additional Mask Options
While Freeze and Thaw Masks are essential, Photoshop offers other mask options for advanced control:
- Replace Selection: Shows the original image’s selection, mask, or transparency.
- Add To/Subtract From/Intersect With Selection: These options allow for adding, removing, or finding the intersection between selected pixels and the current frozen area.
- Invert Selection: Inverts the selection of the currently frozen area.
6. Using a Mesh for Non-Destructive Editing
Liquify adjustments can add up. To keep track of your edits and avoid permanently altering your image, consider using a Mesh. Here’s how:
- In the “View Options” section, select “Show Mesh” and choose a size and color for your mesh.
- To only see the mesh, select “Show Mesh” and deselect “Show Image.”
- To save your mesh for future use, click “Save Mesh” and choose a name and location.
- To use a saved mesh on a new image, select the mesh file and click “Open.”
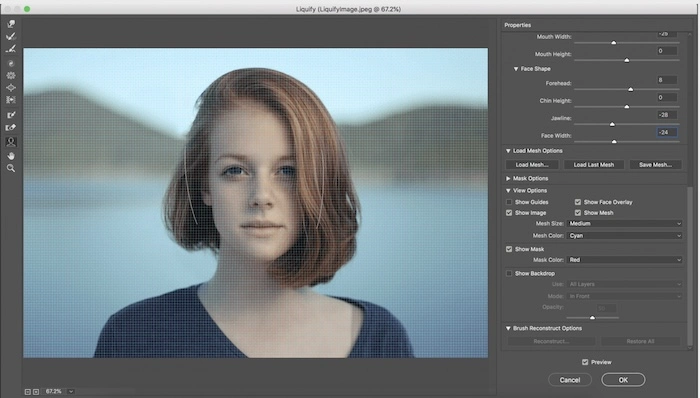
7. Face-Aware Liquify: Effortless Facial Adjustments
The “Face-Aware Liquify” tool simplifies editing facial features like eyes, noses, and mouths. Here’s how to utilize it for non-destructive editing:
- Select a “Smart Object” layer from the “Layers” panel.
- Go to “Filter” and choose “Liquify.”
Using On-Screen Handles:
- Open your image and go to “Filter” > “Liquify.”
- Select the “Face” tool (or press “A”) to identify faces automatically.
- Hover your mouse over a face to see on-screen handles appear.
- Drag the handles to make adjustments and repeat for other faces.
- Click “OK” to finalize the edits.
Using Sliding Controls:
- Open your image and go to “Filter” > “Liquify.”
- Select the “Face” tool (or press “A”) to identify faces.
- You’ll see the identified faces in the “Select Face” menu. Choose a specific face to
Conclusion
Mastering Liquify on Photoshop unlocks a world of creative possibilities for photo editing. This guide equips you with the knowledge to use Liquify effectively, from basic adjustments to advanced techniques. But there’s another option! Evoto, a powerful AI photo editor, offers a user-friendly Liquify tool with AI-powered enhancements, making it a compelling alternative for both beginners and professionals. Explore the world of Liquify and see how Evoto can transform your photo editing workflow!


