Using a green screen remover can transform your photos and videos, providing endless creative possibilities. Whether you’re a professional photographer or an amateur enthusiast, understanding how to effectively remove green screen backgrounds is essential. In this guide, we’ll explore the best methods and tools, with a focus on the innovative Evoto AI Photo Editor. We’ll cover everything from basic concepts to advanced techniques, ensuring you have all the information you need to create stunning visuals.

The Best AI Green Screen Remover in 2024
When it comes to green screen removal, the right tool can make all the difference. In 2024, Evoto AI Photo Editor stands out as the best green screen remover on the market. This powerful software leverages cutting-edge AI technology to provide seamless and efficient background removal. Let’s dive into the features that make Evoto AI a top choice for photographers and editors alike.
Evoto – The Most Efficient AI Photo Editor
Benefits of Using Evoto AI Photo Editor
- AI Background Detection: Evoto AI’s advanced algorithms automatically detect and remove the green screen, ensuring a clean and accurate cutout of your subject.
- Batch Processing: Save time by processing multiple images at once. This feature is especially useful for professional photographers who need to edit large batches of photos.
- AI-Powered Precision: By utilizing machine learning, Evoto AI delivers precise and efficient green screen removal, making it a standout choice for anyone looking to remove green screen backgrounds.
- User-Friendly Interface: The intuitive design of Evoto AI makes it accessible for both beginners and professionals. Navigating the tools and features is straightforward and user-friendly.
- Advanced Editing Features: Beyond green screen removal, Evoto AI offers a comprehensive suite of editing tools, including color adjustments, portrait retouching, and cropping. This all-in-one editor ensures that you can enhance every aspect of your photos.
Read More: Mastering the Green Screen with Evoto AI: A Comprehensive Guide
Step-by-Step Guide of Green Screen Removal
Evoto AI Photo Editor stands out as a powerful tool for green screen removal, offering advanced features that make the process seamless and efficient. Here’s how you can leverage Evoto AI for this task:
Step 1: Upload Your Photo
Open Evoto AI Photo Editor and upload your photo with the green screen background.
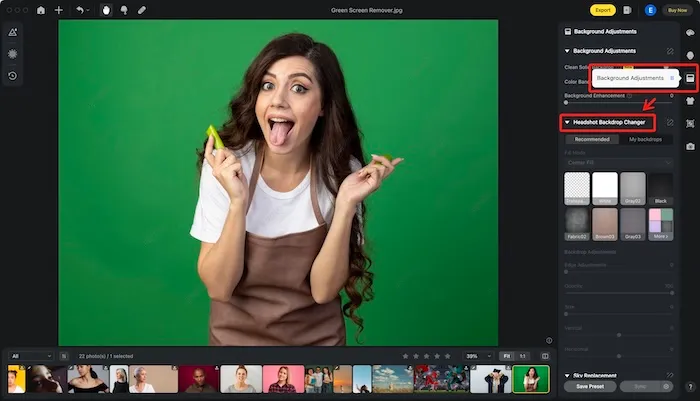
Step 2: Select the Background Adjustments Tool
Navigate to the ‘Headshot Backdrop Changer’ tool in the toolbar.

Step 3: Automatic Detection
Evoto AI’s advanced algorithms automatically detect and remove the green background, providing a clean cutout of your subject.
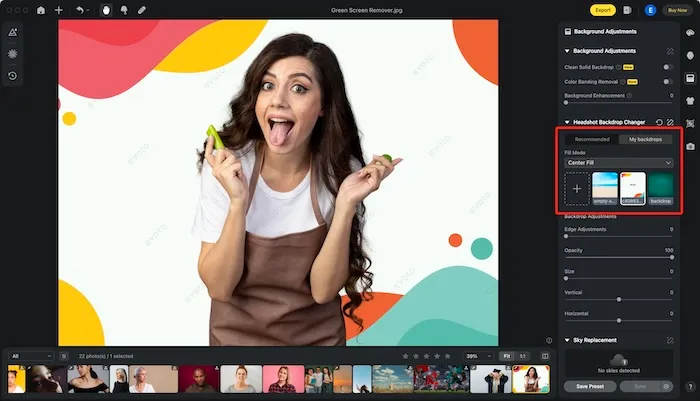
Step 4: Choose a New Background
Select or upload a new background image to replace the green screen. Evoto AI offers a wide range of preset backgrounds or allows you to use your own.

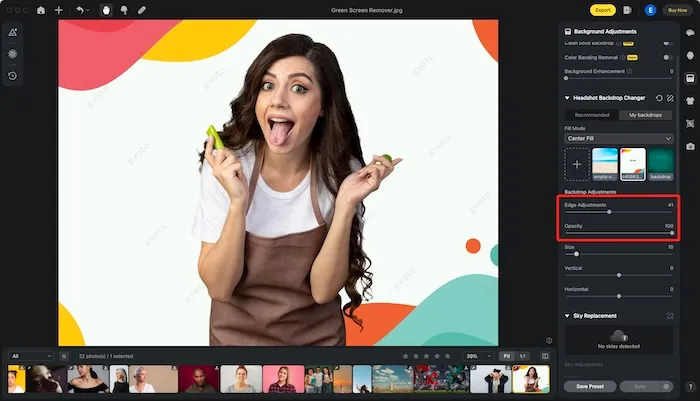
Step 5: Fine-Tune the Edges
Use the edge refinement tools to ensure smooth transitions and remove any green spill.

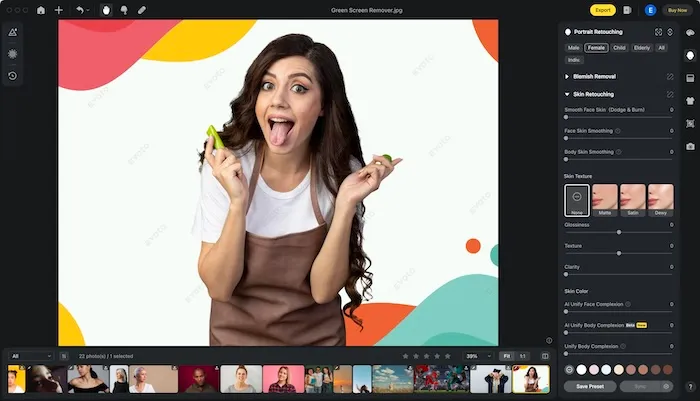
Step 6: Adjust and Enhance
Utilize Evoto AI’s editing tools to adjust lighting, colors, and other elements to ensure the subject blends naturally with the new background.

Green Screen Remover on Photoshop
For those who prefer to use traditional editing software, green screen remove Photoshop techniques are still highly relevant. Photoshop offers powerful tools for green screen removal, albeit with a steeper learning curve compared to Evoto AI. Here’s a quick guide on how to remove green screen using Photoshop:
1. Open Your Photo in Photoshop
Start by opening your photo with the green screen background in Photoshop.
2. Select the Magic Wand Tool
Use the Magic Wand tool to select the green background. Adjust the tolerance level to ensure all green areas are selected.
3. Refine the Edges
Go to Select > Refine Edge to smooth out the edges and remove any green spill. This step is similar to the edge refinement in Evoto AI but requires manual adjustments.
4. Layer Mask
Apply a layer mask to hide the green background. You can then add a new background layer beneath your subject.
5. Final Adjustments
Make any necessary color and lighting adjustments to blend the subject with the new background seamlessly.
Evoto – The Most Efficient AI Photo Editor
Final Thoughts
In summary, mastering the art of green screen removal can significantly enhance your creative projects. While tools like Photoshop are effective, Evoto AI green screen remover offers a more accessible and efficient solution. With features like AI-powered precision, batch processing, and a user-friendly interface, Evoto AI is the best green screen remover in 2024. By following this guide, you’ll be well-equipped to create stunning visuals with ease and professionalism.


