In the realm of photo editing, LUTs in Photoshop are game-changers for color grading and enhancing your images. By applying LUTs, photographers can achieve a cohesive and professional look across their work. This guide will delve into using LUTs in Photoshop, and how integrating Evoto AI can elevate your editing process. Whether you are a beginner or a seasoned editor, mastering LUTs will enhance your workflow and improve the quality of your images.

What Are LUTs?
LUTs (Look-Up Tables) are mathematical formulas that map one color space to another, and they play a crucial role in both video and photo editing. They allow you to apply a specific color grade to your images, creating a consistent look and feel across multiple photos. LUTs can be used for color correction, creating specific moods or atmospheres, ensuring consistency, and speeding up the editing process.
Unlike traditional editing methods that involve manually adjusting each aspect of an image, LUTs offer a way to apply complex color transformations with a single click. This efficiency makes them particularly valuable for professional photographers and videographers who need to maintain a uniform look across a project.
The Difference of LUTs and Presets
LUTs and presets are both tools used in photo and video editing to achieve a certain aesthetic, but they work in slightly different ways:
Focus:
- LUTs: Primarily target color grading and tone adjustments. They essentially replace colors in your image or video with a predetermined set of colors.
- Presets: Offer a broader range of adjustments. They can modify exposure, contrast, saturation, sharpening, and even apply LUTs for color.
Flexibility:
- LUTs: Once applied, the effect is baked in and offers limited room for further tweaking. You can adjust the opacity of the LUT layer, but not the individual colors within the LUT itself.
- Presets: Provide more flexibility. In most editing software, you can adjust the individual sliders within a preset to fine-tune the look after it’s applied.
Complexity:
- LUTs: Generally require less editing knowledge. You can simply apply a LUT and see the results.
- Presets: Can be more complex depending on how many adjustments they include. Some presets offer a one-click solution, while others provide more starting points for further editing.
Use Cases:
- LUTs: Ideal for achieving specific color looks or maintaining consistency across multiple projects. They are popular in video editing for replicating a certain film stock look.
- Presets: Great for applying a consistent overall style to your images or videos, especially for beginners who are still learning editing techniques.
In short, LUTs are for precise color control, while presets offer a wider range of adjustments with more room for customization. The best choice depends on your editing goals and desired level of control.
How to Use LUTs in Photoshop
Using LUTs in Photoshop is a straightforward process that can yield impressive results. Here’s a step-by-step guide to get you started:
Step 1: Load Your Image
Begin by opening your image in Photoshop. Navigate to File > Open and select the image you wish to edit.
Step 2: Add a Color Lookup Adjustment Layer
To apply a LUT, you need to add a Color Lookup adjustment layer:
In the Layers panel, click on the New Adjustment Layer icon. Then, select Color Lookup from the dropdown menu.
Step 3: Choose Your LUT
Photoshop includes several built-in LUTs, but you can also import your own:
In the Properties panel, find the Color Lookup options. Click on the Load 3D LUT dropdown menu to select from the available LUTs or load a custom LUT by clicking on Load 3D LUT….
Step 4: Adjust the LUT’s Intensity
Once you’ve applied a LUT, you can adjust its intensity to suit your image:
Lower the opacity of the Color Lookup adjustment layer to reduce the effect of the LUT. Use additional adjustment layers like Curves or Levels to fine-tune the color grading.
Advanced Editing with Evoto AI
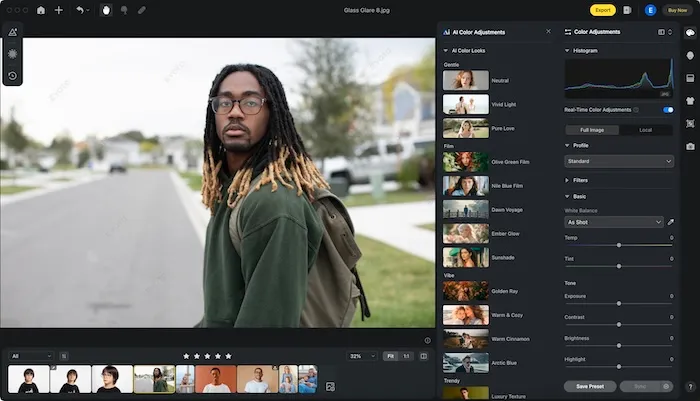
While LUTs in Photoshop are powerful, combining them with Evoto AI photo editor can elevate your photo editing even further. Evoto AI is an advanced photo editing software that leverages artificial intelligence to simplify complex editing tasks and achieve professional results effortlessly.
Evoto – The Most Efficient AI Photo Editor
Key Features of Evoto AI
- AI-Powered Enhancements: Automatically adjust exposure, contrast, and color balance with precision.
- Batch Processing: Apply LUTs and other adjustments to multiple images simultaneously, saving time and ensuring consistency.
- Smart Retouching: Remove blemishes, smooth skin, and enhance details with AI-driven retouching tools.
- Tethered Shooting: Capture photos directly to your computer for instant editing and review, streamlining the workflow from shoot to final edit.
- User-Friendly Interface: Intuitive design that makes advanced editing accessible to photographers of all skill levels.
Integrating Evoto AI with Photoshop
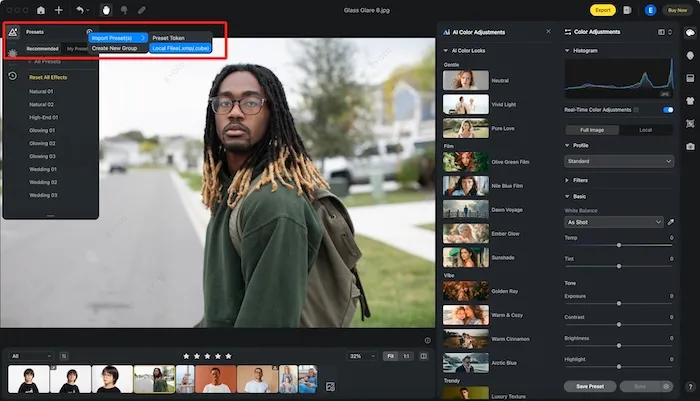
Combining the power of Evoto AI with LUTs in Photoshop offers a robust editing workflow that maximizes efficiency and creativity. Evoto AI’s advanced features, including the ability to import .xmp and .cube files, allow for seamless integration with Photoshop, enhancing your photo editing process.
Here is a step-by-step guide to using Evoto AI with Photoshop LUTs:
Step 1: Import Your Photos into Evoto AI
Begin by importing your photos into Evoto AI. This AI-driven software simplifies initial edits with its intelligent enhancement features, making it an excellent starting point for your editing workflow.
Step 2: Utilize AI-Powered Enhancements
Use Evoto AI’s powerful tools to adjust exposure, contrast, and color balance automatically. These enhancements can save you significant time and ensure that your photos are optimally prepared for further editing in Photoshop.

Step 3: Import .xmp and .cube Files
One of the standout features of Evoto AI is its ability to import .xmp and .cube files. These files, which often contain LUTs and other presets, can be easily integrated into your workflow:
- Importing .xmp Files: Evoto AI supports .xmp files, which are commonly used for storing Lightroom presets. By importing these files, you can apply consistent color grading across multiple photos quickly.
- Importing .cube Files: .cube files are a standard format for LUTs used in both video and photo editing. Evoto AI allows you to import these LUTs, providing a wide range of color grading options.
To import these files:
- Navigate to the file import section in Evoto AI.
- Select the .xmp or .cube file you wish to use.
- Apply the imported LUT to your photos for consistent color grading.

Step 4: Tethered Shooting for Real-Time Editing
Evoto AI’s tethered shooting feature enables you to capture photos directly to your computer, allowing for instant review and editing. This integration is particularly useful during photoshoots, as you can apply LUTs and other enhancements in real time, ensuring that your shots meet your creative vision immediately.
Step 5: Export to Photoshop for Final Touches
Once you are satisfied with the initial edits and color grading in Evoto AI, export your images to Photoshop for final adjustments. Photoshop offers advanced tools and layers that provide precise control over your edits:
- Export your images from Evoto AI in a high-quality format.
- Open the exported images in Photoshop.
- Use Photoshop’s Color Lookup adjustment layer to apply additional LUTs if needed, fine-tuning the color grading to perfection.
Evoto – The Most Efficient AI Photo Editor
Enhancing Your Workflow
By integrating Evoto AI with Photoshop and utilizing the ability to import .xmp and .cube files, you can significantly enhance your photo editing workflow. This combination allows for:
- Streamlined Editing: Start with AI-powered enhancements in Evoto AI and finish with detailed adjustments in Photoshop.
- Consistent Color Grading: Apply the same LUTs across multiple platforms, ensuring a cohesive look throughout your project.
- Real-Time Adjustments: Use tethered shooting to make real-time edits, saving time and improving efficiency during photoshoots.
Comparison with LUTs in Lightroom
While LUTs in Photoshop provide robust color grading options, it’s worth noting that LUTs in Lightroom offer similar functionalities. Lightroom is often preferred for batch processing and its non-destructive editing capabilities. However, Photoshop’s layer-based approach gives more control and flexibility over individual adjustments. Understanding how to use LUTs in both programs can significantly enhance your editing skills and streamline your workflow.
Final Words
Mastering LUTs in Photoshop can transform your photo editing workflow, enabling you to create stunning, professional-quality images with ease. By integrating advanced tools like Evoto AI photo editor, you can streamline the process and achieve even more impressive results.
Experiment with different LUTs, adjust their intensity, and combine them with AI-powered enhancements to bring your creative vision to life. Whether you’re correcting colors, creating a specific mood, or aiming for a cinematic look, LUTs and Evoto AI photo editor together provide the tools you need to elevate your photography. Happy editing!


