A bright smile can make a significant difference in photos, enhancing your overall appearance and boosting your confidence. Achieving a naturally white smile in photos doesn’t have to be difficult or artificial-looking. With the right techniques and tools, you can whiten teeth naturally in your images, ensuring they look both beautiful and realistic.

This article will cover effective methods to whiten teeth naturally using popular photo editing software like Evoto AI Photo Editor and Photoshop, along with some best practices for achieving natural-looking results.
Tools for Whiten Teeth Naturally in Photo Editing
When it comes to editing photos, selecting the right tool is crucial for achieving the desired results. Here are some of the best tools to help you whiten teeth naturally in your photos.
1. Evoto AI
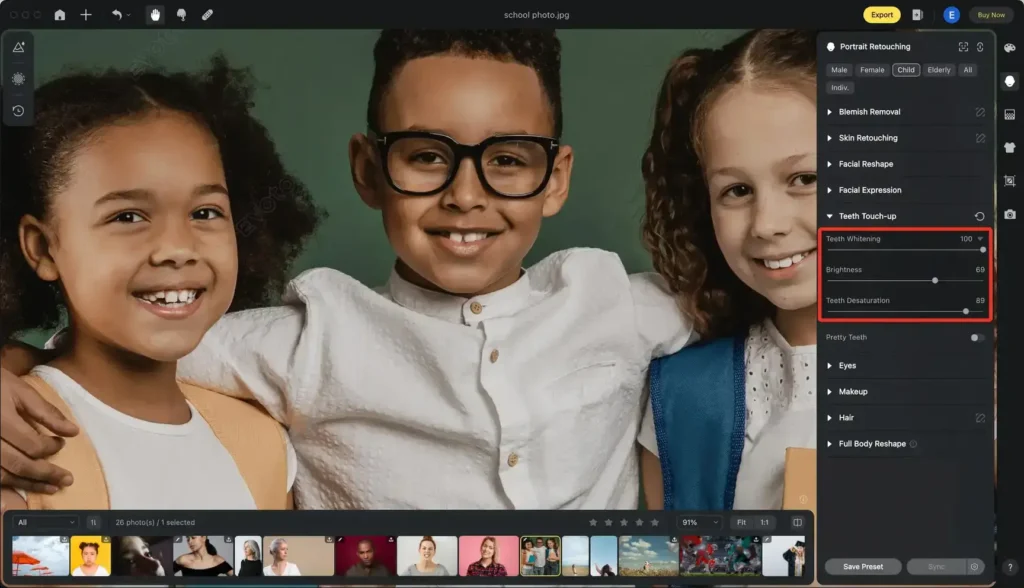
Evoto AI software offers specialized features for teeth touch-ups, including Teeth Whitening, Brightness, and Teeth Desaturation. Evoto AI is known for its user-friendly interface, making it easy to achieve professional-looking edits even if you’re not a seasoned photo editor.
Evoto – The Most Efficient AI Photo Editor
2. Photoshop
A staple in the photo editing world, Photoshop provides robust tools for natural-looking edits. Its capabilities include detailed adjustments to brightness, contrast, and color, which are essential for whitening teeth naturally.
3. Other Software Options
There are several other tools available that can help you lighten teeth naturally in photos. Programs like GIMP, Lightroom, and various mobile apps offer accessible alternatives for those looking to enhance their smile with subtle edits.
How to Whiten Teeth Naturally Using Evoto AI
Evoto AI is an excellent choice for those looking to whiten teeth naturally in photos due to its intuitive design and powerful features. Here’s a step-by-step guide on how to use it effectively:
1. Upload Your Photo
Start by uploading the photo you wish to edit into Evoto AI.
Evoto – The Most Efficient AI Photo Editor
2. Select the Pretty Teeth Tool
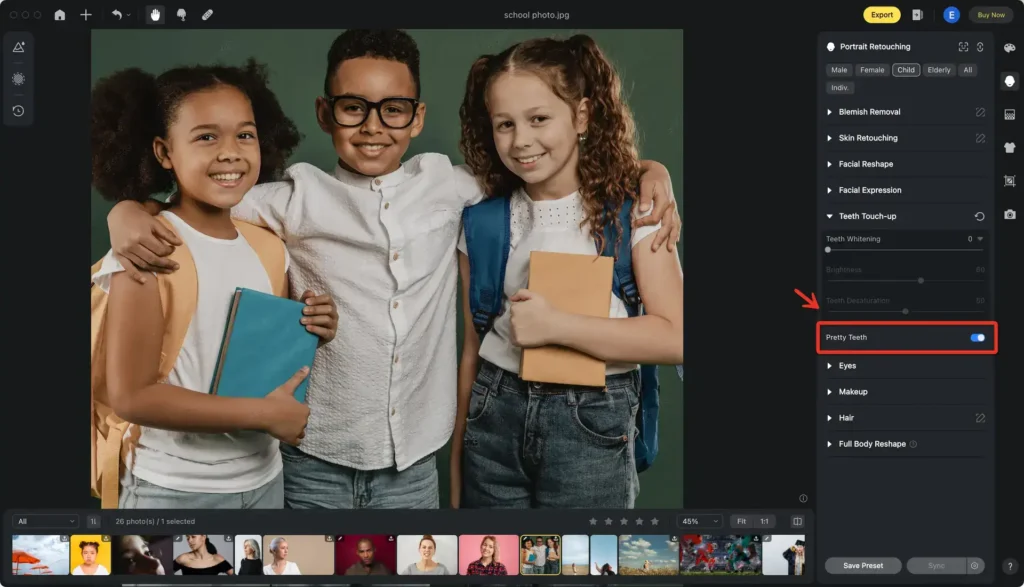
Navigate to the Teeth Touch-up section and switch on the Pretty Teeth button.

3. Adjust the Settings
Use the sliders to adjust the teeth whitening, brightness and saturation levels. Aim for a balance that brightens teeth naturally without making them look overly white or artificial.

4. Apply the Changes
Once you’re satisfied with the adjustments, apply the changes and save your photo.
Before and After Examples: A great way to see the effectiveness of Evoto AI is by comparing before and after images. Notice how the subtle changes enhance the natural whiteness of the teeth without making them look edited.

Tips for Realistic Edits: To ensure your edits look natural, avoid excessive brightness and desaturation. Keep the adjustments subtle and always zoom out to check how the changes appear in the overall photo.
Evoto – The Most Efficient AI Photo Editor
How to Whiten Teeth Naturally Using Photoshop
Photoshop is another powerful tool for whitening teeth naturally. Follow these steps for a flawless edit:
- Open Your Photo in Photoshop: Import the photo you want to edit.
- Select the Teeth Area: Use the Lasso Tool or Quick Selection Tool to carefully select the teeth.
- Create a New Adjustment Layer: Add a Hue/Saturation adjustment layer and reduce the yellow tones to lighten teeth naturally.
- Adjust Brightness and Contrast: Use the Brightness/Contrast adjustment layer to fine-tune the teeth’s appearance.
- Refine the Edges: Ensure the selection edges are smooth and blend seamlessly with the rest of the photo.
Tips for Realistic Edits: Use layer masks to apply the changes gradually. This technique helps in blending the edits more naturally, ensuring the teeth look naturally white without harsh transitions.
Why Whiten Teeth Naturally in Photos?
Natural-looking teeth whitening in photos offers several benefits. It enhances the overall appeal of your images without drawing attention to the edits. In contrast, overly artificial whitening can look unprofessional and detract from the photo’s quality. Realistic edits are crucial for both professional headshots and personal photos, as they maintain the authenticity of your smile.
Best Practices for Natural Photo Editing
When aiming to whiten teeth naturally in photos, subtlety is key. Here are some best practices:
- Use Natural Light: Edit photos taken in natural light for the best results. Natural light reduces harsh shadows and provides a more accurate color balance.
- Proper Exposure: Ensure your photo is well-exposed before making any edits. Proper exposure helps in achieving a more natural look when brightening teeth.
- Enhance Overall Photo Quality: In addition to whitening teeth, enhance the overall photo quality by adjusting brightness, contrast, and sharpness. A high-quality photo compliments naturally white teeth.
Evoto – The Most Efficient AI Photo Editor
Final Words
Achieving a naturally white smile in photos is easier than ever with the right tools and techniques. By following the steps outlined for Evoto AI Photo Editor and Photoshop, you can effectively whiten teeth naturally and ensure your photos look both beautiful and authentic. Give these editing tips a try and enjoy a brighter, more confident smile in your photos.


