In recent years, the film grain effect has become increasingly popular in photography. Film grain refers to the grainy, textured appearance often seen on traditional photographic film. Unlike the smoothness and absolute perfection of digital images, the subtle imperfections of film texture give images the ability to evoke nostalgia and plunge into memories.

In the digital age, film grain has become a popular photo editing technique for those looking to enhance a photo’s visual narrative or retro feel. This article will guide you through the best ways to add film grain to your photos, highlighting the latest tools and techniques to achieve this effect in 2024.
What Is a Film Grain?
Film grains are tiny, random particles that appear on an image in analog photography due to the physical properties of the film. These particles produce a visible grainy texture, especially in images taken at high ISO settings, and the higher the ISO sensitivity, the more noticeable the particles are, creating a textured appearance.
The origins of the film grain effect are deeply rooted in the era of analog photography, and it is a natural and expected feature of the photographic process. Over time, the aesthetic appeal of film texture became a way for photographers to add depth, authenticity, artistry, and nostalgia to their images.
Today, even in the digital age, many photographers and editors choose to incorporate film textures into their work. They apply a film grain filter to alter a digital image to make it look like it was shot on a classic film, which adds depth and richness that might otherwise be missing to achieve this unique and precious visual quality.
Why Add Film Grain to Your Photos?
Adding film grain to photos serves multiple creative purposes, enhancing both the visual and emotional impact of an image.
- One of the primary reasons is to enhance texture. By introducing this subtle, organic layer of grain, images become more dynamic and engaging. This is especially useful in portraits because this texture can help break the overly smooth look and bring a sense of realism to the skin.
- Another key reason is to create a nostalgic feel. Film grain in a photo can evoke memories of classic film stocks and bygone eras. This nostalgic quality gives images with a film grain effect a powerful tool for storytelling, resonating with viewers on an emotional level.
In addition to texture and nostalgia, film grain can also add character and depth to digital photos.
- In a world of ultra-sharp digital photos, adding film grain can introduce a sense of imperfection that makes an image more interesting. The subtle variations in grain can add depth and character to otherwise flat or overly processed images.
- Also, digital photos can sometimes be too sharp or clinical. A touch of film grain can soften this sharpness, giving your photos a more organic, natural feel.
By integrating the film grain effect into your editing workflow, you can transform your photos from being just technically good to emotionally resonant and visually engaging.
How to Add Film Grain Using Evoto AI Photo Editor
Evoto AI Photo Editor is a versatile and powerful tool that simplifies the process of adding film grain to your photos. With its user-friendly interface and advanced AI-driven features, Evoto allows you to apply the film grain effect with precision, enhancing your images with just a few clicks. Whether you’re aiming to recreate the look of a classic film or simply add texture to your digital photos, Evoto offers the perfect blend of functionality and ease of use.
Step-by-Step Guide to Adding Film Grain in Evoto AI
Step 1. Start by launching Evoto AI Photo Editor and importing the image you want to edit. You can do this by clicking the “+” button to create a new project or drag and drop your image to the dashboard.
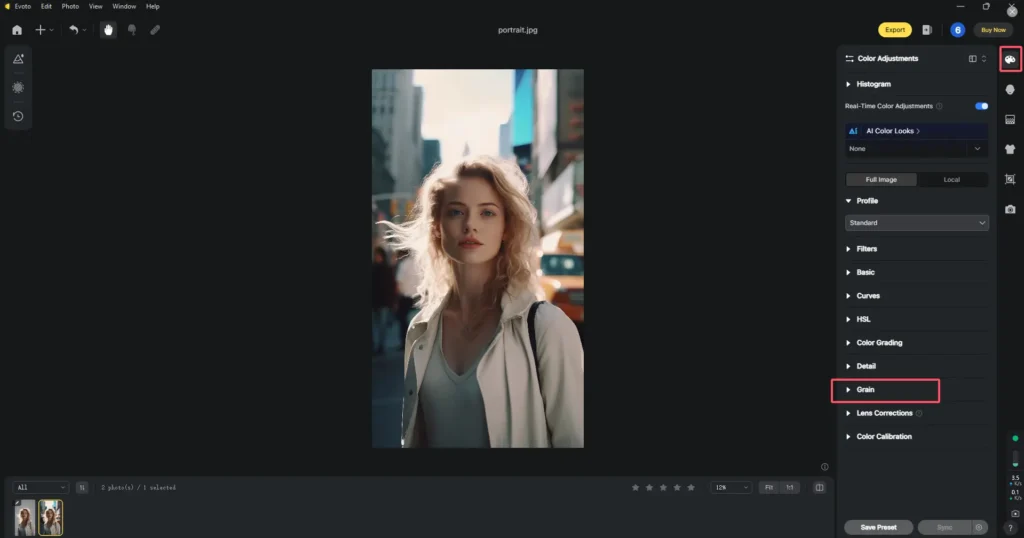
Step 2. Go to the “Color Correction” panel at the right-side toolbar, where you’ll find options for enhancing your photo effects like Filters, AI Color Looks, Curves, Color Grading, HSL, Grain, etc. Hit the Grain tab within this panel.

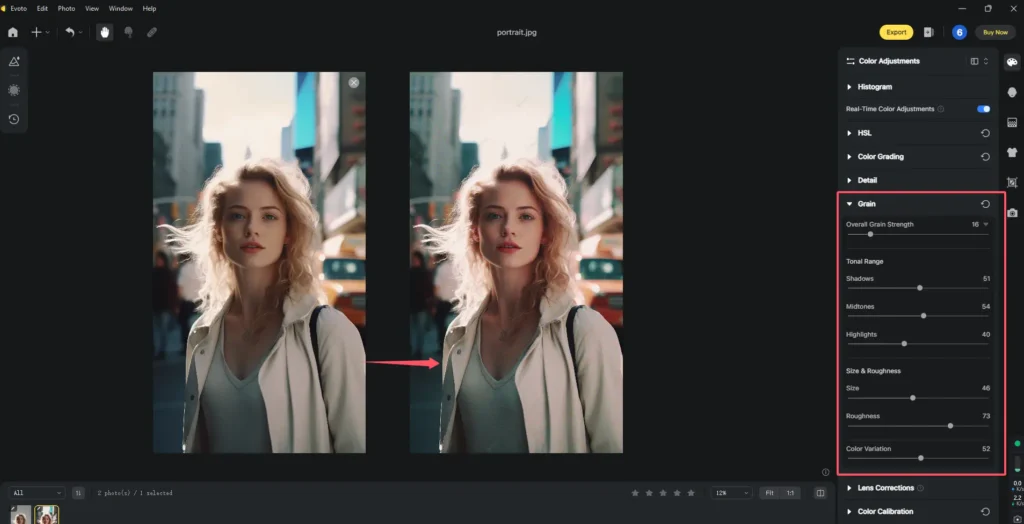
Step 3. Adjust a set of sliders to control the tonal range(the intensity of the grain), size, roughness, and color variation of the grain according to your desired look.
- If you want a subtle, vintage effect, you have to keep the intensity low;
- If you want a more pronounced, artistic look, you can increase the intensity and grain size.

Step 4. See how the film grain effect looks on your photo via Evoto AI’s real-time preview. If needed, you can save the grain effect you’ve created as a preset. And then, you can use Evoto’s Sync function to batch-edit a series of images with the same grain effect.
Step 5. Finally, click “Export” to save the processed photo with the desired name, format, and size to your selected folder.
With Evoto AI Photo Editor, you can add film grain to your photos with any effort. Try it to get a chance to create stunning, textured images that stand out.
Evoto – The Most Efficient AI Photo Editor
Other Methods to Add Film Grain
While Evoto AI Photo Editor offers a streamlined way to add film grain to your photos, there are several other popular tools available that can achieve similar effects. Adobe Photoshop and Lightroom are two of the most widely used alternatives. Check out the brief overviews of how they work.
How to Add Grain of Film in Adobe Photoshop?
Step 1. Launch Adobe Photoshop, select “File” > “Open” and choose your photo from your files.
Step 2. Create a new layer for the film grain effect by going to “Layer” > “New” > “Layer”.
Step 3. Go to “Filter” > “Noise” > “Add Noise“. Adjust the amount slider to control the intensity of the grain. Choose “Gaussian” and check “Monochromatic” to keep the noise color neutral.
Step 4. Change the blending mode of the “Grain” layer to “Overlay” or “Soft Light” for a more natural effect. Adjust the layer opacity if needed to fine-tune the grain’s appearance.
Step 5. Once you’re happy with the result, save your edited image and choose the appropriate format.
How to Add Film Grain in Adobe Lightroom?
Step 1. Open your photo in Adobe Lightroom.
Step 2. Scroll down to the “Effects” section in the Develop module.
Step 3. Use the “Grain” slider to introduce film grain to your image. Adjust the size and roughness of sliders to control the intensity and appearance.
Step 4. Preview the effect on your photo and adjust other aspects like contrast and exposure to complement the film grain effect.
Step 5. When you’re satisfied with the grain effect, export your edited photo with preferred export settings.
Read More:
- AI Presets for Lightroom: A Complete Guide to Enhance Photos
- Top 6 Lightroom Alternatives: Find Best Photo Editors 2024
Both Adobe Photoshop and Lightroom offer powerful tools for adding film grain to your photos, each with its approach and flexibility. Whether you prefer detailed control or streamlined adjustments, Evoto AI and its alternatives provide excellent options for achieving the perfect grainy texture.
Tips for Using Film Filter Effectively
When incorporating film grain into your photos, achieving the perfect balance is key to enhancing your images without overwhelming them. Here are some practical tips for using film filter effectively:
- Avoid Overuse: While film texture can add texture and a sense of nostalgia, too much texture can degrade the quality of a photo. Use this effect with caution, starting with a subtle amount and gradually increasing the intensity only when necessary.
- Choose the Right Intensity: The intensity of the grain should complement the subject and style of your photo. For instance, a high-contrast black-and-white photo may benefit from more pronounced grain, while a soft portrait may require a lighter touch.
- Combine with Other Effects: For a more cohesive and polished look, consider combining film grain with other effects. For instance, pairing grain with color grading or contrast adjustments can create a more harmonious and nuanced visual style.
- Match Grain to the Image Subject: Ensure that the grain you add matches the context and content of your photo. For instance, a landscape photo might benefit from a fine, subtle grain, while a portrait might look better with a softer, more refined texture.
By following these tips, you can effectively use a film grain filter to enhance the texture, mood, and character of your photos, creating a polished and visually compelling result.
Evoto – The Most Efficient AI Photo Editor
Conclusion
In this article, we explore the creative potential of adding film grain to your photos, a technique that can transform your digital images into aesthetic and retro works of art. Experiment with different layers of grain and combine them with other effects to find the perfect balance for your style.
Evoto AI Photo Editor intuitive interface and advanced tools simplify this process and allow you to make precise adjustments. Whether you’re a professional photographer or a hobbyist, Evoto offers the perfect blend of ease of use and functionality to help you achieve the aesthetics you need. Download it to create stunning and timeless photos right now!


