Duotone photography is an exciting visual style that is becoming increasingly popular in modern design and photography. It uses two colors to transform images into eye-catching works of art, providing a new perspective on traditional visual effects. This article will explore how to create these fascinating duotone effects in photos using tools such as Affinity Photo and Photoshop, and how to enhance a duotone photo with Evoto AI Photo Editor.
Understanding the Duotone Effect
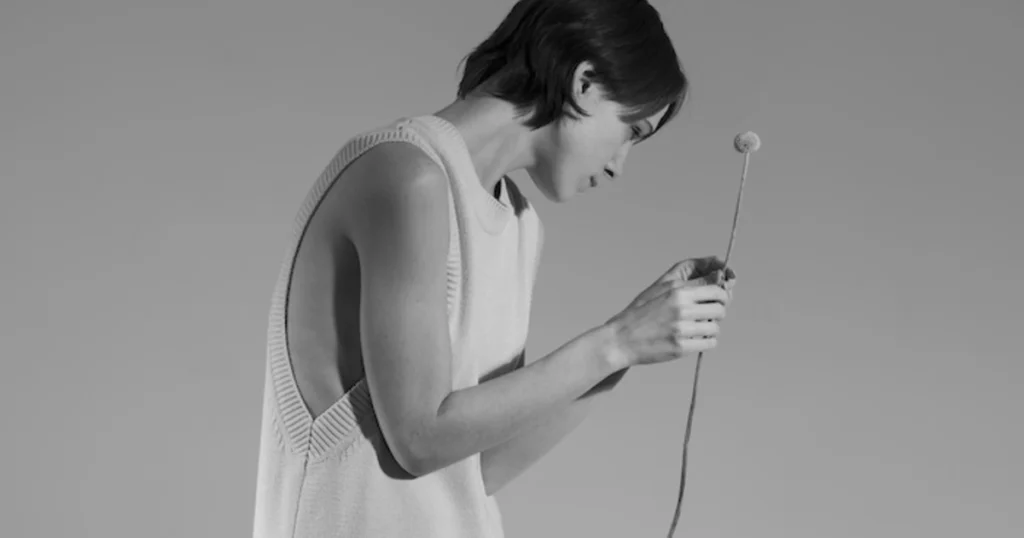
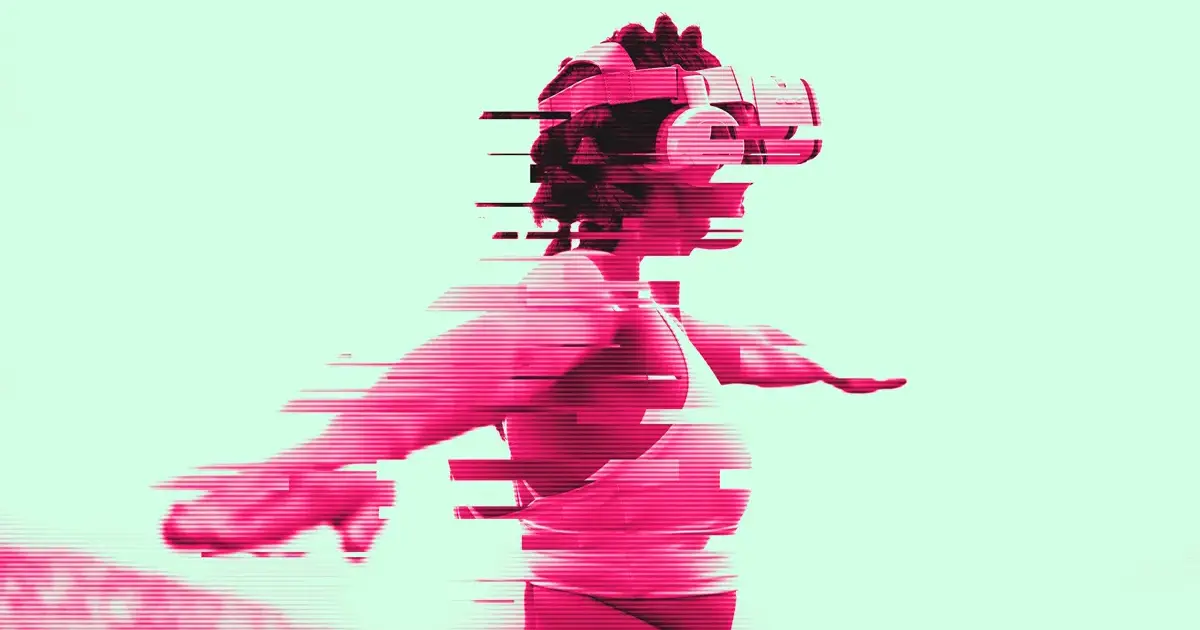
The duotone effect is a technique that uses two colors to create depth and interest in an image. This effect can enhance the emotional impact and aesthetic appeal of a photograph. Historically, two tone photography originated in the printing industry and created depth and contrast in black-and-white images.
Over time, duotone photography has evolved as a creative method that allows photographers to convey mood and subject matter through color combinations. This effect can dramatically change the viewer’s perception and evoke an emotional resonance in the viewer, making it a popular choice for modern artistic expression.
Tools and Software for Duotone Photography
Popular tools like Evoto AI, Affinity Photo, Photoshop, and Pixlr offer various features for creating stunning duotone photos. Each tool has its pros and cons, allowing users to experiment with different effects.
#1 Evoto AI
As one of the most powerful AI Photo Editors in 2025, Evoto AI comes with advanced color grading tools, including AI Color Match. This editor enables people to correct photo color to duotone or two-tone color grades in seconds by referring a given reference color image. Also, it supports color correction with local masks. Besides, other color adjustment tools, like AI Looks, color presets, and manual color curves, are popular among photographers in all kind of photography industries.
#2 Affinity Photo
Affinity Photo is a powerful photo editing software that offers a wide range of features for professional photographers, including a range of tools designed specifically for duotone photography. It supports layers, masks, and adjustments, which are essential for producing duotone effects. The advantages are that it is affordable and has advanced features, but the learning curve can be steep for beginners.
#3 Photoshop
Photoshop, as a professional, all-around duotone photo editing software, remains the industry standard for image editing. With its complex and sophisticated customization tools, comprehensive plug-ins, and useful duotone filters, you can transform your images into duotone pictures in just a few clicks. Its main advantages are its versatility, professionalism, and highly precise customization, although it can be expensive and complex, which is not very friendly to novice users.
#4 Pixlr
Pixlr is a web-based option that is accessible without installation. It provides a simple interface for creating a duotone photo. Its ready-to-use filters simplify the process of editing photos and applying effects such as a duotone filter, making it easy for beginners to get started. It also offers a free version for those who don’t have enough budget. However, its functionality can be limited compared to Photoshop and Affinity Photo, and it also lacks customization options.
How to Get Duotone Photos with Evoto AI
Once you’ve created your duotone photos, you can take them to the next level with Evoto AI. Enhance your images with contrast adjustments, saturation boosts, and color adjustments for professional results.
Here are two ways for adding finishing touches and enhancements with Evoto AI:
Method 1. Correct Color to Duotone with AI Color Match
AI Color Match is the latest color grading tool of Evoto AI Photo Editor. This tool will recognize the color grading from a reference photo, and then transfer the ref image color to your photo. So, if you have a favorite duotone photo, you can take it as a color reference image and match it to your photography work.
Here is how to make it:
Step 1. Import an Color Reference Image
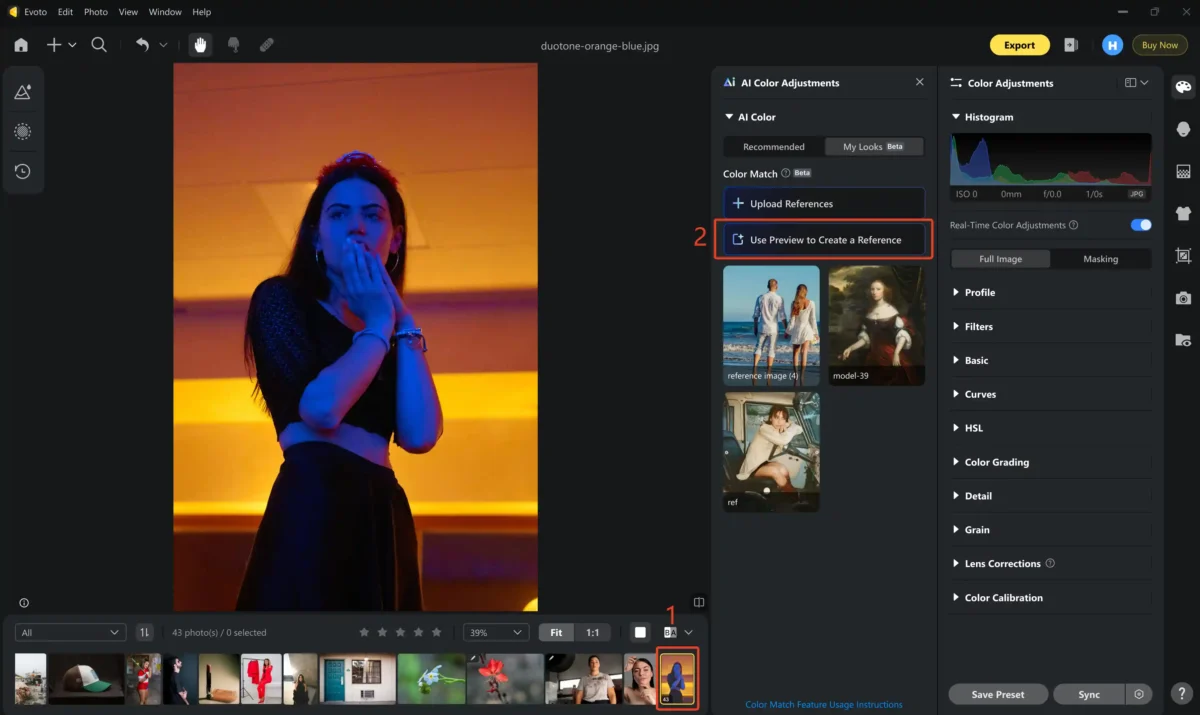
Download and install Evoto AI. Import a duotone reference photo and the photo you want to correct the duotone on. Keep the reference image selected.
Evoto – The Most Efficient AI Photo Editor
Then, go to “Color Adjustment” panel > “AI Color Adjustments”. Click “Create Color Match from Preview” and . Evoto will identify the color grading of your selected reference image and add the image to “My Looks” tab.
Step 2. Transfer Duotone Color Grading to Your Photo
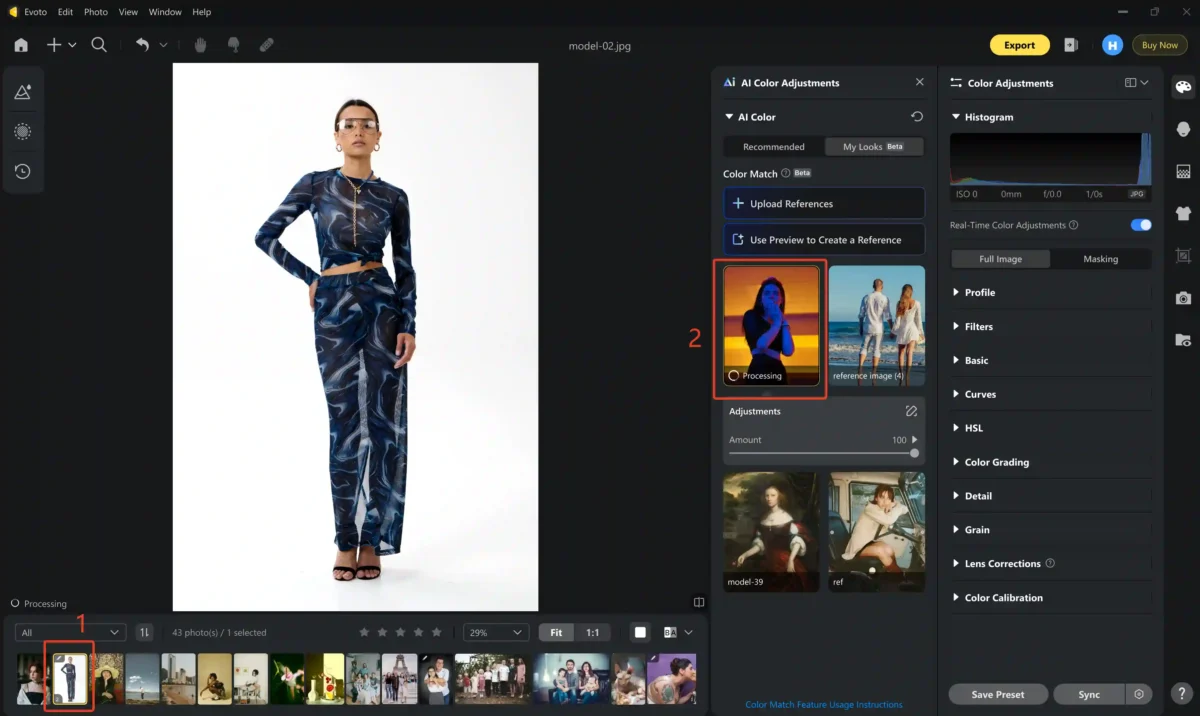
Select the photo you want to change to the duotone from the preview bar. Then, click the duotone reference image from “My Looks”. Wait a while until Evoto apply the duotone color grades to your photo.
Step 3. Fine-Tune the Photo
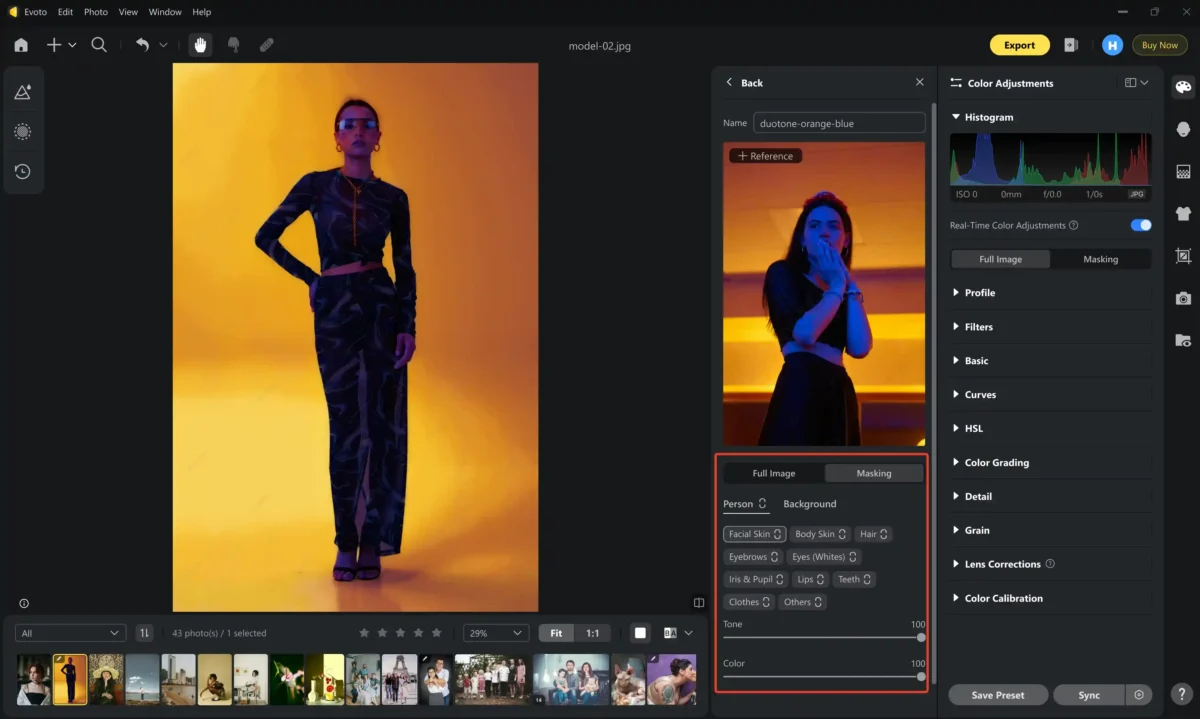
You can adjust the sliders of the reference image for overall or local refinement. Or double-click the reference image for more editing.
Step 4. Export Your Duotone Photo
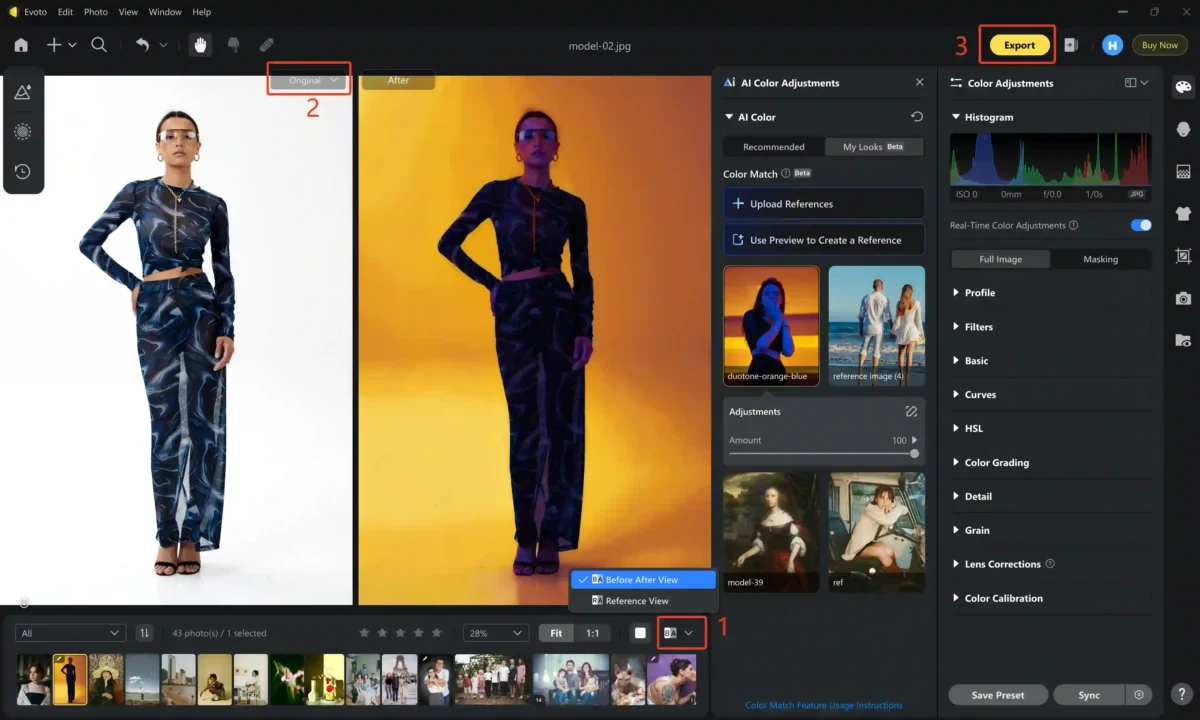
After that, use the “Before and After View” tool to check the edited photo. Now, you get the photo color grading changed into duotone. Just click “Export” to save the duotone photo onto your Windows or macOS device.
Method 2. Manually Adjust Color Grading
You can also use Color Adjustments of Evoto AI to get duotone color grades for your photo. Let’s see how it works:
Step 1. Upload Your Image
Locate the Evoto AI workspace. Open your duotone photo in Evoto AI.
Evoto – The Most Efficient AI Photo Editor
Step 2. Contrast Adjustments
Go to Color Correction > Basic Adjustment, then change the value to boost contrast, which can help make the two colors stand out more vividly, creating a dynamic image.
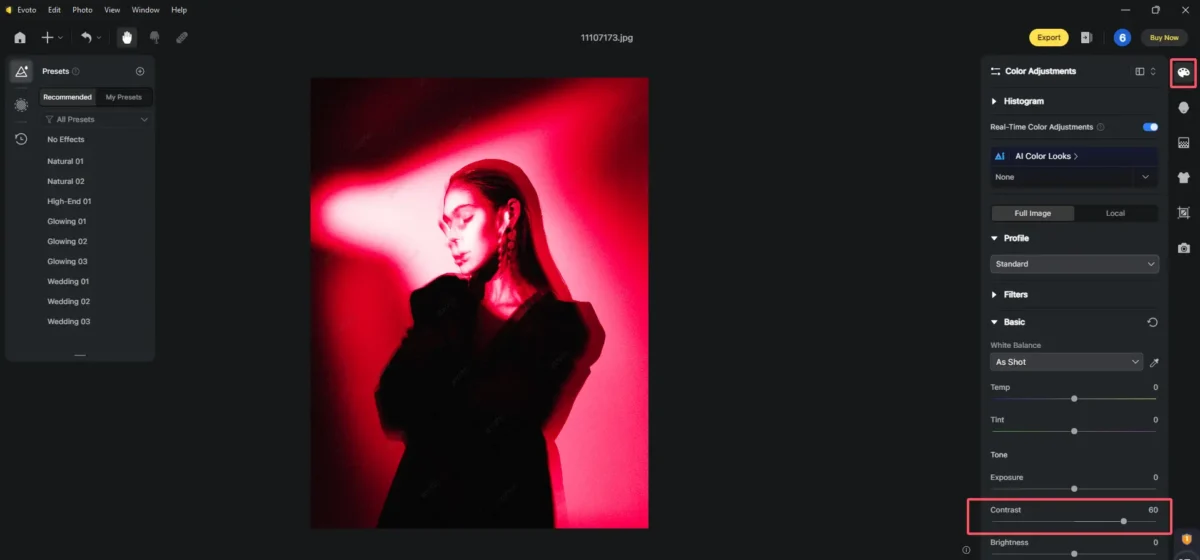
Step 3. Saturation Enhancement
Still in the Basic Adjustment list, increase saturation to give the vibrancy and life of the two colors, enhancing the visual appeal.
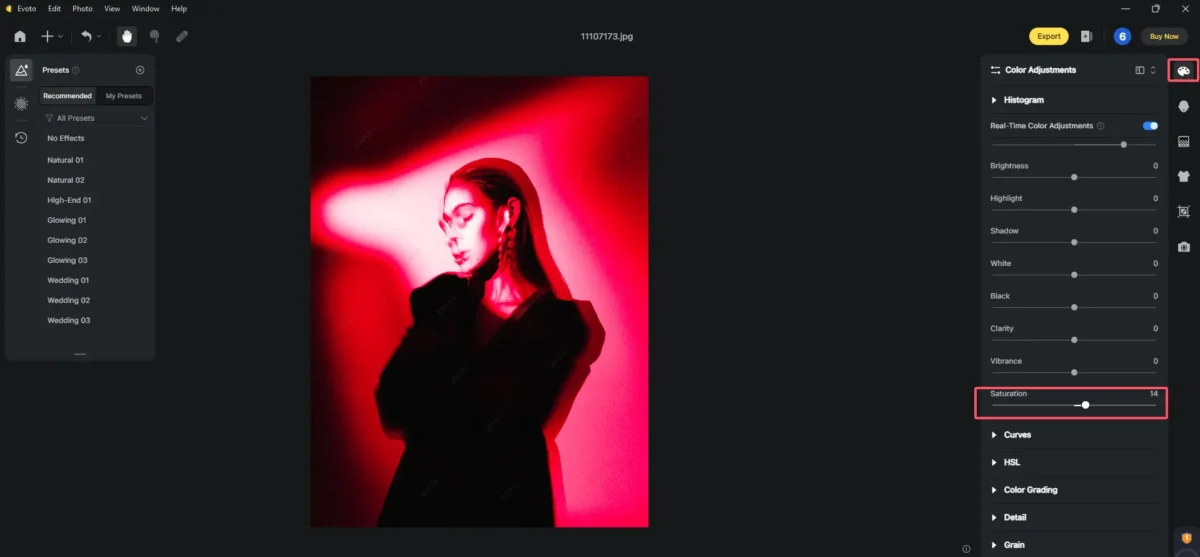
Step 4. Color Tweaks
Go down to the Color Curves. Fine-tune specific colors to achieve a balanced look that maintains the essence of your original image.
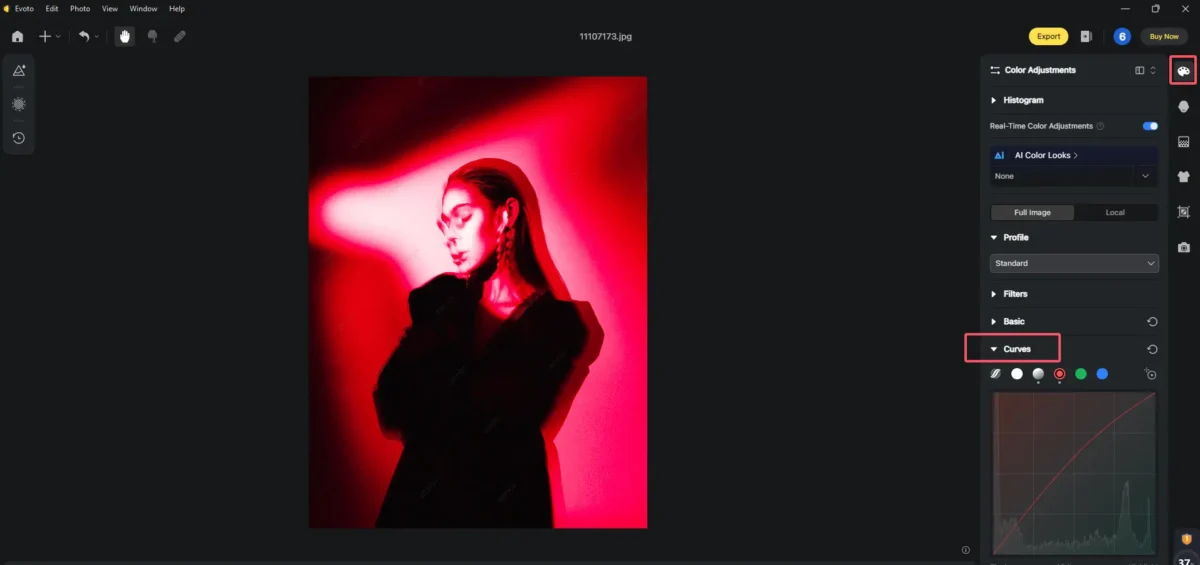
Step 5. Export the Enhanced Duotone Photo
Once you are satisfied with the final look of this duotone photo, you can output it in a preferred format to your local storage.
Evoto AI’s intuitive interface makes it easy to apply these adjustments, ensuring your duotone photography stands out. With its powerful tools, you can refine your images with batch edits, making them ready for any platform or print.
Evoto – The Most Efficient AI Photo Editor
How to Turn an Image into Two Distinct Colors in Photoshop
This step-by-step guide will show you how to transform an image into two distinct colors using Photoshop. Learn tips to refine the effect and ensure a balanced color scheme.
- Open your image in Photoshop.
- Go to Image > Adjustments > Gradient Map Adjustment Layer. This adjustment layer is different from a regular gradient layer, which allows you to map colors onto grayscale values without compromising the original image.
- Select a gradient preset to see how it works on your image or create your own by clicking on the gradient bar.
- Adjust the gradient stops to choose your two colors. Click on each of the color stops and replace them with your preferred color using the Color Picker.
- Click OK and fine-tune using Image > Adjustments > Levels for better contrast.
That’s all for how to turn an image into two distinct colors Photoshop. Make sure to adjust the blending mode for optimal results. This process is a powerful way to achieve a unique duotone photo effect.
How to Duotone in Affinity Photo
Creating a duotone photo in Affinity Photo is straightforward. Follow this detailed tutorial to master the art of duotone photography.
- Open your image in Affinity Photo.
- Go to Adjustment Panel > click Black and White Photography Adjustment. Then, go back to the Adjustment Panel > Gradient Map Adjustment.
- Click on the gradient bar to customize your colors.
- Adjust the gradient stops to select your desired tones, you can try them from time to time to find the created duotone effect you liked most.
- Use the Blend Options to refine how the gradient interacts with your image.
- Finally, you’ll get a satisfied duotone photo in Affinity Photo.
That’s all the steps on how to duotone in affinity photo. Thanks to Affinity Photo’s intuitive interface, which makes it easy to explore and perfect the duotone effect.
How to Apply a Duochrome Filter in Pixlr
Learn how to apply a duochrome filter in Pixlr to achieve a unique two-tone look. Explore tips for choosing color combinations that complement each other and create visually appealing images.
Applying a duochrome filter in Pixlr is simple:
- Go to its website and upload your image to its operational panel.
- Navigate to its Adjustments menu in the toolbar.
- Choose “Color Lookup” from the dropdown options.
- Browse through the presets to find a duochrome filter option that suits your style.
- Adjust the intensity and opacity sliders to customize the look, ensuring the two-tone effect is just right for the desired look.
That’s all for how to add a duochrome filter onto an image, achieving an incredible effect.
Each tool has its strengths, making it easy to find the right fit for your duotone photography needs. Note that, when selecting colors, you can consider using contrasting colors like red and teal for a dynamic feel or choose complementary shades like purple and gold for elegance. Experiment with the hue and saturation settings to see how different combinations impact your image, helping you achieve a unique and visually striking two-tone aesthetic!
Evoto – The Most Efficient AI Photo Editor
Conclusion
Duotone photo effects offer endless creative possibilities, allowing you to transform ordinary images into eye-catching works of art. By mastering the techniques in tools like Photoshop and Affinity Photo and using Evoto AI to enhance your duotone photo creations, you can take your photography to new heights. Start exploring the fascinating world of two-tone photography today!

