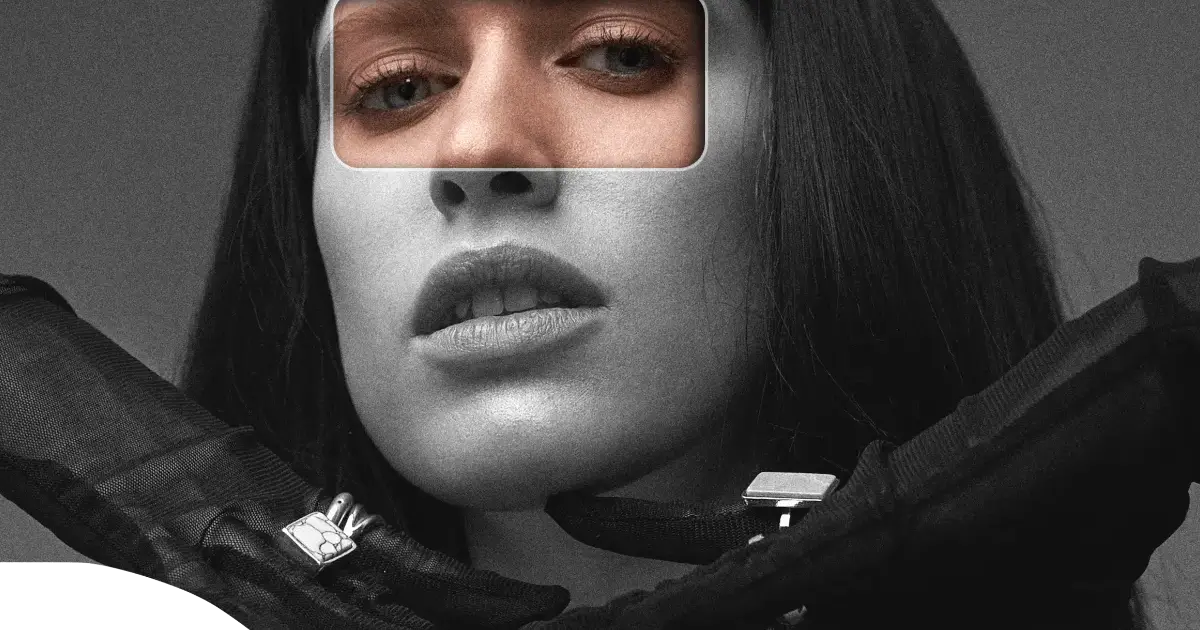
We’ve all been there: you snap a fantastic photo, only to find it marred by unwanted shine on your face. Maybe it’s a bright summer day, or perhaps the studio lights were a little too enthusiastic. Whatever the reason, face shine can take away from the natural beauty of your portrait.
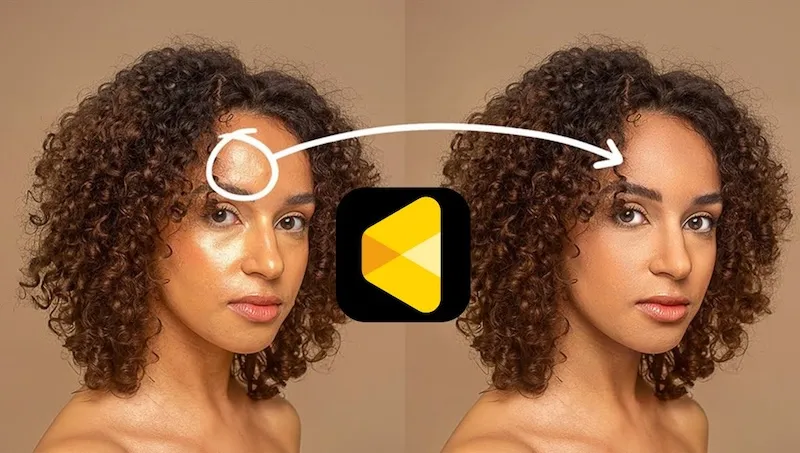
In this blog, we’ll equip you with the knowledge to banish that shine and achieve a flawless complexion in your photos. We’ll explore three effective methods: the one-click convenience of Evoto AI, the powerful tools of Photoshop, and the free, open-source GIMP. So, grab your favorite photo editor and get ready to make your photos shine (in all the right ways).
How to Remove Face Shine from Photo by Evoto AI
First up, we’ll tackle the magic of AI Face Editor. This photo editor boasts powerful AI technology that simplifies photo retouching, especially when it comes to remove face shine. Evoto AI utilizes features specifically designed to tackle blemishes and imperfections, making it a breeze to achieve a natural, radiant complexion.
Here’s how to remove face shine from photos using Evoto AI Photo Editor in a few easy steps:
Step 1: Download and Install
Head over to Evoto AI’s website and download the software for your operating system. Installation is a breeze, so you’ll be ready to edit in no time.
Evoto – The Most Efficient AI Photo Editor
Step 2: Upload Your Photo
Launch Evoto AI and import the photo you want to edit. Simply drag and drop it onto the program’s interface.
Step 3: Navigate to Portrait Retouching
With your photo loaded, navigate to the “Portrait Retouching” section. This is where Evoto AI’s magic happens.

Step 4: Target the Shine
Within “Portrait Retouching,” look for the option labeled “Blemish Removal.” This section houses various tools for tackling imperfections, including our hero for today – the “Face Shine” slider.

Step 5: Refine and Save
Slide the “Face Shine” control to the right to reduce the unwanted shine. You can preview the adjustments in real-time to achieve the perfect level of reduction.

Evoto AI offers a bonus tip: For even faster editing, consider saving your adjustments as a preset. This allows you to apply the same settings to a batch of photos with a simple click, saving you precious time!
Step 6: Export Your Masterpiece
Once you’re happy with the results, click “Export” to save your shine-free photo in your desired format.

Evoto AI’s beauty lies in its simplicity and efficiency. With just a few clicks, you can say goodbye to face shine and hello to stunning portraits that showcase your natural beauty.
Evoto – The Most Efficient AI Photo Editor
How to Remove Face Shine from Photo by Photoshop
For those comfortable with more advanced editing, Photoshop offers a powerful toolbox for tackling face shine.
Here, we’ll break down the process step-by-step:
Step 1: Duplicate the Background
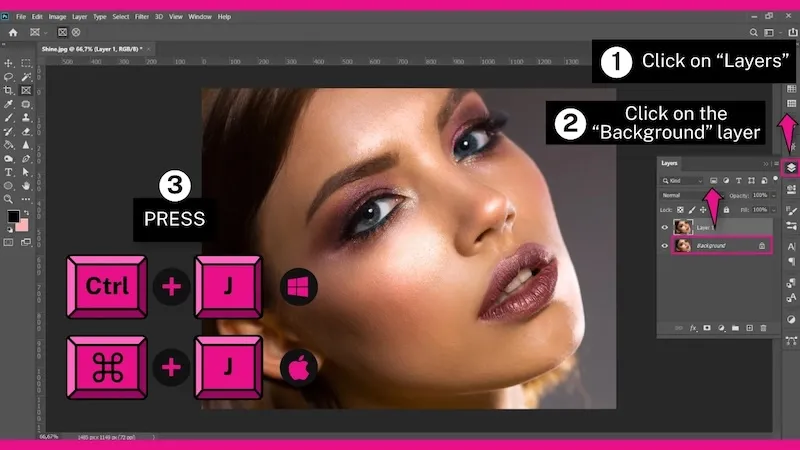
Since our edits are permanent, it’s crucial to create a backup. Navigate to the “Layers” panel (F7 key) and locate the “Background” layer. Right-click and choose “Duplicate Layer” or use the shortcut “Ctrl + J” (Windows) or “Cmd + J” (Mac) to create a copy for editing.
Step 2: Patch Hotspots
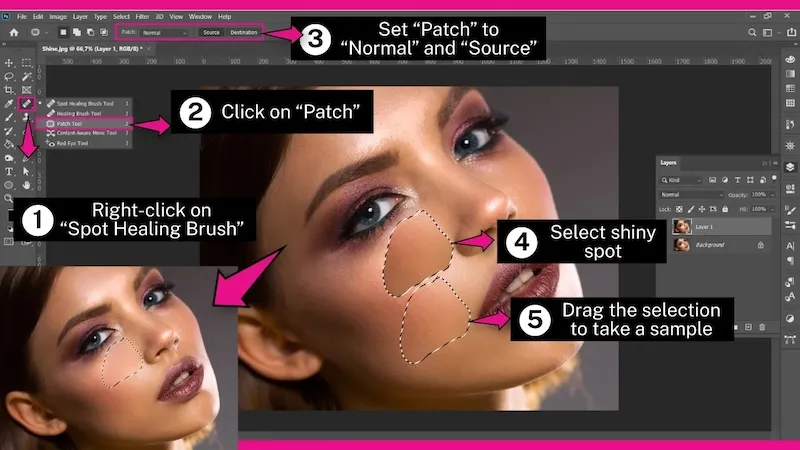
The “Patch” tool is our secret weapon for removing isolated shiny areas. Right-click on the “Spot Healing Brush” tool (J key) and select the “Patch” tool. With “Normal” mode and “Source” selected in the toolbar, click and drag to enclose a shiny spot. Then, drag the selection to a nearby area with similar skin tone and texture, effectively replacing the shine with a flawless patch. Remember, the sample area shouldn’t be shiny!
Step 3: Fade the Patch Selection
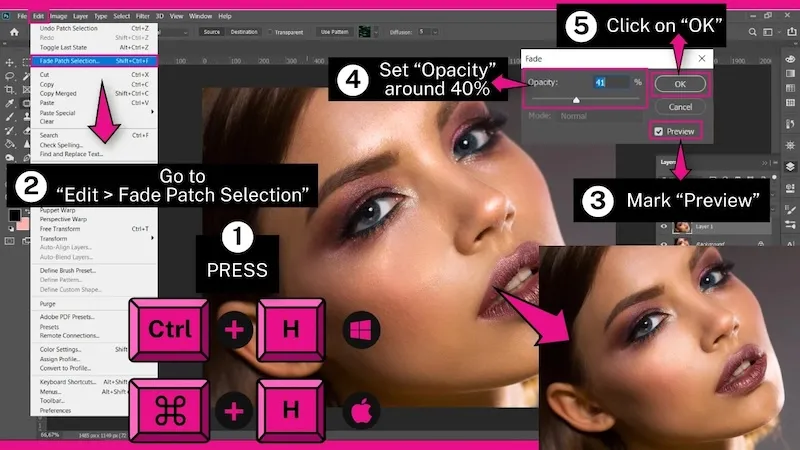
To assess the patch seamlessly, press “Ctrl + H” (Windows) or “Cmd + H” (Mac) to hide the selection lines while keeping the area selected. The patch might appear harsh initially. To fix this, go to “Edit > Fade Patch Selection” (or “Shift + Ctrl + F” / “Shift + Cmd + F”) and adjust the “Opacity” slider in the pop-up window. This helps the patch blend naturally with the surrounding skin.
Step 4: Adjust Curves
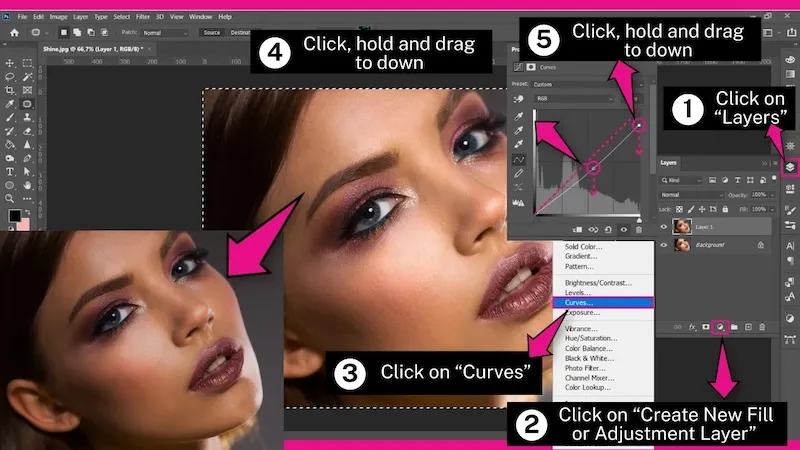
Once you’ve tackled individual hotspots, it’s time to address larger shiny areas. With the duplicated layer selected, create a new “Curves” adjustment layer in the “Layers” panel. The graph in the “Curves” window represents image brightness. To darken the image and reduce shine, click, hold, and drag the middle point of the line downwards, creating an upward curve. Additionally, drag the top-right point slightly down to decrease highlights.
Step 5: Adjust Blend Options
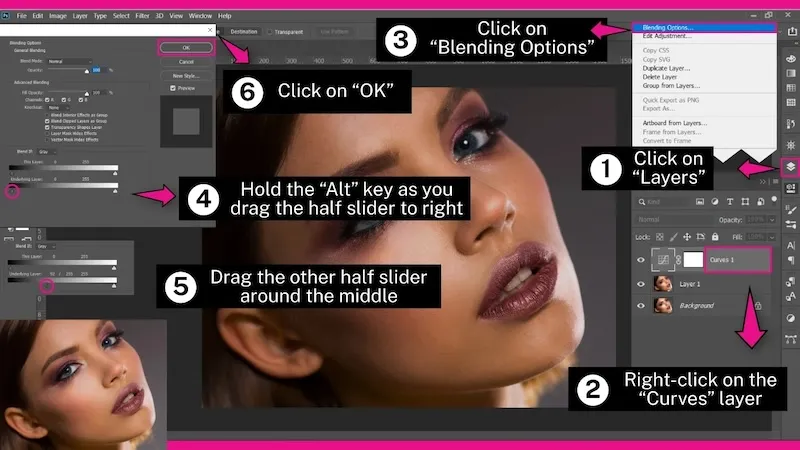
While the “Curves” adjustment darkens the image, we want to target the shine specifically. Right-click on the “Curves” layer in the “Layers” panel and choose “Blending Options.” In the “Layer Style” window, locate the “Underlying Layer” slider. Hold “Alt” (Windows) or “Option” (Mac) and drag the left slider to the right to isolate adjustments. This creates a smoother transition. Now, drag the right half of the slider to a point where the darkening effect is concentrated on the shiny areas.
Photoshop empowers you with precise control over shine removal. Though it requires more steps, the ability to target specific areas and fine-tune adjustments makes it a valuable tool for experienced editors.
- Best Face Symmetry App: How to Fix Asymmetrical Face in Photos
- Face Slimming App: The Best AI Skinny Face Photo Editor 2025
- How to Lose Face Fat on Photos: Easiest Way to Slim Your Face in Pictures
How to Remove Face Shine from Photo by GIMP
GIMP, a free and open-source photo editor, offers a powerful toolbox for tackling face shine. While it requires a few more steps than Photoshop, GIMP provides excellent results without breaking the bank.
Here’s how to remove shine in GIMP:
Step 1: Duplicate the Background
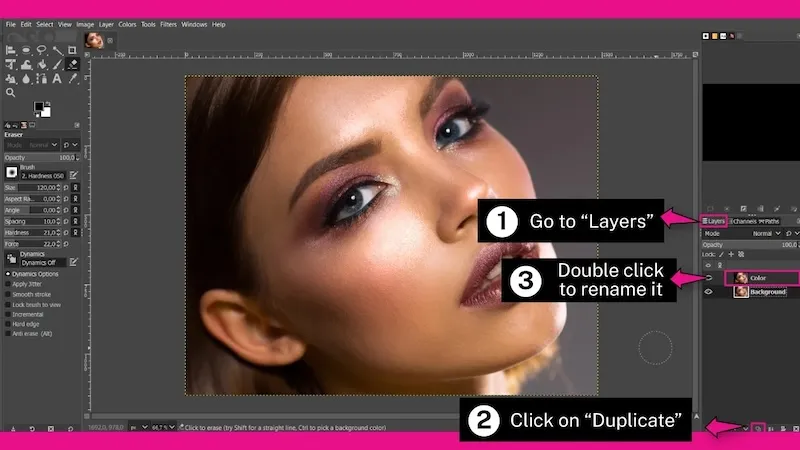
Similar to Photoshop, creating a backup is crucial. Locate the “Layers” dock (usually on the right) or enable it via “Windows > Dockable Dialogs > Layers” (or “Ctrl + L” / “Cmd + L”). Click the “Duplicate” button at the dock’s bottom and rename the duplicated layer for clarity (e.g., “Color”).
Step 2: Apply Blur to the Layer
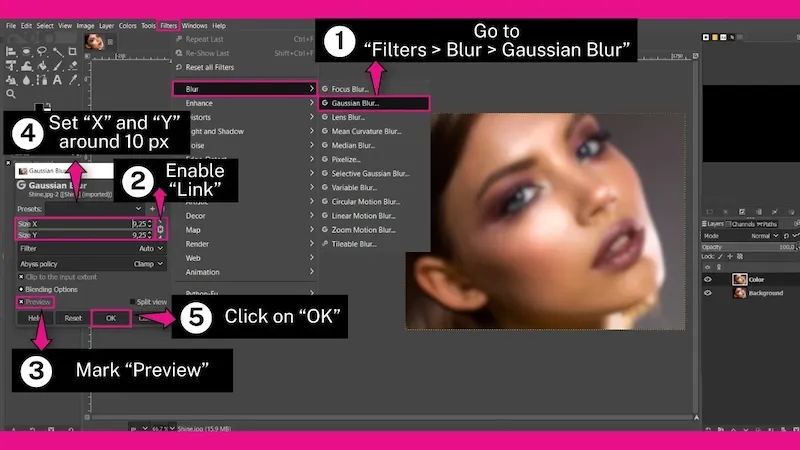
With the “Color” layer selected, go to “Filters > Blur > Gaussian Blur” in the menu. Ensure the “Link” button connects the “X Size” and “Y Size” adjustments. Enable the “Preview” checkbox and adjust the blur value (around 10 pixels) to slightly blur the image while maintaining facial details. Click “OK” to apply.
Step 3: Set Blend Mode and Add Layers
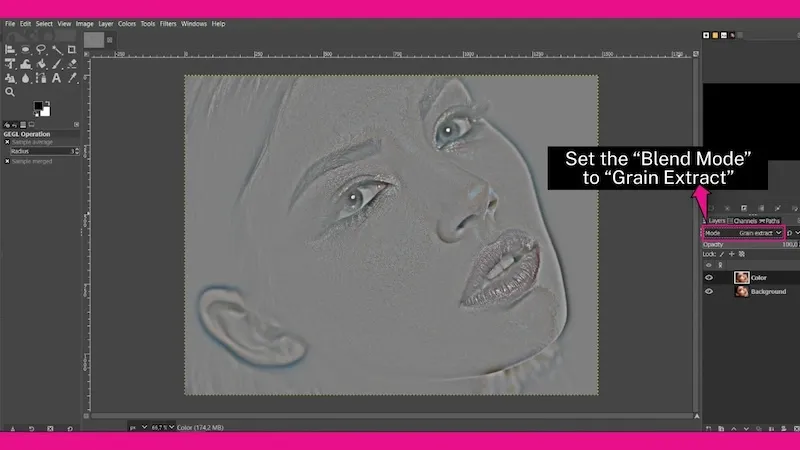
In the “Layers” dock, change the “Blend Mode” of the “Color” layer to “Grain Extract.” Right-click on the “Color” layer and choose “New From Visible” to create a new layer reflecting the current effects. Select the new layer (likely named “Visible”) and set its “Blend Mode” to “Grain Merge.” Finally, switch the “Color” layer’s “Blend Mode” back to “Normal.”
Step 4: Select Hotspots
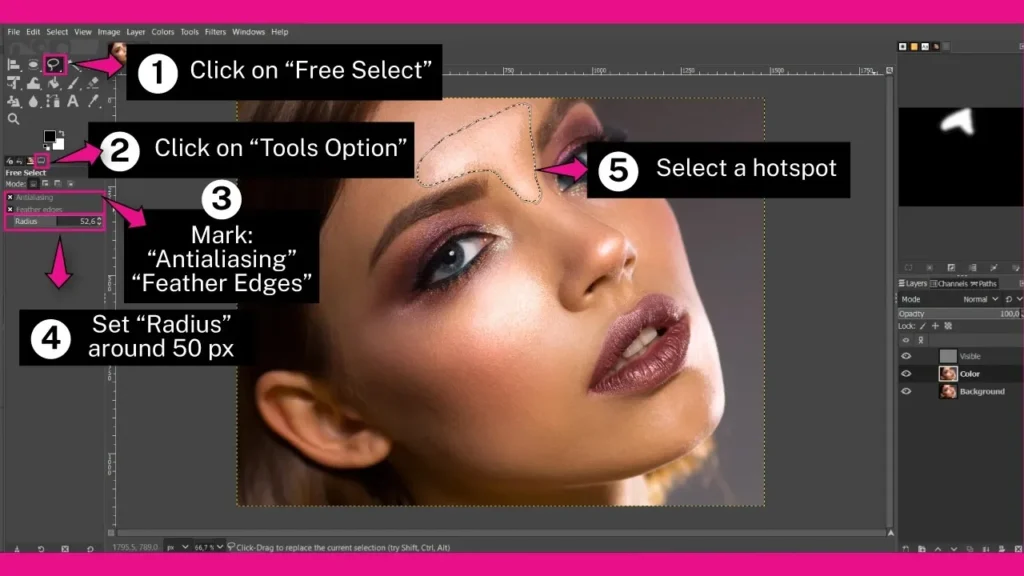
Now for targeted shine removal. Ensure you’re working on the “Color” layer. Grab the “Free Select” tool (F key) and enable “Antialiasing” and “Feather Edges” under the “Tool Options” dock (accessible via “Windows > Dockable Dialogs > Tool Options” if needed). Set the “Feather Edges” value to 50px for a smooth selection. Carefully select a shiny area you want to fix.
Step 5: Refine and Feather the Selection
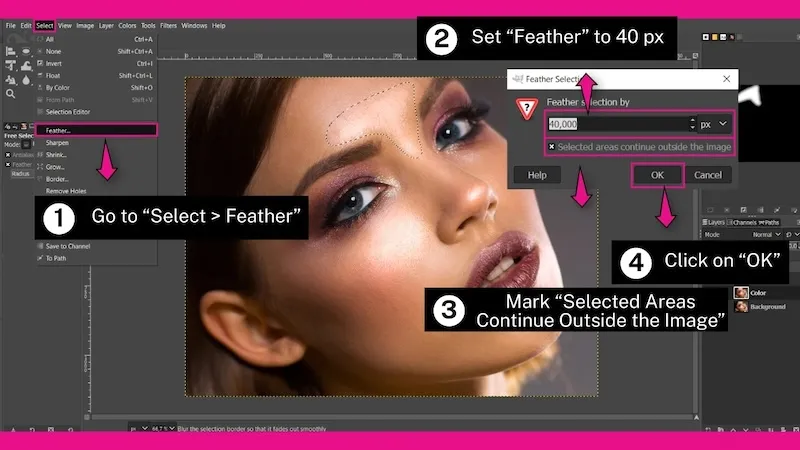
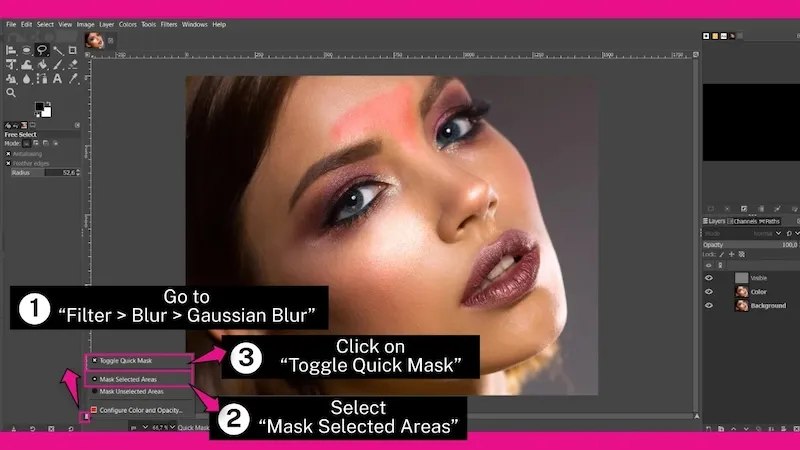
To achieve a seamless effect, we’ll add extra feathering. Go to “Select > Feather” and set the “Feather” value to 40px. Enable “Selected Areas Continue Outside the Image” and click “OK.” Right-click the “Mask” button and choose “Mask Selected Areas” to turn the selection red for smoothness evaluation. Finally, switch to mask mode using “Toggle Quick Mask” (Shift + Q).
Step 6: Apply Blur and Mask Adjustment
Here’s where the shine reduction happens. Go to “Filters > Blur > Gaussian Blur” and adjust the blur amount until the shine disappears (around 55px is a starting point). Click “OK” to apply.
Step 7: Repeat and Adjust
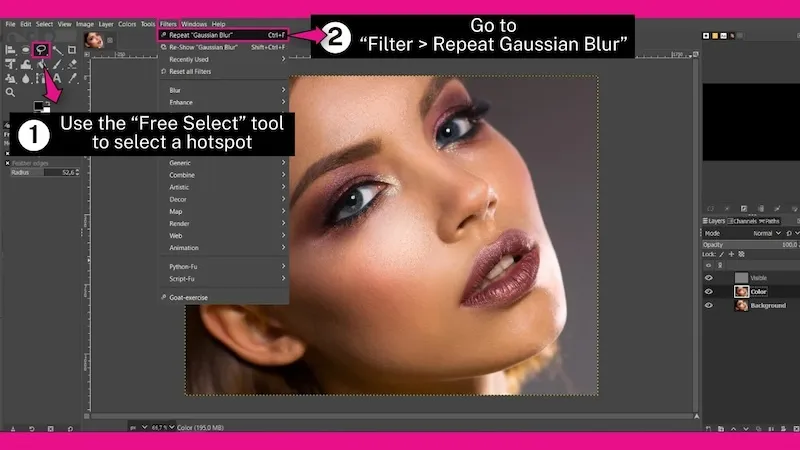
Repeat steps 4-6 to tackle other shiny areas. Utilize the “Repeat Gaussian Blur” function (Ctrl + F / Cmd + F) for faster application. If the effect appears too strong, create a new layer from visible as done earlier (step 4) and adjust its opacity (around 80%) to blend the effect with the original image.
GIMP provides a multi-layered approach for tackling shine. Though it requires more steps than other options, GIMP empowers you with precise control and delivers impressive results, making it a valuable tool for budget-conscious editors.
Evoto – The Most Efficient AI Photo Editor
Conclusion
This blog has equipped you with the knowledge to remove face shine and achieve a radiant complexion in your edits. We explored three effective methods: the one-click convenience of Evoto AI, the powerful tools of Photoshop, and the free, open-source GIMP.
For those seeking a fast and user-friendly solution, Evoto AI shines with its AI-powered blemish removal features. With a few clicks, you can say goodbye to shine and hello to stunning portraits that showcase your natural beauty. So, why not give Evoto AI a try and see the difference it can make in your photos?

