Sky editing has become a cornerstone of modern photography, whether you’re sharing on social media, showcasing travel shots, or marketing real estate. A captivating sky can transform an ordinary image into something extraordinary, setting the perfect mood and enhancing visual storytelling. Thankfully, tools have evolved: you can now add a new sky background to a photo with minimal effort. Evoto AI, a fast, realistic, and user‑friendly solution for sky photo editing background.
In the sections below, we’ll cover why sky replacement matters, show you how to change the sky in Photoshop, and reveal how to achieve professional AI sky replacement in just a few clicks with Evoto AI. Let’s dive in!
Why Replace the Sky in Photos?
Replacing a sky isn’t just about swapping one image for another. It’s about unlocking creative control and fixing technical flaws. Here are the main reasons for changing the sky in photos.
- Enhance visual appeal: Photo sky replacement can add a more dramatic, colorful, or aesthetically pleasing sky to improve the overall image.
- Fix overexposed or dull skies: Vibrant skies (sunset, stormy, clear blue) are better than blown-out, washed-out, or boring skies to enhance the overall image.
- Improve lighting consistency: Photo sky changing helps to get a more cohesive and realistic image by matching the sky to the lighting on the subject.
- Remove distractions: Adding a new sky background to a photo can salvage a good shot by eliminating elements like power lines, planes, or clouds that draw attention away from the subject.
- Match storytelling or theme: Support a narrative by choosing a sky that complements the story or message of the image and evokes the emotion.
How to Change the Sky in Photoshop?
If you prefer the veteran route, here’s how to change the sky in Photoshop in just a few steps:
- 1.Open your image in Photoshop and unlock the Background layer.
- 2.Select the sky area using tools like Quick Selection or the Select > Sky command (available in newer versions).

- 3.Refine the mask edges via Select and Mask: feather, smooth, and shift the edge until tree branches and hair blend naturally.
- 4.Insert the new sky layer: Go to File > Place Embedded, choose your sky photo, and position it beneath your subject layer.
- 5.Match color and tone: Use Adjustment Layers (Curves, Hue/Saturation) clipped to the sky to harmonize with foreground lighting.
- 6.Fine‑tune reflections: If there’s water or glass, duplicate your sky layer, flip or crop to fit, and mask in reflections.
- 7.Export the image that successfully replaces the sky in the photo.

While effective, this manual process can take quite a long time if you’re correcting tricky edges or color mismatches.
How to Add New Sky Backgrounds to Photos with Evoto AI?
Compared to the traditional sky change photo editor, Photoshop, Evoto AI simplifies photo sky change into a few intuitive clicks to achieve lightning‑fast results.
Evoto is an all-in-one sky background changer driven by AI. It has the best place to find sky replacement photos, featuring high-resolution, royalty‑free templates covering everything from cloudy, blue, starry, and dramatic sunset sky replacement. You can change the original sky backdrop with it in two Ways.
Way 1. Select and replace from the recommended sky image styles provided by Evoto.
Step 1. Download Evoto to your desktop. Import the image you want to edit.
Evoto AI Photo Editor – Faster Edits, Finer Control
Step 2. Navigate to the Background Adjustment section > Sky Replacement > Choose from recommended sky styles: blue skies, bright blue skies, sunset &sunrise skies, and starry nights.

Step 3. Slightly adjust the temp, saturation, and brightness to balance the color tone and lighting. Also, blend the harsh edges via the sliders of edge transition, sky blur, and opacity.

Way 2. Upload your sky background for replacement.
Step 1. Turn to My Backdrops under the Sky Replacement options.
Step 2. Import at most 100 sky background images in JPEG, JPG, PNG, GIF, TIFF, and BMP formats. The maximum size for each is 10 MB.

Step 3. Apply a sky background from your uploads to the original image. After AI work, tweak blending edges, adjust brightness/contrast, or modify opacity for perfect integration and realism.

Finally, export the sky replacement photos to your local storage location.
Pro Tips: Evoto supports batch editing and replacement of sky background on multiple photos. This is ideal for real estate shoots or event galleries.
Evoto AI Photo Editor – Faster Edits, Finer Control
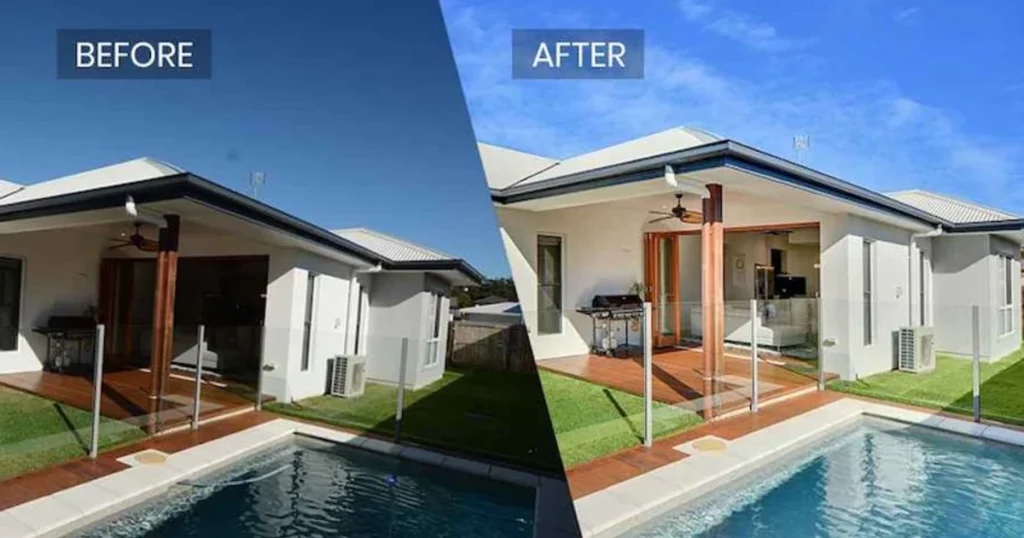
Before & After Add New Sky Backgrounds to Photo Examples
- Blue Sky Replacement

- Night Sky Replacement

- Sunset Sky Replacement

- Cloudy Sky Replacement

Benefits of Evoto AI Sky Replacement
Here are the key benefits of using Evoto AI for sky replacement compared to Photoshop:
- AI-powered automation: Evoto uses advanced AI to detect and replace skies automatically, saving time and effort compared to manual masking in Photoshop.
- User-friendly interface: Designed for ease of use, Evoto requires minimal editing skills, unlike Photoshop’s steep learning curve.
- One-click sky replacement: Both beginners and professionals can quickly apply sky presets with just one click, streamlining your workflow. This is Ideal for photographers on tight deadlines.
- Batch processing: Evoto AI sky replacement tool enables you to easily apply sky replacement to multiple images at once, a feature that requires a more complex setup in Photoshop.
- Sky background library: Evoto has the best place to find sky replacement photos. You can access an abundant and realistic sky replacement library of various backdrops—day, night, sunset, and more—without needing to import external assets.
- Manual fine-tuning: After AI automation work, Evoto also supports manual edits for a natural result, e.g., blending edges, sky color adjustments, blur, opacity changes, etc.
Evoto AI Photo Editor – Faster Edits, Finer Control
Tips for Seamless & Realistic Sky Replacement
Except for mastering a powerful tool to edit the sky in a photo, knowing the practical tips on how to replace a realistic sky seamlessly gets you double the results.
- Match time of day: Select skies with lighting that corresponds to your original scene, e.g., sunrise hour skies won’t suit midday shots.
- Mind reflections: If water or glass surfaces appear, you need to mirror the new sky to maintain realism.
- Feather and blend: Use gentle gradients or Evoto’s built‑in edge transition and sky blur tools to blend harsh edges and avoid hard integrations.
- Adjust color grading: Remember to fine-tune overall image tone so foreground and sky share the same temperature and hue.
- Watch for perspective: You have to ensure horizon lines and cloud formations align with your camera angle.
Common Photo Sky Replacement Issues & How to Fix Them
Here are common issues in sky replacement, along with practical solutions for each:
- Issue: Mismatched lighting between the subject and the sky
Solution: Adjust the photo’s overall lighting and color temperature to match the new sky, or use an AI photo editing tool like Evoto that auto-adjusts tones for realism. - Issue: Harsh or visible edges around objects (e.g., trees, hair)
Solution: Use feathering or edge refinement tools to soften transitions. Evoto’s AI’s edge detection and transition feature can automatically achieve a cleaner blending. - Issue: Reflections don’t match the new sky
Solution: Manually edit or replace reflections (e.g., in water or windows) to mirror the new sky’s elements. - Issue: Clouds cutting off abruptly at edges
Solution: Blend the sky layer gradually using gradient masks or opacity adjustments for a natural transition. Refine the selection mask around objects and ensure proper separation. AI tools minimize this with precise object detection. - Issue: The Sky doesn’t match the time of day
Solution: Choose sky images that reflect the correct time (sunrise, midday, sunset) to ensure consistency in the photo’s mood and shadows.
Conclusion
Sky replacement is a powerful way to add new sky background to photo and take your images from ordinary to extraordinary. While Photoshop offers a manual approach, Evoto AI brings speed, ease, and AI‑driven realism to the process. Whether you need a quick sunset sky replacement or want to batch process an entire gallery, Evoto AI streamlines every step. Try it for free today and see how effortless professional-grade sky editing can be!