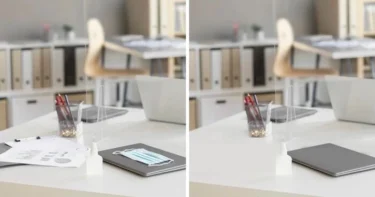
Adding a vignette effect to your photos can significantly enhance the visual appeal by subtly darkening or lightening the edges, drawing the viewer’s attention to the center. While create a vignette in Photoshop is a common technique among photographers and designers, there are alternative tools like Evoto AI Photo Editor that can simplify the process.

In this article, we’ll explore why you should add a vignette to your photos, how Evoto surpasses Photoshop in creating vignette effects, and provide step-by-step guides for both tools.
Why to Add Vignette to Photo
Adding a vignette to your photos can enhance their visual impact in several ways. A vignette subtly darkens or lightens the edges of an image, naturally drawing the viewer’s eye to the central subject. This technique is particularly effective in portraits, where it can help emphasize facial features and expressions, or in landscape photography, where it can highlight a particular element of the scene.
Add vignette to photo can also help to create a sense of depth and focus. By reducing the brightness or sharpness at the edges, the central part of the image stands out more, making the overall composition more compelling.
Furthermore, vignettes can be used to evoke specific moods or atmospheres. For instance, a dark vignette might create a dramatic or mysterious effect, while a light vignette can produce a dreamy or nostalgic feel.
Transitioning to discussing tools, it’s clear that Photoshop has long been a go-to software for applying vignettes. However, modern alternatives like Evoto AI Photo Editor offer unique advantages, making the process easier and more efficient.
Evoto – The Most Efficient AI Photo Editor
The Best Alternative to Create a Vignette in Photoshop
Evoto AI Photo Editor emerges as a superior alternative to create a vignette in Photoshop due to its user-friendly interface and advanced AI capabilities. Unlike Photoshop, Evoto eliminates the need for manual layer adjustments and complex settings, allowing users to create vignette effect with just a few clicks.
Key features that make Evoto the best alternative include:
AI-powered retouching and color adjustment tools
Automatically adjust the vignette effect to complement the image’s existing tones and hues, resulting in a more natural and aesthetically pleasing outcome.
Preset saving
Save your vignette settings as presets, enabling batch processing and consistent results across multiple images.
Simplified interface
Evoto’s streamlined interface allows for quick and efficient editing, making it accessible for both beginners and professionals.
Real-time previews
See changes in real-time, allowing for precise adjustments and faster workflow.
The simplicity and efficiency of Evoto make it an excellent choice for both beginners and professionals looking to add vignette to photo quickly and effectively. Now, let’s dive into a step-by-step guide on how to create a vignette using Evoto AI Photo Editor.
How to Create a Vignette in Evoto AI Photo Editor
Transitioning to a practical application, here’s how you can create a vignette effect in Evoto AI Photo Editor:
Evoto – The Most Efficient AI Photo Editor
Step 1: Open Your Image:
- Launch Evoto and import your image by either importing or dragging the file into the workspace.
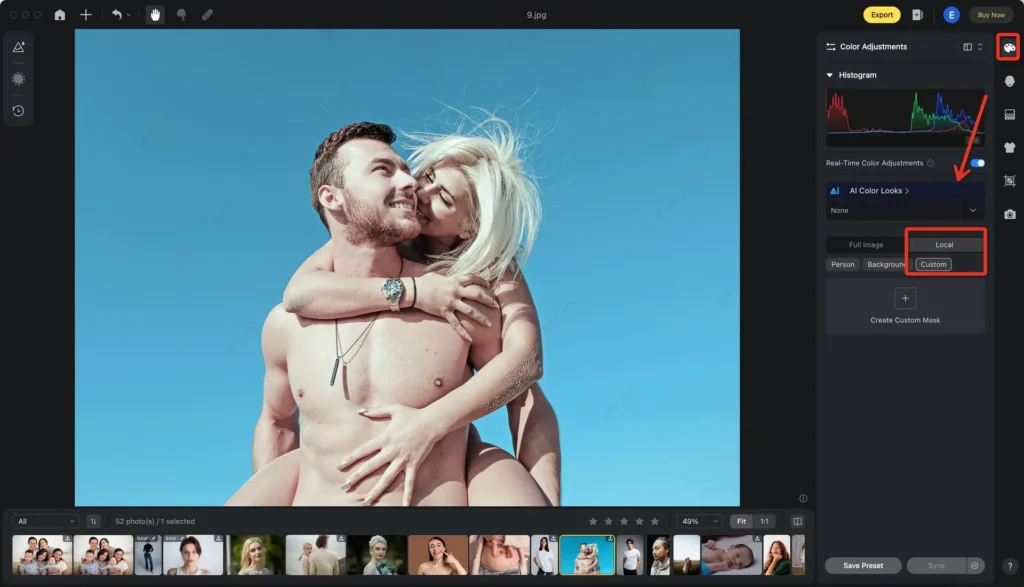
Step 2: Select the Create Custom Mask Tool
- Navigate to the Color Adjustments panel and select the Local Custom option.
Step 3: Create Vignette Area with the Radial Gradient Tool
- Select the Radial Gradient tool. Use the sliders to control the size and softness of the vignette.
- Adjust the vignette’s position by clicking and dragging to center it perfectly.
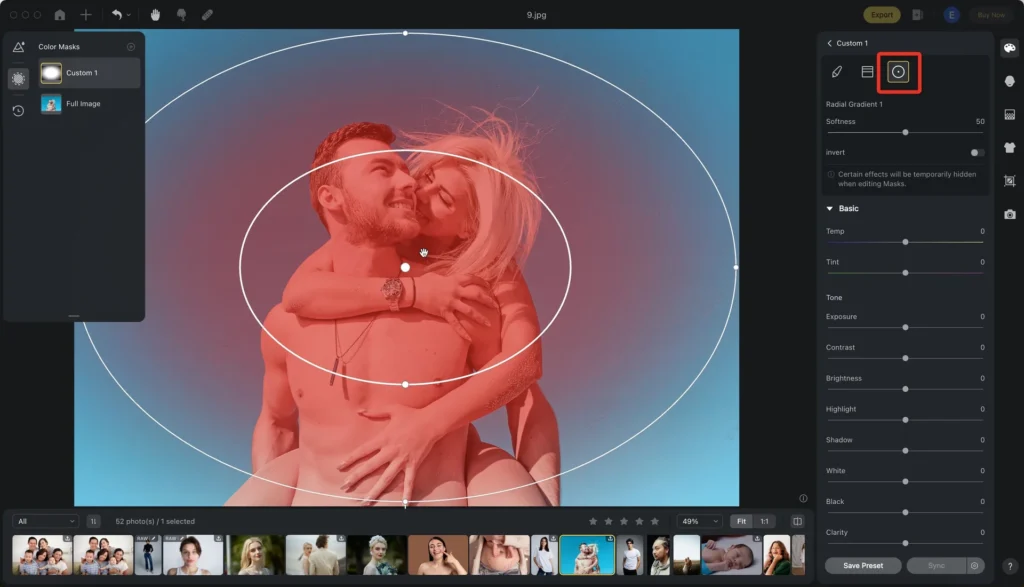
Step 4: Switch on the Invert
- This will ensure the effect is applied to the edges, not the center.
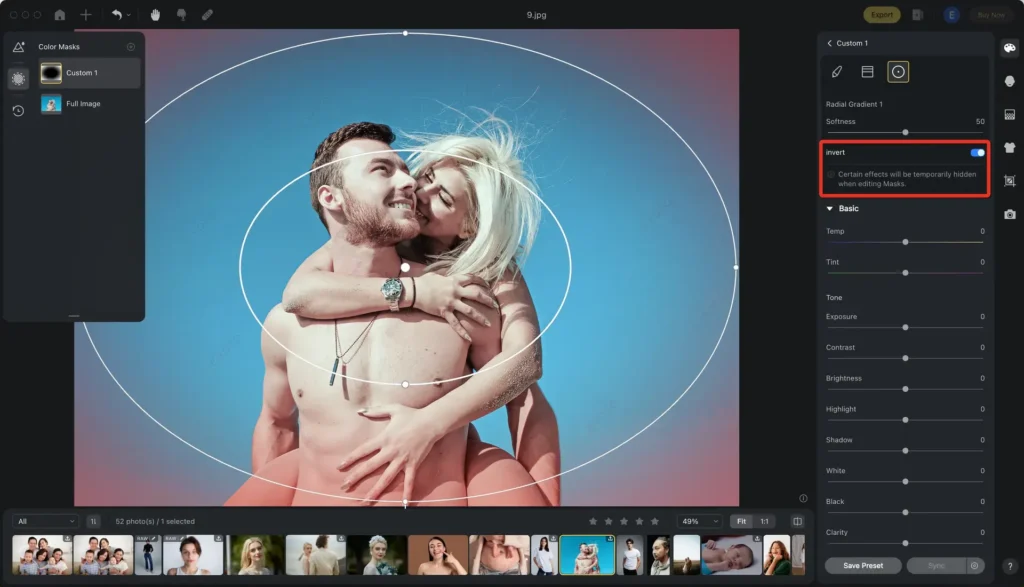
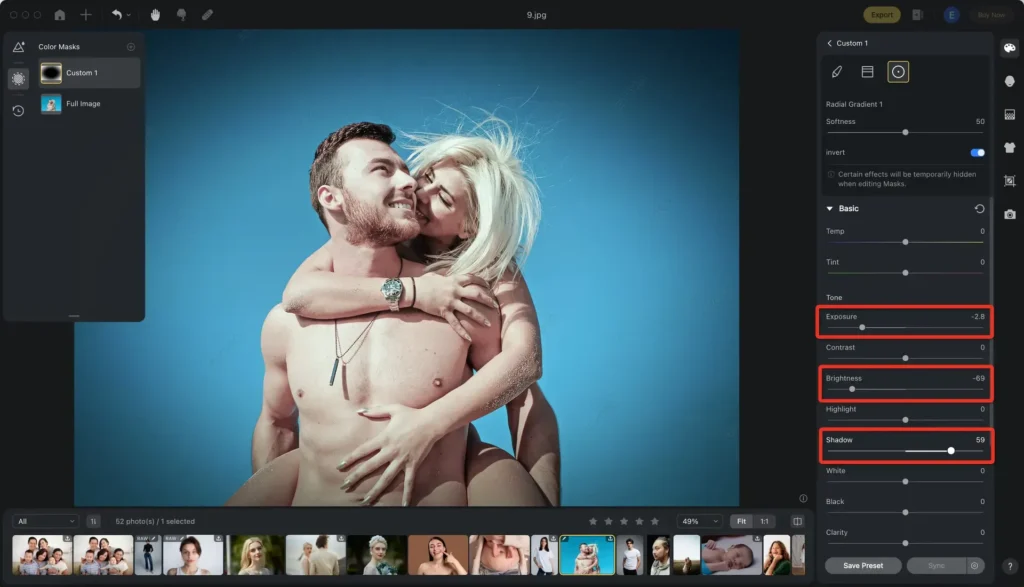
Step 5: Fine-Tune the Effect
- Modify the color and exposure settings if needed. Preview the changes in real-time to achieve the desired effect.
Step 6: Save Your Image
- Once satisfied, save your edited image by clicking Export. Choose the appropriate file format and quality settings.

By following these steps, you can effortlessly add vignette to photo using Evoto, enjoying the benefits of its intuitive interface and powerful editing tools.
How to Creating a Vignette in Photoshop
Transitioning to a traditional approach, here’s how you can create a vignette in Photoshop:
1. Open Your Image:
- Launch Photoshop and open the image you want to edit by navigating to File > Open.
2. Add a New Layer:
- Create a new layer by clicking the New Layer icon at the bottom of the Layers panel or selecting Layer > New > Layer from the menu.
3. Apply the Gradient Tool:
- Select the Gradient Tool from the toolbar (or press G). Choose the Radial Gradient option and set it to go from black to transparent. Drag from the center of your image outward to apply the vignette.
4. Adjust the Layer’s Opacity:
- Lower the opacity of the vignette layer to blend it smoothly with your image. Adjust the opacity slider at the top of the Layers panel.
5. Refine with Layer Masks:
- Add a layer mask to the vignette layer for more control. Use a soft brush to paint on the mask, reducing the vignette effect in certain areas as needed.
6. Final Adjustments:
- Use Levels or Curves adjustments for fine-tuning. Save your edited image by selecting File > Save As.
Although Photoshop provides extensive tools for customization, the manual process can be time-consuming and complex compared to Evoto’s streamlined workflow.
Evoto – The Most Efficient AI Photo Editor
Take Away
In conclusion, while create a vignette in Photoshop is a powerful technique, Evoto AI Photo Editor stands out as the best alternative. Evoto simplifies the vignette creation process with its user-friendly interface, AI enhancements, and efficient workflow.
Whether you are a professional photographer or a hobbyist, Evoto offers a superior solution to add vignette to photo quickly and effectively. Try Evoto today and experience the ease and creativity it brings to your photo editing projects.


