Opacity refers to the degree to which an image or layer is transparent. In simpler terms, a picture with 100% opacity blocks out everything behind it, while a picture with 0% opacity reveals everything underneath it. For photo editing, to change opacity of picture is crucial and offers a range of creative possibilities. It allows you to blend images, create overlays, or achieve a desired visual effect. For example, increasing opacity can make an element stand out more prominently against the background.

But how to change opacity of picture? Evoto Photo Editor emerges as a powerful opacity image editor with its intuitive interface and advanced features. It simplifies the process of adjusting opacity, enabling you to fine-tune your visuals with precision. Keep reading to know how to use it and access more worthy of trying choices.
About Opacity in Pictures
In photo editing, opacity refers to the degree to which an image or layer is transparent. Adjusting opacity allows you to control how much of the layer’s content is visible.
Why Changing Opacity of Picture Can Enhance Images
There are 3 benefits when you change opacity of pictures.
- Blending Layers: Lowering the opacity of a layer can blend it smoothly with the background or other layers, creating a seamless transition between elements.
- Creating Overlays: By reducing the opacity of an overlay, you can add textures, patterns, or color filters to an image without overwhelming it.
- Softening Elements: Lowering the opacity of specific elements, such as text or graphics, can soften their appearance and make them less dominant, allowing the main subject to remain the focal point.
When to Change Opacity of Pictures
There are 4 examples that changing opacity is commonly used in photo editing.
- Photo Overlays: Use opacity adjustments to apply a semi-transparent texture or color overlay to your photo, enhancing its mood or adding a creative effect while keeping the underlying image visible.
- Watermarking: Adjust the opacity of a watermark to protect your work without detracting from the main content.
- Blending Effects: When combining multiple images or graphics, adjust the opacity of individual layers to create smooth transitions and integrated visuals, enhancing the overall composition.
- Highlighting or De-emphasizing: Changing opacity can highlight certain elements or make them less visible.
By understanding and effectively to change opacity of pictures, you can manipulate and enhance your images in creative and impactful ways, adding depth and achieving the desired visual effects.
How to Change Opacity of Picture with Evoto AI Photo Editor
Evoto AI is an effective and outstanding opacity image editor that can assist you to change opacity of picture in 5 easy steps.
Step 1: Open Evoto Photo Editor and Import Your Image
Download and launch Evoto Photo Editor on your device. Create a new project to import your photo or directly drag and drop your image file into the workspace.
Evoto – The Most Efficient AI Photo Editor
Step 2: Navigate to the Background Adjustments Panel
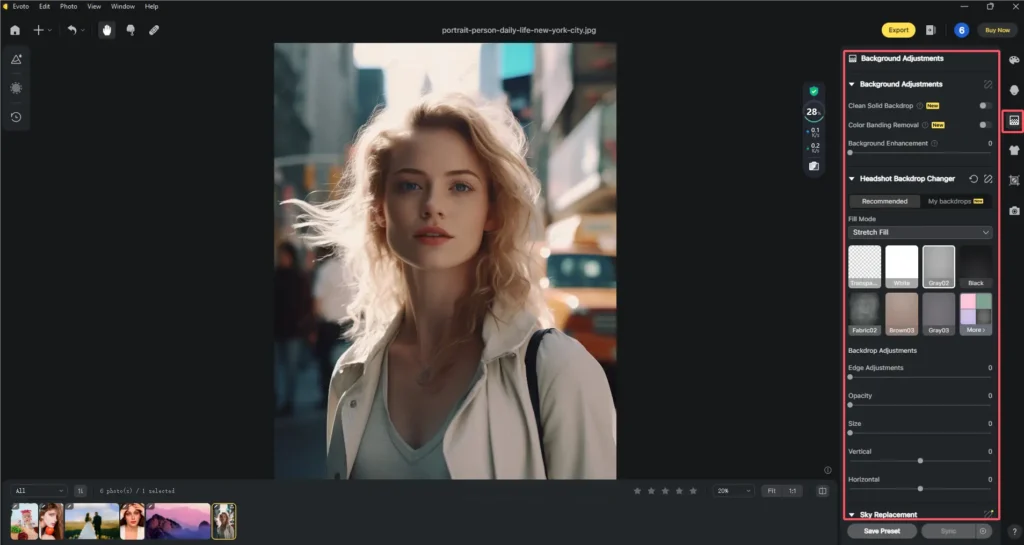
Go to the Background Adjustments panel on the right side of the interface. This panel provides various options for modifying your image’s background, including clean solid color backdrop, texture, opacity, and sky replacement.

Step 3: Select the Backdrop Template You Want to Change
In the Background Adjustments panel, the AI tech will auto-detect what background adjustments you can do with the uploaded image.
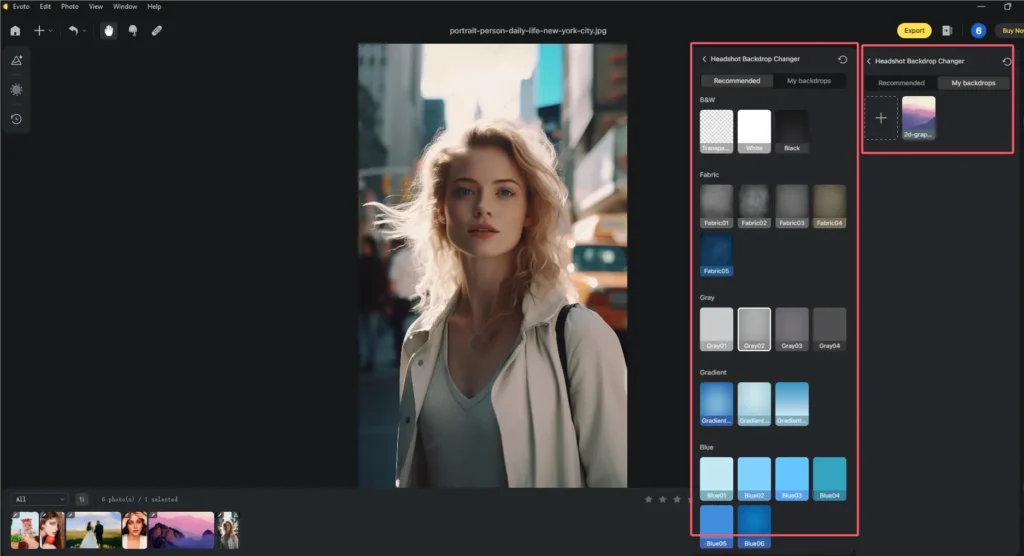
In this example, we can change opacity of picture in the Headshot Backdrop Changer. Then, choose the backdrop template which could be a solid color, gradient, or patterned background, and you can also upload your images as the backdrop template.

Step 4: Use the Opacity Slider to Adjust the Opacity to Your Preference
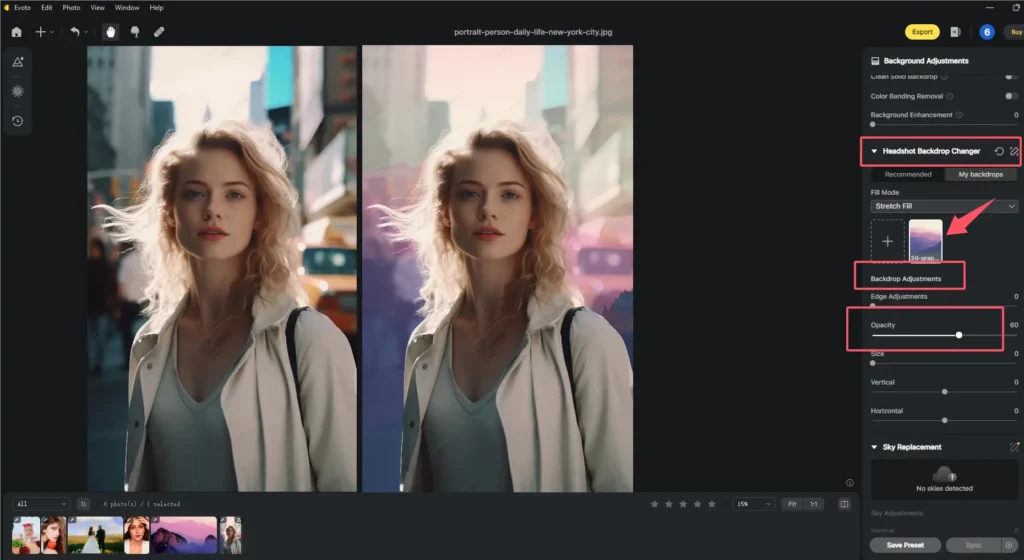
Find the Opacity Slider within the Backdrop Adjustments panel. Drag the slider left or right to decrease or increase the opacity of your selected background layer. As you adjust the slider, you’ll see real-time changes in the background’s transparency, allowing you to fine-tune the opacity to your liking.

Step 5: Export Your Changes
After adjusting the opacity to your satisfaction, export your edited image. Click on the “Export” button located at the top right corner of the screen. Choose your desired file format and quality settings, then save your edited image to your computer or cloud storage.
Evoto – The Most Efficient AI Photo Editor
Unique Features of Evoto Photo Editor
Evoto Photo Editor offers several unique features that streamline the process of adjusting opacity:
- Real-Time Preview: As you adjust the opacity slider, Evoto provides real-time previews, making it easier to see how changes affect your image immediately.
- Intelligent Background Detection: Evoto’s AI-driven technology automatically detects and isolates background elements, simplifying the process of selecting and modifying backgrounds.
- User-Friendly Interface: The intuitive layout and straightforward controls of Evoto make it accessible even for beginners, allowing for efficient adjustments without a steep learning curve.
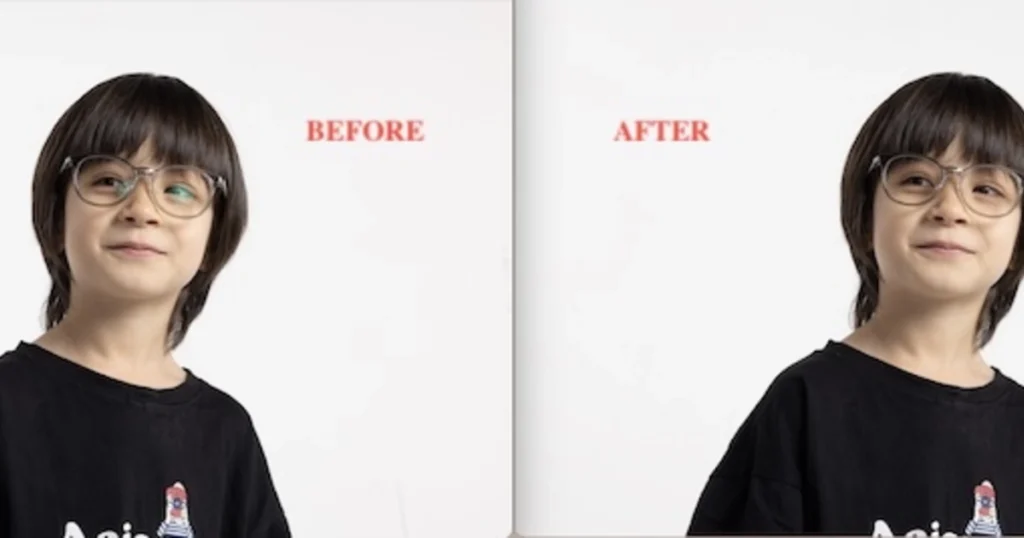
By following these steps and utilizing Evoto’s powerful features, you can easily change opacity of picture background and enhance your images with professional results.
Read More: Smart Background Editing: Easily Remove and Replace Photo Backgrounds
How to Change Opacity of a Picture in Photoshop
Photoshop is an all-in-one photo editor, as well as an opacity image editor. In this section, to change opacity Photoshop is refined as a step-by-step tutorial. Here’s how to change opacity of picture with Photoshop.
1. Open Your Image
Start by launching Adobe Photoshop and loading the image you wish to edit. Go to File > Open, and select your image file from your computer. The image will appear in the workspace.
2. Layer Selection
In the Layers panel, select the layer that contains the background or the part of the image you want to adjust. If your image has multiple layers, make sure to click on the correct layer to ensure that the opacity change applies to the right area.
3. Opacity Adjustment
Locate the Opacity slider at the top of the Layers panel. It is positioned directly under the layer name and above the layer visibility eye icon. Drag the slider left to decrease the opacity, making the layer more transparent, or right to increase the opacity, making it more opaque. As you adjust the slider, you’ll see the changes reflected in the image in real time.
4. Fine-Tuning
For more precise opacity adjustments, you can manually enter a specific percentage value. Click on the percentage box next to the opacity slider and type in the desired percentage, then press Enter. This allows for exact control over the opacity level after the tool make change opacity of picture.
By following these steps, you can effectively manage the opacity on Photoshop, enhancing your ability to create visually appealing and professional-quality images.
Evoto – The Most Efficient AI Photo Editor
Other Tools to Change Opacity of a Picture
Besides changing opacity on Photoshop and Evoto AI, several other tools offer robust features for changing the opacity of a picture. Each tool has unique strengths, catering to various levels of editing complexity and user expertise.
1. GIMP
GIMP (GNU Image Manipulation Program) is a free and open-source photo editor similar to Photoshop. It provides extensive photo editing capabilities, including the ability to adjust layer opacity. GIMP’s interface and features are similar to those of Photoshop, making it a powerful tool for users who need advanced editing options without the cost. To adjust opacity in GIMP, select the layer you want to modify and use the opacity slider in the Layers panel.
2. Canva
Canva is an online graphic design tool that simplifies the process of photo editing and design. As a tool to change opacity of picture, Canva includes straightforward opacity adjustment features, ideal for users seeking an easy-to-use interface. You can change opacity of elements within your design by selecting the item, and then using the transparency slider in the toolbar. Canva is particularly useful for quick edits and creating visually appealing designs without a steep learning curve.
3. Pixlr
Pixlr is a web-based photo editor that supports you to change opacity of pictures, offering a balance between simplicity and functionality. Pixlr’s intuitive interface allows users to make quick adjustments to opacity and other photo settings. By selecting the layer you wish to modify and using the opacity slider, you can achieve the desired level of transparency in your images.
Each of these tools provides valuable options for adjusting opacity, catering to different needs and preferences. Whether you’re looking for a free, open-source solution, a user-friendly online design tool, or a versatile web-based editor, there’s an option suited to your editing style and complexity.
Conclusion
In this article, we explore various ways to change opacity of picture. There are different tools recommended to enhance the visual appeal and create unique effects, from the efficient and professional Evoto Photo Editor and Photoshop to alternative tools such as GIMP, Canva, and Pixlr. Evoto Photo Editor stands out for its user-friendly interface and efficient features to make images transparent. Its real-time preview and streamlined editing process make it an excellent choice for both beginners and experienced users looking to achieve professional results with ease. Download Evoto Photo Editor right now and explore more tutorials on the blog to perfect your photos with ease.


