Color curves are a fundamental photo editing tool that allows for precise adjustments to an image’s color balance and tonal range. Essentially, color curves are graphical representations of the relationship between the input and output values of colors in an image. By manipulating these image curves, you can correct color imbalances, and achieve a desired mood or effect on your photos.

The color curves provide detailed control over the tonal and color adjustments. This means you can adjust specific tonal ranges such as shadows, midtones, and highlights. Also, you can enhance contrast, correct color casts, and create striking visual effects, all while maintaining the natural integrity of the image. Read more about color curves and get a full guide on how to adjust color curves.
What Are Color Curves?
In photo editing, color curves are an essential and powerful tool used to adjust an image’s tonal and color balance. Color curves allow users to manipulate the relationship between an image’s original color values (the horizontal axis) and the adjusted color values (the vertical axis), shown as curves on a grid.
The basic concept behind color curves is relatively straightforward but offers a high level of control. You can adjust how light or dark a color is by using a curve. The shape of the image curves determines different degrees of adjustment. A curve that curves upward brightens the image, while a curve that curves downward darkens it.
In addition, the color curve can be adjusted individually for different colors, enabling accurate color correction and creative color grading. For example, adjusting the red channel curve can enhance or reduce the red hue in an image. And all your adjustments are reflected in the image in real-time
In summary, the curves offer a professional method for tweaking the brightness, contrast, and color balance of an image. It helps achieve a high level of precision in photo editing, enhancing the overall quality and impact of their photos.
Why Use Color Curves?
Color curve is a versatile and powerful tool in photo editing, through the precise control of color, you can render the atmosphere, highlight the subject, and so on. Here are the main advantages and examples of using color curves.
Benefits of Using Color Curves
- Precise Control Over Tonal Range: Color curves allow fine-tuning of the tonal range for specific areas in the image. In portrait photography, using the curves to adjust mid-colors and highlights, enhance skin color tone, and increase contrast can highlight the subject’s features and create a more vibrant and engaging portrait.
- Enhanced Contrast and Depth: By adjusting the shape of the curve, you can increase the contrast and depth of the image. In landscape photography, for example, contrast is enhanced by deepening shadows, brightening highlights, and bringing out both sky and foreground details to make the landscape more dramatic and vivid.
- Color Correction: Color curves achieve target color correction by adjusting individual color channels. This is often used in product photography to accurately fix colors and balance colors, ensuring a clean, professional look.
- Creative Color Grading: In addition to correction, color curves are invaluable for creative color grading. Retro looks or dramatic color changes, for example, require specific color effects to create mood and evoke emotion.
In summary, using the curves can enhance image quality, correct color issues, and achieve a better photo look.
How to Adjust Color Curves in Adobe Lightroom
Adjusting color curves is a key skill in photo editing, and mastering it can significantly improve your images. Most users first learn color curves in Photoshop, an extremely complicated and professional photo editing tool. But here, we will talk about how to adjust the curves in a general photo editor, for example, Adobe Lightroom.
Step-by-Step Guide
Step 1. Launch Adobe Lightroom and import the photo you want to edit. Select the image and go to the Develop module to access editing tools.
Step 2. In the Develop module, find the Tone Curve panel and open the curve adjustment tools.
Step 3. Lightroom provides two types of curves. Use Point Curve to add specific points to the curve and adjust them individually. The Region Curve offers a simpler, preset curve adjustment.
Step 4. Click on the curve to add control points. Drag these points to adjust the color shadows, mid-tones, and highlights. To enhance contrast, create an S-shaped curve by slightly lifting the mid-tones and lowering the shadows. Be sure to use subtle adjustments to avoid over-editing.
Step 5. Click on the Channel dropdown menu within the Tone Curve panel to switch between RGB and individual color channels. For instance, if the image has a color cast, use the Red, Green, or Blue channels to correct it, achieving the color balance.
Step 6. Preview the results and export the edited photo for sharing or collection.
Read More: How to Fix Skin Tones Effortlessly: A Comprehensive Guide
According to these steps and tips, you can effectively use color curves in photo editors like Adobe Lightroom to enhance your images. But if you want an efficient workflow, it’s necessary to use an AI photo editor to adjust the curves.
Such AI curves editing tools can automatically adjust the color to your needs. Let’s see how it works:
How to Use Color Curves in Evoto AI Photo Editor
Evoto AI photo editor offers a comprehensive suite of color editing tools, including AI color curves, histograms, HSL, color grading, color calibration, etc. With Evoto AI’s user-friendly interface and all these color functions, users can fine-tune their images with ease, precision, and creativity.
You can adjust the tonal ranges and color balance based on points and channel-specific controls. Also, you can view changes in real time and get instant feedback. Leveraging AI technology, Evoto offers customizable presets for color curves, so you can save and apply specific adjustments quickly.
Evoto – The Most Efficient AI Photo Editor
The following is a guide to adjust the curves with Evoto AI:
Step 1. Open Your Photo in Evoto
Download Evoto and successfully install it. Drag and drop your photo to the workspace where you can also create a new project by clicking the “+” button.
Step 2. Adjust the Tone Curve
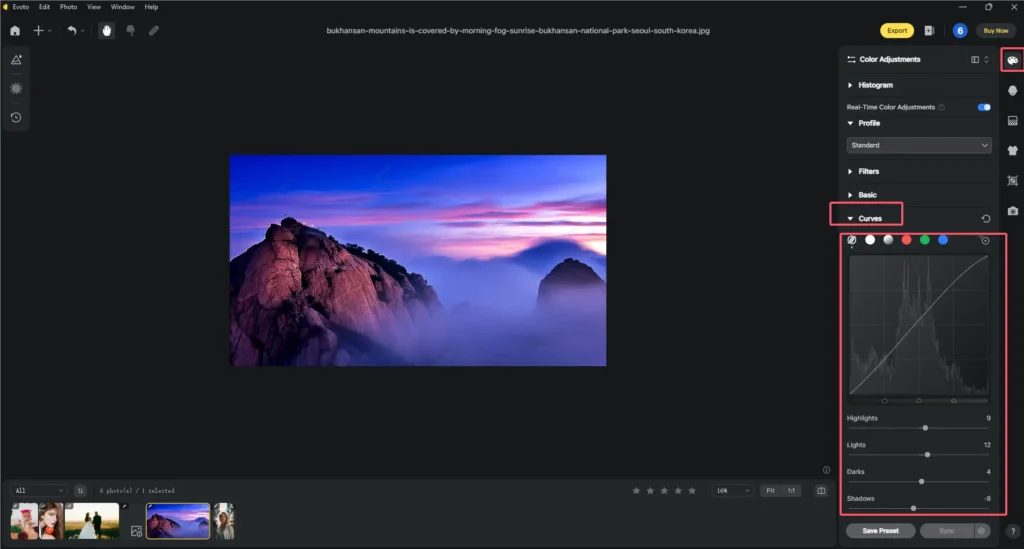
Navigate to the Color Adjustments panel on the right side of the screen. Click on the Color Curves option where you can adjust the highlights, lights, darks, and shadows by adding and moving control points on the curve.
Step 3. Customize Color Channels
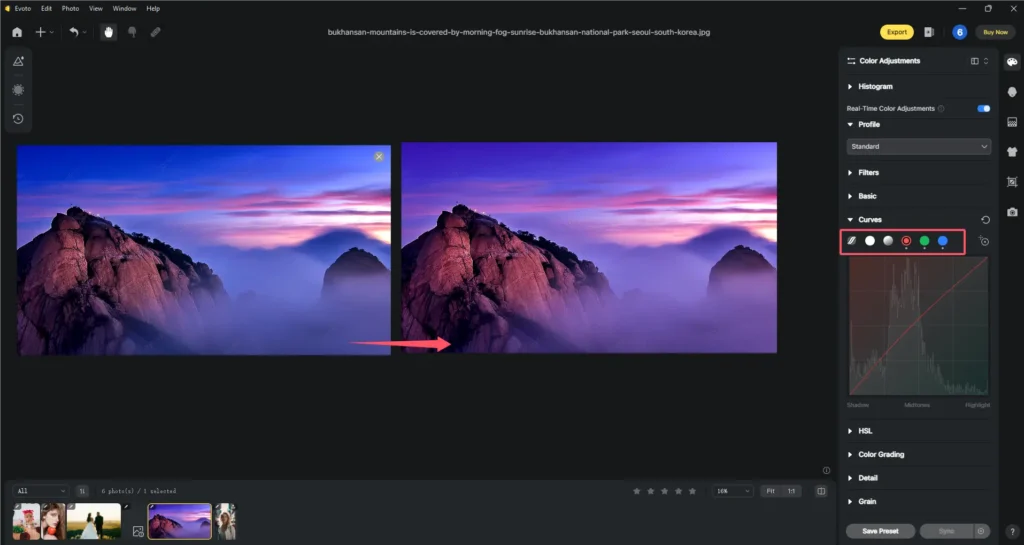
Switch to individual color channels, Red, Green, and Blue, to make specific color adjustments. For example, adjusting the Red channel curve can correct a color cast or enhance warm tones.
Step 4. Apply AI-Assisted Suggestions (Optional)
If enabled, you can get suggestions from AI Color Looks which has presets with automated color curve adjustments based on the analysis of various types of images. This feature can provide a starting point for further manual adjustments.
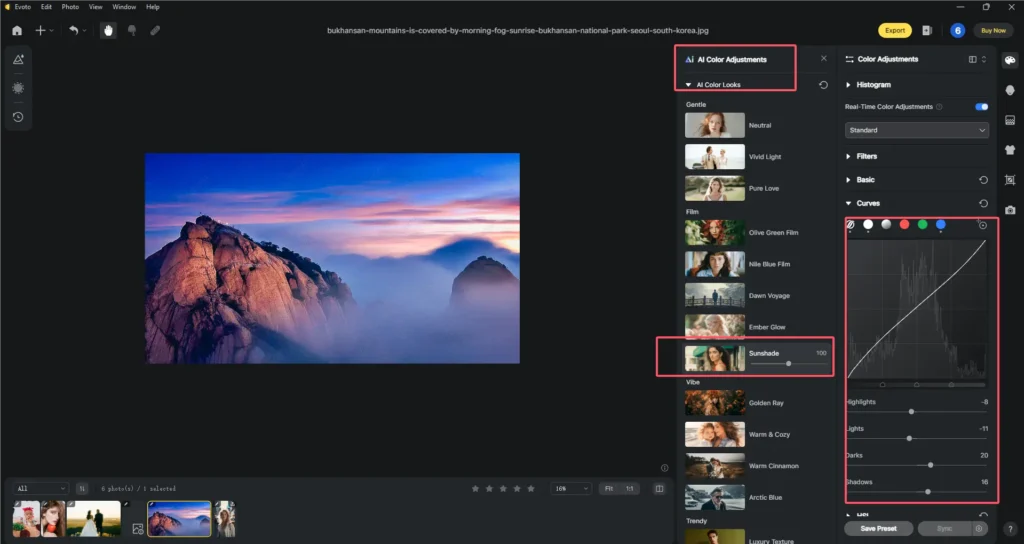
Meanwhile, you can customize your color curve preset and apply consistent adjustments across multiple images, saving time and maintaining a cohesive editing style.
Step 5. Preview and Export
Use the preview option to compare before and after views of your adjustments. If you are satisfied with the editing, you can export it to your desired folder.
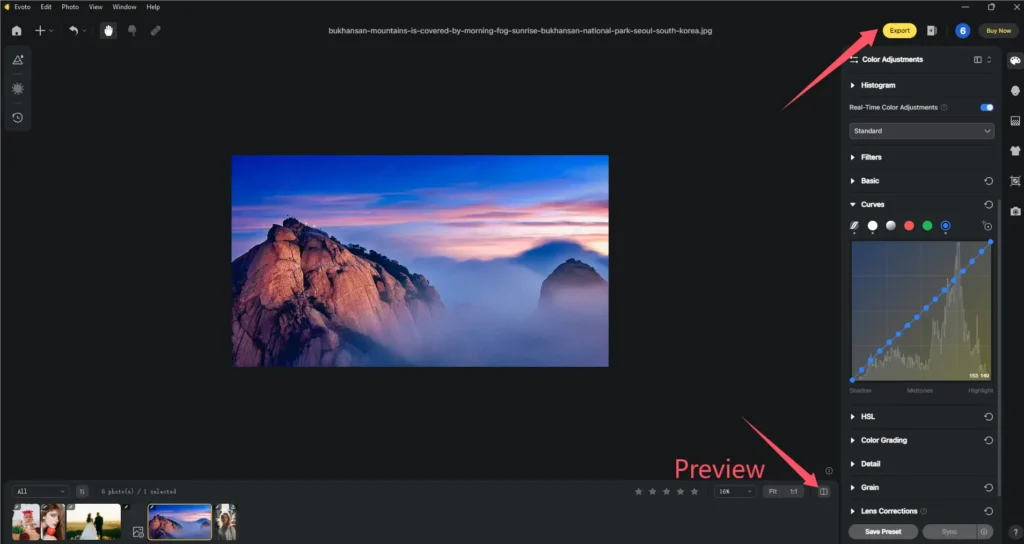
By utilizing Evoto’s advanced color curve features, you can achieve precise, professional-quality adjustments that enhance the visual impact of your photos. Compared to adjusting curves in Photoshop, using Evoto AI with its intuitive controls, AI assistance, and customizable options makes it easier to achieve stunning color and tonal corrections.
Evoto – The Most Efficient AI Photo Editor
Conclusion
Understanding and using color curves effectively can transform your photo editing workflow, providing you with the tools to enhance contrast, recover details, and achieve a desired aesthetic. Whether you’re correcting color casts, improving depth and clarity, or applying creative color grading, mastering this technique is key to unlocking the full potential of your images.
If you’re looking for a powerful yet user-friendly option, Evoto is an excellent choice. With its powerful color curve tools, intuitive interface, real-time preview, and advanced AI-assisted adjustments, you can achieve stunning results without any effort. Download Evoto AI to explore its versatile capabilities and see how it can enhance your photo editing process with precision and ease.


