Photographers, content creators, marketers, and hobbyists often deal with thousands of photos daily. If you don’t manage photos properly, you’ll quickly lose track of important files, waste time editing, and risk losing valuable memories or work. Fast and efficient photo management improves workflow, editing productivity, and storage optimization.
This guide covers the best methods and tools to manage photos effectively, including powerful software like AI Photo Editor.

Common Photo Management Logic and Methods
Whether you’re a professional or a casual photographer, understanding common photo management practices is crucial. Here are some effective methods to manage images efficiently:
- Folder Structure: Create a hierarchical folder system organized by project name, date, client, or event. It makes it easy to locate files quickly.
- Consistent Naming: Use standardized naming conventions like “YYYY-MM-DD_Event_Location” to make searching and sorting easier.
- Metadata and Tagging: Add keywords, ratings, or labels to photos. It helps in fast filtering and easy retrieval.
Version Control: Always save edited images separately to avoid overwriting your originals. - Backup Systems: Regularly back up your library to external drives or cloud storage to prevent data loss.
- Software Tools: Use photo management software with features like batch editing, organizing, auto-tagging, and advanced filtering.
- Routine Maintenance: Every few months, review your collections to organize images, delete duplicates, and archive old projects.
These steps form the best way to organize digital photos efficiently without losing track of your valuable images.
Evoto’s Photo Management Functions and Applicable Groups
Evoto makes it remarkably easy to manage photos with a smart, user-centered design and comprehensive photo editing functions tailored to different users’ needs.
Evoto’s Key Management Features:
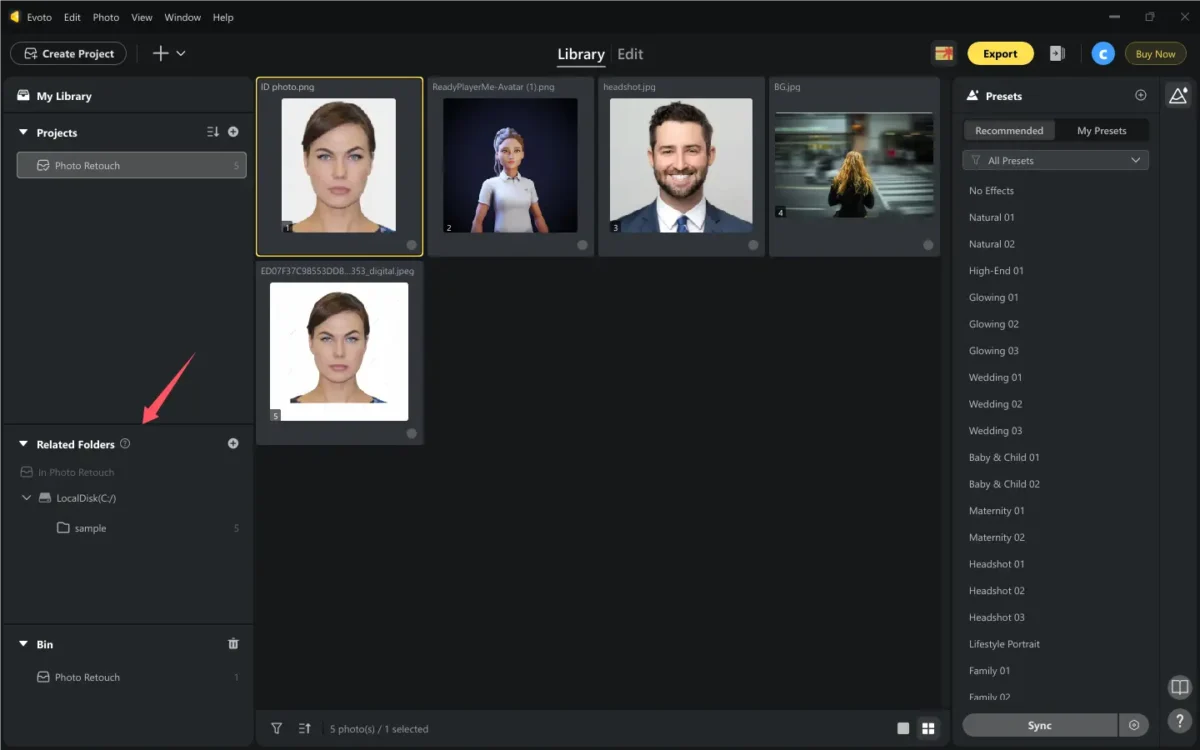
- Related Folders: Create, move, rename, and delete project folders safely, with no risk of losing images.
- Bin Management: Clear files from Evoto only or permanently delete from disk with two simple options.
- Advanced Image Selection: Select multiple images via shortcut keys or mouse drags for faster culling.
- Flexible Marking: Add color labels, stars, or flags to organize images visually and intuitively.
- Efficient Image Filtering: Apply multi-select filters based on image orientation (horizontal/vertical) and marking.
- Direct Image Movement: Use drag-and-drop between folders to auto organize photos efficiently.
Evoto AI Photo Editor – Faster Edits, Finer Control
Evoto’s powerful features are perfect for:
Evoto is designed to streamline workflows for professionals who work with large volumes of images. Its intelligent tools save time, enhance organization, and boost productivity, making it ideal for:
Professional Photographers
Pain point: Hours wasted reviewing thousands of shots manually.
Evoto’s solution: AI-powered photo culling instantly surfaces best shots, while batch tagging and project organization keep galleries searchable.
Result: Spend 70% less time sorting, more time creating.
Retouchers & Designers
Pain point: Repetitive selection tasks are slowing down edits.
Evoto’s solution: Smart filters auto-group similar images, while quick selection tools enable batch adjustments.
Result: Process 3x more images per day with consistent quality.
E-Commerce Businesses
Pain point: Chaotic product libraries causing listing delays.
Evoto’s solution: Bulk tagging and systematic categorization ensure every SKU is trackable.
Result: Launch products 50% faster with perfectly organized visuals.
Creative Agencies
Pain point: Juggling multiple client projects leads to version chaos.
Evoto’s solution: Centralized workspaces with client-specific tags and export presets.
Result: Deliver projects on time with zero asset mix-ups.
Whether you need studio management software for photographers, portrait studio management software, or simply a fast photo manager, the AI Photo Editor offers everything you need in one tool.
How to Manage Photos with Evoto – Step-by-Step Guide
If you want to learn how to organize photos on a computer efficiently, here’s a simple step-by-step guide using Evoto:
Step 1: Importing Photos
Start by importing your images directly into the AI software. Click “Create Project” and add a project name. Then upload an image, or you can bring in entire folders from your computer.
Evoto AI Photo Editor – Faster Edits, Finer Control
To manage photos effectively, it’s best to use “Related Folders” to keep different sessions or projects separate. This way, you maintain an organized workspace and can easily locate images from specific events or clients and backup images.

Step 2: Culling and Selecting Images
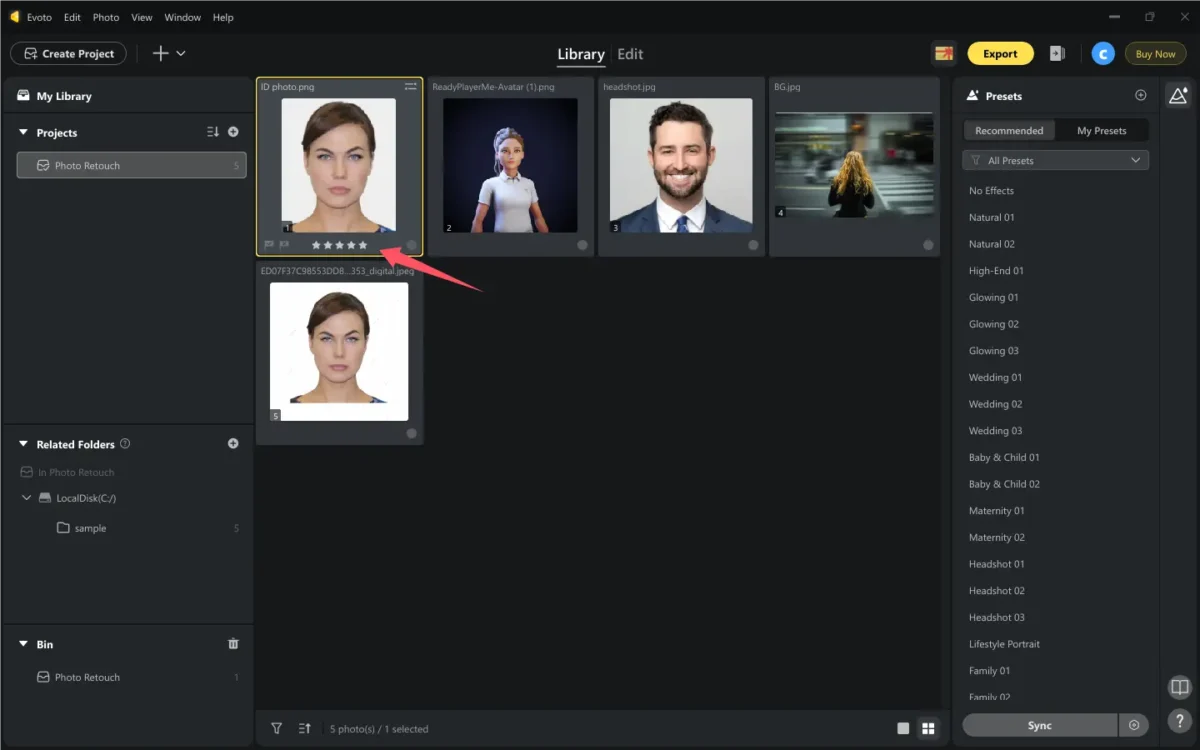
Once your images are in Evoto, it’s time to cull them — a critical step for anyone learning how to cull photos efficiently. Evoto offers a side-by-side comparison feature, letting you view multiple images at once and pick the best shots quickly. Pick a photo and apply star ratings from 1 to 5 stars during this initial review to rank your images based on quality and relevance.

This culling method dramatically improves photo management by letting you focus only on the best material without wasting time sorting through lower-quality shots.
Step 3: Tagging and Marking
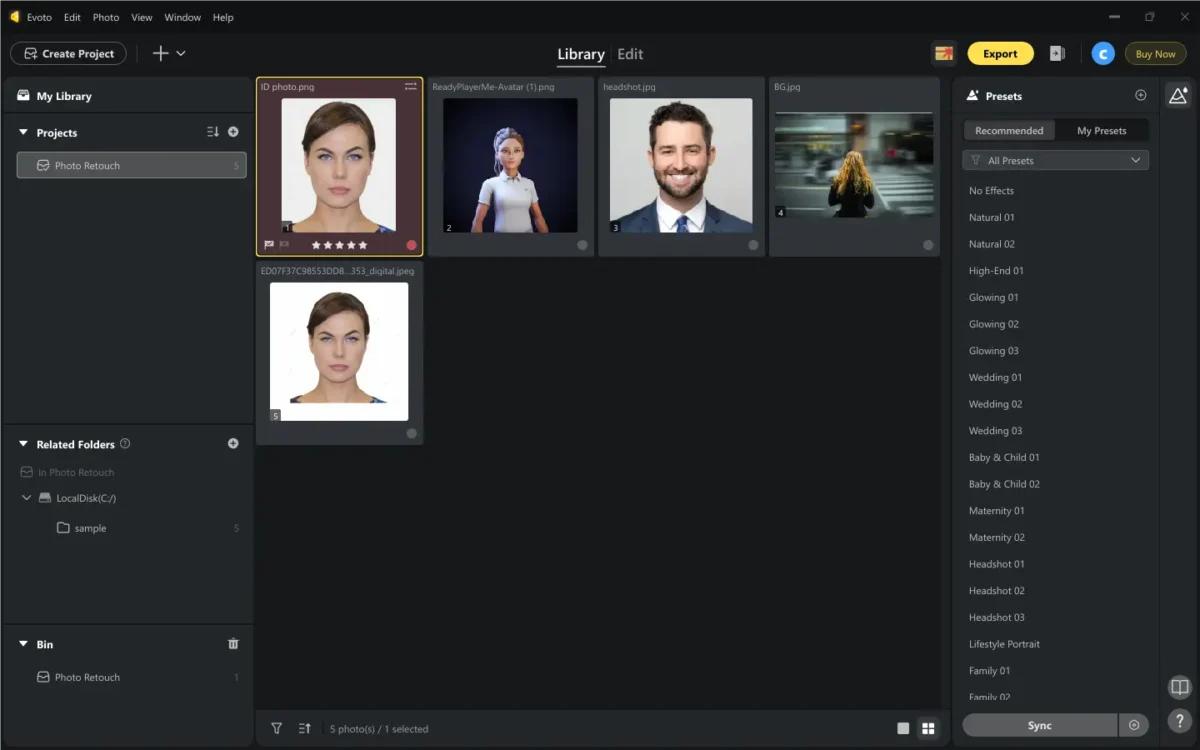
Once you’ve selected your best shots, you can manage photos by tagging and marking. Evoto allows you to add flexible marking systems like color coding and flagging (picked, rejected, or none), which makes your photo management workflow faster, especially when you need to manage gallery contents for different projects. Just click the color or flag logo to annotate.

Step 4: Using Smart Filters
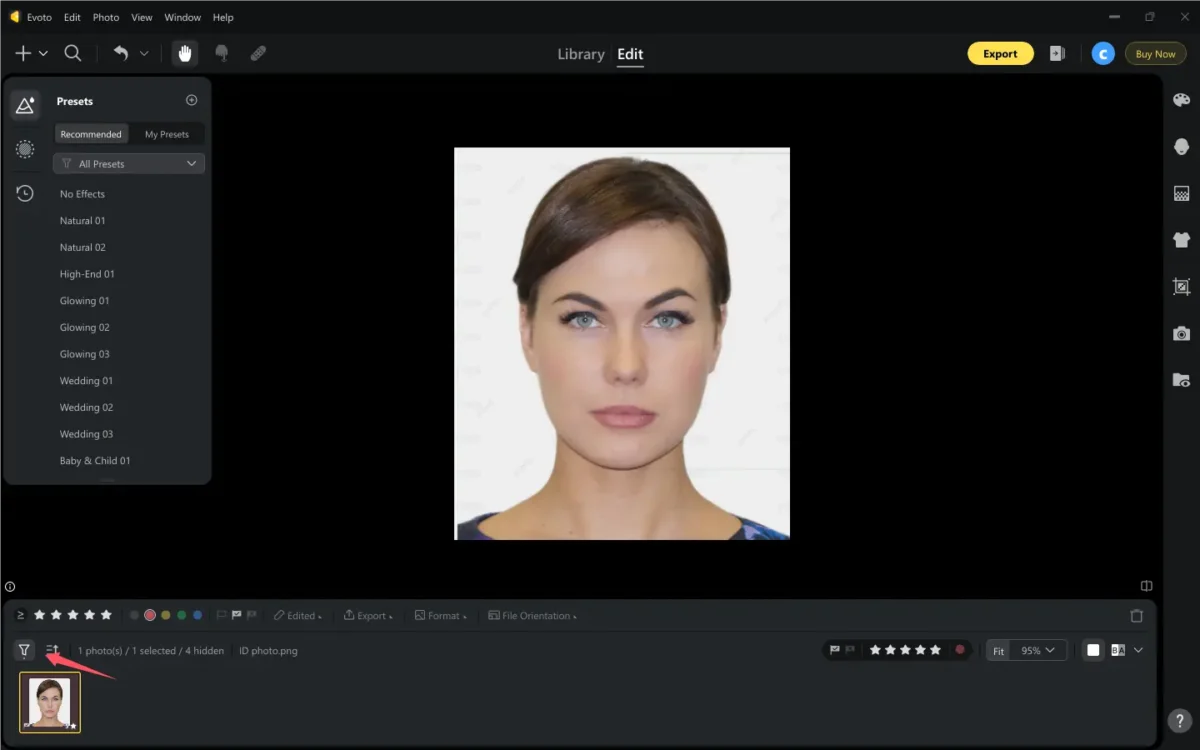
After tagging and marking, take advantage of Evoto’s smart filtering options. Go to the photo editing panel. Click the “Filter” icon, then filter images by star rating, color label, file type, or editing status.

This feature is vital for anyone wondering how to organize photos on a computer without getting overwhelmed. You can quickly isolate favorites, edited images, or files awaiting touch-ups, ensuring a focused editing session. Filters help organize images logically, making it the best way to organize digital photos for professional work.
Step 5: Organizing into Final Folders
When edits are complete, organize your images into final folders. You can drag and drop images between folders. This feature streamlines the workflow for studio managers and individuals using portrait studio management software or other studio management software for photographers.
Step 6: Backing Up Your Work
Finally, always back up your work to protect against data loss. Export your finished images and save both edited and original versions separately. Use both local backups (external hard drives) and cloud backups for redundancy, especially if you rely on photo management software to handle multiple projects simultaneously.
By following these steps, you’ll manage photos professionally without confusion or errors.
Precautions
Properly managing photos requires caution to avoid accidental loss or corruption. Here are essential precautions to follow:
1. Always Double-Check Before Deleting from the Local Disk
Why it matters: Permanently deleting files from your disk is irreversible.
Best practice:
- Use Evoto’s bin management to first move files to a temporary trash folder.
- Verify that you no longer need the images before emptying the bin.
- Enable confirmation prompts in your software to prevent accidental deletions.
2. Backup Your Library Before Major Reorganizations
Why it matters: Large-scale file movements or renaming can sometimes lead to errors.
Best practice:
- Use 3-2-1 backup rule (3 copies, 2 different media, 1 offsite).
- Store backups on:
- External hard drives
- Cloud storage (Google Drive, Dropbox, Backblaze)
- NAS (Network-Attached Storage) for professionals
- Verify backups by occasionally restoring a few test files.
3. Keep Evoto Updated to Avoid Folder Logic Issues
Why it matters: Software updates often fix bugs and improve file-handling stability.
Best practice:
- Enable auto-updates in Evoto’s settings.
- Check for updates manually before starting a big project.
- Read patch notes to understand folder structure changes in new versions.
Common Photo Management Issues & How to Fix Them
Even with the best intentions, managing images can come with challenges. Here are common issues and how Evoto’s features help solve them:
- Accidental image loss: Smart Bin Management protects from permanent loss unless confirmed.
- Inefficient manual tagging: Batch selection and marking speed up the tagging process.
- Difficulty batch organizing: Advanced selection and drag-and-drop simplify batch moves.
- Confusing folder structures: Related Folder functions maintain logical and easy-to-navigate project structures.
- Time-consuming workflows: Evoto consolidates folder, image, and project management into one seamless platform, eliminating the need for multiple tools.
Compared to the traditional photo manager, Evoto is the best free photo management software, which is more intuitive, powerful, and integrated.
Evoto AI Photo Editor – Faster Edits, Finer Control
Conclusion
Properly managing photos saves time, enhances creativity, and ensures smoother project delivery. With Evoto AI Photo Editor advanced yet user-friendly tools, photographers, designers, and businesses can now organize, tag, filter, and deliver high-quality images quickly and effortlessly.


