Creating stunning maternity portraits is both an art and a science. Maternity photoshoot editing plays a crucial role in transforming raw photos into timeless memories. Whether you’re a professional photographer or an expecting parent, editing maternity images can be time-consuming, especially when correcting stretch marks, adjusting color tones, and enhancing body shape. Advanced tools like Evoto AI Photo Editor can help you edit photos faster while maintaining a soft, natural finish.

Common Problems When Editing Maternity Photos
Maternity images require delicate retouching to keep the emotional essence intact. Here are common issues for maternity photoshoot editing:
- Stretch Marks and Skin Texture: Stretch marks after pregnancy, cellulite on legs pregnancy, and loose stomach skin are common.
- Color Inconsistencies: Uneven lighting can result in blotchy skin on legs or blotchy skin on face.
- Clothing Wrinkles: Flowing dresses can crease during posing.
- Distracting Backgrounds: Unwanted elements reduce the impact of the photo.
- Facial Edits: Smoothing without losing character is critical.
- Maintaining a Natural Look: You want a refined but realistic portrayal of pregnant tummies and postnatal belly.
Read More: Guide: Expert Maternity Sessions & Photography Editing for Beautiful Moments
Best Software for Maternity Photoshoot Editing
When it comes to efficient maternity photoshoot editing, Evoto AI Photo Editor stands out. It simplifies complex editing tasks with precision and speed. Key features include:
- Gallery Management: Organize, filter, and tag photos for a smooth workflow.
- Skin Retouching: Eliminate stretch marks after giving birth, soften skin, and apply frequency separation.
- Background Tools: Remove or enhance backdrops to match shoot aesthetics.
- Clothing Wrinkle Removal: Smooth fabrics to create a polished look.
- Color Adjustment: Refine hues for storytelling and emotional depth.
- Maternity Preset Filters: One-click enhancement tailored for dreamy, romantic tones.
Evoto AI Photo Editor – Faster Edits, Finer Control
How to Use Evoto to Retouch Maternity Photos
Follow this step-by-step guide to retouch pregnancy portraits using Evoto. Each stage ensures that the edits preserve the subject’s natural beauty while enhancing the overall mood.
(1) Gallery: Classify and Filter Project Pictures
Step 1. Begin by importing your maternity session into Evoto’s gallery. Open Evoto AI and click “Create Project”. Create a new folder in the “Library” for photo organization and maternity photoshoot editing. Then save the project.

Step 2. Import images or folders into the current project.

Step 3. Right-click the photo to categorize images by color, flag, or rating. Tag photos for maternity before and after comparisons or to sort couples and solo shots.

Read More: 15 Best Photo Organizer Tools for Photographers
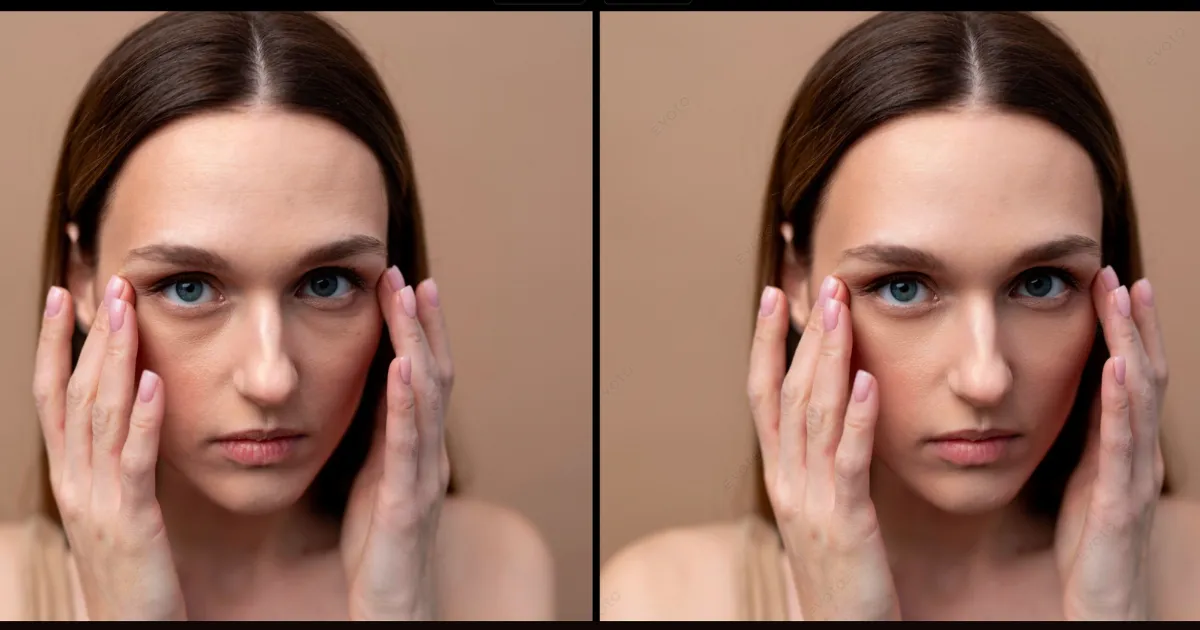
(2) Skin Editing: Remove Stretch Marks and Enhance Skin Texture
Step 1. Stretch Mark Removal
Go to the Edit window, then select the “Portrait Retouching” panel on the side toolbar. Scroll down and launch the “Stomach Stretch Mark” and “Pregnant Line” editing bar. Adjust the sliders to remove stretch marks after pregnancy. It can handle deeper lines or flabby skin after pregnancy.

Step 2. Skin Smoothing with D&B
Click “Skin Retouching”. Then apply “Dodge and Burn” under “Facial Skin” and “Body Skin” selectively to add depth to the face and body and accentuate the pregnant tummies.

Step 3. High & Low-Frequency Retouching
Use “Frequency Separation” to keep natural skin texture while removing blemishes and softening the tone across the skin, helping even out abdominal loose skin or saggy belly.

Step 4. Tone Matching
Go to “Skin Tone”. Adjust face and body skin for consistent tone across face, neck, and belly. This is essential when tackling tummy after childbirth that’s more exposed.

(3) Body Shaping and Facial Editing
Step 1. Highlight Belly Curves
Scroll down to find “Full Body Reshape”. Use body editing tools to emphasize the baby bump while maintaining a natural look. Avoid over-slimming; just refine shape subtly for elegance.

Step 2. Arm and Breast Adjustments
Subtly contour arms to remove unflattering angles. Lift or support breast lines affected by posing without overediting.

Step 3. Hair Retouching
Evoto lets you smooth frizz and flyaways. Go to the “Hair” editing feature. Restore hair volume and shine, especially in windy outdoor shoots.

(4) Background Editing According to Photography Theme
For baby bump photoshoot themes like rustic woods or elegant studios, use Evoto’s background tool to swap or remove backgrounds. Go to “Background Adjustment”, and select or upload an image to change. You can also use the “Sky Replacement” to change the background sky.

(5) Clothing Editing
Step 1. Wrinkle Removal
Click “Clothes & Accessories Adjustment”. Use the “De-winkle Clothing” tool to automatically detect wrinkles in flowing maternity gowns or lingerie for boudoir maternity photography.

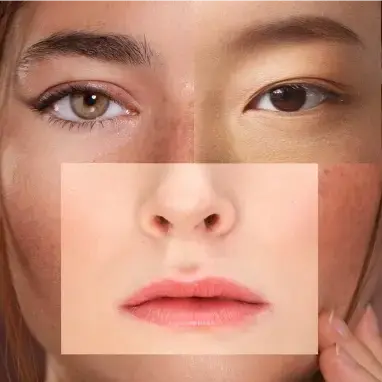
(6) Lighting, Shadow, and Color Adjustment
Step 1. Lighting Enhancement
Go to “Color Adjustment”. Adjust brightness, highlights, shadow, exposure, etc., to enhance the photo color.

Step 2. Color Grading
Evoto’s color grading helps direct emotion and storytelling, especially in maternity and newborn sessions. Use the sliders to apply pastel or warm tones that convey maternal softness.

Evoto’s color grading helps direct emotion and storytelling, especially in maternity and newborn sessions.
Step 3. Maternity Preset Filters
If you’re short on time, this is the fastest way to achieve a stunning result, especially for an AI pregnancy photoshoot editing free. Click the “Presets” option from the left sidebar, then select from filters optimized for AI maternity photos, AI pregnancy filter, or high-fashion editorial style maternity portraits. One-click maternity presets can be adjusted for intensity, contrast, and color balance.

Tips for Editing Different Types of Maternity Photography
Each maternity style requires a unique editing approach. Check the specific tips when editing different types of maternity photos:
- Studio Maternity Shoots: Emphasize clean lighting and detailed facial retouching. Great for using AI pregnancy filters.
- Outdoor Maternity Shoots: Focus on color balance and background blending.
- Boudoir Maternity Photography: Enhance skin texture, smooth lose skin after pregnancy, and accentuate curves delicately.
- Maternity and Newborn Sessions: Synchronize tones between baby and mom.
- High-Fashion Editorial Style: Use dramatic color grading, sharper shadows, and sculpted contours.
- Couple or Family Maternity Shots: Maintain balanced exposure and consistent tone across all subjects.
Evoto AI Photo Editor – Faster Edits, Finer Control
Conclusion
Maternity photoshoot editing is a delicate and detailed process, demanding attention to skin, body, and ambiance. With the help of AI-powered tools like Evoto AI, photographers can eliminate distractions like vein softening, stretch marks, and blotchy skin on face, while preserving the emotional depth of each shot.Ready to elevate your maternity portraits? Try Evoto’s pregnancy photo editor free and transform raw images into artistic keepsakes with ease.