Photo editing options have never been more versatile. Whether you’re fine-tuning travel photos, preparing wedding portraits, or adding artistic flair to everyday snapshots, the right editing style can completely change how an image feels.
From clean, realistic adjustments to bold, cinematic looks, photographers across every genre use editing to enhance their work. Wedding photographers turn to vintage and black-and-white for romance. Landscape shooters use HDR to balance light and shadow in tricky conditions. And lifestyle creators often go for pastel or airy tones to match a soft aesthetic.
With so many styles available, it’s easy to feel unsure about where to begin. In this guide, you’ll learn 10 popular photo editing styles and step-by-step tips for creating them, even if you’re new to editing.
What Are Photo Editing Styles?
A photo editing style is a specific way of adjusting colors, light, and details to give an image a certain mood. It’s not just about throwing a filter over your photo, it’s about making choices that change how the viewer feels.
For example, a bright and airy style uses more light and soft colors for a fresh look, while a dark and moody style uses deep shadows and muted colors for drama. The same photo can look completely different depending on the style you use.
Essential Tools for Applying Photo Editing Styles
You can use software like Evoto, Photoshop, or mobile apps to apply different styles. These tools allow adjustments to exposure, contrast, saturation, and tone curves. Even free apps can help you achieve a professional look with the right settings.
Learning basic adjustments is important before applying any style. Understanding how brightness, shadows, and color balance work gives you more creative control. Once you know the basics, you can apply any photo editing style with confidence.
Basic Settings You Should Understand
Even with the best tools, you need to understand the core settings:
- Exposure: Controls how bright or dark the whole image looks. Example: Increase exposure for a dark indoor photo.
- Contrast: Adjusts the difference between the light and dark parts of the photo. High contrast makes it bolder, low contrast makes it softer.
- Saturation: Changes how vivid the colors are. Increase it for vibrant colors, decrease it for a softer look.
- White Balance: Adjusts the warmth (yellow tones) or coolness (blue tones) of your image. Warm tones suit sunsets, cool tones suit snowy scenes.
Top 10 Photo Editing Styles and How to Achieve Them
1. HDR (High Dynamic Range)
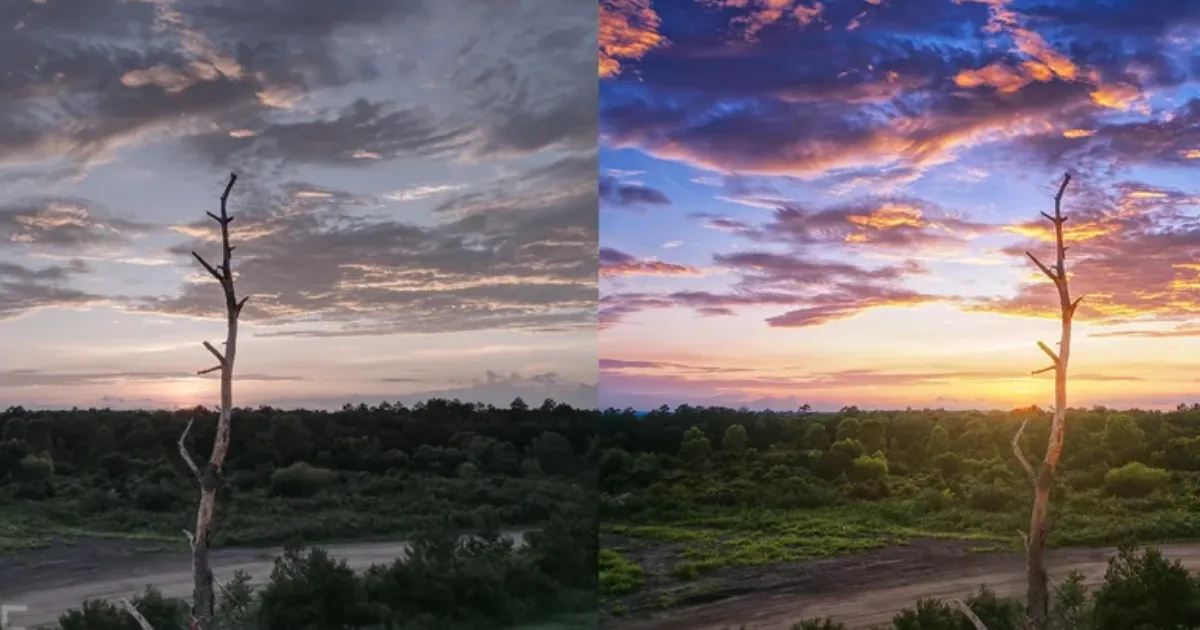
HDR helps reveal detail in both the lightest and darkest parts of a photo. Without it, skies can turn too bright or shadows can hide important features. It’s especially effective for landscapes, city views, and architecture where you want every part of the scene visible.
How to achieve it easily: Lower the brightness in overly light areas until the detail comes back, then gently brighten the darker spots so they’re not hidden. Add a touch of sharpness to bring out textures, but keep it subtle to avoid a harsh look.
2. Bright & Airy
Bright and airy editing creates a soft, clean look filled with light. It works beautifully for weddings, lifestyle photos, and home interiors where you want an open, welcoming feel. The style enhances natural light and gives the image a fresh, uplifting atmosphere.
How to achieve it easily: Brighten the overall image so it feels well-lit, soften any dark areas, and reduce strong contrast to keep shadows gentle. Slightly mute the colors to maintain a light, airy mood without overpowering the scene.
3. Dark & Moody
Dark and moody photos have deep shadows, muted colors, and a dramatic tone. Start by lowering the exposure slightly, then increase contrast to deepen dark areas. Reduce saturation a bit to keep colors subtle. Use the tone curve to lift shadows for a matte look. This works beautifully for food photography, portraits, and street scenes where mood and emotion are important.
How to achieve it easily: Lower the brightness slightly to make the image richer. Deepen the dark tones but avoid making them pure black. Reduce color intensity so the scene feels more subdued and emotional.
4. Vintage/Retro

Vintage editing gives photos the charm of an old film print. Colors are softer, tones are warmer, and the overall look feels timeless. It’s a favorite for street scenes, family portraits, and storytelling images that carry a sense of history and nostalgia.
How to achieve it easily: Fade the colors slightly so they look aged, add gentle warmth for a sun-kissed feel, and soften the edges for a film-like finish. Darkening the corners just a little can draw the eye toward the center and complete the retro effect.
5. Black & White

Black and white editing strips away color so the focus shifts to texture, shape, and light. It works best when the original image already has clear highlights and shadows. This style is often used for portraits, architecture, and documentary shots to create a timeless, dramatic effect.
How to achieve it easily: Change the image to shades of gray, then brighten the lighter areas and deepen the shadows to add depth. Sharpen just enough to make patterns and textures stand out without making the image look harsh.
6. Cinematic (Teal and Orange)
This cinematic style uses cool teal tones in the shadows and warm orange in the highlights, creating a striking contrast that makes subjects stand out. It’s a favorite for travel portraits, urban photography, and storytelling images that need a bold, dramatic edge.
How to achieve it easily: Add warmth to the lighter areas so they gently glow, then give the shadows a soft blue tone for balance. Increase the contrast just enough to make the separation between light and dark more eye-catching without losing detail.
7. Matte Effect

The matte effect softens dark tones and adds a gentle, faded finish. It’s often seen in fashion photography and social media feeds for its calm, stylish feel. This approach creates a relaxed mood while keeping the overall image elegant and modern.
How to achieve it easily: Lighten the darkest areas so they appear softer rather than pure black. Reduce sharpness slightly for a smooth, subtle look, and keep brightness balanced so the photo doesn’t appear flat or washed out.
8. High Contrast

High contrast editing makes colors bold and shapes more defined. Increase the contrast slider, then adjust whites and blacks for balance. Use clarity to make details sharper, but don’t overdo it to avoid harshness. This style works best in sports, street, and action shots where you want a strong visual impact.
How to achieve it easily: Darken the shadows and brighten the light areas until the difference between them is clear. Keep the details in both areas visible by making adjustments slowly instead of all at once.
9. Minimalist/White Background
Minimalist editing removes distractions and keeps the focus on the main subject. Brighten the background using the exposure or selective adjustment tool, then reduce saturation in non-essential areas. Keep colors clean and simple. Perfect for product photography, flat lays, and marketing images where clarity is key.
How to achieve it easily: Brighten the background to make it cleaner and less noticeable. Tone down any colors that take attention away from the subject. Keep the focus sharp on the main element in the photo.
10. Pastel/Soft Tone
Pastel tones create a dreamy, gentle atmosphere. Lower saturation so colors are muted, raise exposure slightly, and reduce contrast for softness. Adjust temperature based on the mood warmer for cozy shots, cooler for calm images. This style works beautifully for baby portraits, florals, and romantic outdoor scenes.
How to achieve it easily: Lighten the photo slightly and reduce the strength of colors so they look soft. Lower contrast to keep everything smooth, then adjust the temperature depending on whether you want a warm or cool atmosphere.
Tips for Maintaining a Consistent Editing Style
- Save your favorite settings as presets so you can use them again.
- Keep a folder of reference photos for inspiration.
- Edit in similar lighting conditions for a uniform look.
Common Mistakes to Avoid When Applying Photo Editing Styles
- Over-editing and losing natural detail.
- Applying one preset to every photo without adjusting.
- Ignoring original lighting can ruin the final result.
The Easiest Way to Master Any Editing Style
If you want to bring these editing styles to life without spending hours in complicated software, Evoto is your all-in-one solution.
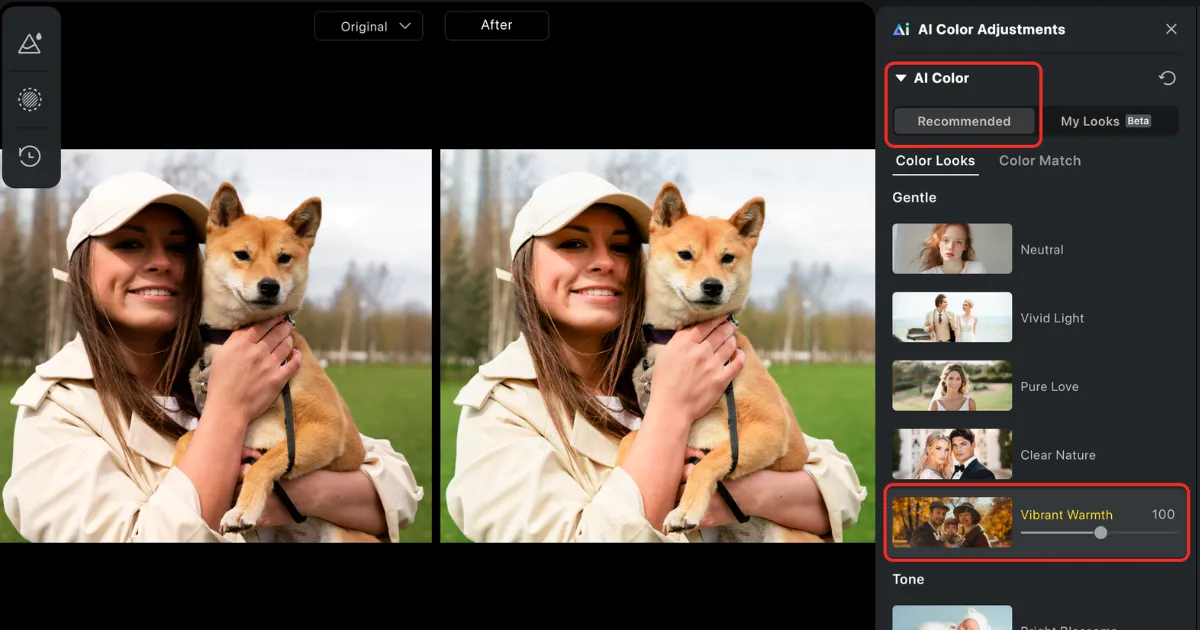
Its flexible color adjustment sliders give you total control over tones, lighting, and hues so you can perfect every shot.
With built-in presets or AI Color Match, you can instantly recreate any style — from cinematic teal & orange to soft pastels — with professional accuracy.
For portraits, Evoto’s natural yet powerful retouching tools smooth skin, enhance eyes, and balance features while keeping every detail realistic.
And because it’s a complete editing suite in one platform, you can shoot tethered, edit, and batch-process entire sets without ever breaking your creative flow.
Whether you’re new to editing or a seasoned pro, Evoto makes achieving the perfect look faster, easier, and more inspiring than ever.
Final Thoughts
Mastering different photo editing styles takes practice, but it’s also a lot of fun. Each style has its own personality and can completely change how a photo feels. Start with small adjustments, see what works best for your images, and don’t be afraid to experiment.
Over time, you’ll develop a style that feels like your own and makes your work instantly recognizable.


