Have you ever snapped a picture that captured a joyful moment, only to find your smile looking a little less than dazzling? Sometimes, even the brightest smiles can appear a bit dull in photos due to factors like lighting or camera settings. Don’t let a less-than-pearly white smile hold your photos back.
This blog is your guide to achieving a brighter, more confident smile in all your pictures. We’ll explore both online and offline photo editors that offer teeth whitening in pictures, making it easy to add a natural-looking sparkle to your grin. We’ll even touch upon the classic method of teeth whitening in Photoshop, a powerful tool for those with advanced editing skills.

[Offline] How to Teeth Whitening in Pictures
Now that you’re armed with the knowledge of when teeth whitening in pictures comes in handy. This section explores various offline photo editors, both for PC and mobile, that can help you achieve a brighter smile in your photos.
1. Teeth Whitening in Pictures on PC (Win & Mac)
Method 1 – Teeth Whitening in Pictures with Evoto AI
Evoto AI goes beyond basic teeth whitening in pictures. It offers a comprehensive suite of teeth touch-up features designed to bring a natural sparkle to your smile. Here’s what sets Evoto AI apart:
- Teeth Whitening: Evoto AI provides precise control over teeth color, allowing you to achieve the desired level of brightness without looking artificial.
- Advanced Features: Explore options like “teeth brightness,” “teeth desaturation,” and even a “pretty teeth in one click” feature for a quick and natural-looking enhancement.
- User-Friendly Interface: Evoto AI boasts a user-friendly interface, making it easy for beginners and professionals alike to achieve stunning results.
Using Evoto AI for Whiter Teeth
Step 1: Download and install Evoto AI to PC.
Step 2: Upload the photo that needs teeth whitening in pictures.
Step 3: Navigate to Portrait Retouching > Teeth Touch-up.
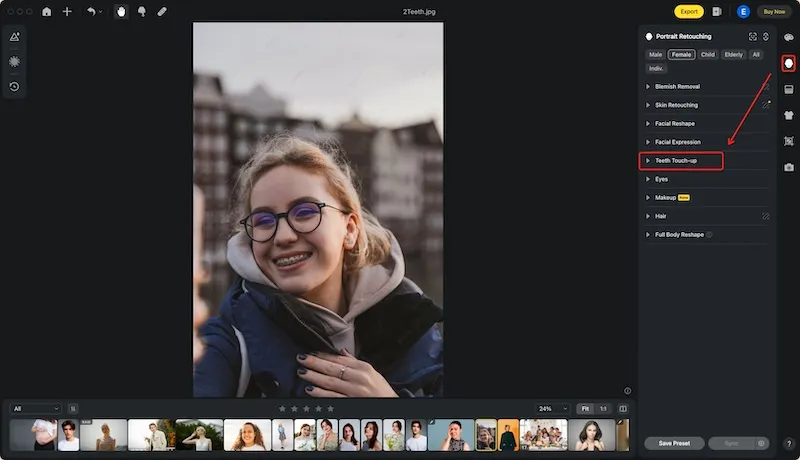
Step 4: Switch on the Pretty Teeth button, then toggle the slider under teeth whitening, brightness, and teeth desaturation, to make your smile harmonious.
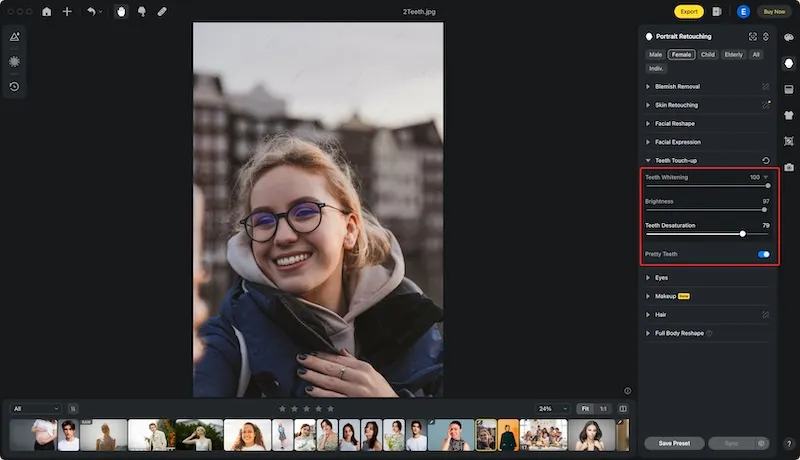
Step 5: Once satisfied with your edits, export the photo to save your work.
Now, it’s you turn to try this photo editor for teeth whitening in pictures:
Evoto – The Most Efficient AI Photo Editor
Method 2 – Teeth Whitening in Photoshop (for Advanced Users)
While Evoto AI offers a user-friendly approach, some users might prefer the granular control provided by professional editing software like Photoshop. However, it’s important to note that Photoshop requires familiarity with its tools and functionalities. Here’s a breakdown of the teeth whitening process in Photoshop.
Photoshop allows for precise adjustments to your smile. Here’s how you can achieve whiter teeth:
Steps to Whiten Teeth in Photoshop
Step 1: Create an Adjustment Layer
Begin by creating a new adjustment layer. This ensures your edits are non-destructive and easily adjustable. Locate the “Layers” panel and click the “Create new adjustment layer” icon. Choose “Hue/Saturation” from the dropdown menu.
Step 2: Select the Teeth
Now, it’s time to isolate the teeth. Grab the Lasso tool from the toolbox (it resembles a looped rope). Carefully create a selection around the teeth you want to whiten. It’s okay if you accidentally capture a bit of the lips or gums; we’ll refine the selection later.
Step 3: Hue/Saturation Adjustment
With the teeth selected, navigate to the “Properties” panel associated with your newly created Hue/Saturation adjustment layer. Within the “Properties” panel, locate the dropdown menu labeled “Master” and change it to “Yellows.” This ensures we’re only targeting the yellow tones in the teeth, which contribute to their appearance of color.
Step 4: Whiten Those Teeth
Now comes the magic! In the “Properties” panel, locate the “Saturation” slider. By dragging this slider to the left, you’ll decrease the yellow tones in the selected area, effectively whitening the teeth. Move the slider cautiously until you achieve the desired level of brightness.
Step 5: Refine the Selection (Optional)
If your initial selection included some unwanted areas like lips or gums, you can refine it now. Within the “Properties” panel, locate the section labeled “Masks” and click on it. Here, you can adjust the “Feather” slider to soften the edges of your selection, creating a more natural look.
Step 6: Save Your Smile
Once you’re happy with your pearly whites, go to “File” and then “Save As” to save your edited photo with a brighter smile!
While Photoshop offers powerful teeth-whitening capabilities, it requires more editing expertise. In the next section, we’ll explore online photo editors that provide a convenient, web-based solution for achieving a brighter smile in your photos.
Read More:
- AI Braces Remover: Remove Braces with AI Photo Editor
- Add Smile to Photo in Seconds with AI
- How to Fix a Crooked Mouth/ Crooked Smile and Sideways Mouth with Evoto AI
2. Teeth Whitening in Pictures on Mobile (Android & iOS)
For quick and convenient teeth whitening on the go, mobile apps like YouCam Makeup offer a user-friendly solution. Here’s how YouCam Makeup helps you achieve a brighter smile in just a few taps:
YouCam Makeup utilizes AI technology to provide efficient teeth whitening capabilities. Here’s a simplified breakdown of the process:
Steps to Whiten Teeth with YouCam Makeup
Step 1: Download YouCam Makeup
Head over to the App Store (iOS) or Google Play Store (Android) and download the YouCam Makeup app.
Step 2: Access Teeth Whitening
Launch YouCam Makeup and select the “Photo Makeup” option. Within the “Photo Makeup” menu, locate and choose “Teeth Whitener.”
Step 3: Effortless Smile Brightening
YouCam Makeup provides a convenient slider that allows you to easily adjust the level of teeth whitening. Simply move the slider to the desired level for a brighter smile.
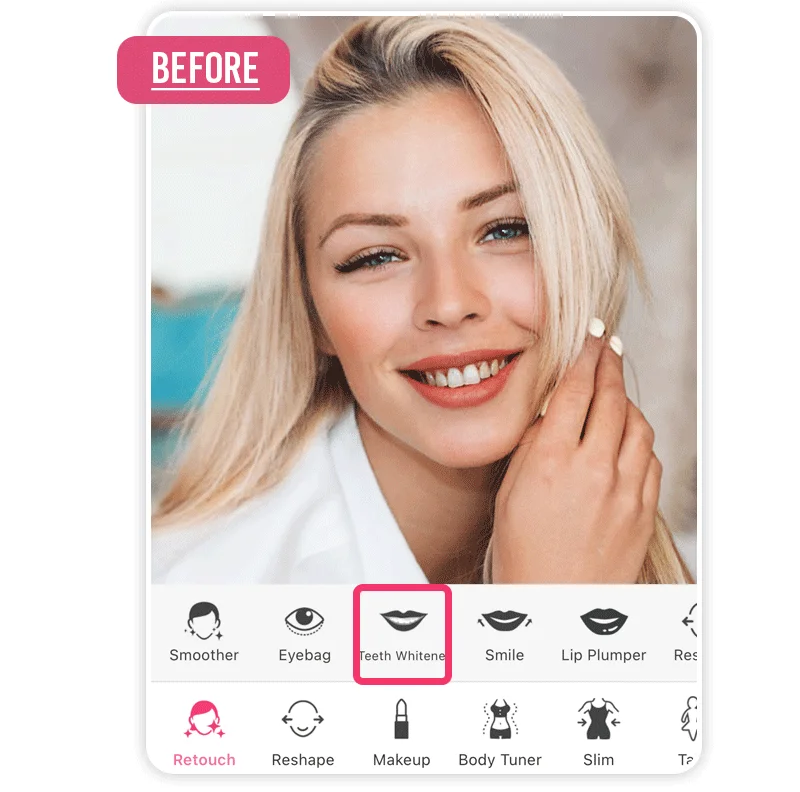
Step 4: Save Your Masterpiece
Once you’re happy with your enhanced smile, save the photo with your edits to preserve your pearly whites.
While YouCam Makeup offers a convenient on-the-go solution, Evoto AI remains the standout choice for comprehensive smile enhancement. Evoto AI goes beyond basic teeth whitening, providing a suite of features specifically designed to create a natural-looking, radiant smile. From adjusting teeth brightness and color to refining the overall shape, Evoto AI empowers you to achieve a picture-perfect smile in just a few clicks, regardless of your editing expertise.
In the next part, we’ll delve into the world of online photo editors, exploring convenient web-based solutions for achieving a brighter smile in your photos.
[Online] How to Teeth Whitening in Pictures
Now that we’ve explored offline options for achieving a brighter smile in your photos, these web-based solutions offer a convenient way to whiten your teeth without downloading any software.
Method 1: Teeth Whitening in Pictures Online – Fotor
Fotor is a user-friendly online photo editor that boasts a powerful teeth whitening tool. Here’s how to use Fotor to achieve a radiant smile:
Steps to Whiten Teeth with Fotor
Step 1: Head to Fotor
Visit Fotor’s website and locate the “Teeth Whitening” feature. You might see a button labeled “Start Whitening Teeth Now” that will take you directly to the editing page.
Step 2: Upload Your Photo
Click on “Open Image” or drag and drop your photo into the designated upload area.
Step 3: Access Beauty Tools
Once your photo is uploaded, locate the “Beauty” section within Fotor’s editing tools.
Step 4: Whiten Your Smile
Within the “Beauty” section, find the specific tool labeled “Teeth Whitening.”
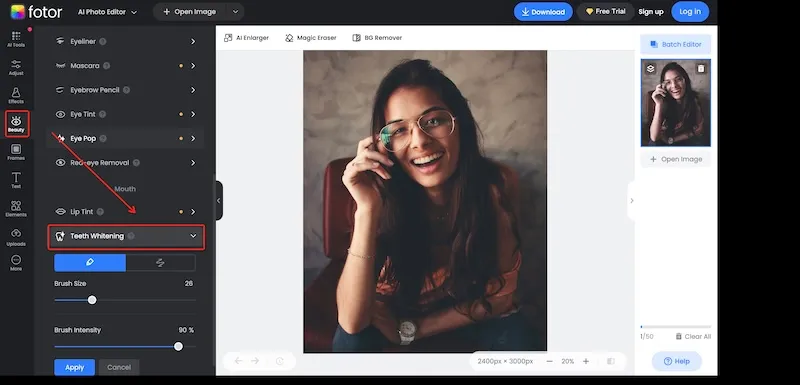
Step 5: Precise Brushing
Fotor provides a brush tool that allows you to target specific areas of your teeth for whitening. Simply hold down the mouse and drag the brush across the teeth to remove stains and achieve a whiter appearance.
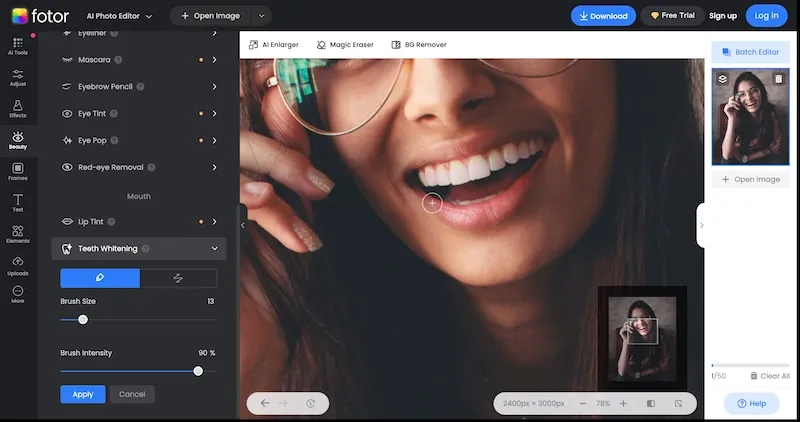
Step 6: Customization Options
Fotor offers additional control by allowing you to adjust the brush size and intensity for a more natural-looking edit. Refine these settings to achieve your desired level of whitening.
Step 7: Save Your Masterpiece
Once you’re happy with your enhanced smile, click the “Download” button to save the photo with your whiter teeth.
Method 2: Teeth Whitening in Pictures Online – BeFunky
BeFunky is another popular online photo editor offering teeth whitening capabilities. Here’s a simplified guide to achieving a brighter smile with BeFunky:
Steps to Whiten Teeth with BeFunky
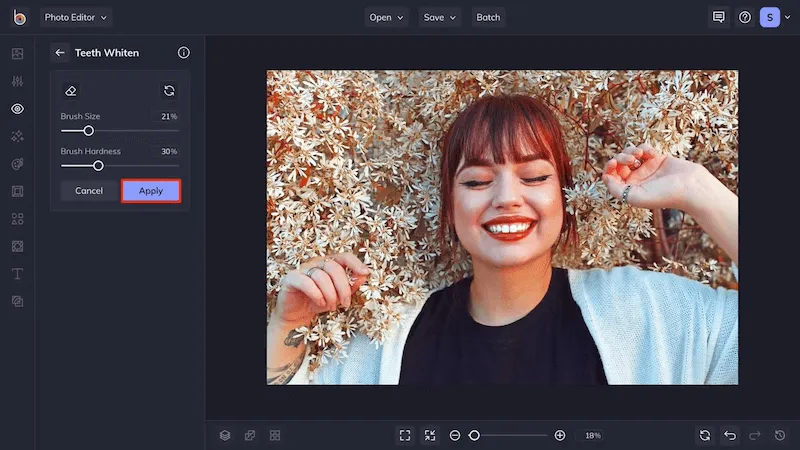
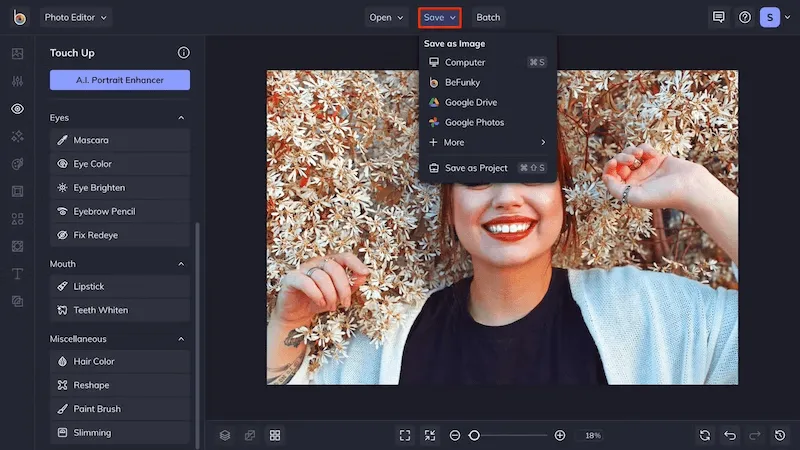
Step 1: Locate Teeth Whiten
Launch BeFunky and navigate to the “Teeth Whiten” feature. This might be located within the “Touch-Up” or “Beauty” section of the editing tools.
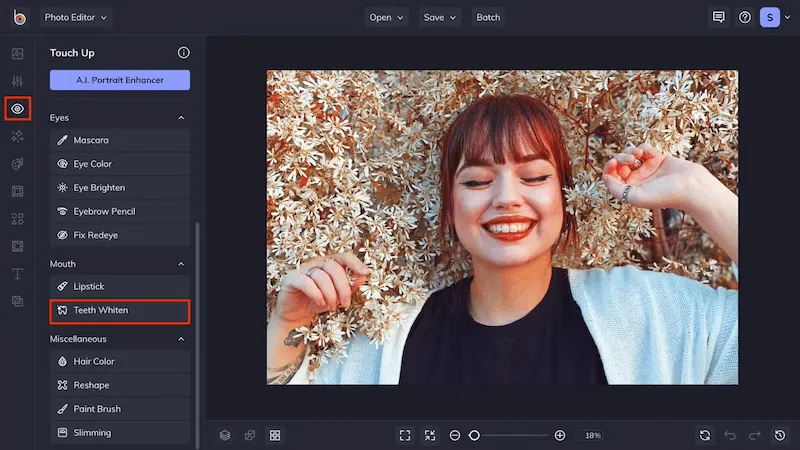
Step 2: Brush Customization (Optional)
While BeFunky offers teeth whitening functionality, it might not provide the same level of brush size and intensity adjustments as Fotor. However, you can still achieve a noticeable improvement in your smile.
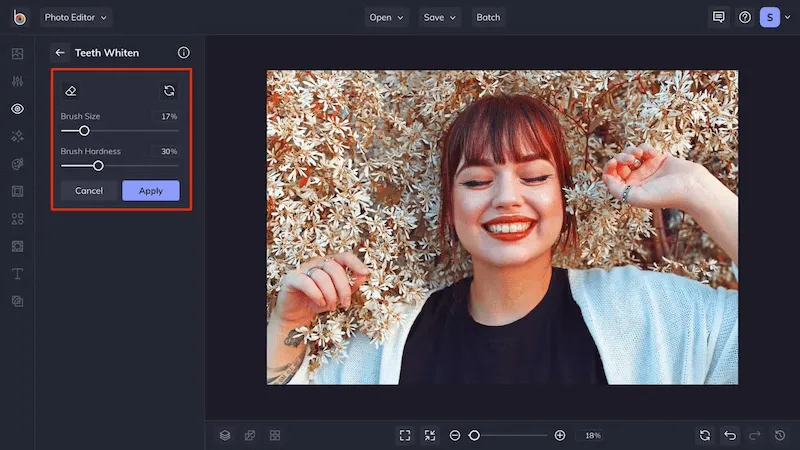
Step 3: Apply the Changes
Use the provided teeth whitening tool to brush over your teeth in the photo. BeFunky will automatically apply the whitening effect.
Step 4: Save and Enjoy
Once you’re satisfied with your brighter smile, save the edited photo using BeFunky’s download options.
While both Fotor and BeFunky offer convenient online solutions, they might not provide the same level of detail and customization as dedicated offline software like Evoto AI.
For those seeking a comprehensive smile makeover, Evoto AI remains the superior choice. Evoto AI goes beyond basic whitening, offering features like adjusting teeth brightness, and saturation, and even refining the overall shape of your smile for a truly natural and radiant look. In the final section, we’ll explore some helpful tips and tricks to ensure your teeth whitening edits always appear natural.
Conclusion
Want to banish dullness and reveal a dazzling smile in your photos? This blog has empowered you with various teeth whitening in pictures solutions! Explore user-friendly offline editors like Evoto AI photo editor for teeth whitening, which provides a suite of smile-enhancing features beyond just whitening. For on-the-go editing, mobile apps like YouCam Makeup offer convenient options. We also delved into online editors like Fotor and BeFunky, perfect for quick web-based touch-ups.
Remember, Evoto AI stands out for its ability to create a natural-looking, radiant smile in just a few clicks. So, choose your weapon and unleash your pearly whites in every photo.


