Introduction to Batch Editing RAW Files in Photoshop
Batch editing in Photoshop is a powerful technique that allows photographers to apply the same adjustments to multiple images simultaneously. This process is especially useful when working with RAW files, as it ensures that all images in a photo set maintain a consistent look and feel. Achieving color consistency is crucial for creating a cohesive collection of photos, whether for a professional portfolio, a marketing campaign, or personal projects.
One of the primary benefits of batch editing is the significant time savings it offers. Instead of adjusting each image individually, photographers can make changes to one image and then apply those settings across an entire batch. This is particularly advantageous when dealing with large volumes of photos, such as those from a wedding or a photoshoot.
However, color matching in Photoshop can be challenging, especially for colorblind users. Ensuring that colors are balanced and consistent across multiple images requires a keen eye and attention to detail. For colorblind photographers, this task can be even more daunting, as distinguishing between certain hues may be difficult.
In the following sections, we’ll explore various techniques and tools in Photoshop to help overcome these challenges and achieve perfect color harmony in your photo sets.
Preparing Your RAW Files for Batch Editing
When it comes to batch editing RAW files in Photoshop, the first crucial step is to properly prepare your files. Ensuring that your RAW files are well-organized and ready for batch processing not only saves time but also enhances the accuracy of color adjustments across a large number of images.
1. Import and Organize RAW Files
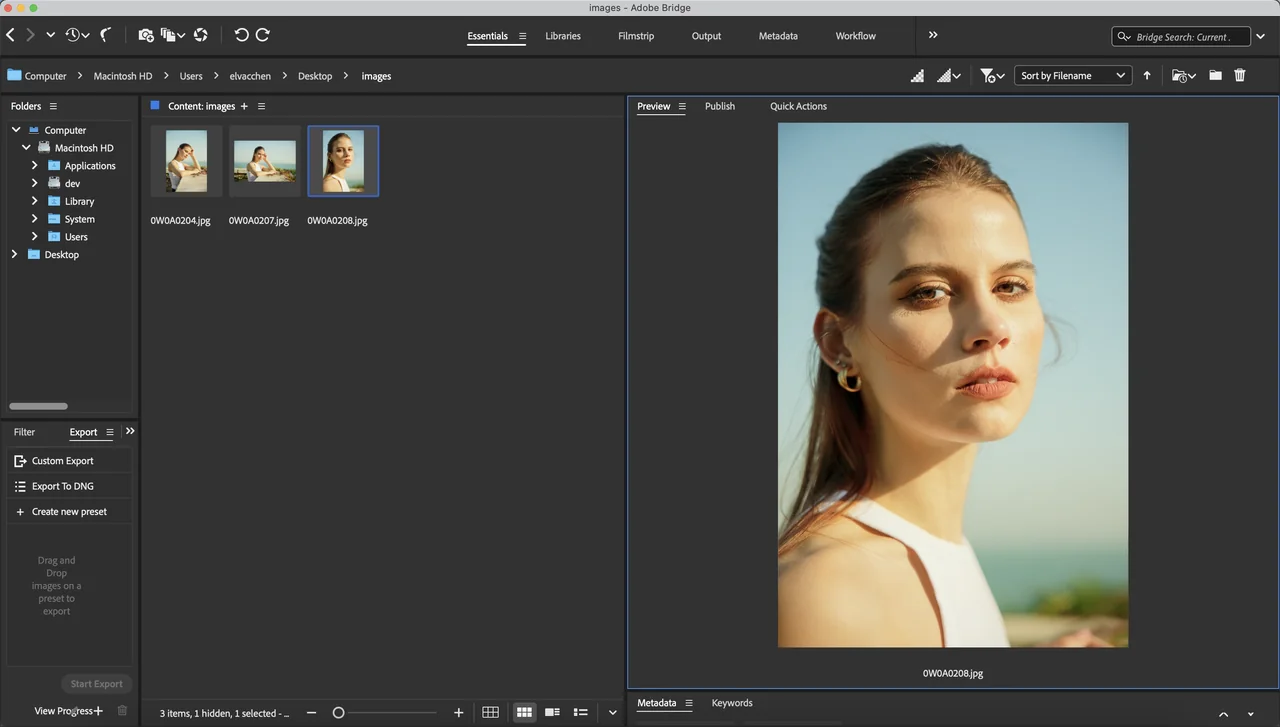
The first thing you’ll want to do is import your RAW files into Photoshop. Open Photoshop and go to File > Open, then select your RAW files. For larger batches, using Adobe Bridge or Lightroom can help streamline this process, allowing you to view and sort images before opening them in Photoshop.
2. Apply Basic Adjustments and Synchronize Across Images
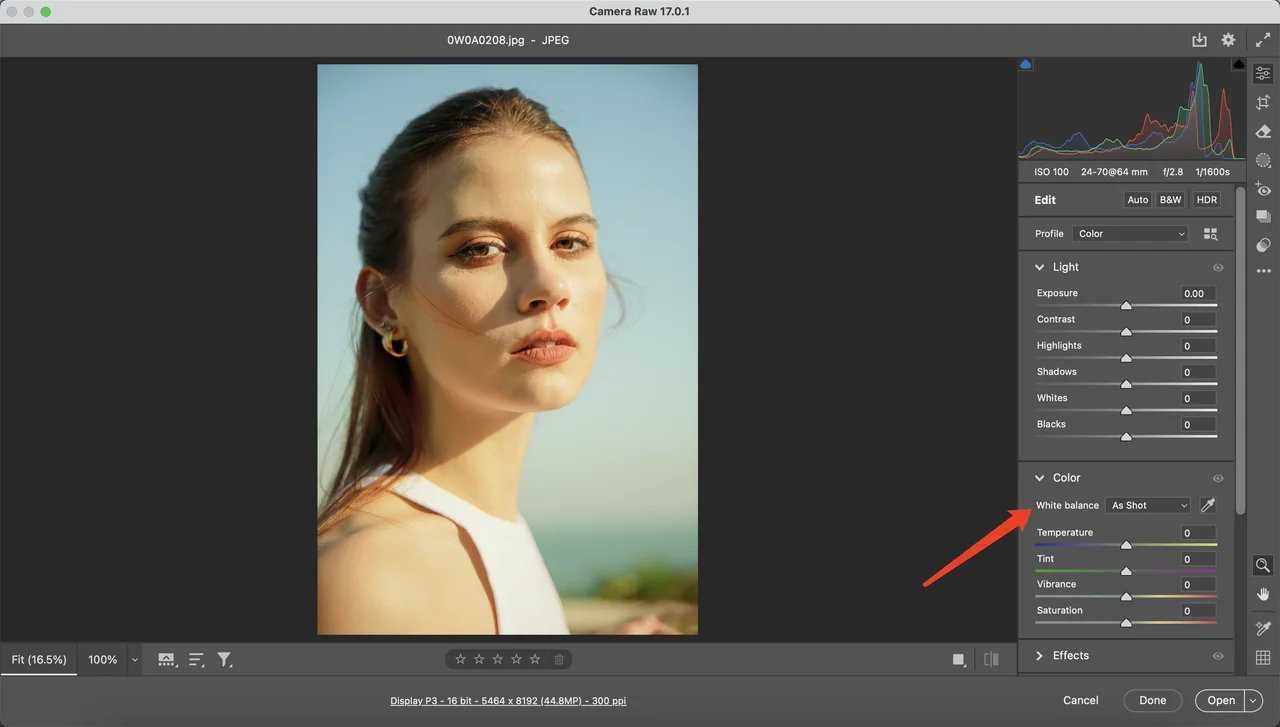
After opening the first RAW file in Adobe Camera Raw, begin by applying basic adjustments like exposure, contrast, and white balance.
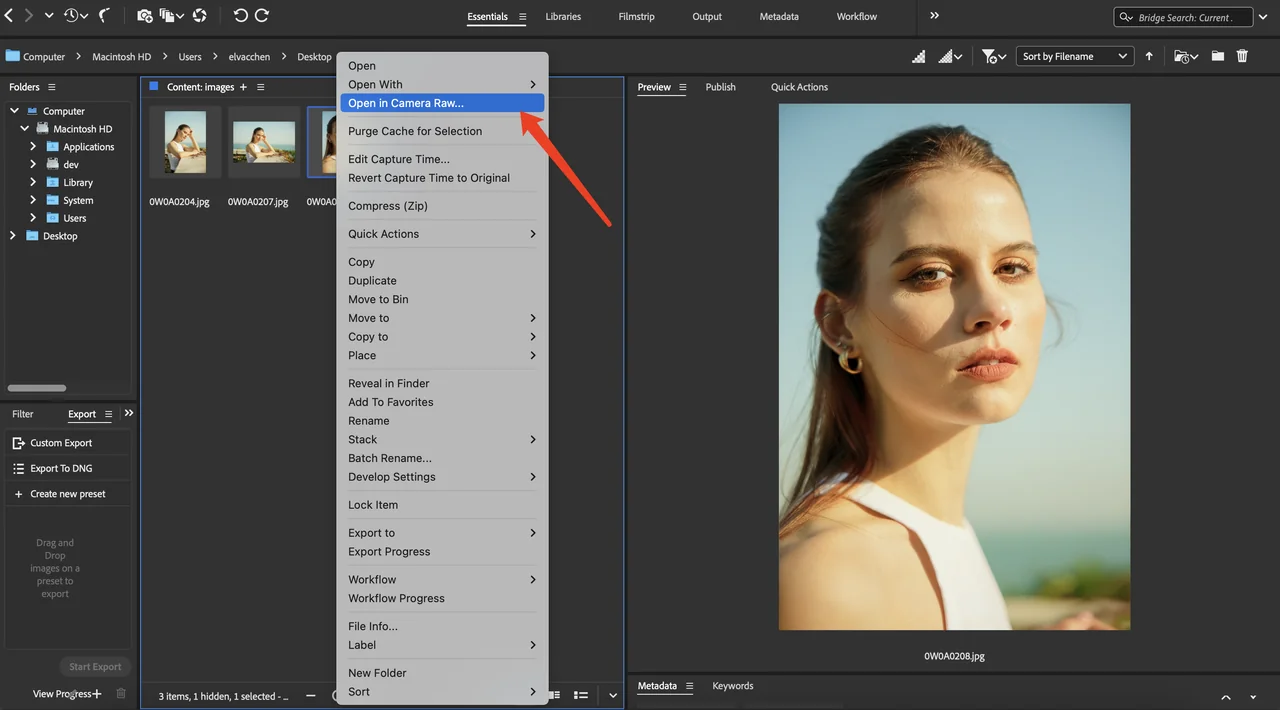
Let’s take white balance as an example:
By clicking the white balance and try to find the perfect medium
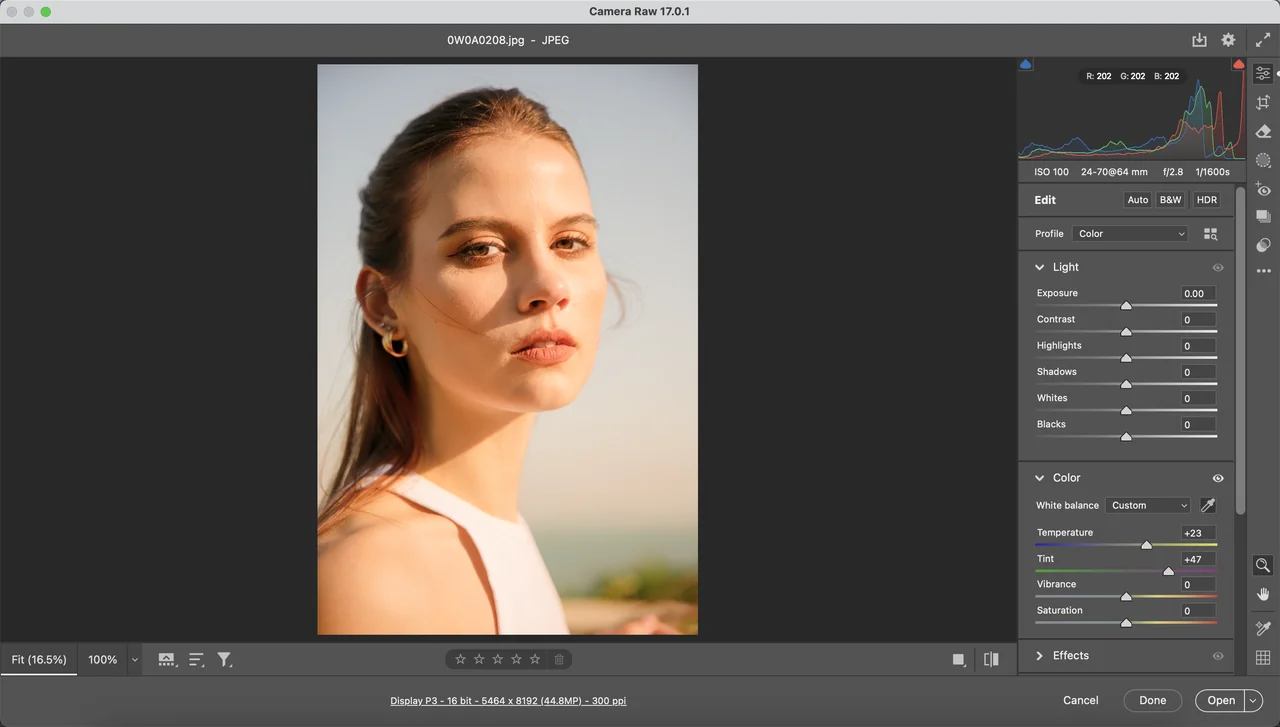
This serves as your template for the entire batch. Once you’re satisfied with the adjustments on one image, synchronize those settings across all other images in the batch.
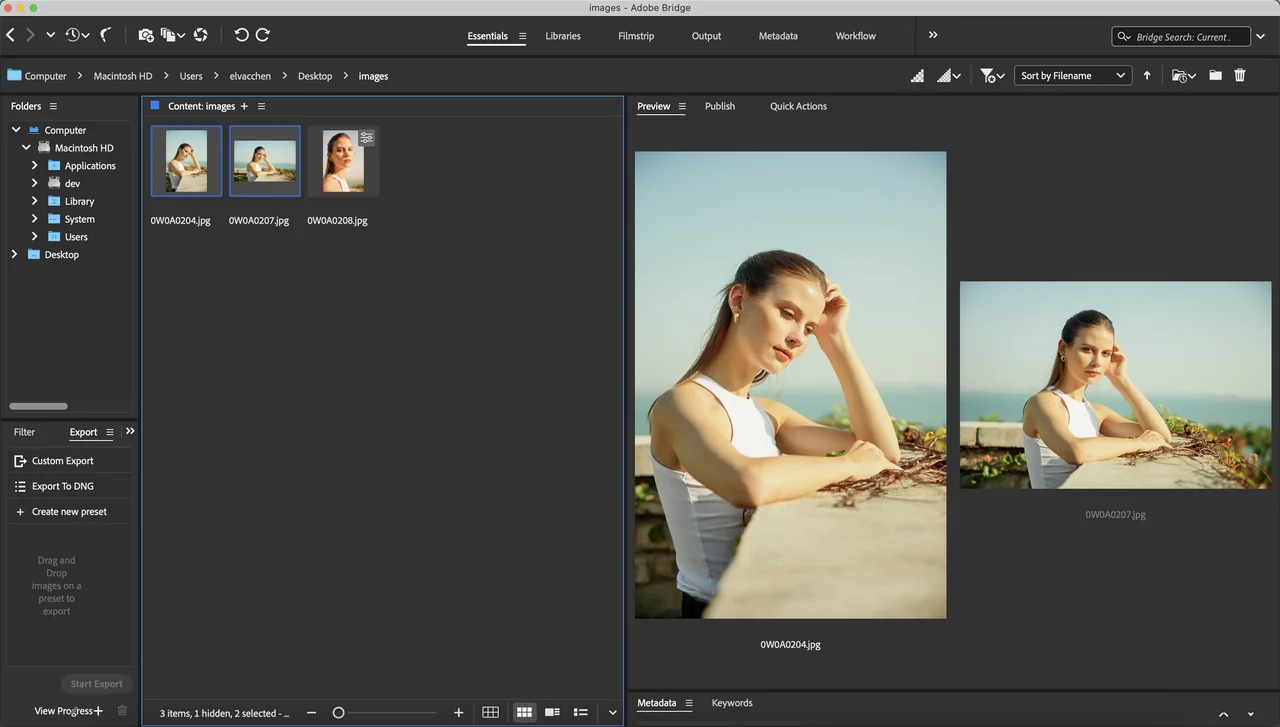
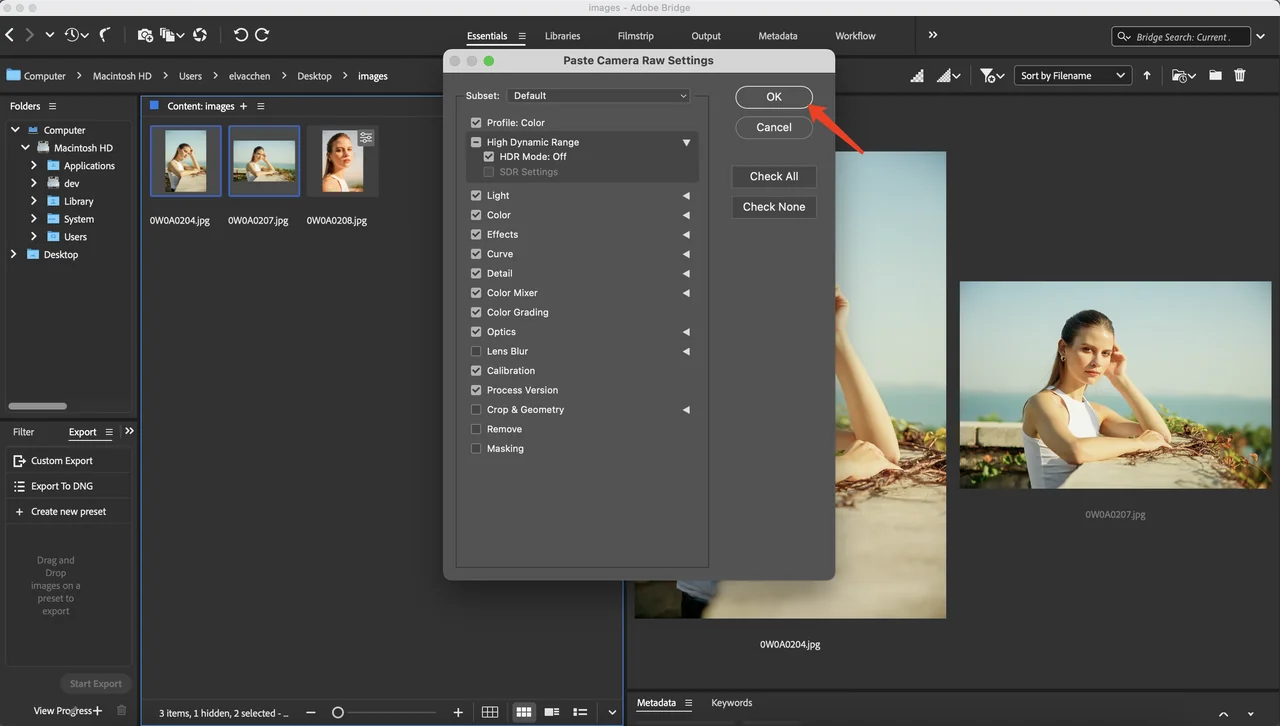
In Adobe Camera Raw, you can do this by selecting multiple images and clicking on the “Sync” button, or by the keyboard shortcut “Option+Cmd+C” copy the effect from the photo you just edited, select all the images you want to sync, and use shortcut “Option+Cmd+V” to paste and sync the effect.
This ensures that all the images share the same basic settings, which is essential for maintaining consistency throughout the batch.
Using Auto Color Correction in Photoshop
Auto color correction in Photoshop is a powerful feature in Photoshop that can significantly streamline your workflow, especially when working with multiple images. By automatically adjusting color balance across a set of images, this tool ensures a consistent look, saving you time and effort in post-production to achieve a better color balance.
1. Understanding Auto Color Correction and Its Benefits
The auto color correction tool in Photoshop is designed to enhance your images by correcting color casts and improving overall tonal balance. By using the Curves adjustment layer, Photoshop applies a set of automatic adjustments based on the image’s characteristics. This tool is especially beneficial when you need to process a large number of images and want to maintain a uniform color palette across them.
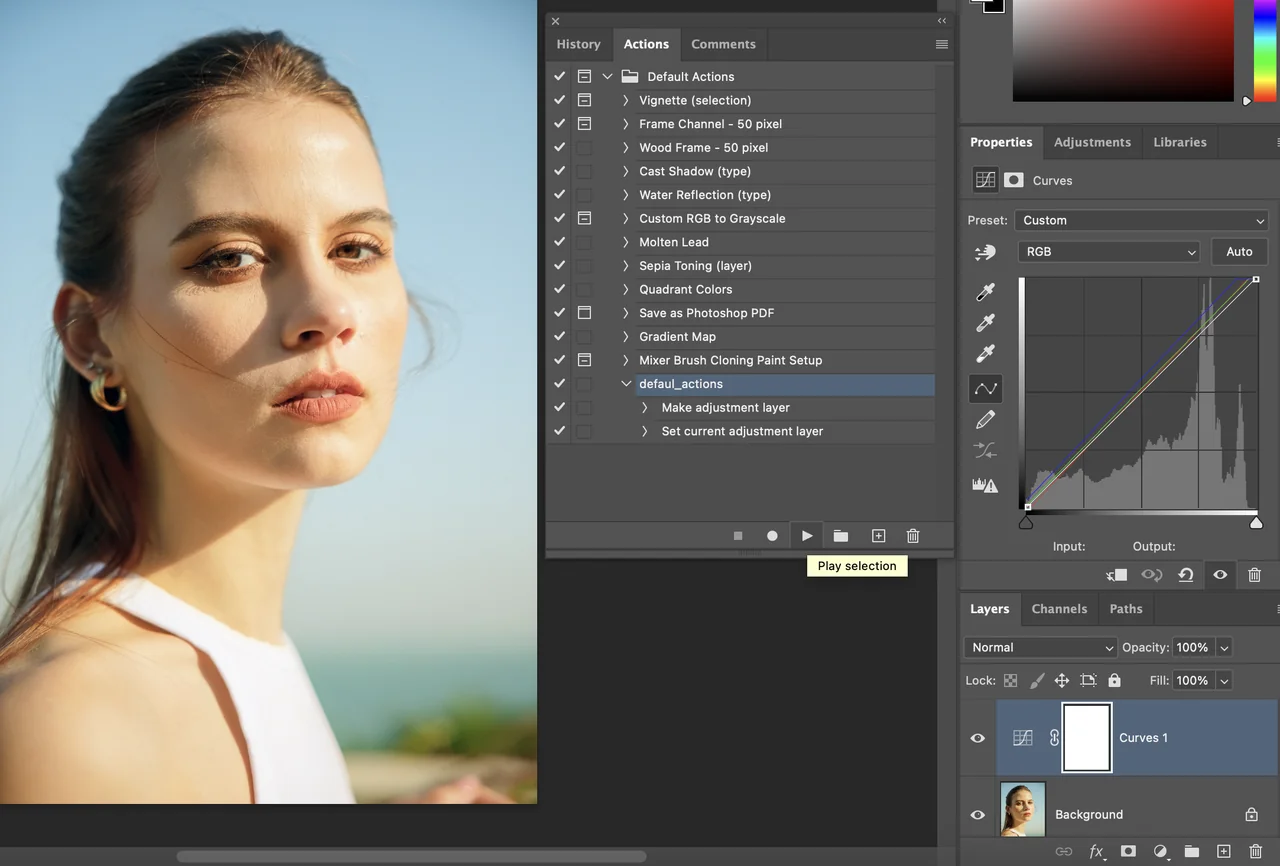
Click the “Create New Fill” or “Adjustment Layer”, select “Curve”:
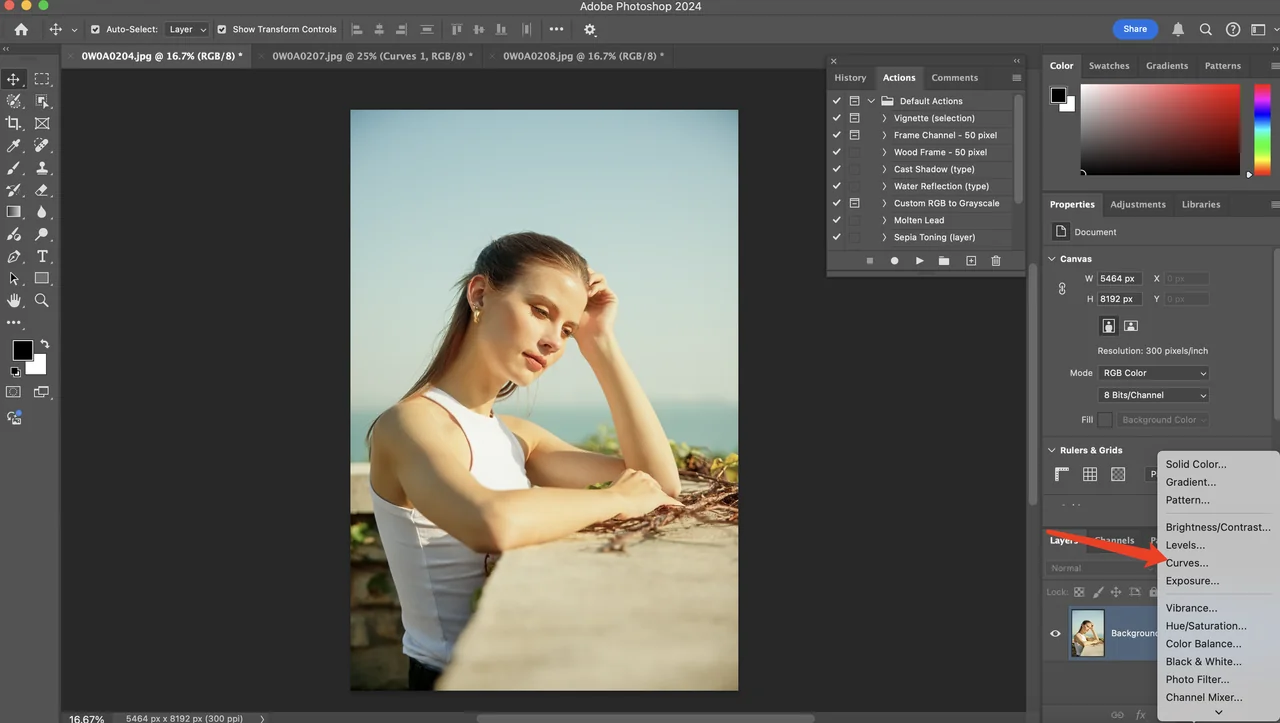
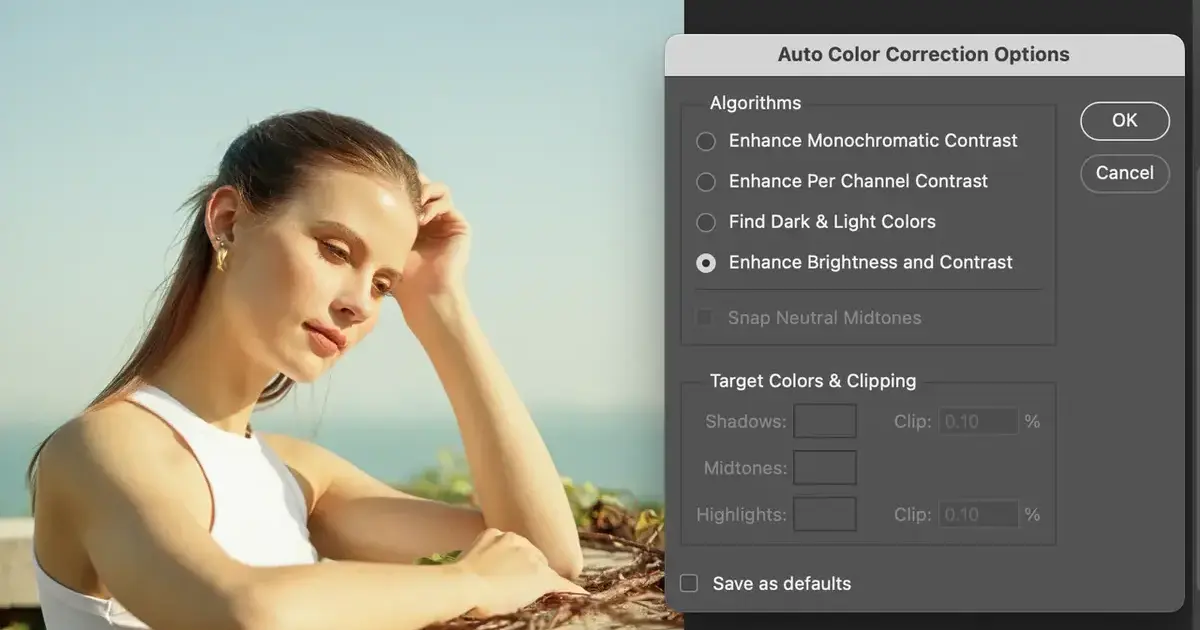
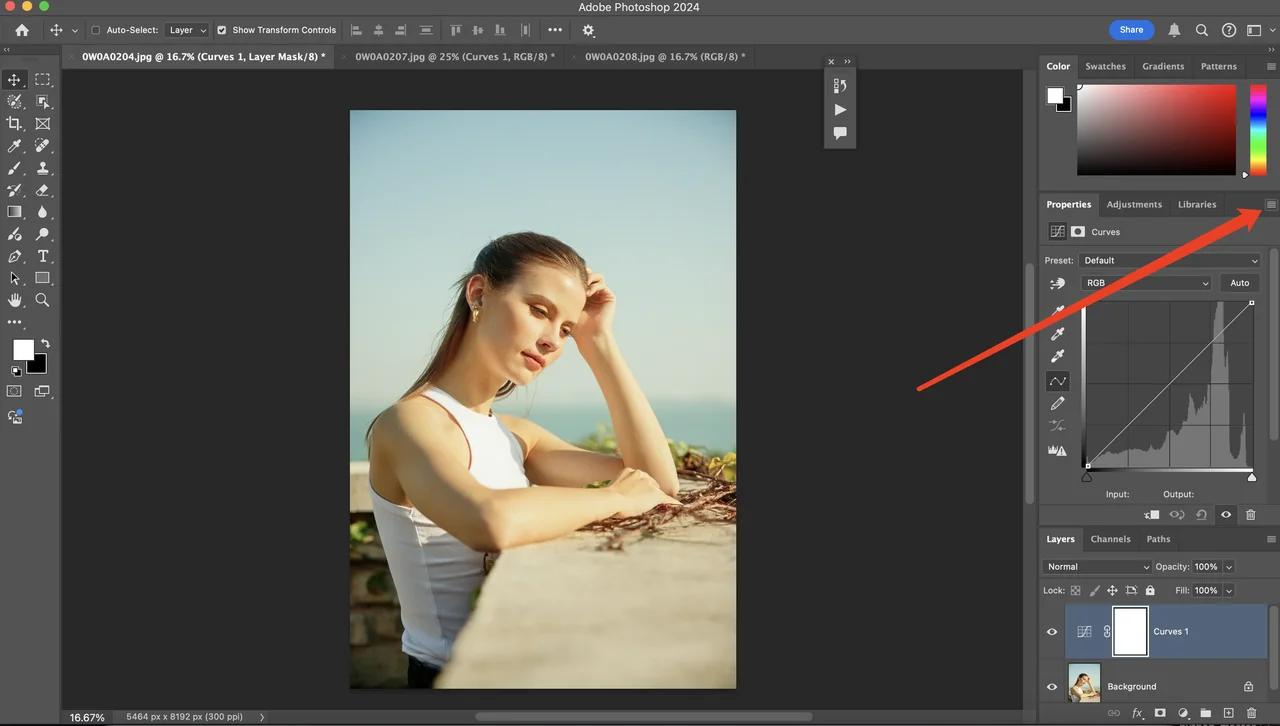
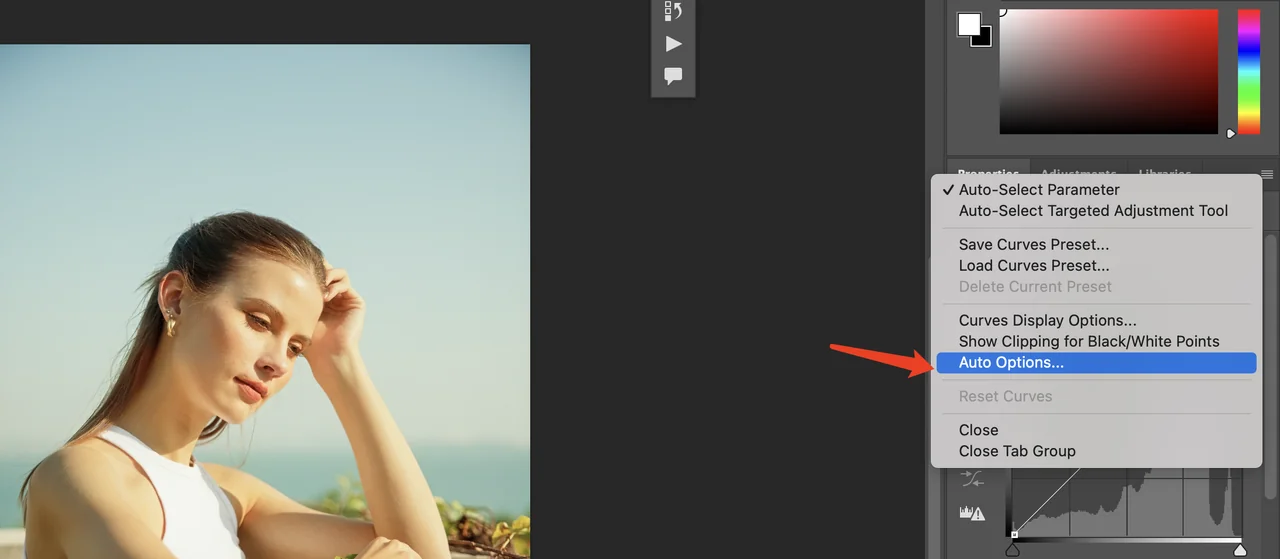
Click on the “Auto” button for the automatic correction, or select the “Auto Color Correction Options” for:
- Enhance Monochromatic Contrast
- Enhance Per Channel Contrast
- Find Dark&Light Colors
- Enhance Brightness and contrast
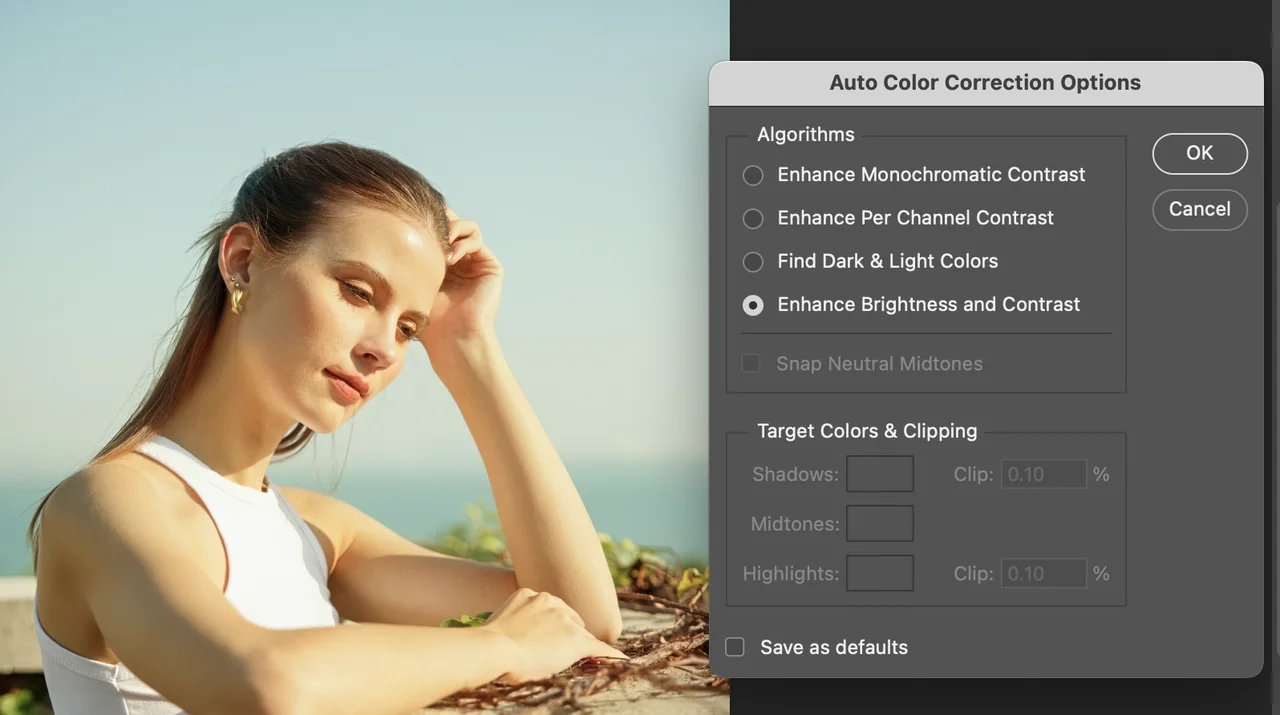
2. Use Auto Color Correction for Batch Editing
Using the auto color correction feature in Photoshop is easy and can be applied in batch editing workflows to save time and ensure consistency across multiple images. Here’s a step-by-step guide on how to use this tool:
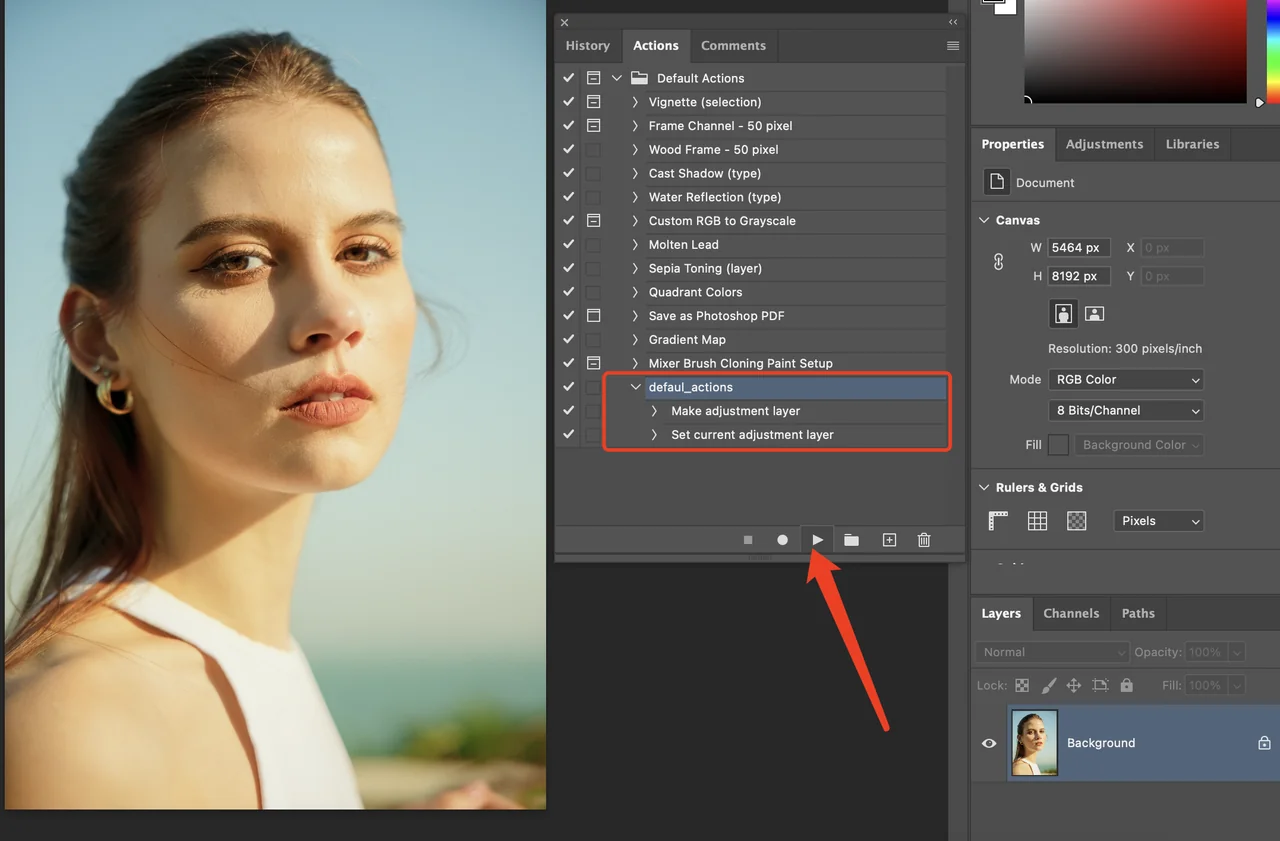
- Create New Action: Create new action and name it as what you want; click on “Record” to start recording the moves to the new action
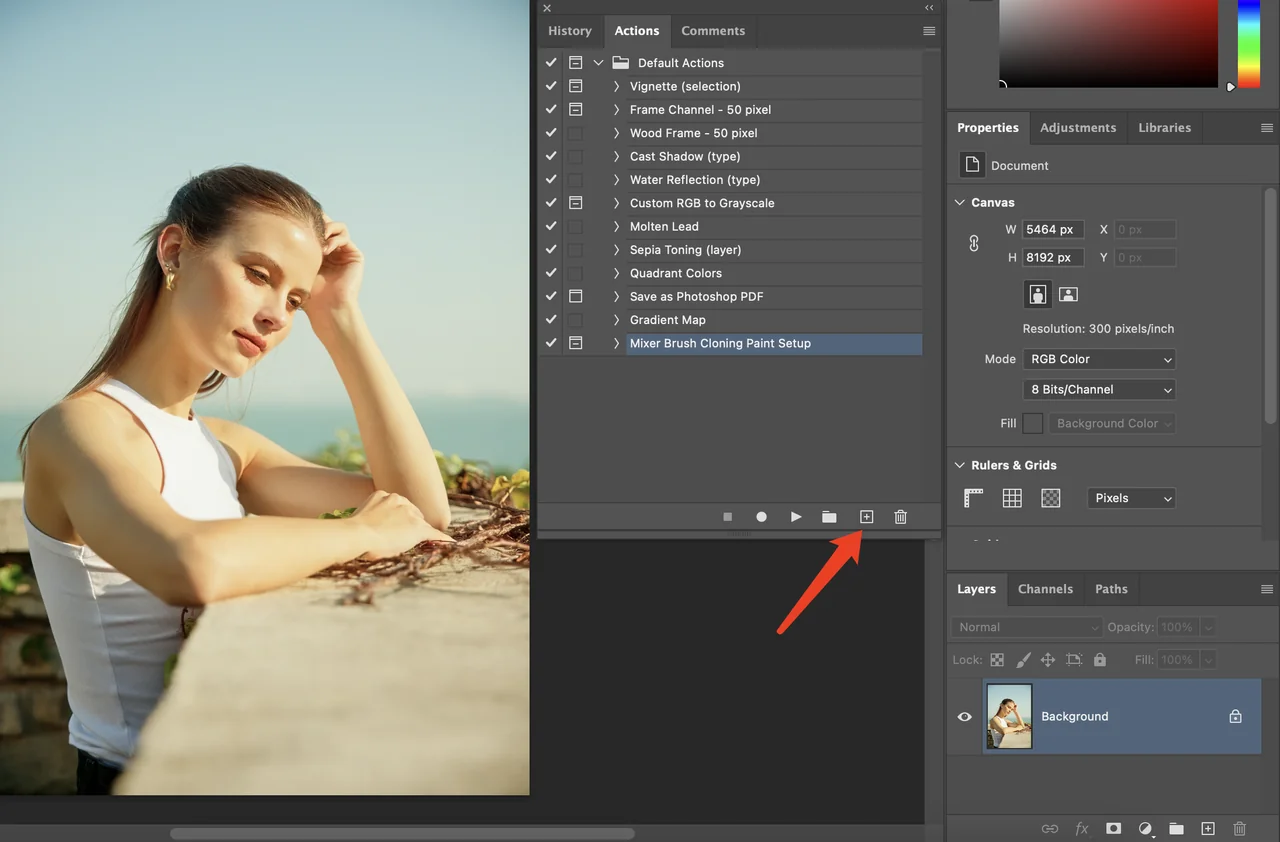
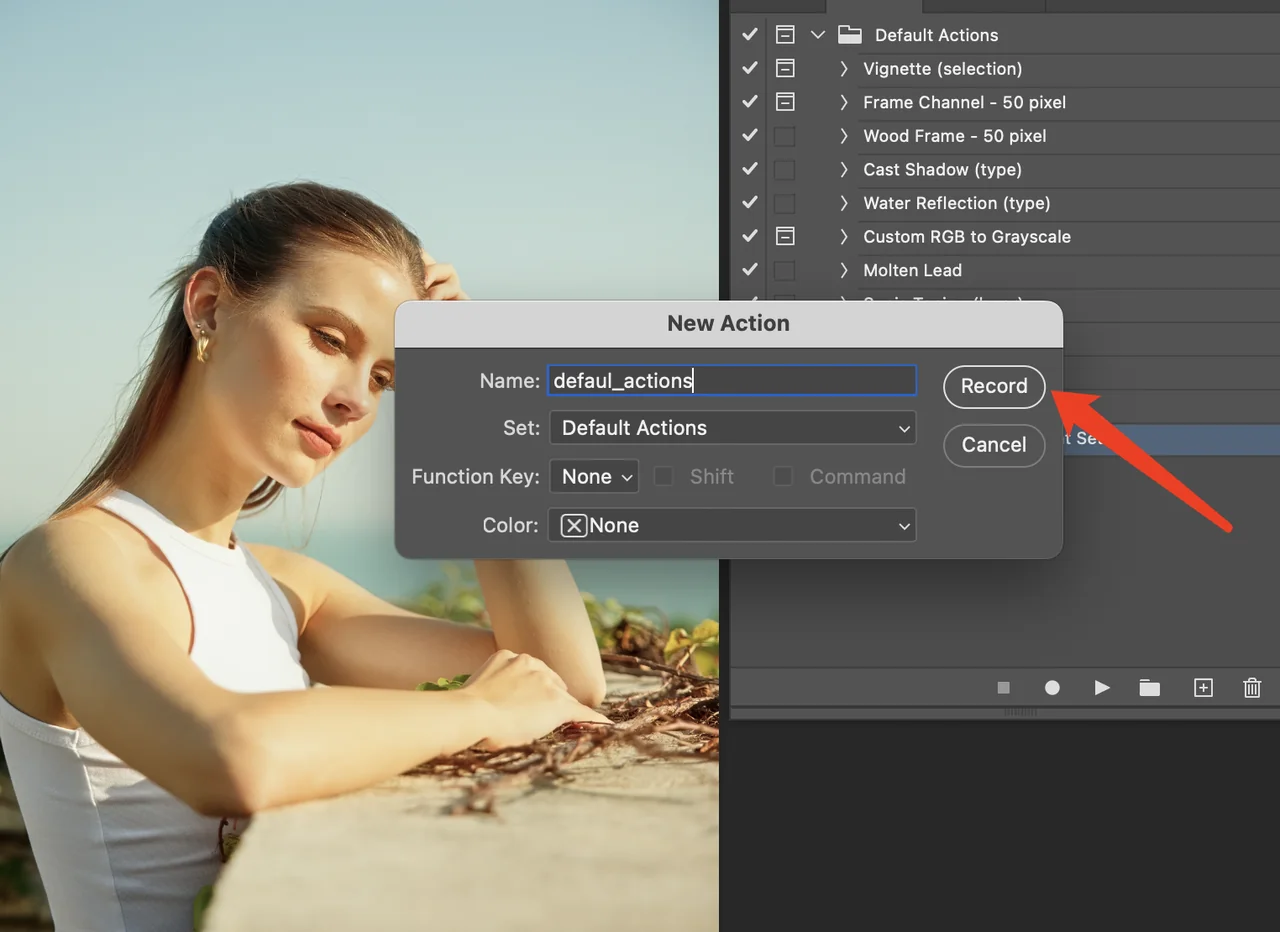
- Apply the Curves Adjustment Layer: For each image, create a Curves adjustment layer. This is the layer responsible for handling the color adjustments.
- Activate the Auto Option: With the Curves adjustment layer selected, click on the Auto button. Photoshop will automatically adjust the color balance, contrast, and brightness of the image.
- Stop Playing the Action: Stop the action playing and all your applies were saved in the defualt_actions
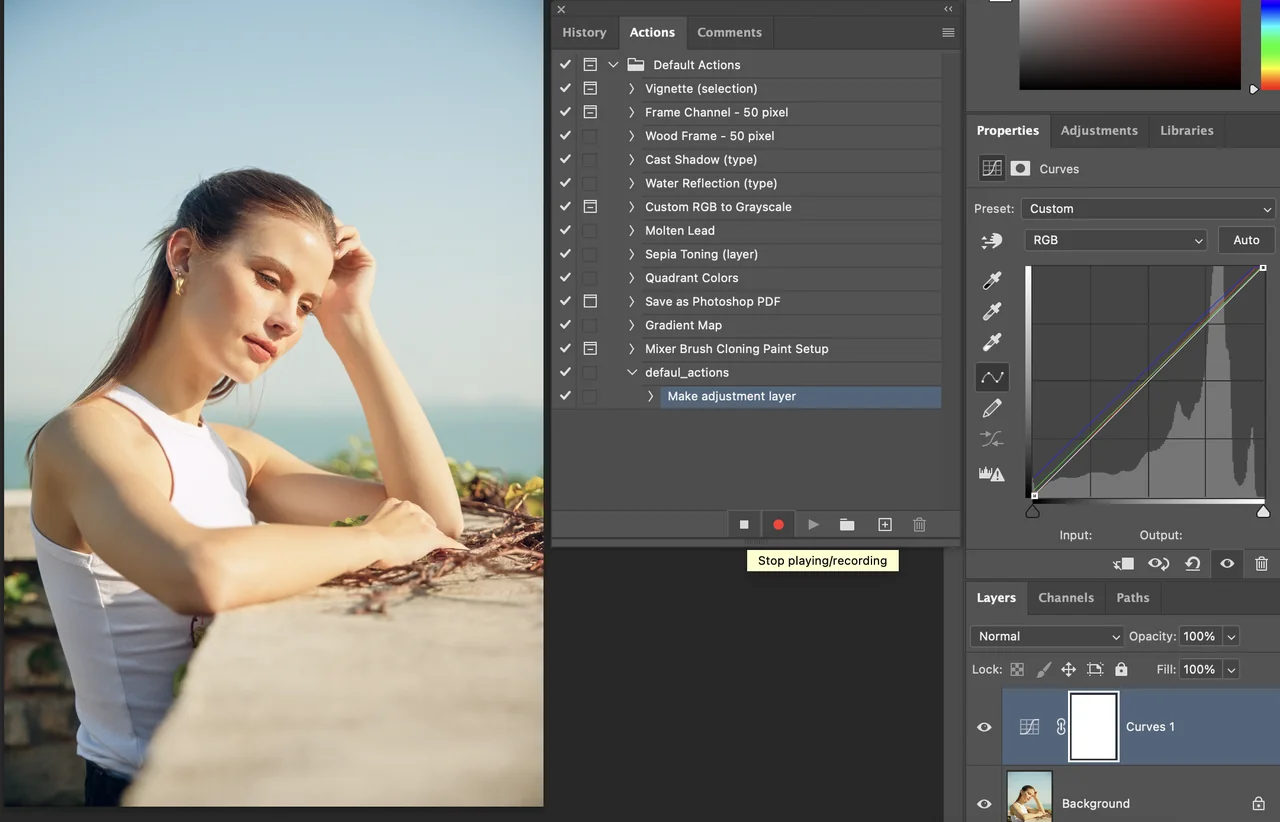
- Synchronize Settings Across All Images: After adjusting one image, you can synchronize these settings across all your images by selecting all the layers and applying the same settings by clicking the play button of your saved action. This helps maintain consistency in color across the batch.
3. Fine-tuning Auto Color Correction Results
While auto color correction does a good job of improving images quickly, the results are not always perfect. Sometimes, small tweaks are necessary to get the exact color balance you desire.
Here’s how you can fine-tune the results:
- Adjust the Color Channels: If you notice a particular hue that’s off, go into the individual color channels (Red, Green, Blue) within the Curves adjustment layer. This allows you to enhance specific colors in the image for better color matching.
- Focus on Key Areas: If certain areas of your image have different color casts, you can select those areas using selection tools like the Rectangular Marquee Tool and apply the auto color correction only to those regions. This selective adjustment will ensure that the rest of the image remains unaffected while the selected areas receive the necessary color correction.
- Review Across Multiple Images: When editing in a batch, always review the results across the entire set of images to ensure the color balance remains consistent. Make manual adjustments if needed for specific images to maintain a cohesive color palette throughout.
Evoto – The Most Efficient AI Photo Editor
Color Matching in Photoshop – Solving Hue Discrepancies Between Layers
These hue inconsistencies can arise for various reasons, including differences in lighting, camera settings, or post-processing techniques. For photographers looking to ensure their batch-edited images maintain a cohesive visual appearance, it’s essential to understand how to identify and address these hue discrepancies effectively.
In this section, we will discuss common causes of hue discrepancies, how to harmonize hues using Photoshop tools, and how to use layer masks to make precise corrections.
1. Identifying Common Causes of Hue Discrepancies
Hue discrepancies are often subtle, but they can disrupt the harmony of an image set. Some of the most common causes include:
- Lighting Variations: Different lighting conditions can drastically affect how colors appear in an image. For instance, images taken in warm light may have a yellowish hue, while those in cooler light may have a bluish tint.
- Camera Settings: Variations in white balance or exposure settings across different shots can introduce slight shifts in hue, especially if different cameras or lenses were used.
- Post-Processing Errors: When editing multiple images, inconsistencies in color adjustments, such as overuse of filters or unbalanced color grading, can lead to noticeable hue shifts.
Identifying these discrepancies often requires keen attention to the details of each image and comparing the colors in various parts of the photo. Using reference images or color swatches can be an effective way to pinpoint these issues.
2. Using Layer Blending Modes and Opacity Adjustments to Harmonize Hues
One of the most powerful ways to address hue discrepancies is by using layer blending modes and adjusting the opacity of specific layers. Blending modes determine how two layers interact with one another, and can be used to subtly alter the hue or tone of an image.
Here are some tips:
- Blending Modes: Modes like Soft Light or Overlay can be used to balance the color across layers, especially in cases where you want to apply a uniform color correction without drastically changing the underlying image.
- Opacity Adjustments: Adjusting the opacity of a layer can also help to soften harsh color shifts, especially when working with adjustment layers such as Hue/ Saturation or Color Balance. Lowering the opacity allows the original layer beneath to show through, which can help blend discrepancies more smoothly.
3. Correcting Specific Areas with Layer Masks
To fix hue discrepancies in localized areas of an image, layer masks provide an invaluable tool. Layer masks allow you to isolate certain regions of an image and apply corrections only to those areas, leaving the rest of the photo intact.
Here’s a step-by-step guide to using layer masks effectively:
- Create a New Adjustment Layer: For example, add a Hue/Saturation or Color Balance adjustment layer to your image.
- Apply a Layer Mask: Once the adjustment layer is added, click the layer mask icon (a small rectangle next to the layer thumbnail) to create a mask.
- Use the Brush Tool: Select the Brush Tool with a soft round brush, set the color to black, and paint over areas that need correction. Black will hide the adjustments, while white will reveal them.
- Fine-tune with Opacity: You can reduce the opacity of the brush to make more subtle corrections, which is especially helpful when blending transitions between areas with different hues.
Evoto – The Most Efficient AI Photo Editor
Additional Tips and Resources for Color Matching in Photoshop
To continue improving your color correction and batch editing skills in Photoshop, whether you’re a beginner or an experienced editor, mastering these techniques requires continual learning and access to powerful tools.
Here are some recommendations to help you improve your skills and introduce an even more efficient solution for advanced editing:
1. Tutorials and Online Resources
There are many online resources to guide you through mastering color correction and batch editing in Photoshop. Some helpful platforms include:
- Adobe’s Official Tutorials: Adobe offers comprehensive video tutorials on Photoshop that cover everything from color correction to batch editing techniques.
- Online Learning Platforms: Websites like Skillshare and Udemy offer courses on Photoshop’s features like color matching, auto-correction, and even retouching for portraits.
2. Plugins and Tools for Color Matching in Photoshop
Incorporating plugins and additional tools into your workflow can significantly enhance the speed and accuracy of your color correction and batch editing tasks:
- Nik Collection: This suite of plugins offers powerful tools for color enhancement and correction, including Viveza, which allows for targeted adjustments to colors and lighting in specific areas of the image.
- Capture One: Known for its precise color grading capabilities, Capture One is an excellent alternative to Photoshop for batch processing and editing RAW files.
3. Evoto AI Photo Editor
For users looking for a more advanced and easy-to-use alternative to Photoshop, Evoto AI Photo Editor is an excellent choice.
Evoto – The Most Efficient AI Photo Editor
This tool takes the complexity out of color matching and batch editing, providing features designed to streamline and automate many of the tedious tasks associated with photo editing. Some key features include:
- AI Color and Tone Adjustment: Evoto automatically adjusts the colors and tones of your photos, ensuring consistency across multiple images.
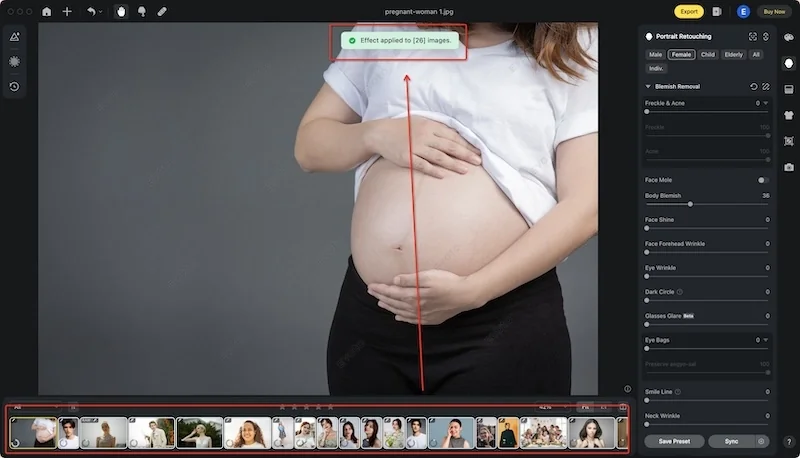
- Batch Editing: Easily edit large sets of photos in a fraction of the time it would take in Photoshop. Evoto allows you to apply the same edits, like color adjustments or blemish removal, to all images in one click.
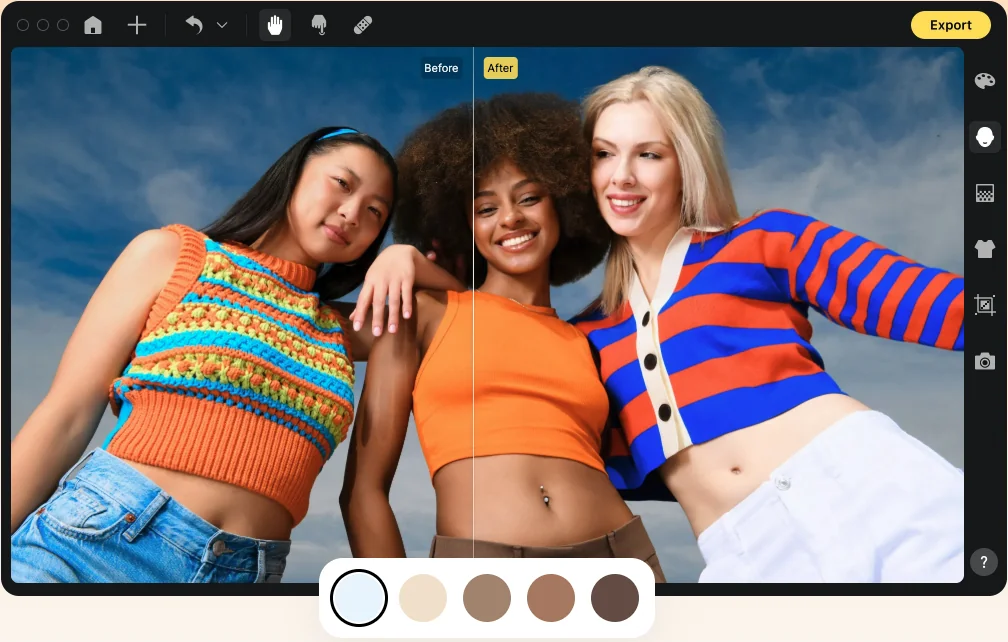
- AI Photo Retouching: With its powerful AI capabilities, Evoto can detect faces, skin tone variations, and adjust these elements to create a smoother, more polished finish. This tool is ideal for portrait photography and group photos, ensuring all individuals are evenly adjusted.
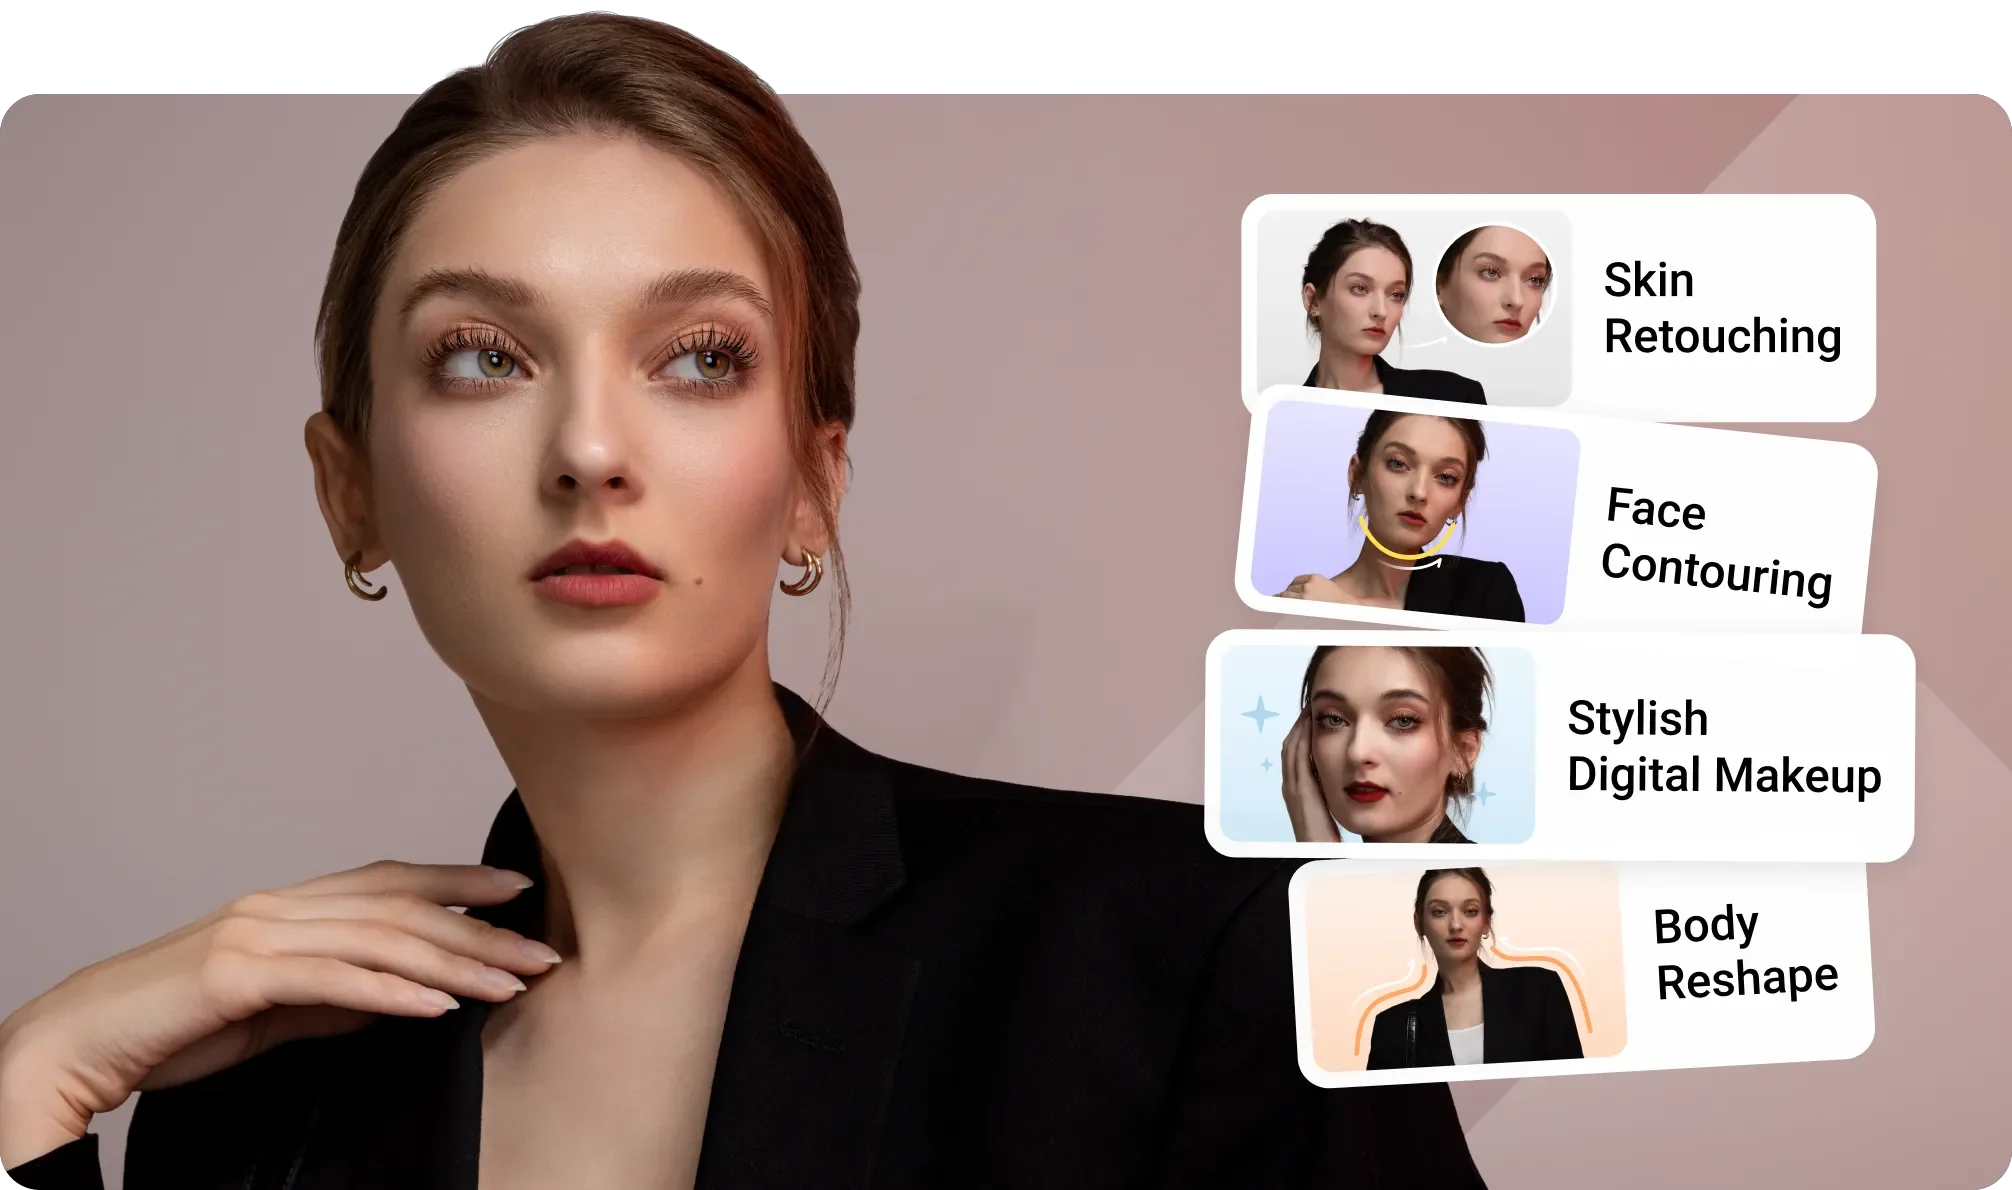
- Free Presets and AI Blemish Remover: Evoto also offers a range of presets for common photo styles, as well as advanced tools like the AI Blemish Remover for flawless images without manual retouching.
Evoto – The Most Efficient AI Photo Editor
The End
In conclusion, the journey through Photoshop’s batch editing and color correction capabilities is a continuous exploration. Whether you’re grappling with the nuances of color matching in Photoshop, capitalizing on the efficiencies of auto color correction Photoshop offers, or fine-tuning with Photoshop color correction techniques, there’s always room for growth.
As you strive for that perfect blend of hues and seamless consistency across your photo collections, remember that tools like Evoto AI Photo Editor stand ready to augment your efforts. Its advanced AI-driven features, from effortless batch editing to precise color and tone calibration, can revolutionize your workflow.
By integrating such solutions and persistently honing your skills via tutorials and plugins, you’re well-equipped to transform your images into visual masterpieces that captivate and endure.

