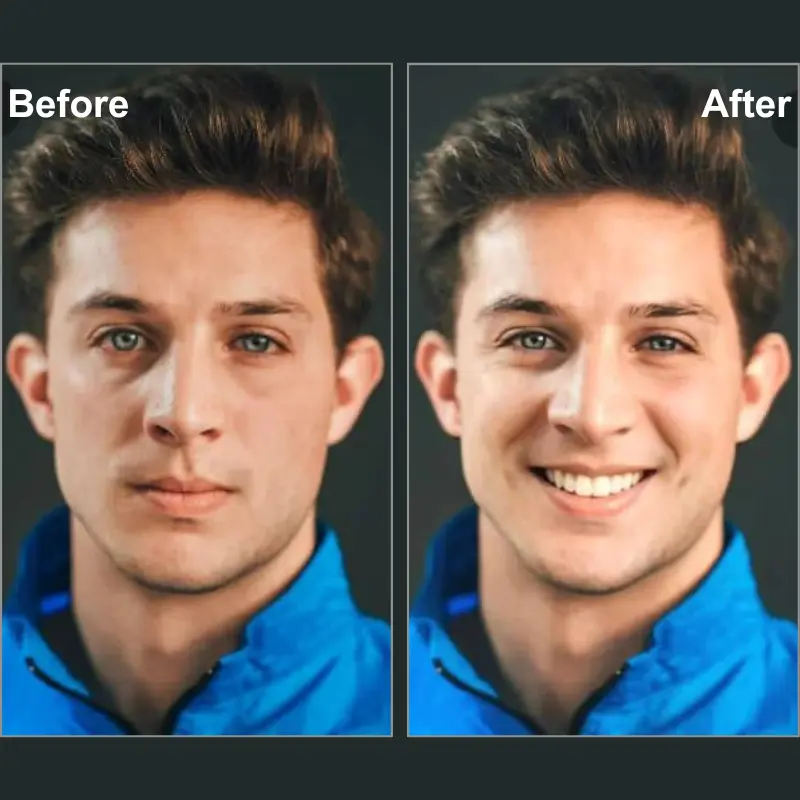
How can you naturally replace my photo with a virtual background? The green screen can help you do that. A green screen, in short, is a uniformly colored green screen that works by allowing the user to seamlessly replace the background. It has revolutionized the world of photography, filmmaking, video production, and live streaming, creating endless possibilities. As technology advances, tools like Evoto AI can help you easily make or replace green-screen backgrounds to create imaginative photos.

This guide will walk you through the basics of using a green screen, the benefits it offers, and how Evoto AI can simplify the process of creating and deleting a green screen background free.
What is a Green Screen?
A green screen is a filmmaking and photography tool that allows you to replace the background of an image with a different scene. The process involves using a pure green background and then digitally removing it using a technique called chrominance keying.
Chroma keying is the use of color information to select a very specific range of colors and separate them to make it transparent, allowing any other background to be placed in its place. The principle behind the green screen is simple, replacing a specific color with another image or video to create the illusion of a different environment.
Why Add Green Screen to Your Photos?
Incorporating green screens into your photography brings many benefits.
- Creative Freedom: Green screen allows unlimited creative possibilities. You can place themes in almost any environment without physically moving them. Green screens can seamlessly implement any virtual background you want, whether it’s a bustling cityscape or a fantasy world.
- Cost and Time Efficiency: Using a green screen can be more cost-effective and time-efficient compared to location shoots. Instead of spending resources on travel and logistics for different shooting locations, you can create diverse and professional-looking backgrounds in a controlled environment. This not only reduces expenses but also speeds up the production process, allowing for quicker turnaround times on projects.
- Professional Quality: The green screen provides a clean, consistent background that can be easily replaced or adjusted in post-production, resulting in high-quality visuals that meet industry standards. This method is especially useful for creating promotional materials, editorial content, and any project that requires precise, polished images.
Overall, green screens offer significant benefits in terms of flexibility, creativity, and efficiency, making them a valuable tool in modern photography and video production.
Tools for Creating a Green Screen Background
To set up a successful green screen setup, you can try different tools according to your needs.
- Green Screen Fabric: Choose between matte and reflective fabrics; matte is preferred for reducing glare. Ensure it’s wrinkle-free for the best results in film and television fields, creating special effects and CGI integration.
- Lighting Equipment: Use softboxes or LED panels to achieve even, shadow-free lighting on both the green screen and subject. Consistent lighting prevents color spill and maintains a uniform backdrop.
- Backdrop Stands: Opt for portable and adjustable stands to easily set up and position the green screen. That is the perfect choice for making YouTube videos, tutorials, and vlogs.
- Cameras and Equipment: Use high-resolution cameras and lenses; set the camera to manual mode for consistent exposure and focus. This can be used for remote work and presentations.
- Software: As for creative photo editing, software is always the preferred option. Evoto AI offers one-click green screen generation, in addition, it can remove green screen background at ease. Besides, Adobe Premiere Pro, Final Cut Pro, and OBS Studio are also popular for green screen editing, offering tools for chroma keying and background replacement.
How to Make Green Screen Background Footage with Evoto AI
Evoto AI Photo Editor is an excellent tool for creating stunning green screen footage.
Here’s a step-by-step guide on how to make green screen backgrounds that can help you get started.
Step 1. Open Evoto AI and upload your photo with any background.
Step 2. Locate the Background Adjustment > Headshot Backdrop Changer > click the Recommended tab > select an even green color background.
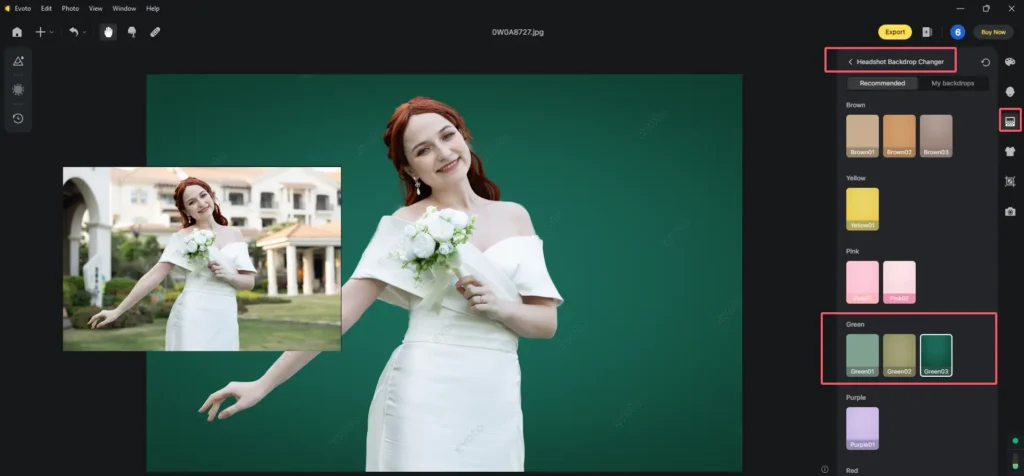
Step 3. Additionally, you can upload high-quality solid green color images as your green screen background.
Proceed to My Backdrops > click the “+” button to add a green color background.
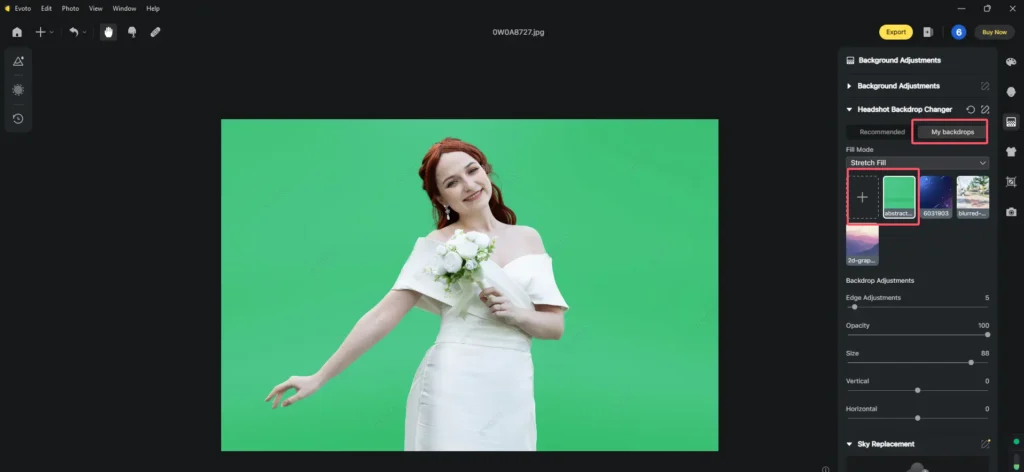
Step 4. (Optional choice) If you need to create green screen background footage from a great many photos, you can use Evoto AI’s batch processing feature. It helps save the changes on one image as a preset and use the preset to deal with other photos that need to be edited as the green screen background footage.
Step 5. Save your green screen footage in your preferred format for further editing.
Now, it’s your turn to try making green screen in Evoto AI:
Evoto – The Most Efficient AI Photo Editor
How to Remove Green Screen Background with Evoto AI
Removing a green screen background with Evoto AI is straightforward. Follow these steps for a flawless result.
Step 1. Start by uploading your image with the green screen background to Evoto AI.
Step 2. Navigate to the Background Adjustment feature > Go to the Headshot Backdrops Changer > click the Recommended tab > select the transparency background in Evoto AI.
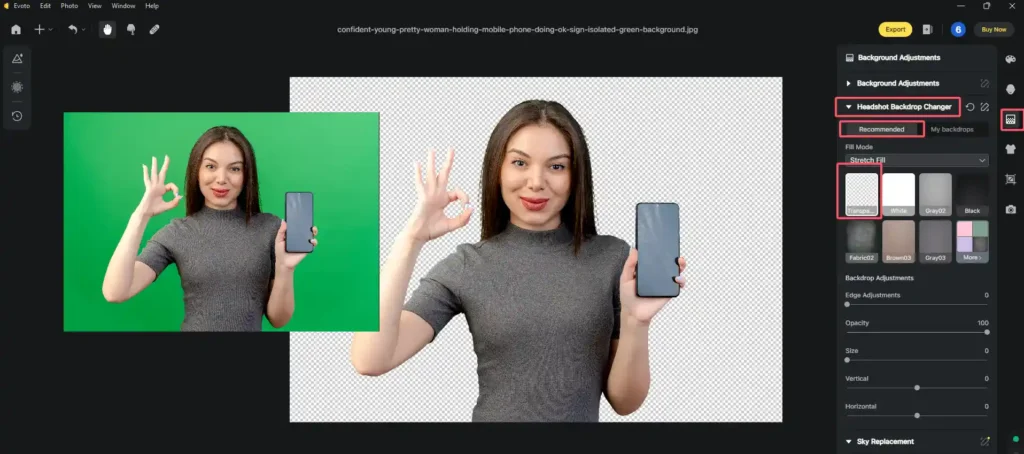
Step 3. Under Headshot Backdrop Changer > click the My Backdrops to insert your chosen background from the available options or upload a custom one.
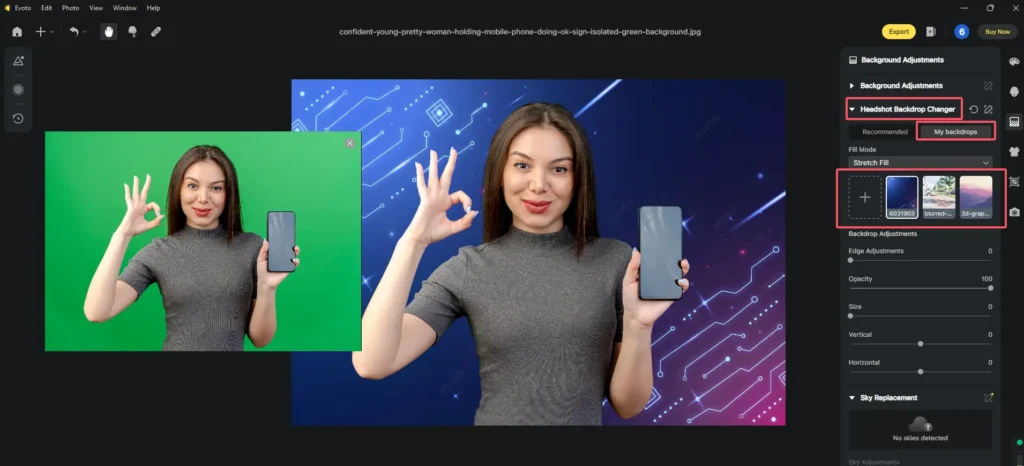
Step 4. If necessary, use the editing tools to clean up any residual green edges around your subject.
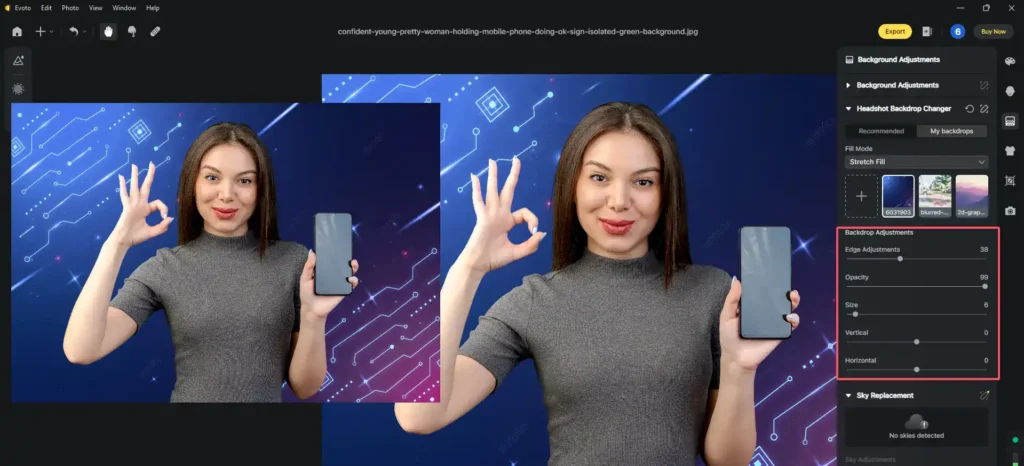
Step 5. (Optional) Evoto AI’s batch-processing feature enables you to save your adjustments as a photo preset and use these adjustments to multiple images at one time.
Step 6. Review your image, make any final adjustments, and save the edited photo.
That’s all about how to remove green screen backgrounds with Evoto AI. By following the steps above, you can make creative visual backgrounds at ease.
Read More: Image Opacity Adjustment – How to Change Opacity of Background Image in Photo Editing?
Conclusion
The green screen is an easy alternative background for photography and video production, it has unlimited creativity, saves cost and time efficiency, and helps to produce professional-quality results. You can use a green screen to create any background you like without having to go out and shoot.
AI-powered green screen editing, such as Evoto AI, can further improve efficiency, enhance creative effects, and generate green background images in batches or replace green screen with a clear image background. With its advanced features, precise background removal, and seamless integration, Evoto AI can help you achieve superior results quickly and efficiently. Download it now and try it!


