Have you ever captured a picture that perfectly portrays your outfit, only to find pesky wrinkles stealing the show? Whether it’s a candid shot or a carefully posed portrait, clothing wrinkles can detract from the overall look of your photo. So, today let’s explore how to remove wrinkles from clothes.

This guide equips you with two effective methods to smooth out clothing folds. We’ll introduce you to an AI-powered tool that offers a quick and user-friendly solution, as well as a more advanced technique using Adobe Photoshop for those seeking greater control. With these solutions how to remove wrinkles from clothes, you can ensure your clothing always appears crisp and polished in every photo.
How to Remove Wrinkles From Clothes in Pictures with Evoto AI
Evoto AI steps in as your knight in shining armor, offering an AI-powered approach to banish those unwanted creases.
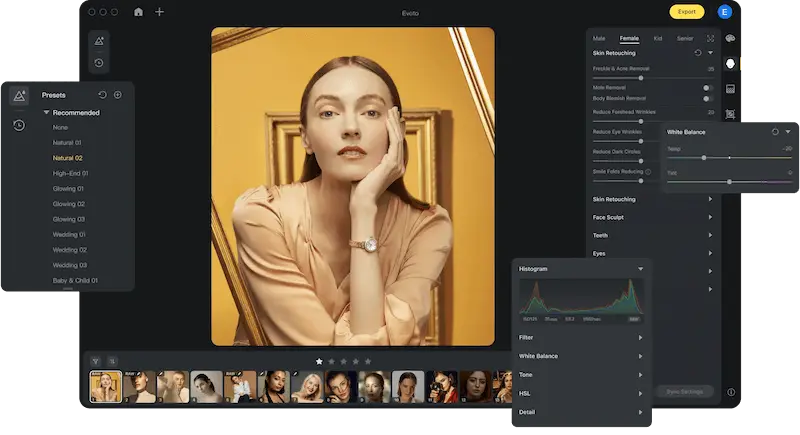
Evoto AI boasts a dedicated feature specifically designed to tackle clothing wrinkles – the “Clothes and Accessories Touch-Up” section. Within this section, you’ll find powerful tools that categorize wrinkles by size and texture:
- De-wrinkle Clothing: This is the hero tool for overall wrinkle reduction. Evoto AI’s intelligent algorithms analyze your photo and effortlessly smooth out even extensive wrinkles, leaving your clothes looking crisp and polished.
- Remove Fine Wrinkles: For those pesky thin wrinkles that often appear on shirts or dresses, Evoto AI offers a “Remove Fine Wrinkles” slider. This allows you to target these delicate wrinkles while preserving the natural texture of the fabric.
- Remove Coarse Wrinkles: Larger creases and folds, like those caused by sitting down, can be tackled with the “Remove Coarse Wrinkles” slider. Evoto AI intelligently smooths these wrinkles while maintaining the natural flow of the garment.
How to Remove Wrinkles From Clothes with Evoto AI
Evoto AI’s beauty lies in its user-friendly approach. Here’s a simplified breakdown of how to utilize Evoto AI to achieve wrinkle-free clothing in your photos:
Step 1: Download Evoto AI and Install
Download the software for your PC or Mac. Follow the on-screen instructions to complete the installation process.
Evoto – The Most Efficient AI Photo Editor
Step 2: Upload Your Photo
Launch Evoto AI and import the photo where you want to remove clothing wrinkles. Select the photo and it will be displayed in the editing workspace.

Step 3: Target Clothing Folds
Locate the “Clothes and Accessories Touch-Up” section within Evoto AI’s editing tools. This section might be labeled differently depending on the specific interface version.
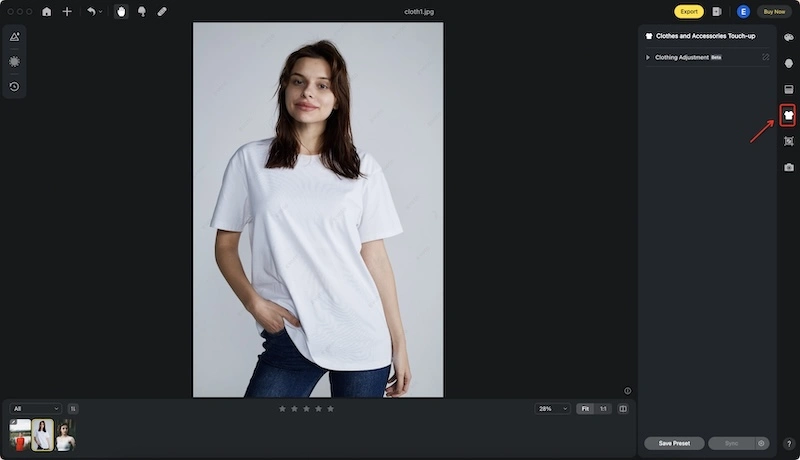
Step 4: Wrangle those Wrinkles
Within the “Clothes and Accessories Touch-Up” section, you’ll find the “De-wrinkle Clothing” slider. Adjust this slider to your desired strength. For more targeted wrinkle removal, explore the “Remove Fine Wrinkles” and “Remove Coarse Wrinkles” sliders. Experiment with these options to achieve the level of smoothing you require.
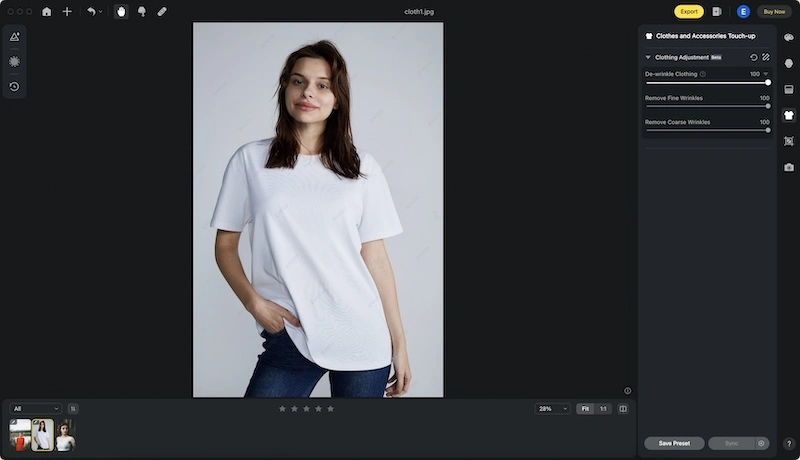
Step 5: Export Your Flawless Photo
Once you’re happy with the wrinkle removal and overall look of your photo, click on “File” and then “Export” to save the final edited image. Evoto AI allows you to choose your preferred file format and quality for the saved photo.
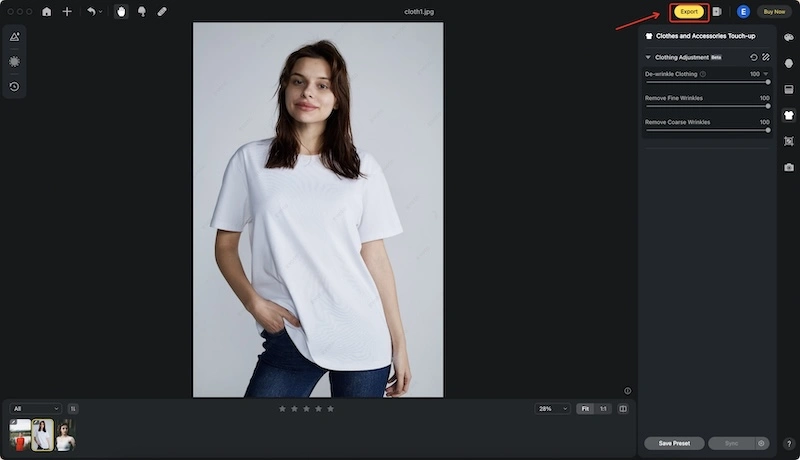
In the next part, we’ll delve into a more advanced technique using Adobe Photoshop for those seeking even more granular control over wrinkle removal.

Black Friday
11.24-11.30
| Annual Subscription | Credit Count | Price | Discounts |
|---|---|---|---|
| Starter Plan | 800 | 35% | |
| Basic Plan | 1,600 | 35% | |
| Basic Plus Plan | 3,600 | 25% | |
| Standard Plan | 9,000 | 20% | |
| Standard Plus Plan | 24,000 | 20% |
| Pay-as-You-Go | Credit Count | Price | Discounts |
|---|---|---|---|
| 200 Credits Pack | 200 | 25% | |
| 500 Credits Pack | 500 | 25% | |
| 1,200 Credits Pack | 1,200 | 0% | |
| 3,600 Credits Pack | 3,600 | 0% |
How to Remove Wrinkles From Clothes in Pictures with Photoshop
For those seeking even more precise control over wrinkle removal, Adobe Photoshop offers a powerful toolbox. Here, we’ll explore two popular methods for tackling clothing wrinkles in Photoshop:
Method 1: De-wrinkle Clothing with Healing Tools (Precise and Time-Consuming)
This method involves utilizing a combination of Photoshop’s healing tools to manually remove wrinkles. Here’s a basic breakdown:
- Healing Brush Tool: Sample a smooth area of fabric near the wrinkle and use the Healing Brush tool to paint over the wrinkle, effectively replacing it with the wrinkle-free texture.
- Patch Tool: For larger wrinkles or areas with complex patterns, the Patch Tool allows you to select the wrinkled area and then define a smooth area of the same fabric to act as a patch. Photoshop seamlessly blends the patch onto the wrinkled area, smoothing it out.
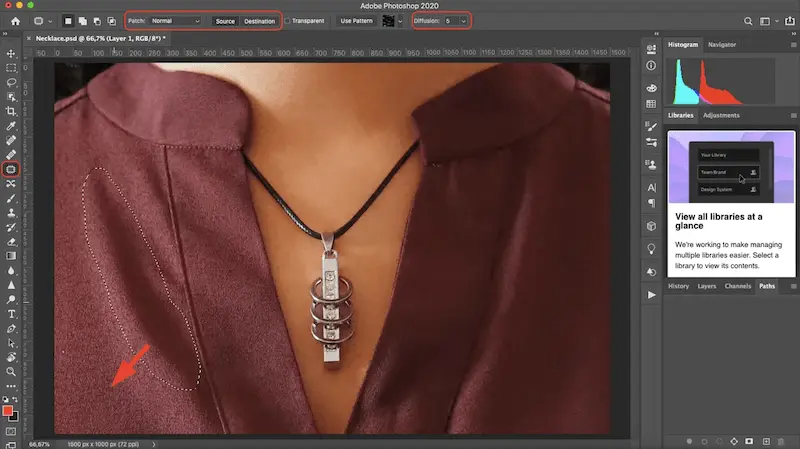
- Stamp Tool: Similar to the Healing Brush tool, the Stamp tool allows you to clone a smooth section of fabric and use it to cover up wrinkles. This method is particularly well-suited for repetitive patterns on clothing.
Method 2: Remove Wrinkles From Clothes with Frequency Separation (Advanced and Resource-Intensive)
Frequency separation is a powerful, yet more advanced technique for removing wrinkles. Here’s a simplified explanation:
- Frequency Separation: This process splits the image into two layers: “high frequency” (texture and details) and “low frequency” (color and overall tone).
- Smoothing the Texture: You can then use tools like Blur on the high-frequency layer to selectively smooth out wrinkles while preserving the fabric’s texture details.
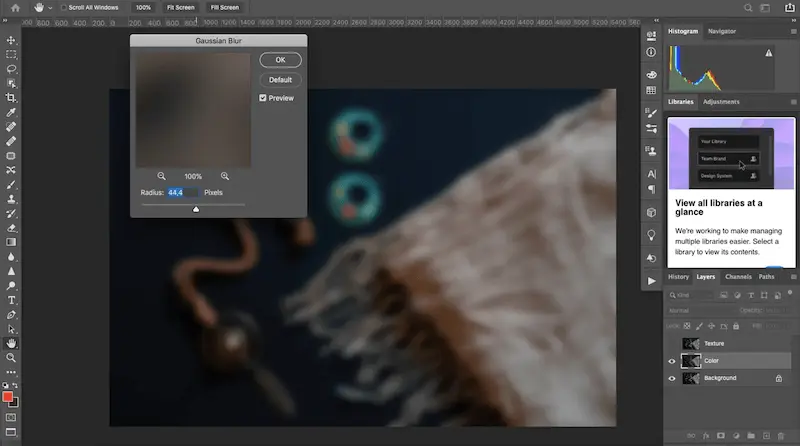
- Reuniting the Layers: Finally, the modified high-frequency layer is recombined with the low-frequency layer, resulting in a wrinkle-free image that retains a natural-looking fabric texture.
The choice between these Photoshop methods depends on your experience level and desired level of control. The Healing Tool approach offers precise results but can be time-consuming for extensive wrinkles. Frequency separation delivers powerful wrinkle removal but requires a good understanding of Photoshop functionalities.
Read More: Remove Double Chin in Photo with AI Double Chin Photo Editor
Take Home
How to remove wrinkles from clothes? This blog unveiled solutions to achieve a polished look, showcasing both Evoto AI’s AI magic and advanced Photoshop techniques. Evoto AI stands out for its user-friendly approach. Its AI analyzes clothes, smoothing wrinkles with a touch of a slider. For those seeking ultimate control, Photoshop offers methods like the Healing Tool and Frequency Separation.


