Achieving natural and flattering skin tones is a fundamental skill for any photo editor. The RGB (Red, Green, Blue) color model offers precise control to refine skin colors, and popular software like Lightroom, Photoshop, and Evoto provide powerful tools for this purpose.
This guide will equip you with the knowledge and techniques to master skin tone color RGB adjustments in these three programs.
Why Use RGB Adjustments for Skin Tones?
Natural and flattering skin tones are the hallmark of a captivating portrait. But achieving this can be tricky, especially when dealing with uneven lighting or unwanted color casts. This is where the power of RGB adjustments comes in.
RGB, standing for Red, Green, and Blue, forms the foundation of color representation in digital images. By manipulating these individual color channels, we can target specific aspects of skin tones with incredible precision.
Here’s how skin tone color RGB adjustments become your secret weapon for flawless skin color:
- Natural Look: Digital cameras can sometimes capture skin tones with a slight color cast. RGB adjustments allow you to fine-tune the red, green, and blue values, eliminating unwanted hues and achieving a realistic, natural appearance.
- Selective Control: Skin tones aren’t uniform across a face. Highlights tend to be brighter, while shadows might contain unwanted redness. RGB adjustments empower you to focus on specific areas, like reducing redness in cheeks or brightening shadows under the eyes, for a more polished look.
- Correcting Flaws: Let’s face it, blemishes and uneven tones happen. RGB adjustments provide the tools to address these concerns. You can reduce redness caused by sunburn, adjust yellowing for a more youthful look, or even out uneven skin tones for a flawless finish.
How to Adjust Skin Color Tone RGB in Lightroom, Photoshop and Evoto
The magic of RGB adjustments for skin tones translates beautifully across popular photo editing software. While the specific tools might differ slightly, the core principles remain the same.
Here’s a breakdown on how to harness the power of RGB in Lightroom, Photoshop, and Evoto AI:
Method 1 – How to Adjust Skin Color With RGB in Lightroom
Lightroom offers a streamlined approach to skin tone adjustments using the HSL panel (Hue, Saturation, and Luminance). Here’s how to use it:
- Navigate to the Develop Module: This is where the editing magic happens in Lightroom.
- Locate the HSL Panel: Look for the panel with a rainbow-like icon. You can also access it by pressing the “J” key on your keyboard.
- Target Specific Hues: Click on the “Reds” or “Oranges” hue sliders. Adjusting these sliders directly impacts overall skin tone. Dragging the hue slider left reduces red tones, while moving it right adds more.
- Fine-tune with Saturation and Luminance: For even more control, use the Saturation slider to adjust the intensity of the chosen hue. The Luminance slider allows you to brighten or darken specific color ranges within the targeted hue.
- Selective Adjustments: Lightroom’s “Brush” tool allows for targeted adjustments. Brush over the areas you want to refine (like cheeks or blemishes) and then use the HSL panel to adjust the RGB values specifically within that selection.
Method 3 – How to Adjust Skin Color With RGB in Photoshop
Photoshop offers a more in-depth approach to skin tone adjustments, providing several powerful tools:
- Selective Color Adjustments: Navigate to the “Layer” menu and select “New Adjustment Layer” > “Selective Color.” This allows you to target specific color ranges within your image.
- Refine Skin Tones: Choose “Neutrals” or “Reds” in the dropdown menu. Adjust the sliders for these color channels to manipulate skin tones. Reducing red in the “Neutrals” can remove color casts, while adjusting cyans and yellows in the “Reds” can target specific skin tones.
- Color Balance for Highlights, Midtones, and Shadows: Another powerful tool is “Color Balance.” Access it through the “Image” menu > “Adjustments” > “Color Balance.” This allows you to fine-tune the RGB balance in highlights, midtones, and shadows. For example, adjusting the red slider in the “Highlights” section can reduce redness in brighter areas of the skin.
Method 4 – How to Adjust Skin Color With RGB in Evoto AI
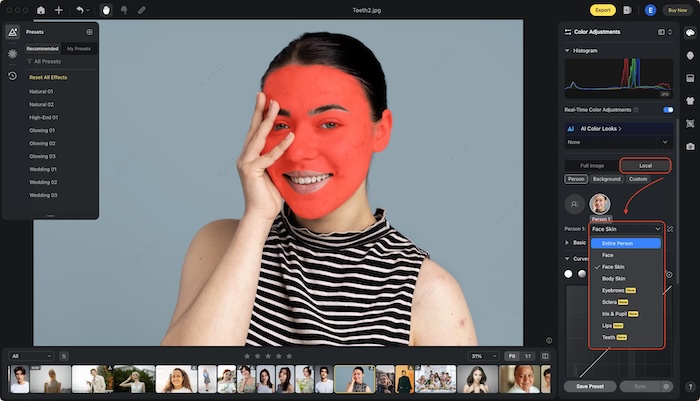
Evoto AI offers a modern approach to color grading, making it perfect for precise skin tone adjustments:
Evoto – The Most Efficient AI Photo Editor
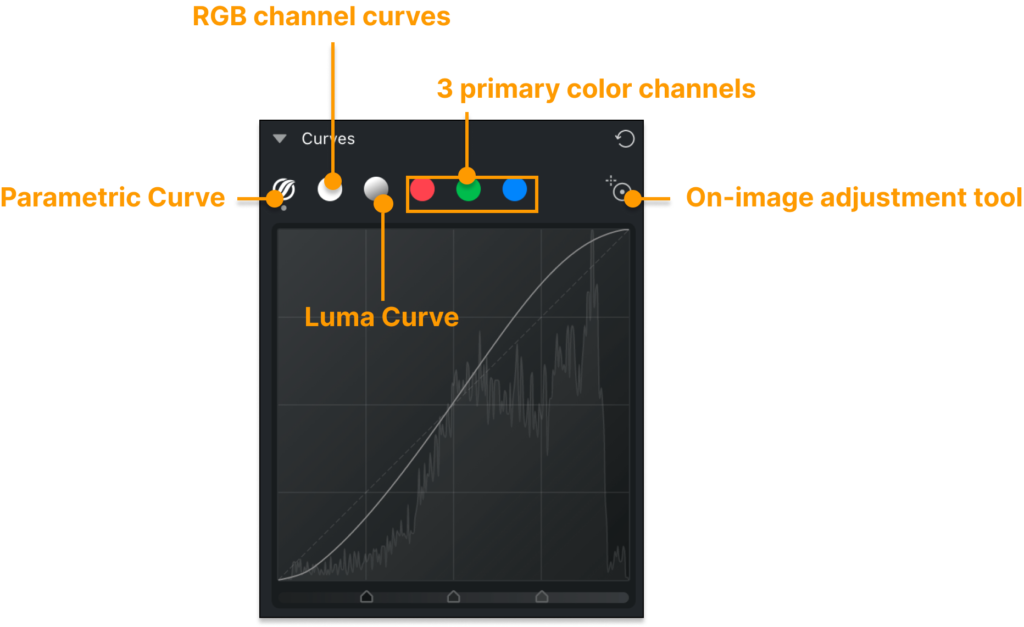
- Access the Color Adjustments Panel: Look for the panel with color curves.

- Adjust RGB Curves: Utilize the curves to manipulate specific color channels (red, green, blue) globally or with targeted selections. Click and drag on the curves to adjust the color balance within that channel.

General Tips for Flawless Skin Tones
The journey to achieving captivating portraits doesn’t stop at RGB adjustments. Here are some additional tips to ensure your edits result in flawless skin tones:
- Calibrate Your Monitor: An accurate monitor is essential. Improper calibration can lead to skewed color perception during editing, potentially resulting in unnatural skin tones in your final image.
- Reference Photos: Keep a collection of photos with natural and flattering skin tones handy. Use them as a reference point while editing your own images to ensure you’re achieving a realistic look.
- Start Subtle, Build Gradually: It’s easy to get carried away with adjustments. Always begin with subtle changes and gradually build the effect. This allows you to maintain a natural look and avoid over-editing.
- Consider Different Light Sources: The lighting conditions in your photos can significantly impact skin tones. Adjustments made for photos taken in warm sunlight might need tweaking for images captured under cool studio lighting. Be mindful of these variations and adapt your editing process accordingly.
- Work in Tandem with Other Tools: While RGB adjustments are powerful, they’re not the only tool in your arsenal. Combine them with other editing techniques like dodging and burning to further refine highlights and shadows, or use noise reduction to smooth out skin texture for an even more polished look.
By following these practices alongside your newfound RGB mastery, you’ll be well on your way to consistently achieving flawless and natural-looking skin tones in all your portrait edits.
Take Home
Unleash the power of RGB adjustments and transform your portraits skin color tone. With the techniques covered in this guide for Lightroom, Photoshop, and Evoto AI, you now possess the knowledge to refine skin tones with precision. Remember, practice makes perfect. So, grab your photos, embrace the world of skin tone color RGB, and watch your edits come alive with natural-looking, flawless skin.


