

- Step 1: Update Evoto and Prepare the Workspace
- Step 2: Start from Lightroom Classic
- Step 3: Choose the File Settings for the Handoff
- Step 4: Retouch the TIFF in Evoto
- Step 5: Use the Export Setting That Completes the Round Trip
- Step 6: Return to Lightroom Classic and Resolve the Metadata
- Step 7: Repeat the Process with a Virtual Copy
- Quick Checklist
- Final Thoughts
Moving a photo from Lightroom Classic into another editor is easy. Getting the finished image back into the same catalog—without creating unnecessary exports or manually importing another file—is where the workflow can become messy.
Photographer Mark Wallace demonstrates a faster approach using Evoto’s external-editing integration. Lightroom Classic renders the current RAW adjustments into a TIFF, Evoto handles the portrait retouching, and the finished edit returns to the catalog by updating the TIFF that Lightroom already created.
The process will feel familiar to anyone who has used Edit In with Photoshop, DxO PhotoLab, FilmPack, or the Nik Collection. The difference is one easy-to-miss Evoto export option that turns a normal export into a complete round trip.
To follow along: Lightroom Classic, Evoto 3.8 or later, a RAW photo already added to a Lightroom catalog, and an Evoto preset or portrait edit you want to apply.
💡Bonus: Use Mark Wallace’s discount code “Mark20” to save up to 20% on an Evoto before you start.
[evoto_promo_banner]
Step 1: Update Evoto and Prepare the Workspace
Make sure the integration is available before starting the handoff.
- Open Evoto and check for updates from the application menu.
- Confirm that Evoto 3.8 or later is installed.
- In Lightroom Classic, keep one test image selected so you can clearly track every file the process creates.
- If needed, right-click the photo and choose Show in Finder or Show in Explorer to view its original folder.
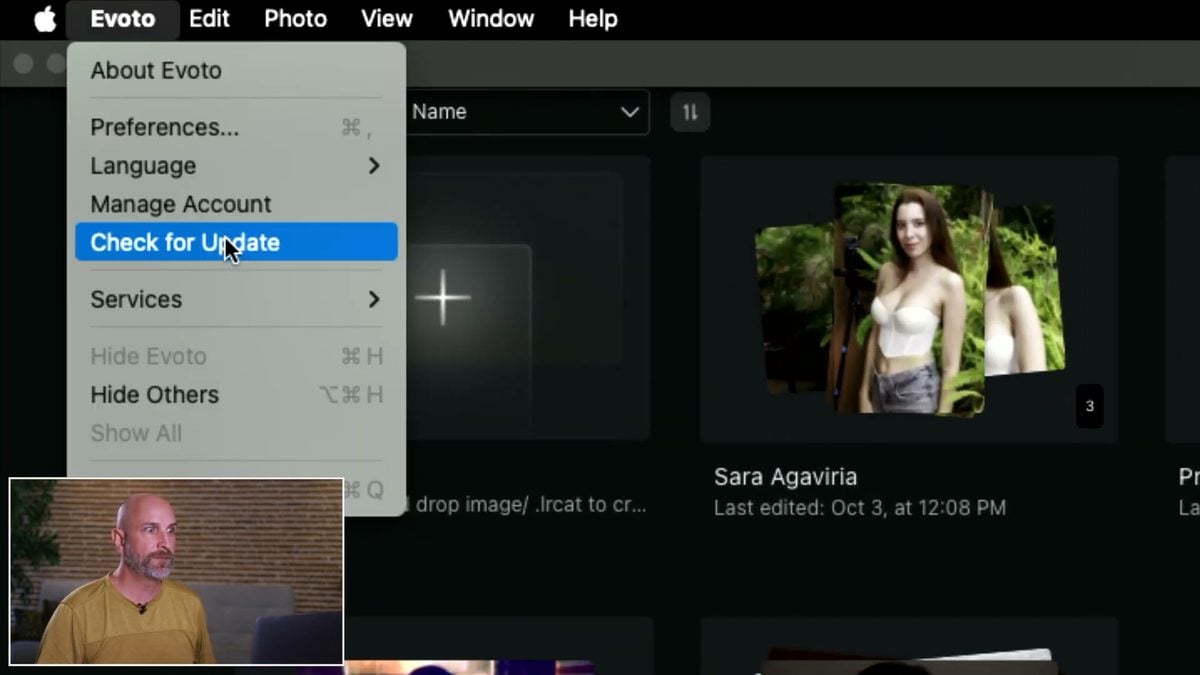
The update installs the Edit In Evoto option used by Lightroom Classic and other supported photo applications.
Starting with one image makes the file behavior easier to understand. Before the round trip, the folder contains only the original RAW file. Once Lightroom prepares the external edit, a second file appears. After Evoto saves the result, a backup is added as well.
Step 2: Start from Lightroom Classic
Before sending the image, decide where it should open in Evoto.
- Leave Evoto open with no project selected to create a new project for the incoming photo.
- Open an existing Evoto project first if the photo should be added there.
Then start the round trip:
- Select the image in Lightroom Classic’s Library or Develop module.
- Right-click the photo and choose Edit In.
- Select Edit In Evoto.
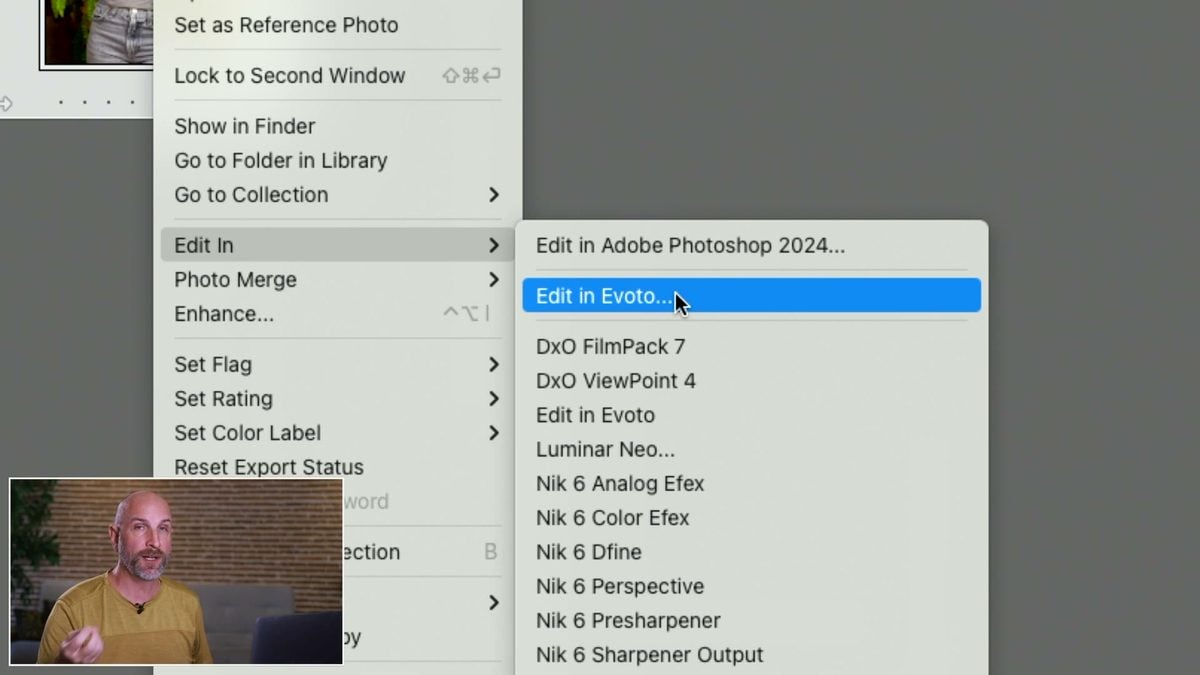
Any Lightroom Classic work already applied to the RAW file—such as white balance, exposure, highlights, blacks, midtones, or crop—can be included in the rendered file sent to Evoto.
This is the key distinction: the original RAW file does not move into Evoto for direct editing. Lightroom Classic first builds a new file with the current adjustments baked in.
Step 3: Choose the File Settings for the Handoff
When Lightroom Classic opens the external-editing dialog, choose Edit a Copy with Lightroom Adjustments.
For the demonstration, the handoff uses:
- File format: TIFF
- Color space: ProPhoto RGB
- Bit depth: 16-bit
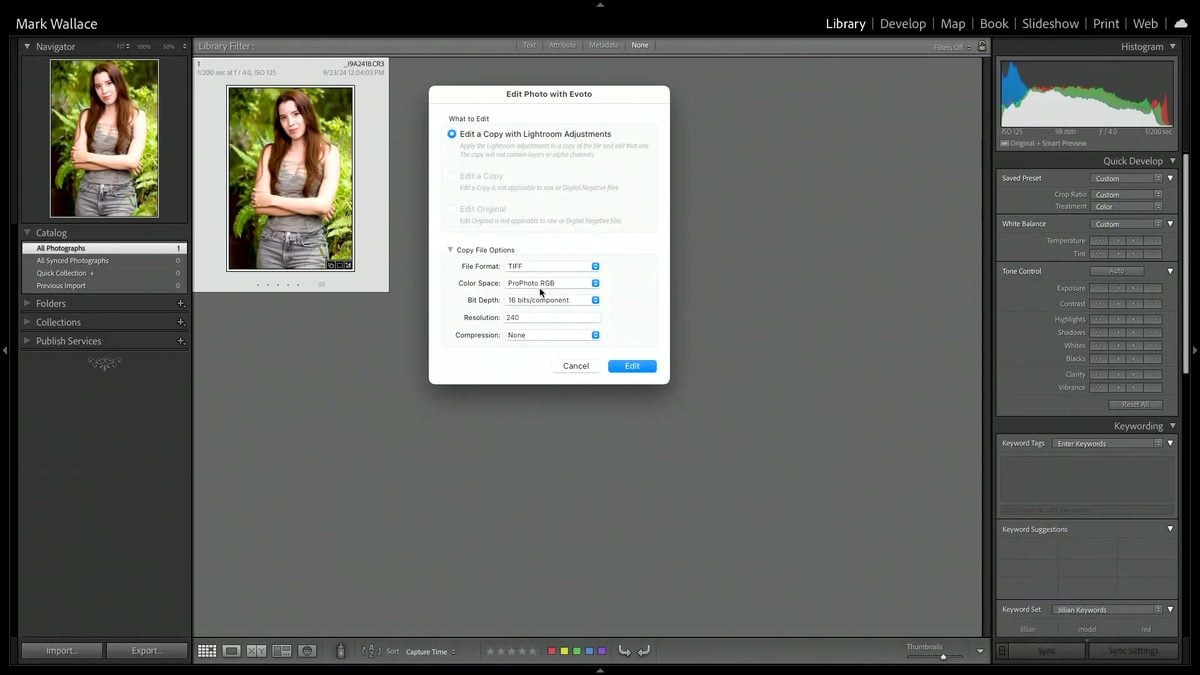
These settings create a high-quality working file with enough color and tonal information for the retouching pass. You can use settings that fit your own production requirements, but it is important to understand what happens next.
After clicking Edit, Lightroom Classic:
- Applies the current RAW adjustments.
- Creates a rendered TIFF in the original image folder.
- Adds that TIFF to the Lightroom catalog.
- Opens the same TIFF in Evoto.
At this stage, the Lightroom catalog contains both the untouched RAW file and the TIFF being edited in Evoto.
Step 4: Retouch the TIFF in Evoto
Once the file opens in Evoto, apply the adjustments that belong in the second part of the workflow.
In the portrait example, a saved preset takes care of several small but time-consuming corrections:
- Reduce the visible red-eye effect.
- Even out the skin.
- Remove a small vein on the hand.
- Clean a mosquito bite and minor bumps on the arm.
- Apply the preset’s overall skin and tonal treatment.
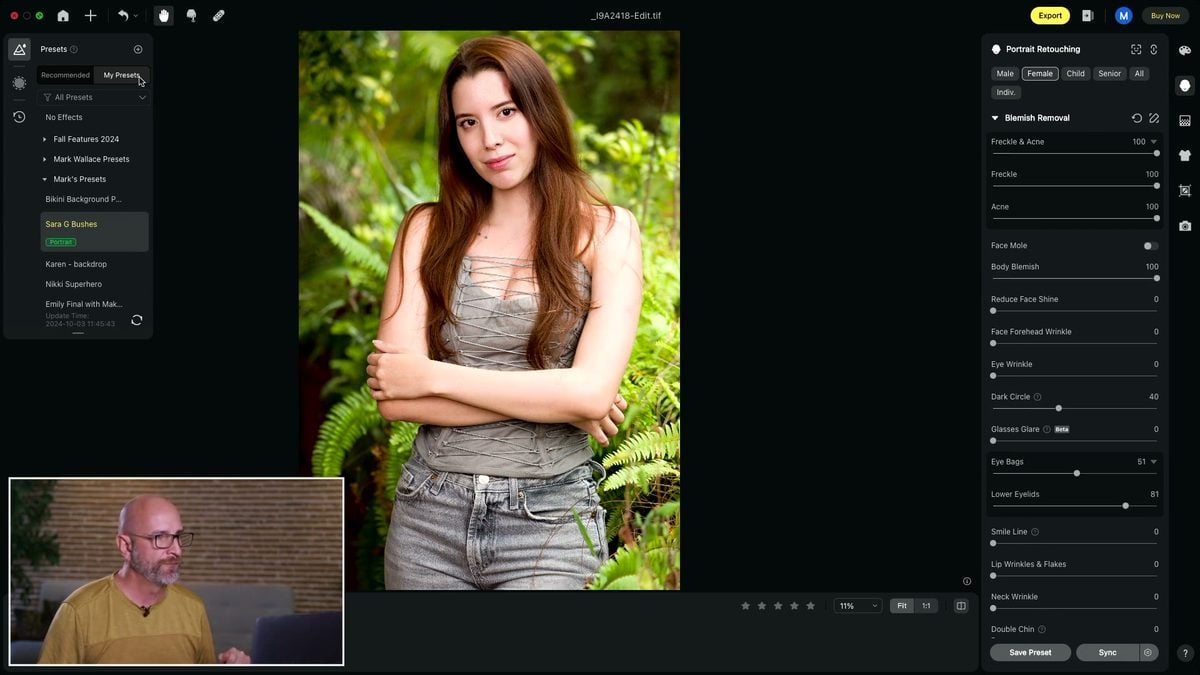
Use the before-and-after view to inspect the result before moving on. The goal is not to create another detached export. Evoto is working on the exact TIFF that Lightroom Classic placed in the catalog, and the next step saves the retouching back into that file.
This keeps the division of labor clear: Lightroom Classic handles the RAW development and catalog, while Evoto handles the portrait retouching pass.
Step 5: Use the Export Setting That Completes the Round Trip
The export configuration is what sends the finished result back correctly.
- Open Export in Evoto.
- Set the destination to Folder of Original Photo.
- Enable A non-RAW image will replace the existing file.
- Click Export.
- Confirm Replace when Evoto displays the overwrite warning.
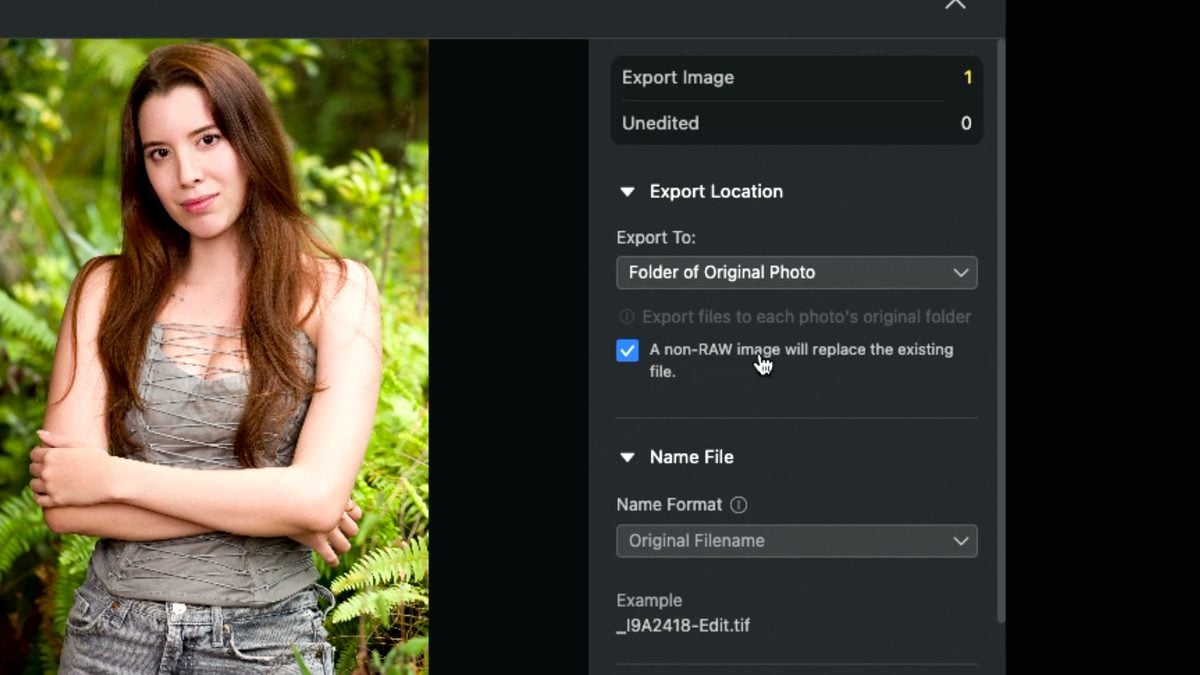
Once the replacement option is enabled, the file name and image format cannot be changed. That is expected: Evoto is saving over the working TIFF instead of generating another file with a new name.
“The TIFF file that we’re currently working on is just going to be overwritten.”
Evoto also creates an automatic backup of the TIFF. The main TIFF receives the finished retouching and stays connected to Lightroom Classic, while the backup provides a recovery point if the replaced version is not what you intended.
Tip: Keep Evoto and Lightroom Classic in the same color space for a more predictable handoff.
Step 6: Return to Lightroom Classic and Resolve the Metadata
When the export finishes, switch back to Lightroom Classic. The TIFF already in the catalog should now display the Evoto retouching automatically—there is no need to import a separate finished image.
Lightroom Classic may show a metadata-change warning because Evoto has written to the file. Click the warning and choose the option that writes Lightroom Classic’s catalog metadata back to the file.
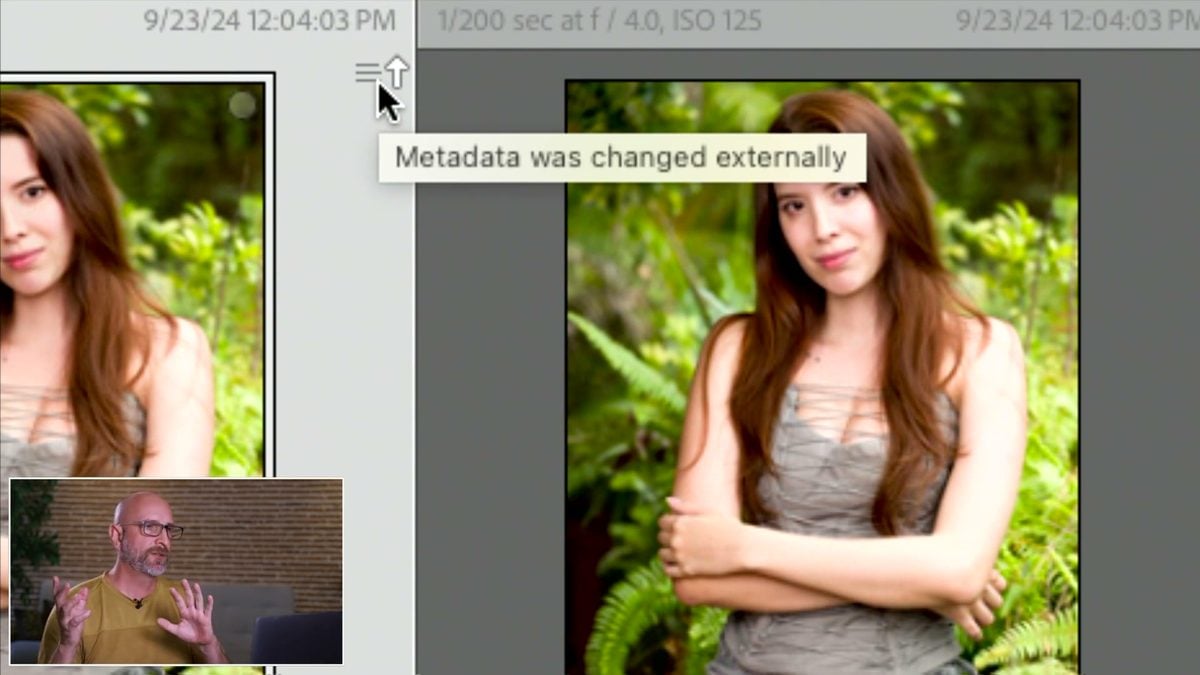
The completed folder now contains:
- The original RAW file.
- The TIFF rendered by Lightroom Classic and updated by Evoto.
- The automatic TIFF backup created during replacement.
The round trip is complete: the Lightroom adjustments went into Evoto, the Evoto retouching came back, and the edited TIFF remains organized beside the original RAW file.
Step 7: Repeat the Process with a Virtual Copy
Once the file behavior is clear, the same process can be repeated quickly with a different Lightroom treatment.
- Create a Virtual Copy in Lightroom Classic.
- Apply a different crop, vignette, or tonal adjustment.
- Right-click and choose Edit In Evoto.
- Confirm the TIFF handoff.
- Apply the Evoto preset.
- Export to the original folder with A non-RAW image will replace the existing file enabled.
- Return to Lightroom Classic and verify the result.
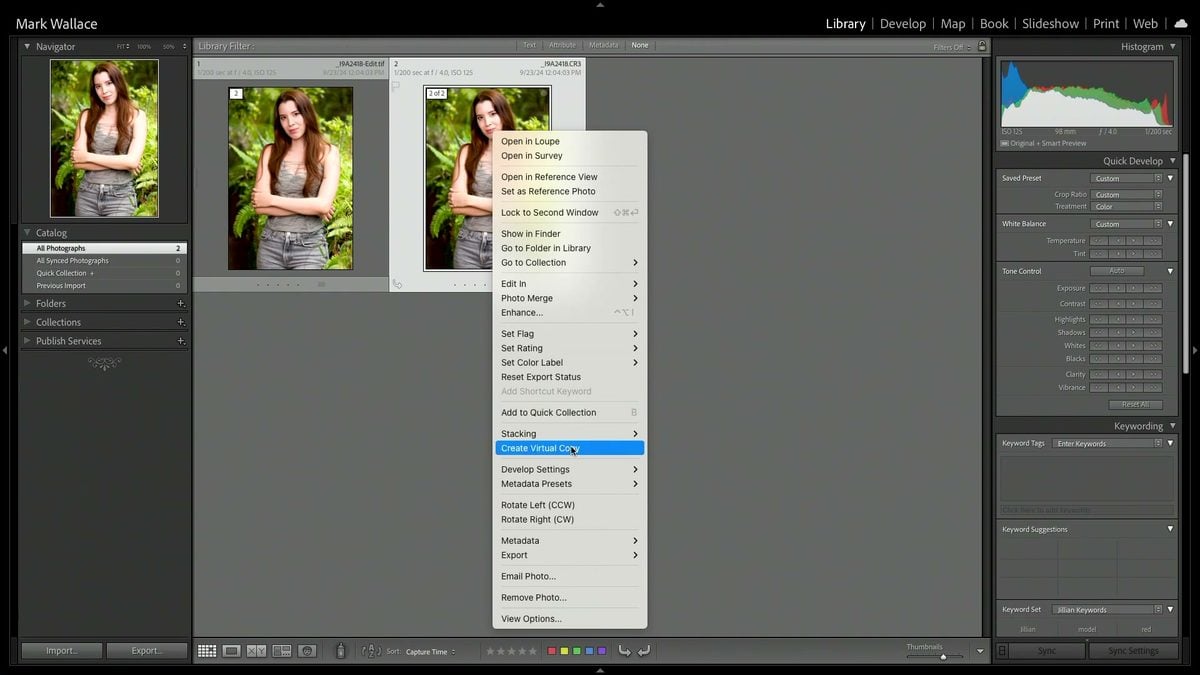
A virtual copy is useful when you want more than one Lightroom interpretation of the same RAW capture. Each version can carry its own crop and development settings into a separate rendered TIFF before receiving the Evoto edit.
After the first careful test, the practical workflow becomes short: develop in Lightroom Classic, choose Edit In Evoto, retouch, replace the TIFF, and continue working in the catalog.
“In my experience, this is the absolute fastest way to get stuff from Lightroom Classic over into Evoto and then back.”
Quick Checklist
- Update Evoto to version 3.8 or later.
- Test the workflow with one RAW photo first.
- Open an Evoto project in advance if the image should land in that project.
- Apply the necessary RAW adjustments in Lightroom Classic.
- Choose Edit In > Edit In Evoto.
- Select Edit a Copy with Lightroom Adjustments.
- Use TIFF, ProPhoto RGB, and 16-bit as a high-quality starting point.
- Apply the portrait edit or preset in Evoto.
- Set the export destination to Folder of Original Photo.
- Enable A non-RAW image will replace the existing file.
- Confirm the replacement and allow Evoto to create its backup.
- Return to Lightroom Classic and resolve the metadata warning.
- Use virtual copies when you need multiple Lightroom starting points.
Final Thoughts
This round-trip workflow does not ask Lightroom Classic and Evoto to do the same job. Lightroom remains the home for the RAW files, catalog organization, and initial development. Evoto becomes the focused retouching step for skin, eyes, blemishes, and saved portrait treatments.
The most important detail is the replacement setting. Without it, a normal Evoto export creates another file that must be managed separately. With it, Evoto updates the TIFF Lightroom Classic already knows, and the finished portrait appears back in the catalog automatically.
Try the process with one image before using it on client work. Watch the original folder, confirm which file is being replaced, check the backup, and resolve the metadata warning. Once those pieces are familiar, moving from Lightroom Classic to Evoto and back becomes a fast, repeatable part of the editing workflow.
Want to see the complete handoff performed in real time? Watch the original video on Mark Wallace’s channel.
📷 Author Bio
Mark Wallace is a photographer, educator, and world traveler who has been teaching photography both in person and online since 2003. Millions have watched his classes on AdoramaTV, CreativeLive, Fstoppers, ISO 1200, and at live workshops around the world. He is also the founder of SnapFactory, a creative hub designed to provide photographers with inspiration, collaboration, and education.
Build Your Own Workflow with Evoto
Retouch photos with Evoto and make your photos best!


