

Quick Answer
- Tight crops and prints reveal nostril cleanup problems long after a phone review looks “fine.”
- The same tool is useful in newborn and child portrait delivery when you need to remove visible mucus or dried nasal residue before handing off finals to parents.
- In Evoto Desktop, the cleanup tool lives in Portrait Retouching -> Blemish Removal -> Nostril Cleanup.
- Set the pass on the worst hero frame first. Judge it with Original, After, and the eye-icon comparison before syncing it anywhere else.
- If the nose still feels heavy after cleanup, then open Facial Reshape -> Nose for a tiny Width or Nose Tip adjustment.
A nostril cleanup problem usually appears at delivery time, not culling time. A client approves the gallery on a phone, then the album spread, cropped headshot, or homepage banner exposes every dark fiber on the nostril rim. In newborn delivery, the same thing happens when a close face crop reveals dried mucus or tiny nose-area residue that nobody noticed during a fast cull.
That does not mean the portrait was bad. It means the file has crossed from casual viewing into professional scrutiny.
The weak version of this topic talks vaguely about “nose-area enhancement.” Real retouchers do not work that way. They want to know exactly where the control lives, when to use nostril cleanup, how far to push it, and when to stop before the nostril edge starts looking fake.
This guide is written from that angle.
For broader shaping tools beyond cleanup, read the Nose Editor guide on the Evoto blog or the AI Nose Shaper tutorial. If you want the main product anchor first, start with Evoto. For a quick definition of why close framing changes what viewers notice first, see close-up.
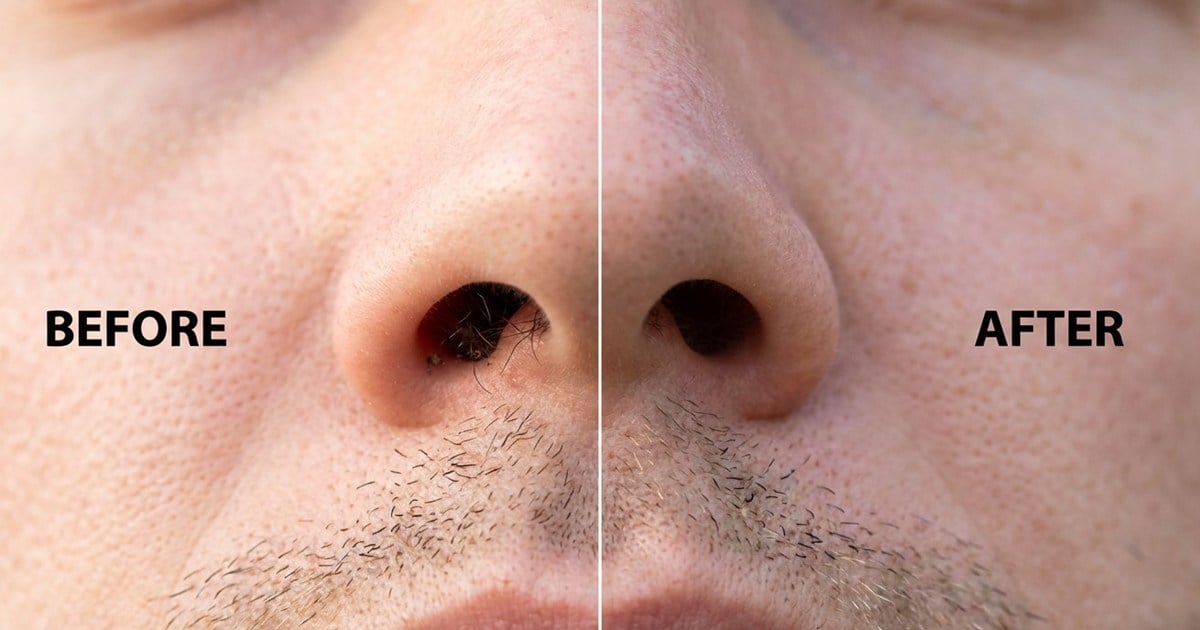
Why Nostril Cleanup Becomes a Delivery Problem
Phones hide small distractions. They compress the file, shrink the face, and keep the viewer emotionally focused on expression.
Professional delivery does the opposite:
- A tight LinkedIn crop puts the nostril edge near the center of attention.
- A large print keeps the viewer on skin texture and edge quality much longer.
- A corporate or school-photo workflow magnifies consistency problems across many files at once.
- A newborn close-up or toddler portrait can capture dried mucus or small nose residue that parents would absolutely expect removed in the delivered file.
That is why wedding photography delivery, commercial headshots, and newborn or child portrait photographers all run into the same problem from different angles. The quality standard is the same: remove distraction, keep identity.
Nostril Cleanup in Evoto: The Real UI Path
If you want to remove visible nose hair, mucus, or small debris, the working path is:
Portrait Retouching -> Blemish Removal -> Nostril Cleanup
That matters because vague wording can easily drift into an invented workflow. The actual control is not buried inside Facial Reshape. It sits in the blemish-cleanup family, which makes sense: you are cleaning a distraction first, not changing facial structure.
Before that, make sure you’ve got Evoto on your device:


Powerful AI Photo Editor
How to Apply Nostril Cleanup on a Hero Frame
Here is the version that actually scales in a studio.
Step 1: Start with the worst crop, not the easiest one
Pick the file where the nostril detail is most obvious. That is usually the frame with the closest crop, strongest contrast, or highest chance of being printed large.
If you solve the hardest frame first, the rest of the batch becomes easier to judge.
Step 2: Apply Nostril Cleanup like a hygiene pass
Open Portrait Retouching and expand Blemish Removal. Raise Nostril Cleanup only until the distracting fibers or debris stop catching your eye.
This is the crucial nuance: the slider is for cleanup, not sterilization. You still want the nostril rim, pores, and tiny tonal transitions to feel real. If the lower nose starts looking airbrushed, you went too far.
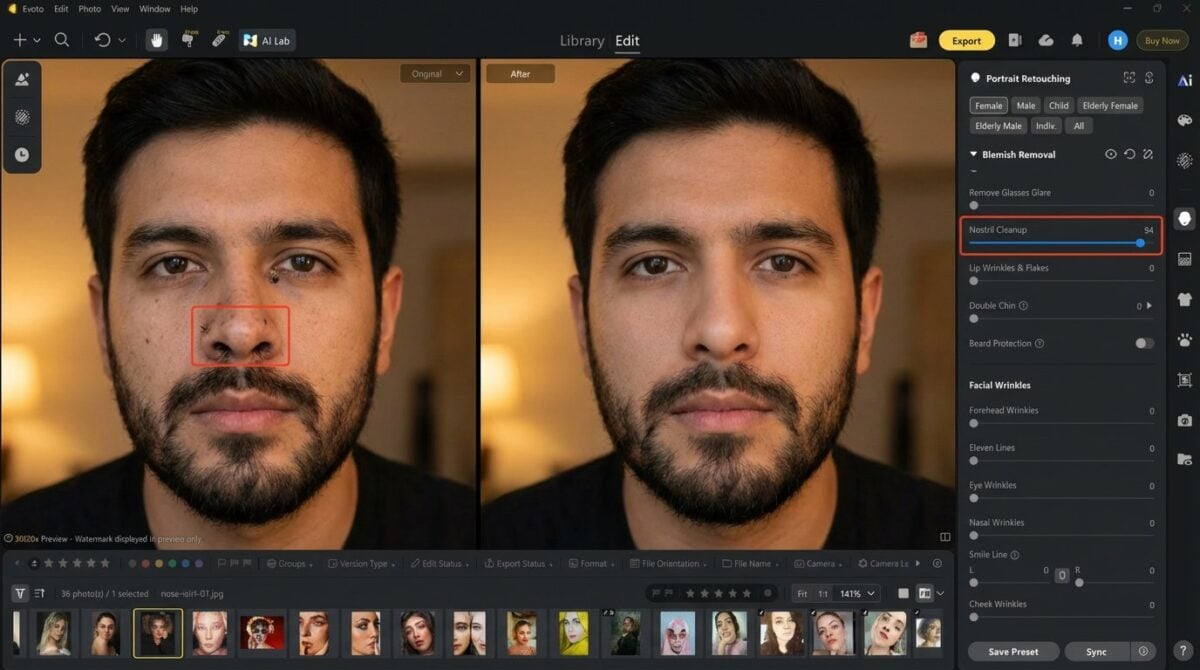
This is also where the tool earns its place in newborn photography. Babies and young children often give you a perfect expression and a perfectly usable frame except for a small streak of mucus or dried residue at the nostril edge. That is not a reshaping problem and not something you want to leave for manual clone work on every close-up. A restrained Nostril Cleanup pass solves the delivery issue while keeping the baby’s skin texture and natural nose shape intact.
Step 3: Compare the adjustment the right way
The best comparison workflow is not just a quick glance at After.
Use three checks:
- Original for your baseline.
- After for the delivered result.
- The eye-icon comparison for the specific adjustment group when you want to hide only that effect.
In practice, hold the eye icon to compare the whole feature group, or hold a slider name to compare that specific adjustment. That is the kind of detail a real retoucher uses because it isolates the cleanup decision instead of flattening the whole portrait history.
Step 4: Only shape the nose after cleanup if the portrait still needs it
Sometimes the complaint is not just nose hair. Once the nostril area is clean, the bridge or tip may still read heavier than you want in a close crop.
That is when you move into Facial Reshape -> Nose and make a restrained structural correction:
- Width if the nostril wings still read broad in a frontal portrait.
- Nose Tip if the lower third still feels visually heavy.
- Symmetrize only when the pose is truly straight-on and balance matters more than expression.
Cleanup first, geometry second. That order protects edge quality and keeps you from chasing the wrong problem with the wrong tool.
Step 5: Batch safely instead of blindly
Once the hero frame looks right:
- Save a preset if you expect to reuse the same cleanup strength.
- Sync only to images with similar pose, crop, and file scale.
- Spot-check outliers before export.
This is especially important in volume work. A frontal school-photo frame and a loose laughing wedding portrait do not need identical cleanup strength even if both came from the same session.
The same restraint applies to newborn sessions. Remove the temporary distraction, but do not let the cleanup drift into broad skin smoothing or shape changes.
Powerful AI Photo Editor
What Good Nostril Cleanup Should Still Preserve
The finished result should keep:
- natural nostril edge definition
- believable skin texture
- tonal continuity around the philtrum and upper lip
- the subject’s actual anatomy
If the nostril opening starts looking painted in, or if the lower nose suddenly loses all structure, the retouch crossed from delivery polish into overcorrection.
The same logic applies to more sensitive cleanup examples too. The tool can remove obvious distraction effectively, but the professional bar is still realism.
Privacy and Ethics in Nostril Cleanup Work
Portrait studios often handle children, executives, bridal work, and other sensitive client files. That makes local workflows part of the professionalism story, not just a technical preference.
For client-facing positioning, frame Evoto Desktop as a practical local workstation tool that helps you finish sensitive files without sending them through random consumer demos. That angle supports data privacy for professional photographers and still reads naturally in a studio conversation.
Common Nostril Cleanup Mistakes
Mistake: You describe the workflow as a general nose retouch when the actual control is in Blemish Removal.
Fix: Name the real path: Portrait Retouching -> Blemish Removal -> Nostril Cleanup.
Mistake: You judge the cleanup only on the overall portrait.
Fix: Check Original, After, and the eye-icon comparison so you isolate the cleanup itself.
Mistake: You reshape before you clean.
Fix: Run Nostril Cleanup first. Structural edits should come only after the distraction is gone.
Mistake: You sync the same strength across every image in the gallery.
Fix: Sync only to similar frames and spot-check the tightest crops by hand.
Mistake: You remove all evidence of texture.
Fix: Stop as soon as the distraction disappears. Good cleanup still looks photographic.
Mistake: You treat newborn cleanup like beauty retouching.
Fix: Remove only temporary residue or visible mucus, and keep the baby’s natural skin texture and facial structure intact.
Related Links
For a general browser-based overview of the tool family, see AI Photo Editor.
For the desktop app discussed in this workflow, see download Evoto.
Powerful AI Photo Editor
Conclusion
Good nostril cleanup is not glamorous, but it is exactly the kind of detail clients remember when a portrait feels fully finished.
In Evoto Desktop, the workflow is straightforward once you name it correctly: Portrait Retouching -> Blemish Removal -> Nostril Cleanup, then compare with Original, After, and the eye icon before you sync anything. If the nose still needs shape refinement after that, move into Facial Reshape with a light hand.
That is a professional delivery workflow. It sounds right because it is how a retoucher actually works.
FAQ
1. Where is nose hair cleanup in Evoto Desktop?
Open Portrait Retouching, then Blemish Removal, then use Nostril Cleanup.
2. Should I use Facial Reshape before Nostril Cleanup?
No. Clean the distraction first. Only use Facial Reshape -> Nose if the portrait still needs a structural adjustment afterward.
3. How do I compare the cleanup accurately?
Switch between Original and After, then use the eye icon to compare the whole adjustment group or isolate a specific effect.
4. Can I sync nostril cleanup across a whole session?
Yes, but only across similar poses and crop scales. Always spot-check the tightest frames before export.
5. Is Nostril Cleanup useful for newborn or child portraits?
Yes. It is a practical delivery tool for removing visible mucus, dried residue, or similar small distractions in newborn and child close-ups, as long as you keep the edit light and preserve natural skin texture.
6. What should the final result still look like?
It should still show natural nostril edges, pore texture, and believable skin transitions. The subject should look cleaned up, not airbrushed.



