Glare can be the bane of a photographer’s existence. That perfect beach shot ruined by a blinding sun reflection on the water? The once-majestic mountain vista overshadowed by lens flare? Fear not, photo warriors! There are ways to reclaim your images from the clutches of glare.
In this guide, we’ll explore various methods to remove glare from photo, from quick and easy fixes to more advanced techniques. No matter your editing experience, you’ll find a solution to make your photos shine (without the unwanted kind of shine, of course).
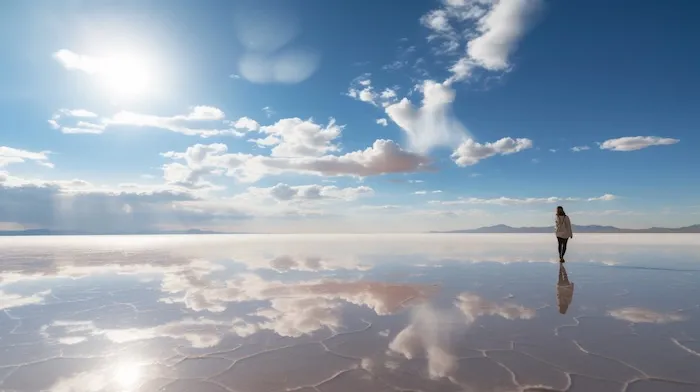
Understanding Glare: There’s More Than Meets the Eye
Ever taken a picture that looked perfect on your camera screen, only to find it marred by unsightly bright spots or hazy circles later? That is glare.
It can be the difference between a breathtaking landscape and a blurry mess. But fear not! Before we dive into the banishment of glare, let’s break down its two main types:
- Lens Flare: This sneaky culprit appears when stray light hits your lens, causing ghosting or hazy circles to form in your photo. Imagine a disco ball effect, but way less fun.

- Surface Glare: This one arises when light reflects off shiny elements within the scene, like water, glass, or even someone’s sunglasses. Think of that blinding reflection on the water ruining your beach shot – that’s surface glare at its finest (or worst, depending on how you see it).
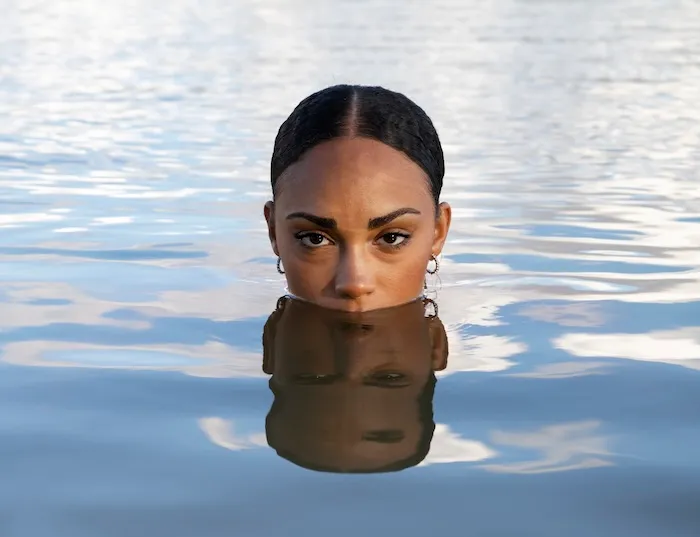
By understanding these two types of glare, you’ll be better equipped to tackle them in the editing battlefield. Stay tuned for part two, where we’ll explore various techniques to remove glare and restore your photos to their former glory!
Battling the Beast: Techniques to Remove Glare from Photo
Conquered glare in theory? Now it’s time to translate that knowledge into action.
Here’s your arsenal of weapons against those pesky glares:
#1 – The Editing Software
Most photo editing programs like Evoto AI photo editor come pre-equipped with built-in glare reduction tools. These work like magic by adjusting highlights, shadows, and clarity to lessen the glare’s intensity. Think of it as turning down the volume on a glaring spotlight.
Evoto – The Most Efficient AI Photo Editor
#2 – Spot Heal (or Clone Stamp)
For more targeted glare removal, consider the spot healing brush (or clone stamp tool). Imagine having a magic paintbrush that can copy glare-free pixels from another area of your photo and seamlessly blend them over the affected spot. This is perfect for removing smaller, isolated glares.
#3 – Selective Adjustments
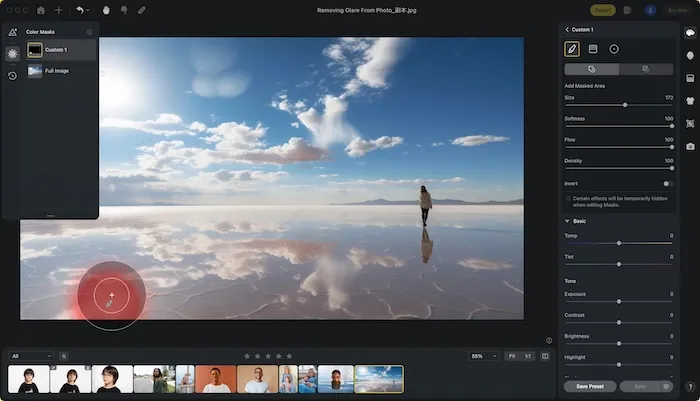
Need to tackle intricate glare on specific areas? Selective adjustments with AI masking is your friend. This allows you to fine-tune properties like exposure and saturation only in the areas you define. Like a skilled surgeon, you can target the glare without harming the surrounding details.
#4 – Dodge and Burn
Dodge and burn tools are like the old masters of glare removal. Dodge allows you to lighten specific areas, while burn darkens them. Use them strategically to selectively reduce glare’s impact, bringing back the natural light balance in your photo.
#5 – The AI Edge (Evoto AI)
Feeling fancy? Some advanced photo editing software to remove glare from photo, like Evoto AI, boasts AI-powered glare removal features. Imagine having a super-powered sidekick that uses artificial intelligence to automatically detect and eliminate glare. This can be a real time-saver, offering a quick, one-click solution for less complex glare issues.
Remember, these techniques can be used individually or combined for maximum glare-fighting efficiency. Stay tuned for part three, where we’ll explore some preventive measures to keep glare at bay before you even hit the shutter button!
Read More:
- How to Remove Face Shine from Photo
- Best AI Photo Editor Remove Blemishes in 2024 for PC, iOS and Online
How to Remove Light Glare From Photo with Evoto AI
Having conquered glare in theory and with traditional editing techniques, let’s explore Evoto AI’s toolbox for tackling light glare. Here, we’ll delve into two main approaches to remove glare from photo:
#1 – Selective Adjustments with AI Masking
This method allows you to adjust specific areas affected by glare.
- Navigate to Color Adjustments > Local > Custom masking (create a new mask).
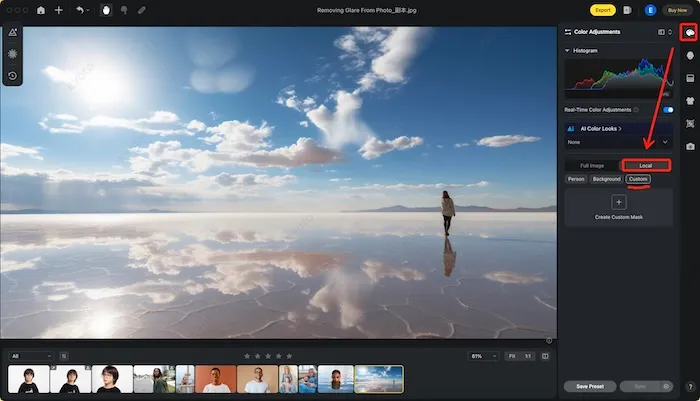
- Click Create Custom Mask. Use the Brush or Radial Gradient tool to meticulously select the area with glare (like a water reflection).
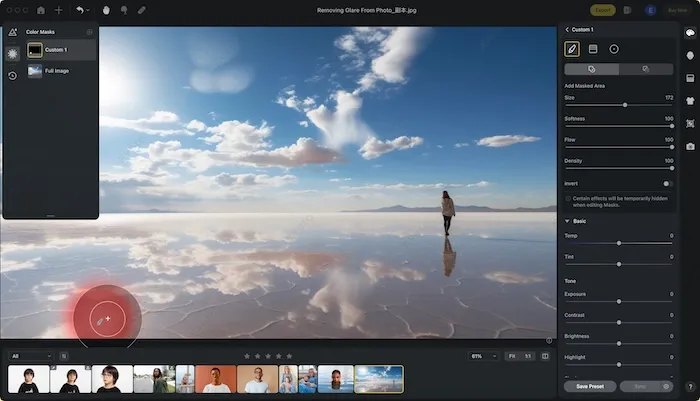
- Go to the Basic color adjustments panel. Here, you can fine-tune parameters like exposure, shadows, HSL (Hue, Saturation, Lightness), and Color Grading to specifically reduce light glare on the water surface.
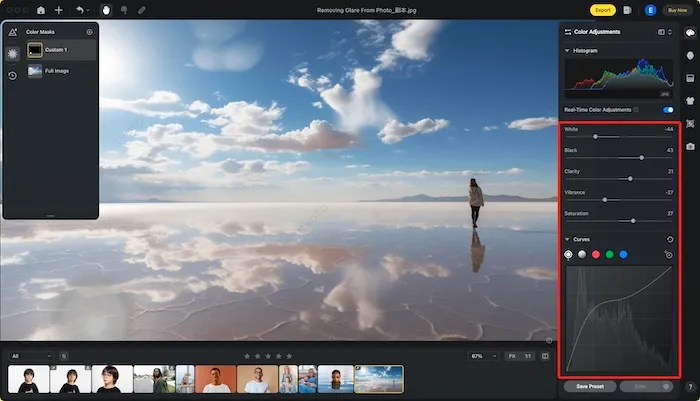
#2 – Spot Healing Brush for Minor Glare:
The Spot Healing Brush is excellent for removing small, isolated glares.
- Go to Healing Tool > Spot Healing Brush Tool.
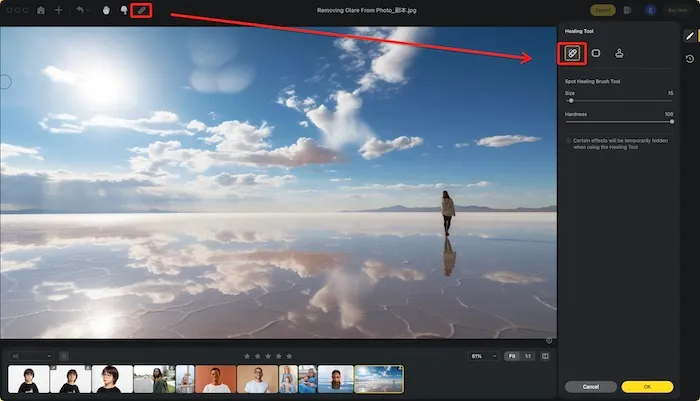
- Adjust the Size and Hardness of the brush depending on the glare size.
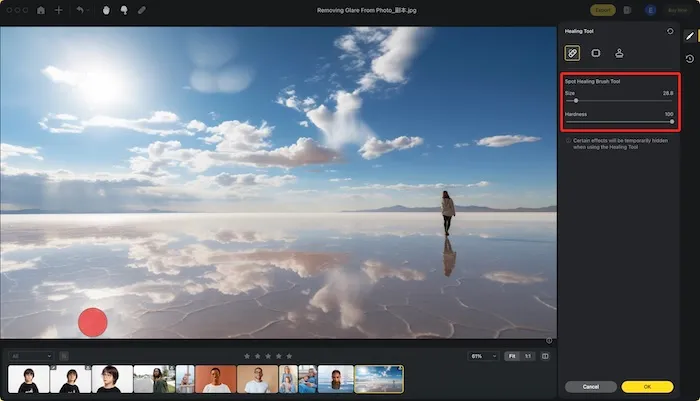
- Brush over the glare area (like a water reflection) to remove it.
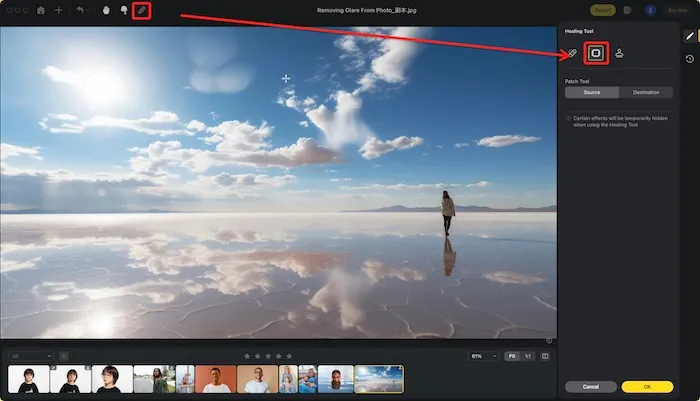
#3 – Patch Tool for Larger Areas
The Patch Tool is ideal for tackling larger areas affected by light glare.
- Navigate to Healing Tool > Patch Tool.

- Adjust the Size and Hardness of the Patch Tool.
- Click and drag to select the area with glare (like a water reflection).
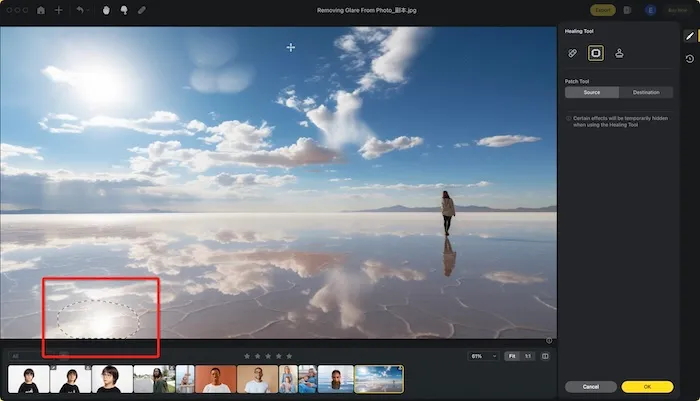
- Move the selection to a glare-free area with similar lighting and texture (ideally next to the glare). This area will be “copied” to replace the glare.
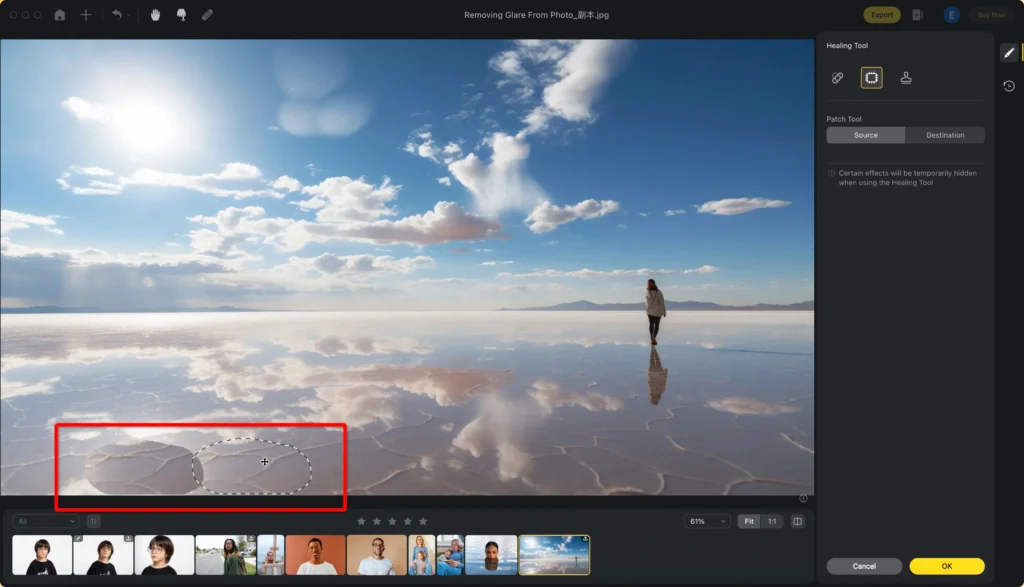
#4 – Clone Stamp Tool for Precise Glare Removal:
The Clone Stamp Tool lets you copy glare-free pixels from another part of the photo.
- Go to Healing Tool > Clone Stamp Tool.
- Adjust the Size, Hardness, and Opacity of the Stamp Tool based on the glare size.
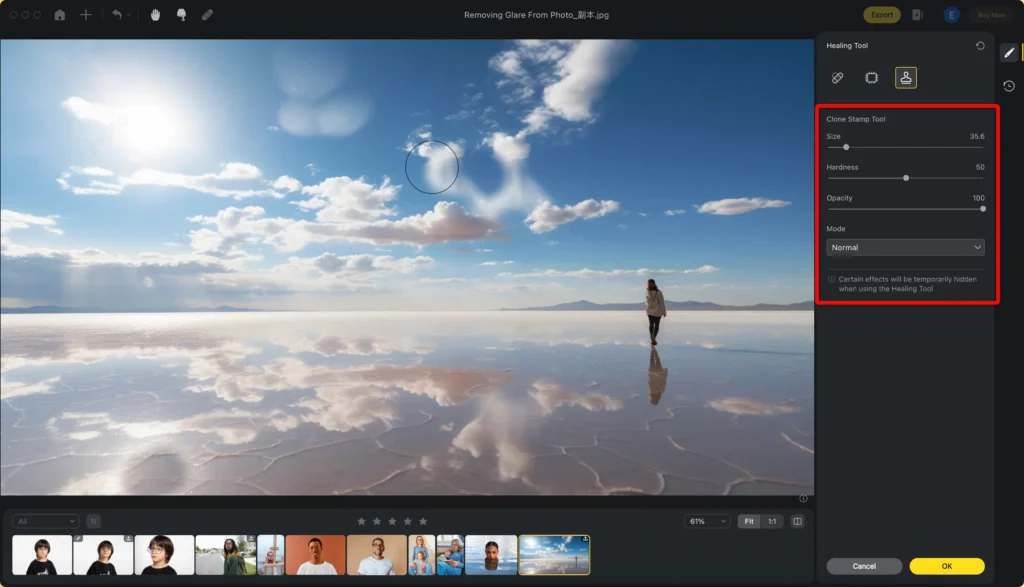
- Hold Option (Mac) or Alt (Windows) and click on a glare-free area with similar lighting and texture (ideally next to the glare). This copies the pixels.
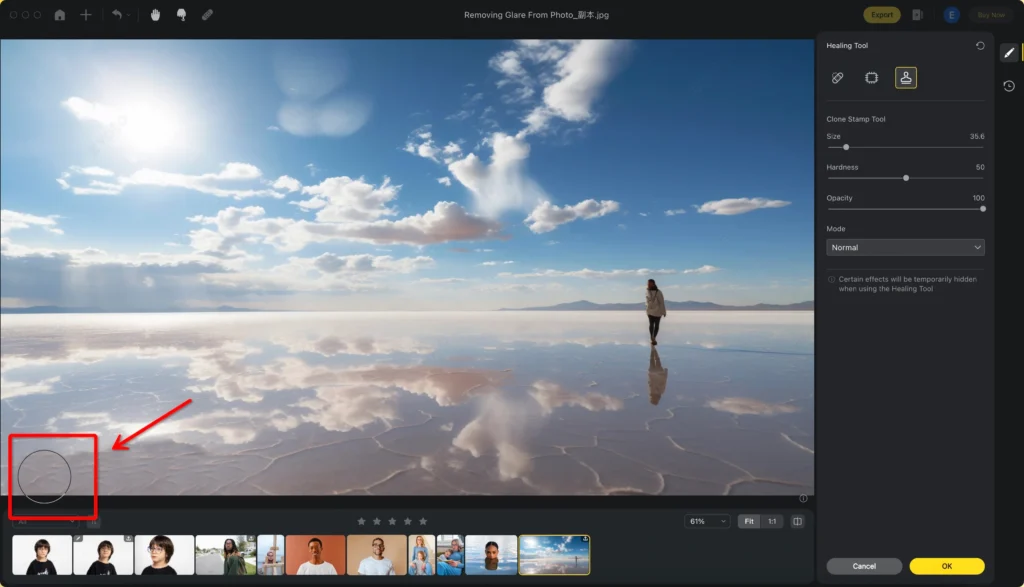
- Move to the glare area (like a water reflection) and click to “paste” the copied pixels, effectively removing the glare.

How to Remove Lens Glare from Photo with Evoto AI
While Evoto AI shines at removing light glare, lens flare demands a different tactic. Here’s how to address it using Evoto AI manual tools to remove glare from photo, while acknowledging its AI-powered solution:
#1. Manual Techniques for Lens Flare Removal
- Healing Tools: Remember the Spot Healing Brush and Patch Tool from Part 3? For minor, uncomplicated lens flare, they can still be surprisingly effective.
- Dodge and Burn for Precision: Dodge and Burn tools offer a more refined approach. Use Dodge to subtly reduce the flare’s overall brightness, and Burn to darken its edges, minimizing its prominence.
#2. Content-Aware Fill
For complex lens flare, Evoto AI might offer a Content-Aware Fill tool. This analyzes the surrounding area and attempts to seamlessly replace the affected area.
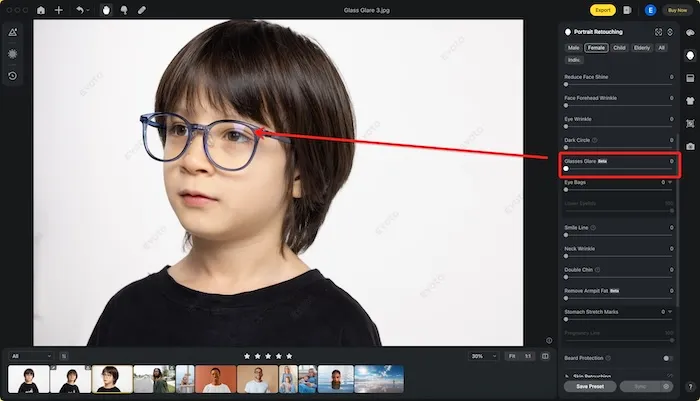
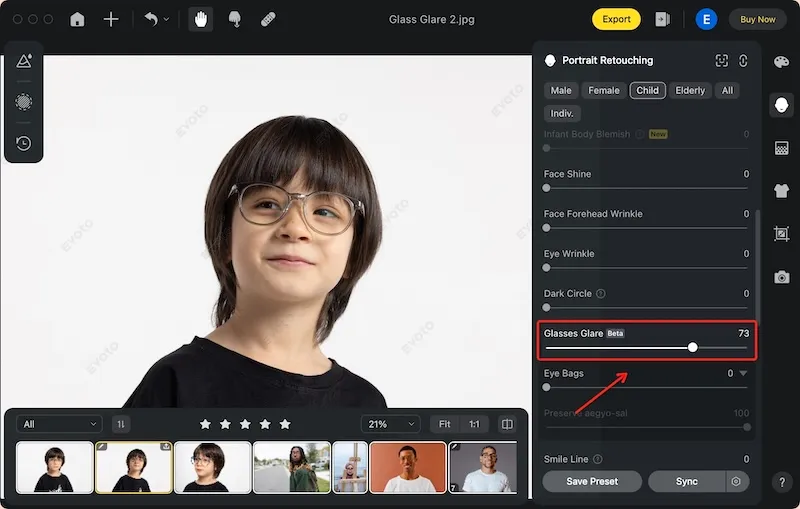
Evoto AI’s AI Glass Glare Removal (For Glasses Specifically): It’s important to note that Evoto AI also boasts an AI Glass Glare Removal feature specifically designed for eyeglasses. This one-click solution can be a lifesaver for you to remove glare from glasses in portrait photos.
Step 1: Download and install the Evoto AI editor to remove glare from photo onto your device.
The software is available for both Mac and Windows, making it accessible for everyone.
Evoto – The Most Efficient AI Photo Editor
Step 2: Upload your image to Evoto.
Step 3: Navigate to the Portrait Retouching > Blemish Removal.
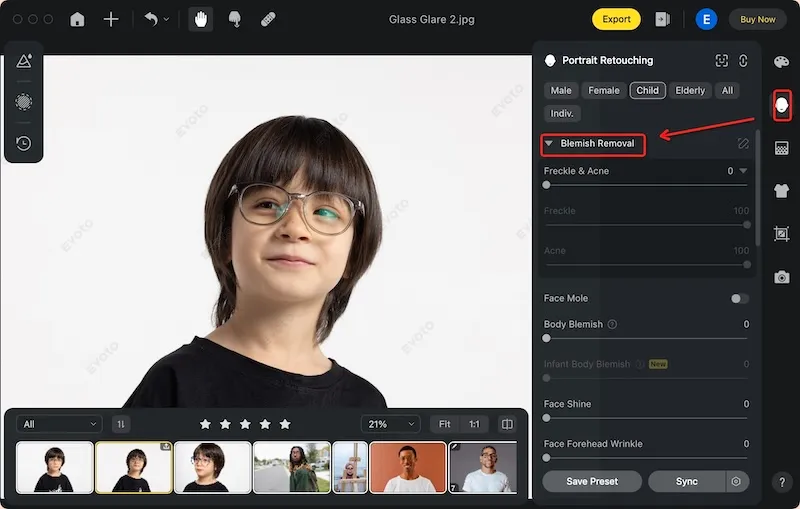
Step 4: Under the blemish options, you’ll find the dedicated Glasses Glare Removal toggle. Simply activate it. Evoto’s AI will work its magic to remove glare from photo. It will automatically detect and remov the glare from your subject’s glasses.
Conclusion
To remove glare from photos is no longer a battle! This guide explored various techniques, from AI-powered solutions in Evoto AI to manual editing mastery. Embrace Evoto AI’s user-friendly interface and its tools like the Healing Brush and selective adjustments.
Remember, preventing glare with a lens hood is ideal, but Evoto AI photo editor empowers you to fix it flawlessly when needed. So, go forth and capture stunning, glare-free photos.


