

It is wedding delivery night. The hero front smile already cleared the couple’s group chat. You pull one dance-floor three-quarter for a last polish pass, and the mouth suddenly looks glued on: wider, flatter, and oddly bright around the edge. That is the lip filler side profile (or half-turn) moment that exposes a front-only plump in the photograph. The same fail shows up in dating headshots and senior albums the second a friend shares a side crop instead of the approved smile.
This article stays in photography retouching. You will learn the fake tells, a practical checklist to walk strength back, and a full Evoto App fix path using 3D Lip Plumper. It is a photo edit workflow, not a clinical forecast. If you came here from a client text that says the lips look fake from the side, start with the diagnostic section, then rebuild on the angled frame before you touch the rest of the gallery.
TL;DR
- Spot the fake signals first in the photo: outline stretch, dead flat lip plane, one-sided bulge, duck projection, and waxy missing texture.
- Pull strength down, separate width from volume, and force a side or three-quarter check before you ship.
- Rebuild volume in Evoto on the angled frame, then recheck identity on a front frame.
- Run delivery QC across smiles, speech frames, and post-contrast sharpening.
This is not another eight-app ranking. Below is how you rescue a lip filler side view that already failed in a portrait set.
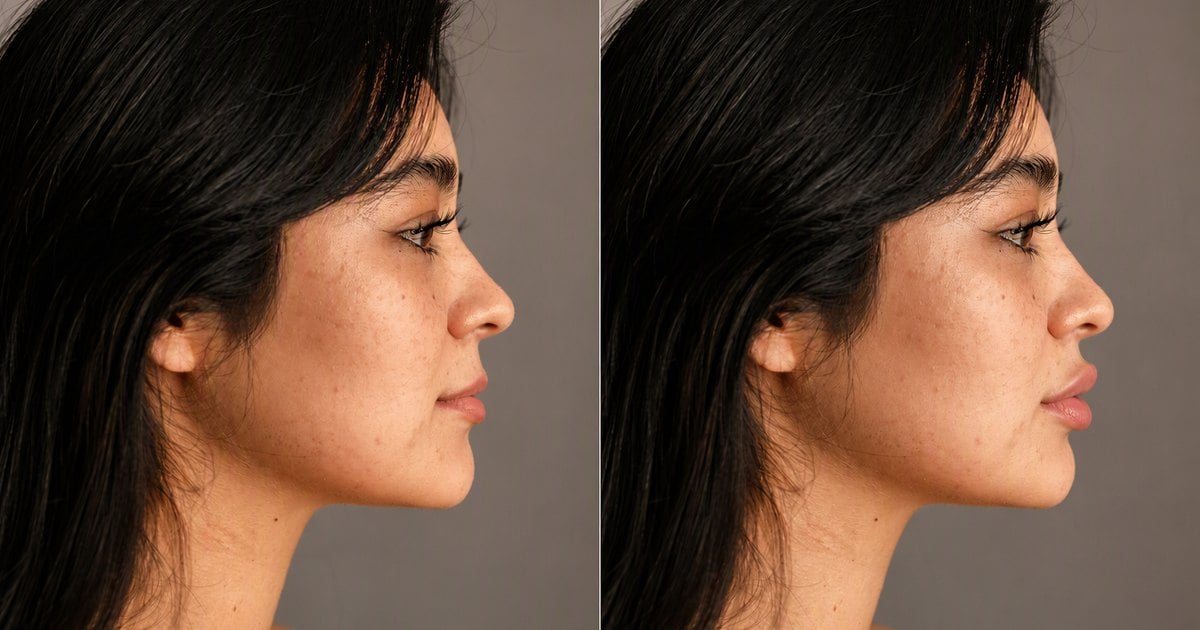
Fake Lip Filler Side Profile Looks: What Retouchers Flag First
When a side profile lip filler photo edit fails, it almost never fails as “a little too soft.” It fails as a mouth that got wider without gaining thickness, lost surface light, or started projecting like a filter preset. Use the five tells below as a fast read on the next reject.
The Mouth Gets Wider but Never Thicker
Passport-style front plumps are the usual culprit. You liquefied the outline so the smile looked fuller in the hero crop, then opened a lip filler side profile and saw only silhouette expansion. Thickness through the lip body never arrived. Mark that frame: if the mouth grows left-right but the profile stays paper-thin, you stretched outline, not volume. On a bridal aisle three-quarter photograph, that miss reads as a floaty mouth edge that does not meet the teeth plane the way a real fuller lip would.
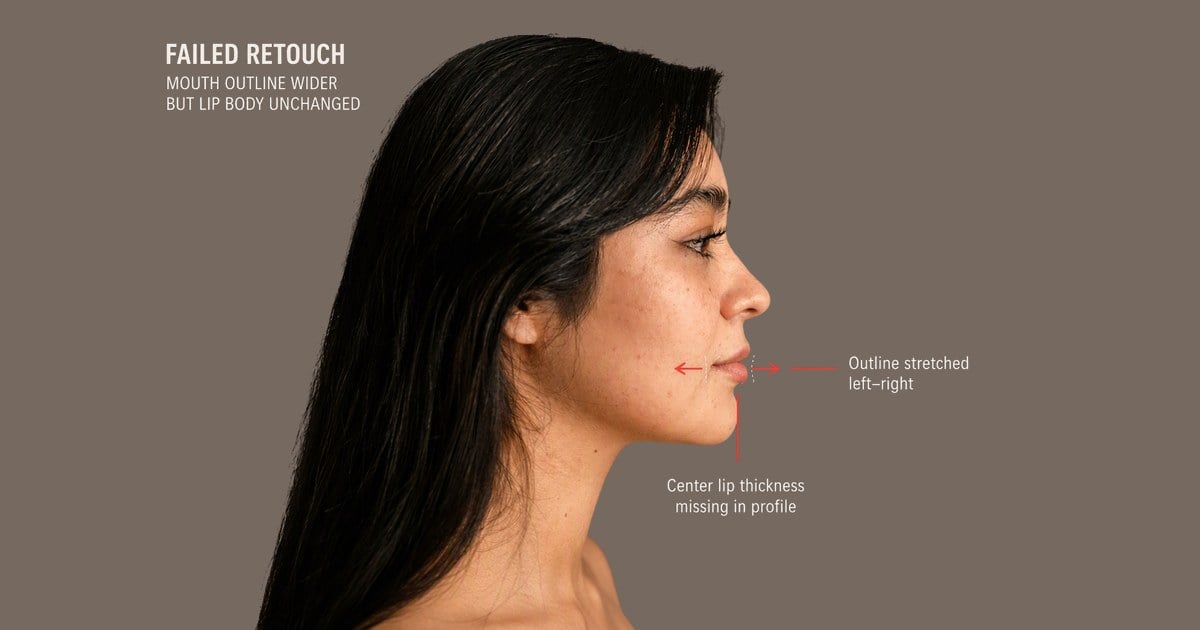
The Lip Surface Goes Dead Flat
Beauty-studio lips usually carry a soft highlight along the lip plane. Heavy blur or aggressive smooth-mouth passes erase that plane. From a three-quarter, the lips read like cut paper stuck on the face in the photo. Makeup try-on sets are especially fragile here: the lipstick catchlight was doing half the plump work, then a smoothness slider wiped it. If that highlight disappeared the second you added volume, restore light and texture before you raise strength again. A flat plane with a fat outline is still a fail on a lip filler side view.
Three-Quarter Views Bulge on One Side Only
Cover frames get the love. The opposite cheek turn gets ignored until the album layout needs it. One-sided bulge is common when you only edited the hero angle: the near lip looks inflated, the far lip stays original, and identity breaks in a photo grid. Portrait sessions with a “best cheek” instruction create the same trap. Always prove the edit on both turns if the set includes them, and keep notes on which frame set your strength master.
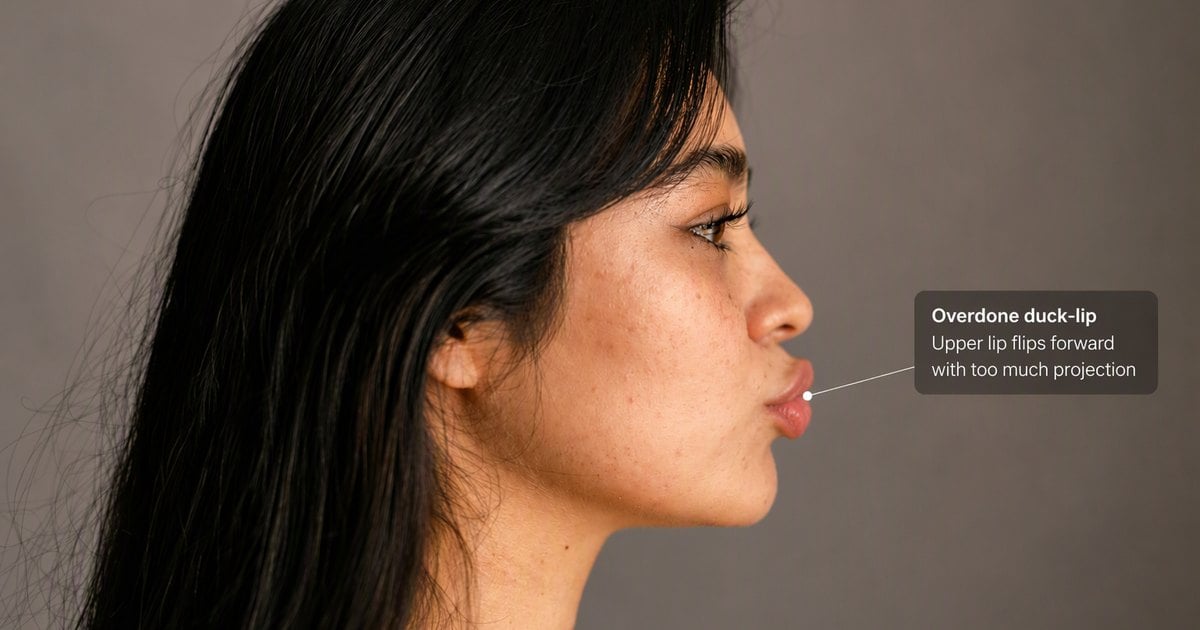
Too Much Lip Filler Side Profile and the Duck Lip Tell
Creators who slam one-tap plump presets often land here. The upper lip flips, the mouth projects forward, and the profile reads as too much lip filler side profile rather than a soft beauty finish in the photograph. Across beauty forums and creator threads, the recurring complaint under duck lips filter talk is the same: overdone projection that looks done instead of fuller, especially once someone flips to a side crop in comments. If the side silhouette starts to beak, you are past the natural range. Pull back before you invent new shape controls, and treat duck projection as a strength problem first, not a missing cupid’s bow preset.
Mouth Texture Disappears and the Face Turns Waxy
Volume plus total lip wrinkle erasure is a classic delivery miss. Fuller lips with zero surface grain look like plastic from a side angle, and skin next to the mouth starts to look painted in the photo. When the mouth goes waxy while you plump, clean texture carefully instead of bleaching every line; the guide to remove lip wrinkles and dead skin from photos pairs with a restrained plump so the lips stay believable. Keep enough micro-detail that a close phone crop still reads like skin.
A Practical Checklist Before You Touch Another Slider
Do not open a new tool until you walk this list. Each tip is a delivery habit for photo QC, not a theory card.
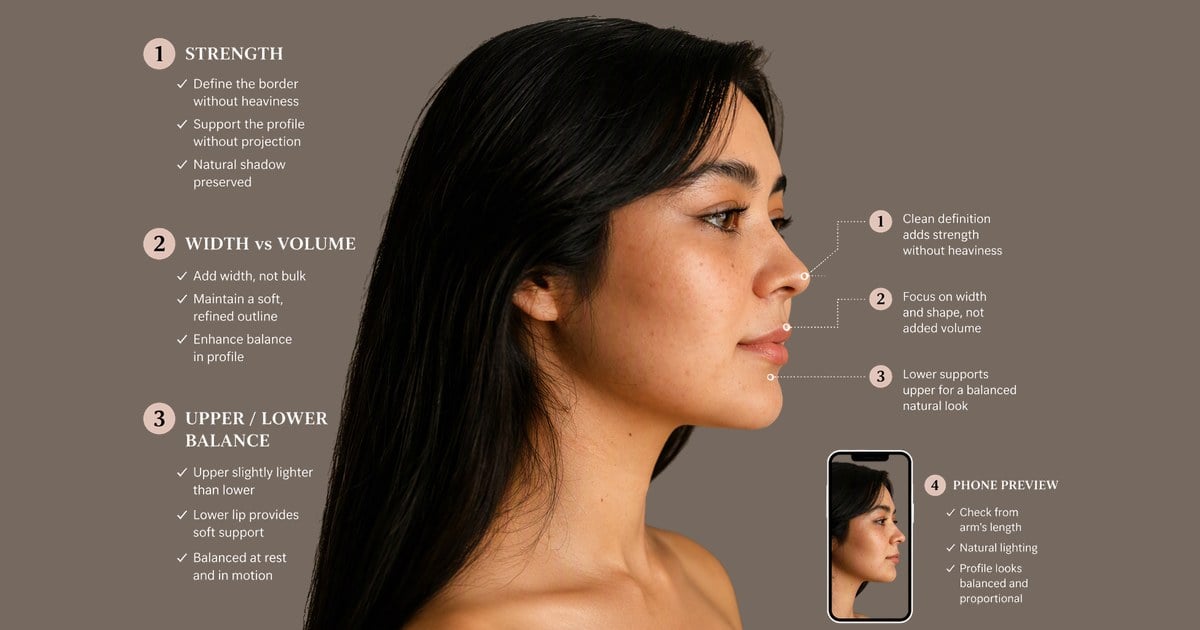
Restart From Low Strength
Dating-profile rejects often sound like “this looks like you had work done.” That feedback is almost always strength, not a missing preset. Drop the plump toward zero, rebuild slowly, and stop at the last setting that still looks like the same person in the photograph. Save a named version each time you raise the slider so you can roll back without guessing.
Force a Side or Three-Quarter Check
A front pass is not done. In a wedding set, grab one head-turn dance frame or aisle three-quarter before you mark lips complete. If the lip filler side profile fails, the front win does not count. Build the habit into your soft-proof checklist the same way you already check white balance on skin in photography delivery.
Separate Width From Volume
If you must liquify, push thickness through the lip body in tiny steps. Do not yank the corners outward. Corner pull is how mouths get cartoon-wide with no depth in the photo. When in doubt, toggle before and after on the center of the lips only, and ignore the smile width until volume is honest.
Think Upper and Lower Lips Apart
Stacking only the lower lip creates a tray-mouth profile: the bottom shelf grows while the upper stays thin. Balance both planes so the side silhouette stays even. Bridal close-up photographs with soft lipstick make this easy to miss until a profile still arrives in the cull.
Treat Gloss as a Side Dish
Lipstick sheen can make lips look optically plump in a photo. It cannot replace missing structure. Add a light gloss after volume reads correctly, not before. If gloss alone “fixes” the front crop, the angled frame will still look hollow.
Glance at the Lower Face
Aggressive lip projection can clash with chin soft tissue. If the under-chin area starts to fight the mouth, a light double chin cleanup in photo pass may help harmony; do not rebuild the whole jaw to hide a mouth mistake. Your job is proportion in the portrait, not a second face sculpt.
Preview at Delivery Size
Zoom to phone width at 100%. Clients judge albums on phones, not on your 200% retouch zoom. Fake projection that looked soft on a big monitor often screams on a nine-grid share. Do one final swipe test on a phone export before you call the gallery done.
Fix Angled Lips in Evoto App With 3D Lip Plumper
When the angled frame is the problem, rebuild volume where you can watch the profile update live. The walkthrough below is Evoto App only: Portrait → Facial Reshape → Mouth → 3D Lip Plumper.


Powerful AI Photo Editor
Open Evoto’s Lip Plumper feature page, then continue in the Evoto App Mouth panel with 3D Lip Plumper so angled photo frames gain volume instead of outline stretch.
Set Up the Right Frames First
Pick the same person in a clean front frame plus a side or three-quarter. Use even light and a mouth that is not covered by a glass, hand, or veil edge. A single hero front smile cannot prove the angled lip look. If the set only has one sharp angled still, treat that still as the master for strength, then mirror intensity carefully onto related fronts.
Skip motion-blur dance stills for the master; use a sharp three-quarter where you can still see lip texture. When clients only send a front selfie for a curiosity preview, ask for one head-turn capture before you lock a delivery look.
Follow the App Path, Then Prove It on a Side Frame
Step 1: Import the Angled Portrait First
Open Evoto App and import the side or three-quarter portrait first. The angled photograph is the master for strength.
Step 2: Open Mouth and Confirm Detection
Go to “Portrait” → “Facial Reshape” → “Mouth”. Confirm the mouth is detected and the preview tracks the lips. If detection drifts, reframe slightly so the full mouth is visible. Easy Mode path if you prefer a shorter UI: “Size” → “Mouth”.
Step 3: Raise 3D Lip Plumper Carefully
Find “3D Lip Plumper”. Start at 0, then raise to about 25 to 45 while watching volume and lip-plane light, not only outline width.
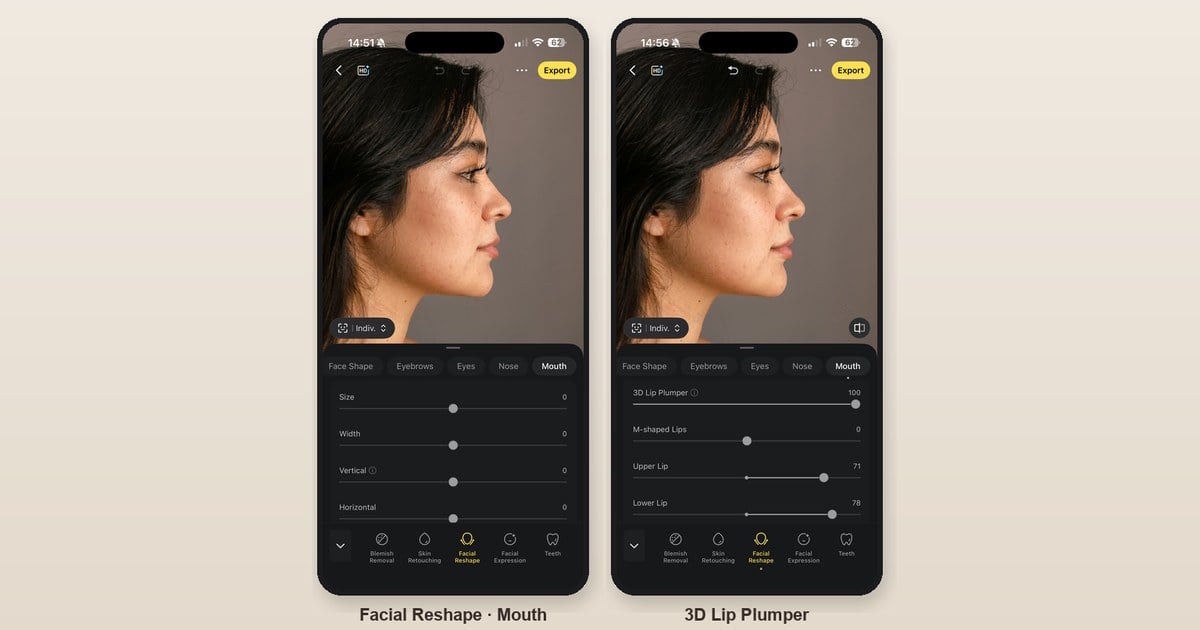
Step 4: Correct Duck Projection, Then Optional Balance
If the profile already looks duck-forward, reduce immediately. If the lips still look flat after a modest raise, add a little more in small steps. Optional: light “Upper Lip” or “Lower Lip” only when balance is off; touch “M-shaped Lips” only when the cupid’s bow needs definition; a low “Lipstick” gloss pass can add optical plump after structure is right.
Step 5: Prove Front Identity, Then Recheck the Side
Switch to the matching front frame to confirm identity, then return to the side frame for one last silhouette check. Run the same front versus side proof before export.
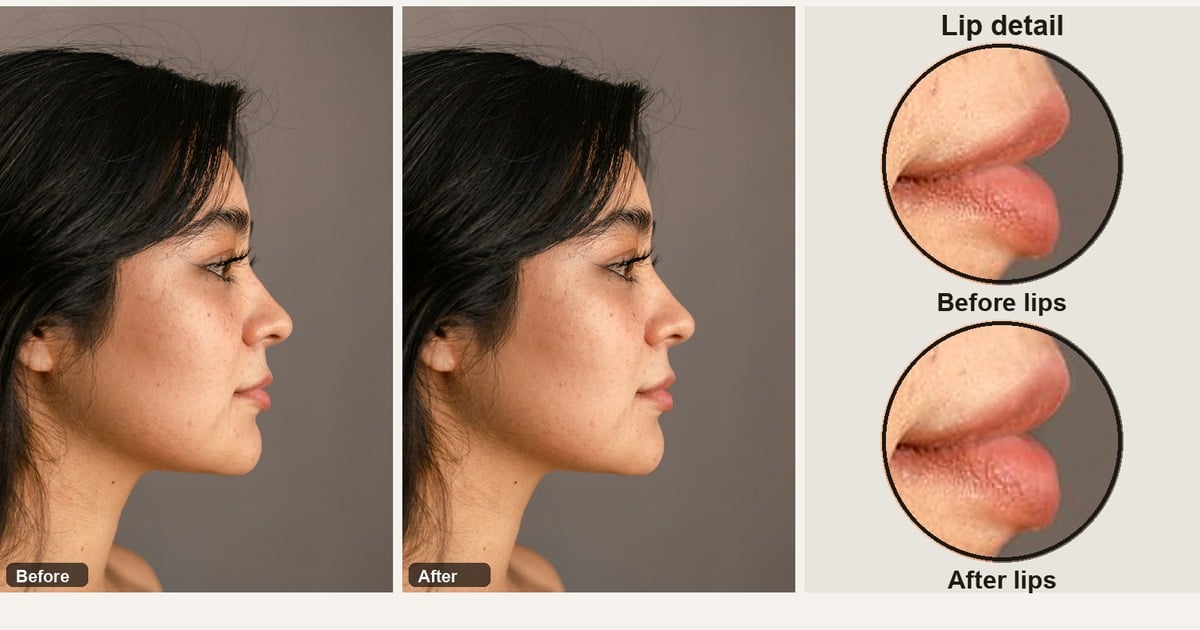
Platform note for angled rescues. When the fail is a side or three-quarter silhouette, the app remains the fastest place to watch 3D Lip Plumper update live on the problem frame. Evoto’s web tool is useful if you only need a quick browser confirmation of the same dimensional control. Once strength is locked, move the gallery to Evoto Desktop for Mouth reshape-style consistency and Lipstick polish across dozens of delivery files.
Adobe’s notes on keeping Liquify subtle in portrait work match the same habit here: small moves, frequent toggles, and no corner yanking. Evoto App simply puts dimensional volume on a dedicated slider so angled checks go faster on the phone you will deliver against.
After the slider passes, place the App before-and-after beside each other at phone width. You are looking for thickness with unchanged identity in the photograph, not a bigger smile outline.
Pass or Fail on the Angled Lip Edit
| Signal | Pass | Fail |
|---|---|---|
| Structure | Thickness plus believable lip-plane highlight | Outline got wider only |
| Identity | Still reads as the same person | Duck projection or filter face |
| Texture | Natural lip grain remains | Waxy plastic mouth |
Ship only when all three columns land on Pass for the problem angle. If structure passes but identity fails, strength is still too high. If identity passes but texture fails, reverse the smoothness stack before you raise plump again.
If the mess started as a one-tap beauty preset, compare tools in our best lip filler simulator tools review. If you are still choosing a photo preview path before any delivery edit, start with what would I look like with lip filler.
Delivery QC When the Whole Gallery Must Match
Graduation season is the loudest version of this failure. You polish forty album frames, perfect the smiling front cover, then a parent posts a side-view nine-grid and the mouth does not match. Wedding and senior photography sets share the same risk: hero smiles travel well in email proofs, while angled candids travel harder in family group chats.
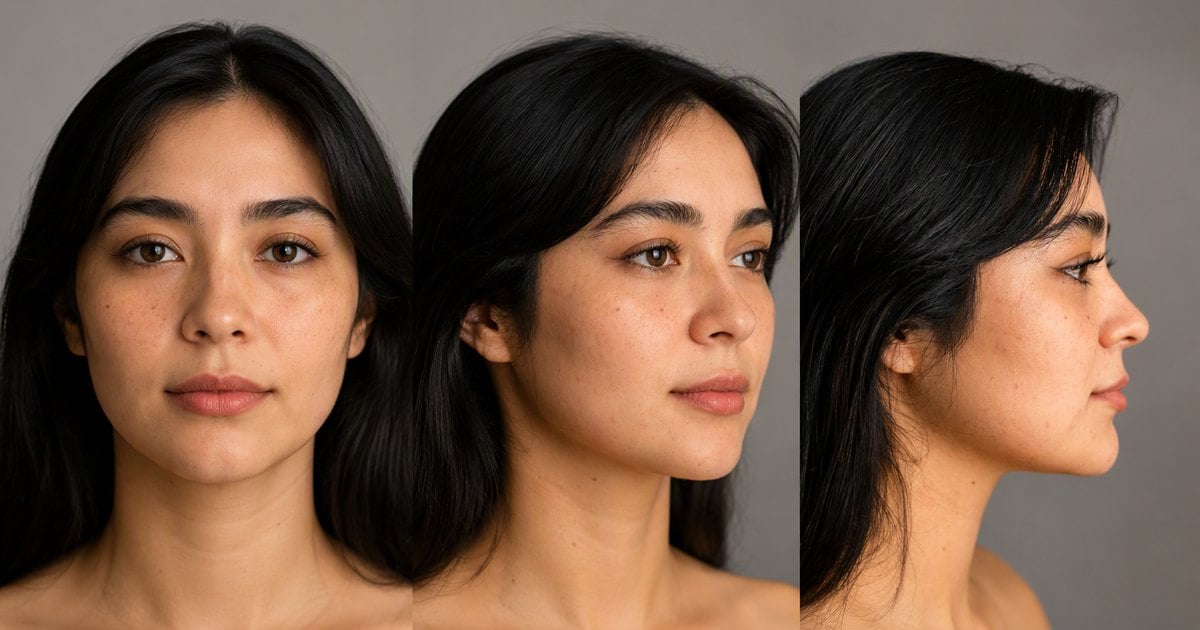
Keep Lip Volume Consistent Across Angles
If the cover smile is soft and the dance three-quarter is aggressive, viewers will catch the swap immediately in the photo gallery. Match strength to the weakest acceptable angled frame, not to the flattering front. When in doubt, export a three-frame strip (front, three-quarter, side) and ask whether they still look like one person.
Watch Smiles and Speaking Frames
Open-mouth laughs and mid-sentence stills exaggerate projection. A pass that survived a closed-lip profile can fail the second the subject talks. Pull a speaking candid into the proof stack even if it will not be a cover photograph.
Recheck After Contrast and Sharpening
Final grade passes make the mouth edge harder and can exaggerate a lip filler side profile that looked soft before polish. Toggle the side frame after you finish global contrast, clarity, and export sharpening. If the silhouette suddenly beaks, lower lip strength rather than softening the entire face again.
Powerful AI Photo Editor
An angled lip edit fails when volume is only outline stretch. Pull strength down, restore lip-plane light, and prove the edit on a three-quarter before delivery. Use Evoto App‘s 3D Lip Plumper as a practical fix for a weak lip filler side profile, and keep every export labeled as a photography preview, not a clinic result.
FAQ
1. Why does lip filler side profile look worse than the front view?
Front photo edits can hide flat stretch. Side and three-quarter views reveal thickness, projection, and surface light. If you only approved the hero smile, the angled frame is where fake width shows up first. Treat the angled still as the real QC gate for any plump decision in photography delivery.
2. How do I fix too much lip filler side profile in an edit?
Lower strength first. Rebuild with volume controls instead of corner stretch, balance upper and lower lips, then preview at phone width. In the Evoto App, dial 3D Lip Plumper down until the silhouette stops beaking, then add only what the identity can hold. If the file came from a beauty filter stack, strip unrelated face slims before you judge the mouth alone in the photo.
3. Duck lips versus a natural plump look in photos?
Duck lips usually mean a forward upper-lip flip and heavy mouth projection. A natural plump keeps the person’s lip shape, adds soft thickness, and preserves texture in the photograph. If the profile looks like a preset, you are in duck territory. Clients describe the fail as filter lips even when the front smile still looks pretty.
4. Should I fix angled lips in Evoto App, web online, or Desktop?
Use the Evoto App or the web online tool when the job is an angled or three-quarter volume preview and a fast strength alignment with 3D Lip Plumper. Use Evoto Desktop when the job is full-gallery photography finishing: batch consistency, fine Mouth reshape-style balancing, Lipstick polish, and export discipline across dozens of files. A practical team split: lock “how full” on the problem side frame in App or web online, then finish the set on Desktop under your studio pipeline. Match the Evoto form to the photo job instead of assuming every Mouth control exists everywhere.
5. Is this the same as real lip filler?
No. This article is about photo retouching and photography preview edits only. Real lip filler and related clinical procedures belong with licensed providers. Do not treat a slider result as medical advice or a dosage plan. Photo previews help with taste and identity talks; they do not forecast tissue response.
6. Is Evoto safe, and do you train AI on my uploads?
Evoto is built for secure photo editing workflows. Uploaded photos are handled to provide the editing service, and Evoto does not use your user content to train its AI models under its current product policy language. Keep client files organized under your own retention rules the same way you would with any other retouching tool.



