

A bridal client texts a fitting-day selfie and asks, “What would I look like with lip filler?” If you reply with a clinic before-and-after collage, she hears a medical promise. If you walk her through a photography retouch preview she can repeat, the conversation stays in photo editing where it belongs.
This guide covers four practical photo edit paths photographers and creators actually use: Photoshop Liquify, Evoto App, YouCam Makeup, and the browser lip filler simulator Pokecut. None of them replaces a licensed provider. All of them answer the photo version of the question.
TL;DR
- Pick the photo path that matches the job: Photoshop for pixel control, Evoto App for dimensional volume on a portrait panel, YouCam for a same-night selfie edit, Pokecut when installs are off the table.
- Keep strength low at first. Check a three-quarter or side frame before anyone falls in love with a front-only look.
- Treat every export as a photo edit preview, not a clinical forecast.
- After you pick a method, still QC angled frames the way you would before gallery delivery.
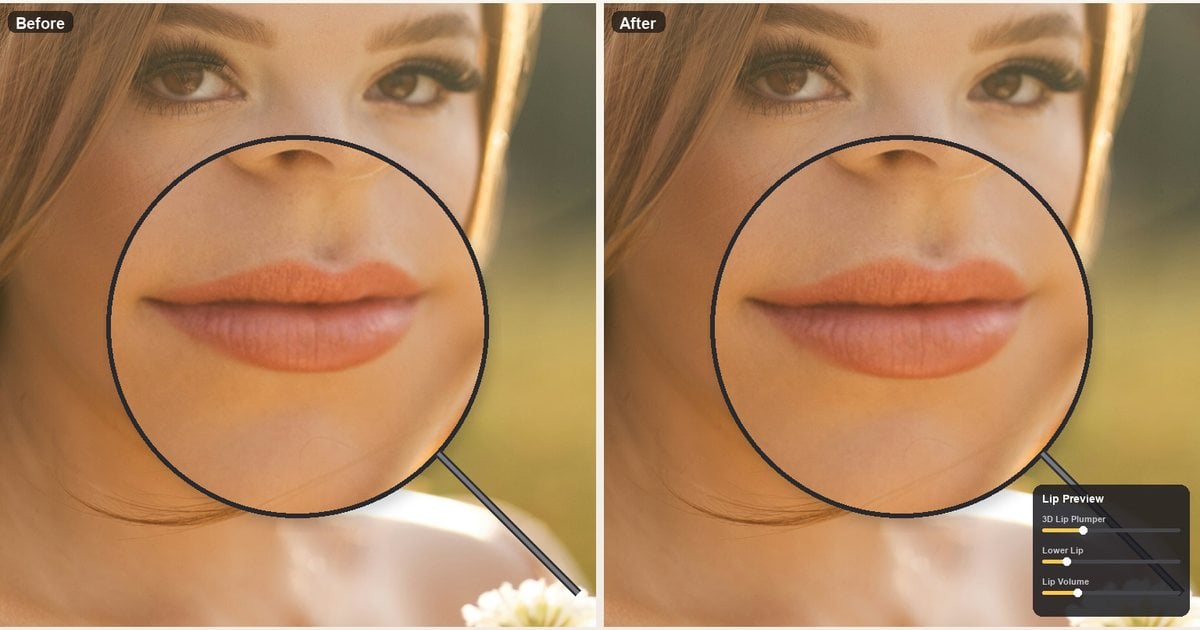
Method 1: Liquify a Fuller Look in Photoshop
Wedding week is the classic photography case. The dress is approved, the soft proof looks fine, and the client still asks how she would look with a little more lip volume “just for curiosity.” If Photoshop is already open on the portrait file, Liquify is the honest first stop for how to make lips bigger in Photoshop without inventing a new retouch workflow.
Step 1: Duplicate the Background Layer
Duplicate the background layer so the original portrait stays untouched. Keep a clean before file for side-by-side photo review later.
Step 2: Open Liquify
Open Filter → Liquify, or use Face-Aware Liquify if your Photoshop version surfaces lip handles there. Adobe’s own Liquify filter help is worth a skim if the panel layout shifted after an update.
Step 3: Push Thickness Through the Lip Center
Use a small brush and low pressure. Push thickness through the center of the lower lip first, then the upper lip. Avoid yanking the corners outward; that is how mouths get wider in the photo without looking fuller.
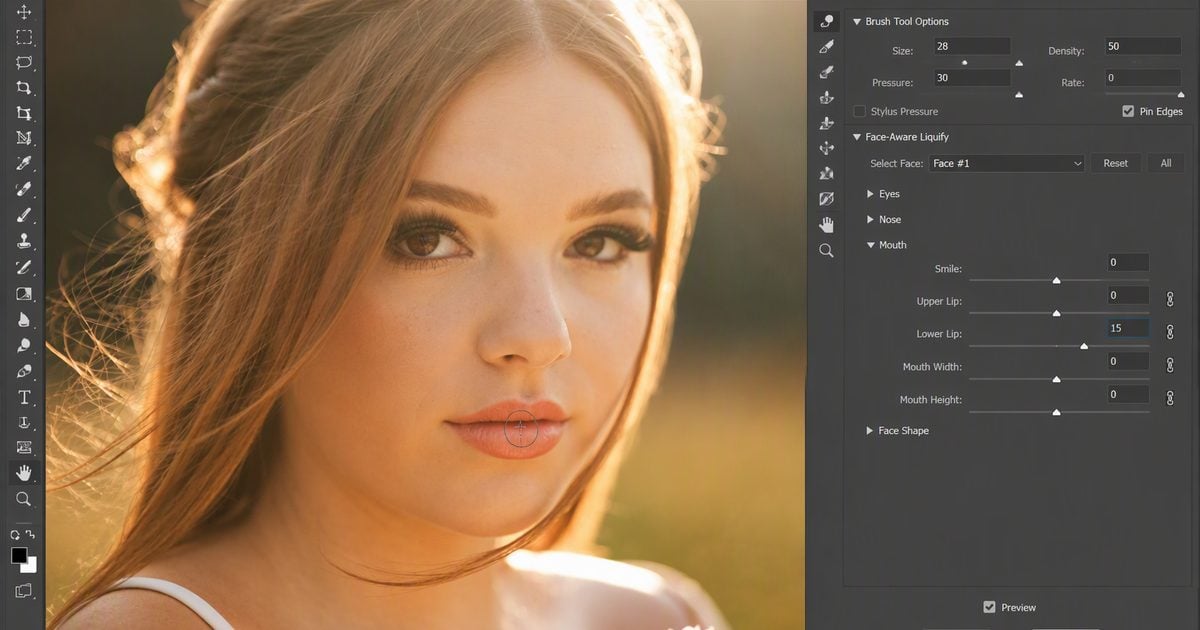
Step 4: Toggle Preview and Save a Named Copy
Toggle the preview on and off. Save a PSD or TIFF copy with a clear name such as preview-lips-v1 so the edit stays reversible in your photography pipeline.
Step 5: Proof at Phone Width and Check an Angle
Shrink the canvas to phone width. If the set includes a three-quarter or side frame, jump to it before you text the client. Front-only photo wins are fragile in real galleries.
When Liquify fails, it usually fails as outline stretch: the lips look broad from the front and flat from an angle. That is the same failure pattern we break down in the companion guide on lip filler side profile photo retouch tips. Use Photoshop when you already live in Liquify and need brush-level control. Skip it when the client only wants a two-minute comparison on her phone.
Method 2: Build Natural Lip Volume in Evoto
Dating-profile photo edits are less forgiving than bridal curiosity tests. The front smile can pass, then a friend says the beauty-filter version “does not look like you.” Evoto is the path when you need volume that still reads as the same person in a portrait edit, not a full-face filter stack.
Open Evoto’s Lip Plumper feature page, then run a restrained strength test in the Evoto App Mouth panel with 3D Lip Plumper.
Step 1: Load the Portrait You Will Actually Text
Import the dating headshot or client still into Evoto App. Even light and a fully visible mouth matter more than a flattering filter selfie. Hands, glasses rims, or veil edges over the lips make the preview unreliable.
Step 2: Enter Mouth Through Portrait Reshape
In Pro Mode open “Portrait” → “Facial Reshape” → “Mouth”. Prefer Easy Mode? Use “Size” → “Mouth” instead. You are looking for the dimensional plump control, not a full-face beauty stack.
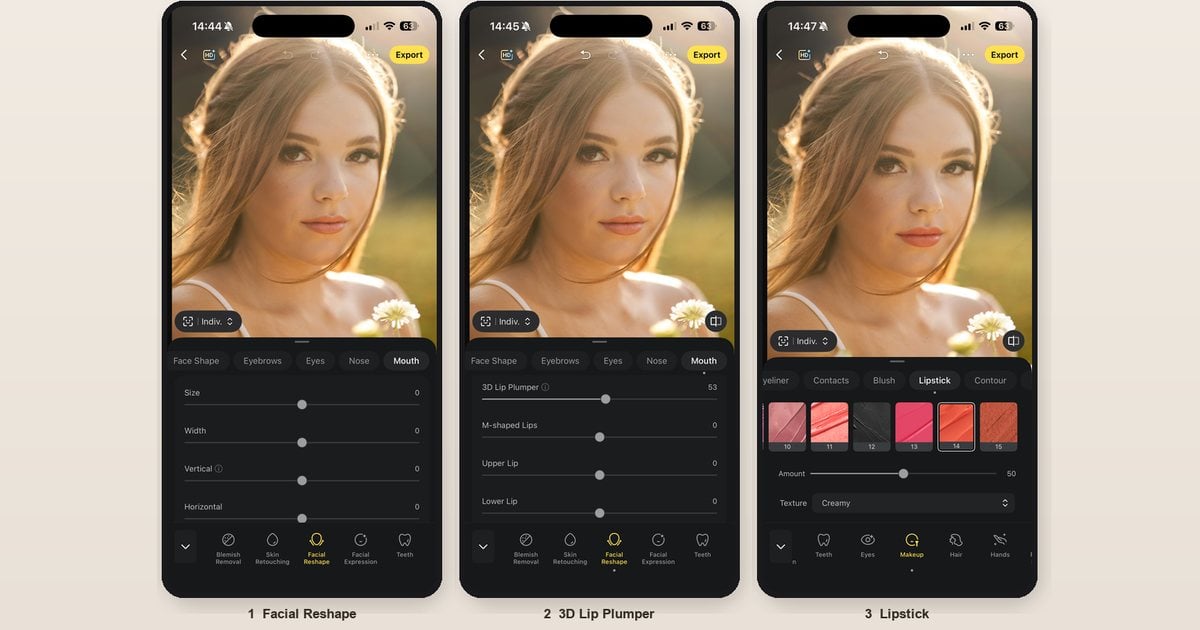
Step 3: Dial 3D Lip Plumper Until It Still Looks Like Them
Locate “3D Lip Plumper” and leave it at 0 first. Nudge upward while you watch center thickness and lip-plane light change in the photo. Many likeness-first previews settle near 20 to 40; softer dating crops often stay in the mid teens to low thirties. If a friend would no longer recognize the mouth, you went too far.
Step 4: Tiny Shape Tweaks, Then a Three-Quarter Reality Check
Only after volume feels honest should you touch “Upper Lip”, “Lower Lip”, or “M-shaped Lips”, and then only for small balance fixes. A light “Lipstick” gloss can sell optical plump without adding structure. Export candidates only after a three-quarter still reads as the same person.
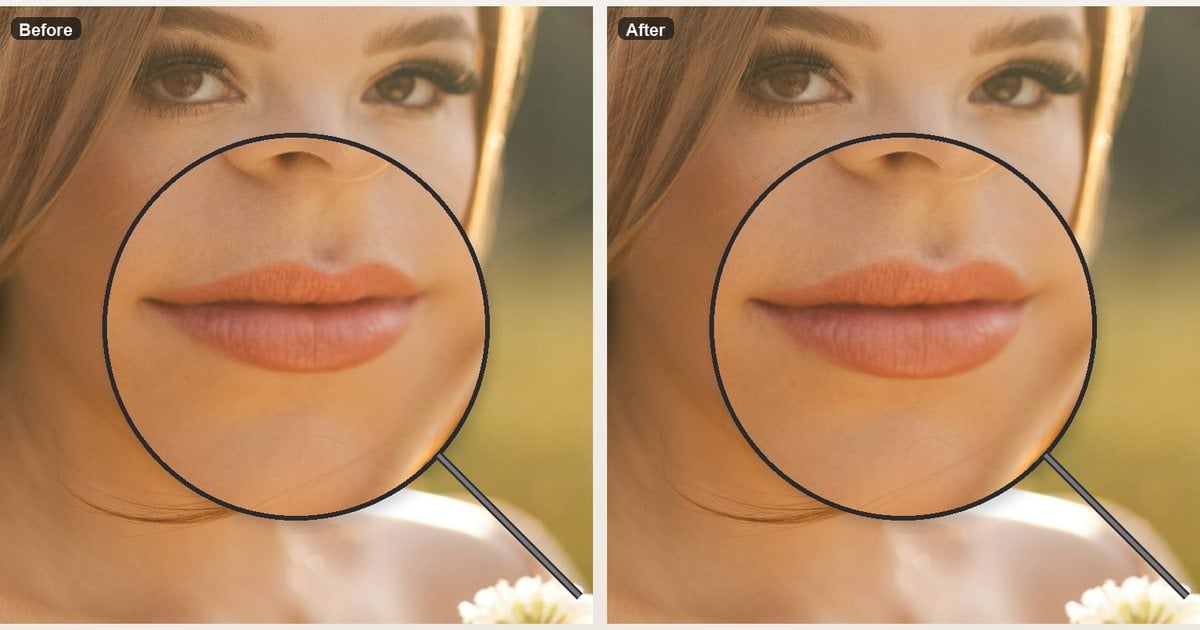
Where else to run Evoto for this preview. If the client will not install anything tonight, start the same 3D Lip Plumper look in Evoto’s web tool, then move into Evoto App when you want longer slider control on phone. Keep Evoto Desktop for gallery finishing: Mouth reshape-style lip balancing and Lipstick polish across a set after the “how full” decision is already locked.


Powerful AI Photo Editor
After the slider passes, keep mouth texture honest in the photograph. Over-smoothing the lip edge while you add volume is a common miss; the guide to remove lip wrinkles and dead skin from photos pairs well when the mouth looks fuller but strangely plastic.
Method 3: Check a Selfie Look in YouCam Makeup
Photoshop and Evoto cover control. Beauty apps cover speed. For a same-night photography try-on, open YouCam Makeup.
When a beauty creator finishes a lipstick swatch reel, the next question is often whether a plumper lip would overpower the shade in the photo post. She needs an answer before the posting window closes, not a studio retouch ticket.
Step 1: Shoot or Pick a Sharp Selfie
Shoot or pick a selfie with even light and a sharp mouth. Soft blur in the photo makes any plump edit harder to judge.
Step 2: Open YouCam Makeup and Find Lips
Open YouCam Makeup. Move into “Face” / “Lips” (or the current Retouch lip area on your build).
Step 3: Settle Color, Then Raise Plump
Settle lip color first if the brief is a lipstick test. Then raise plump or reshape controls from a low setting so the photo edit stays readable.
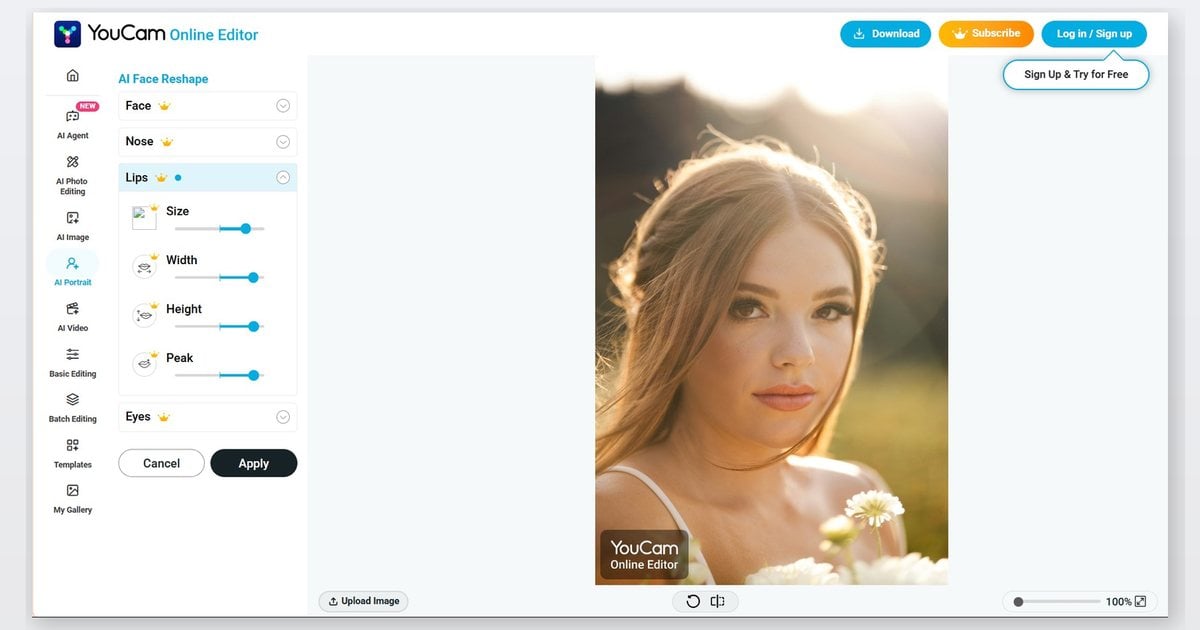
Step 4: Isolate Lips From Full-Face Beauty Stacks
Turn off unrelated face-slim, big-eye, or full-beauty stacks so the lip test is not polluted by a different identity in the photograph.
Step 5: Save Both Files and Recheck a Head Turn
Save the original and the edit. Capture a slight head-turn three-quarter photo and compare again before you commit the look in a caption.
This path is perfect when the brief is “reply tonight.” It is a weak substitute when you need delivery-grade lip structure for a paid gallery. Virtual lipstick try-on and makeup photo editor habits live here; keep them labeled as selfie photo tools, not clinic simulators.
Method 4: Run a Browser Photo Test in Pokecut
Some clients will not install another app. They will upload one JPEG in a browser and ask “how would I look with lip filler” on that single photo. That is where an online lip filler simulator such as Pokecut earns a seat. This section teaches one clean photo pass; the deeper bake-off lives in our best lip filler simulator tools review.
Step 1: Open Pokecut’s Lip Filler Editor
Open Pokecut’s face/lip filler editor page (confirm the live URL before you publish screenshots).
Step 2: Upload a Clear Front Photo
Upload a clear front-facing photo. Skip frames with hands on the mouth or motion blur.
Step 3: Choose Strength or a Visual Preset
Choose strength or a preset. If a label says something like “1ml,” treat it as a visual preset name for the photo, not a medical dose.
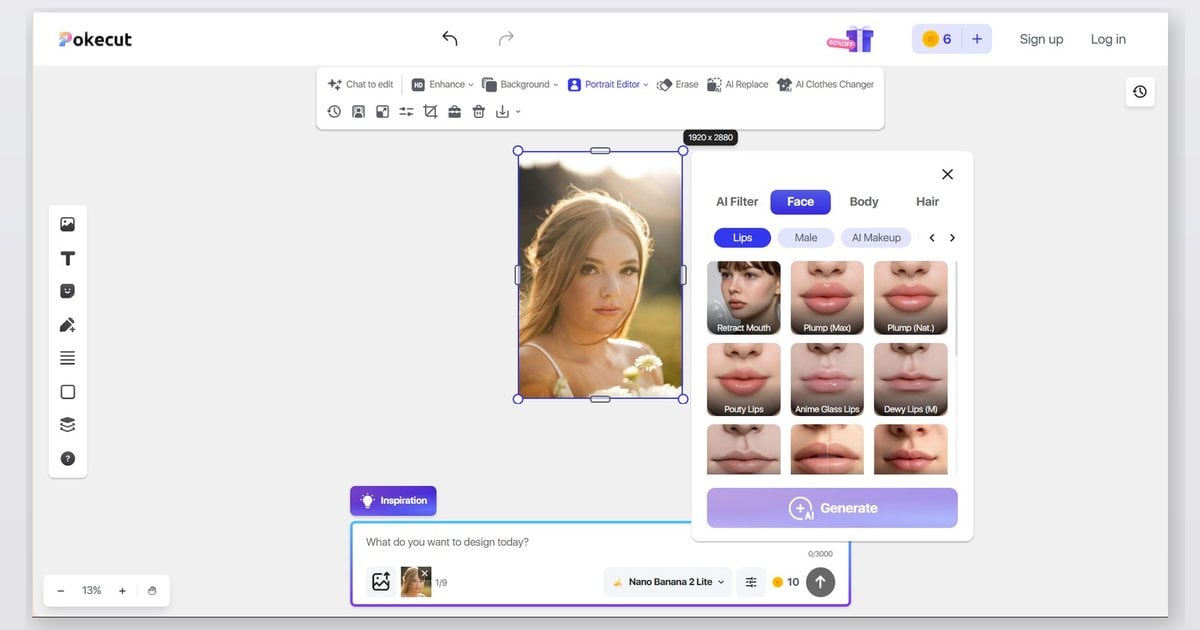
Step 4: Generate and Compare Beside the Original
Generate, then download or screenshot. Place the result beside the original photograph so the edit is easy to judge.
Step 5: Recheck a Side or Three-Quarter Capture
If you also have a side or three-quarter capture, run or compare that next. Front-only photo wins are fragile in client reviews.
What Would I Look Like With Lip Filler? Match Tool to Job
| Path | Real photography example | Main risk |
|---|---|---|
| Photoshop | Bridal soft proof, curiosity test mid-edit | Outline stretch if you pull corners |
| Evoto App | Dating headshot that must still look like them | Needs a minute in the Mouth panel |
| YouCam Makeup | Lipstick swatch or weekend selfie photo | Filter look, full-face stack creep |
| Pokecut | Client will only use a browser | Coarser control; verify angles |
Whatever path you choose, do not ship a gallery on a front-only lip decision. Angled frames expose flat stretch faster than hero smiles. When a lip filler side profile (or three-quarter) looks fake in the photograph, use the diagnostic checklist in the side profile retouch tips companion.
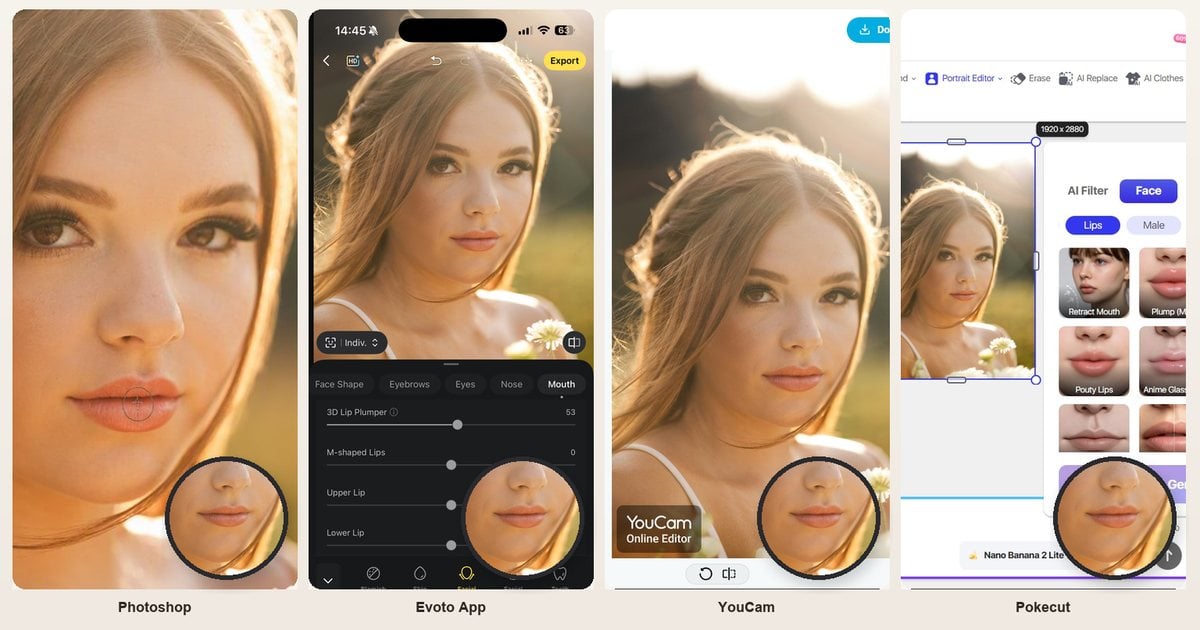
Asking for that fuller-lip photo preview is really asking which edit path fits tonight’s file, skill, and deadline. Pick one photography method, keep the edit honest, and leave clinical decisions to licensed providers.
Powerful AI Photo Editor
FAQ
1. What would I look like with lip filler if I only edit a photo?
A photo edit can show a plausible fuller-lip direction for that lighting and camera angle. It cannot promise how your tissue will respond in a clinic. Use the photography preview to talk taste and identity, not dosage.
2. Which method should I try first for a dating profile photo?
Start with the Evoto App at a soft range (about 15 to 30) or a restrained YouCam Makeup pass. Dating frames punish “I clearly used a filter” more than bridal curiosity tests. Check a three-quarter crop before you upload the photo.
3. Photoshop versus YouCam versus an online simulator?
Photoshop wins when you need brush control on a file already in a photo edit. YouCam Makeup wins when speed matters more than structure. Pokecut wins when installs are forbidden. Evoto App sits between beauty speed and retouch control when likeness is non-negotiable in the portrait.
4. Is a photo plump the same as lip augmentation?
No. This article is about photo previews and photography retouching only. Lip augmentation and related clinical procedures belong with licensed providers. Do not treat an edit as medical advice.
5. Evoto App, web online, or Desktop for lip photo work: what should I use?
Use the Evoto App or the web online tool when you want 3D Lip Plumper volume previews, quick client alignment, or a same-day social still. Use Evoto Desktop when the job is a full studio photography pipeline: batch delivery, Mouth reshape-style lip balancing, Lipstick finishing, and export discipline across a set. A practical split many teams use: agree on “how full” in the app or on the web, then finish the gallery on Desktop. Match the Evoto form to the photo job instead of assuming every Mouth control exists everywhere.
6. Is Evoto safe with my photos, and does it use uploads to train AI?
Evoto is built for secure photo editing workflows. Uploaded photos are handled to provide the editing service, and Evoto does not use your user content to train its AI models under its current product policy language. Keep client files organized under your own retention rules the same way you would with any other retouching tool.



