

Quick Answer
- Start by checking lens distance, crop, and nose shadow. Many “make it smaller” comments are really perspective or lighting problems.
- In Evoto Desktop, open Portrait Retouching -> Facial Reshape -> Nose. For most frontal portraits, start with Width and then refine with Nose Tip.
- Compare the edit three ways: Original, After, and the small eye icon beside the Nose group to hide just that adjustment.
- Build the look on one hero frame, then use Save Preset and Sync only across poses that match.
A narrow nose request almost never arrives in technical language. Clients say the face feels a little strong in the crop, the tip pulls too much attention, or the close-up looks harsher than the person did in real life.
That difference matters. A good portrait retoucher is not chasing a cosmetic-surgery fantasy. You are solving how the nose reads inside a specific focal length, crop, and light pattern.
This guide is written for photographers and retouchers who need a repeatable Evoto Desktop workflow that still sounds like real studio practice. The goal is a believable narrow nose read, not a plastic before-and-after gimmick.
If you want a broader overview first, read the Nose Editor guide on the Evoto blog. If the real problem is camera angle rather than retouching, start with how to make a nose look smaller in photos. For a quick refresher on why distance changes facial proportions, see perspective distortion.
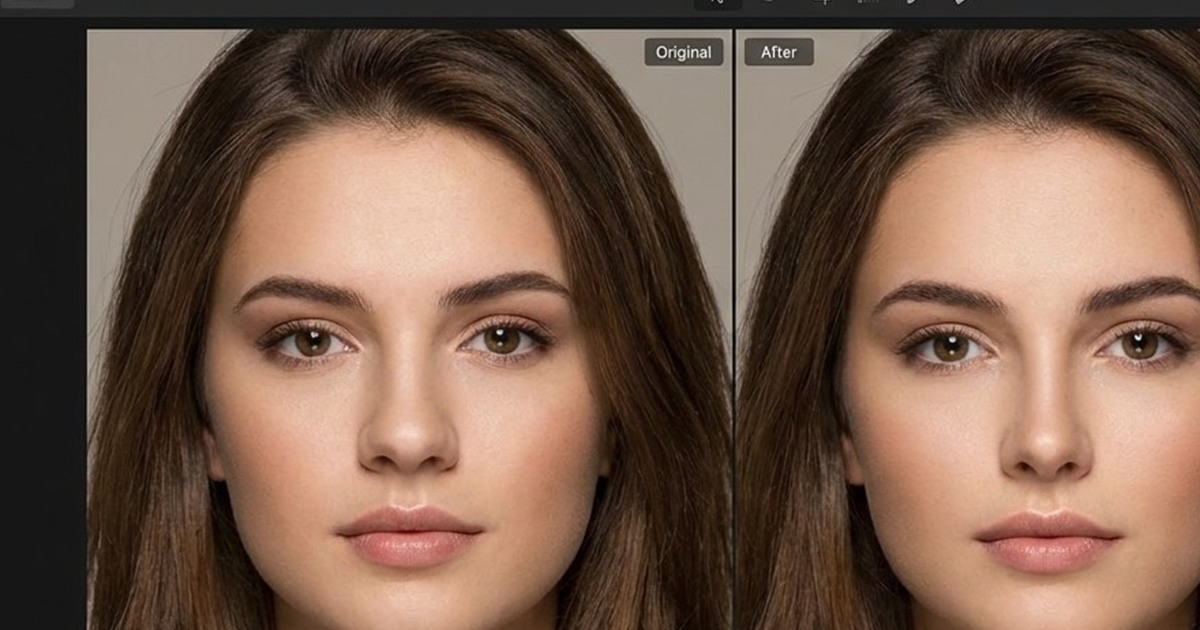
Why a Narrow Nose Request Usually Starts With Lens and Light
The nose is the closest facial feature to the lens in most portraits. That means short working distance, a low camera angle, or a tight crop can exaggerate it before you touch a single slider.
In practical terms:
- A close 35 mm frame can make the bridge and tip feel larger than they looked on set.
- Side light can widen the shadow side of the nose even if bone structure is fine.
- A crop that lands too close to the nostrils can make a perfectly normal nose feel heavier in print.
That is why experienced retouchers do not open a ai nose job style panel first. They ask whether the file needs geometry at all. If the answer is “mostly lighting” or “mostly lens distance,” fix the read conceptually before you fix it numerically.
What a Natural Narrow Nose Retouch Should Preserve
Natural work keeps the highlight pattern believable, preserves pore texture around the bridge and tip, and avoids strange warping around the nostrils.
That last point is where many tutorials go wrong. They treat nose reshaping like a one-slider trick. In real delivery work, the nose sits between both eyes, the philtrum, upper lip, and cheek transitions. Push too hard and the whole central face starts looking synthetic.
Professional portrait retouching standards are simpler:
- Fix the visual complaint, not the anatomy.
- Move the fewest sliders possible.
- Keep enough imperfection that the face still belongs to the subject.
Narrow Nose Controls in Evoto: Where to Start
Use one repeatable path so your batch decisions stay consistent. You need to download Evoto and launch the AI photo editor on your Windows or MacOS device first.


Powerful AI Photo Editor
Step 1: Open the portrait in Edit mode inside Evoto Desktop.
Step 2: In the right panel, open Portrait Retouching.
Step 3: Expand Facial Reshape and choose Nose.
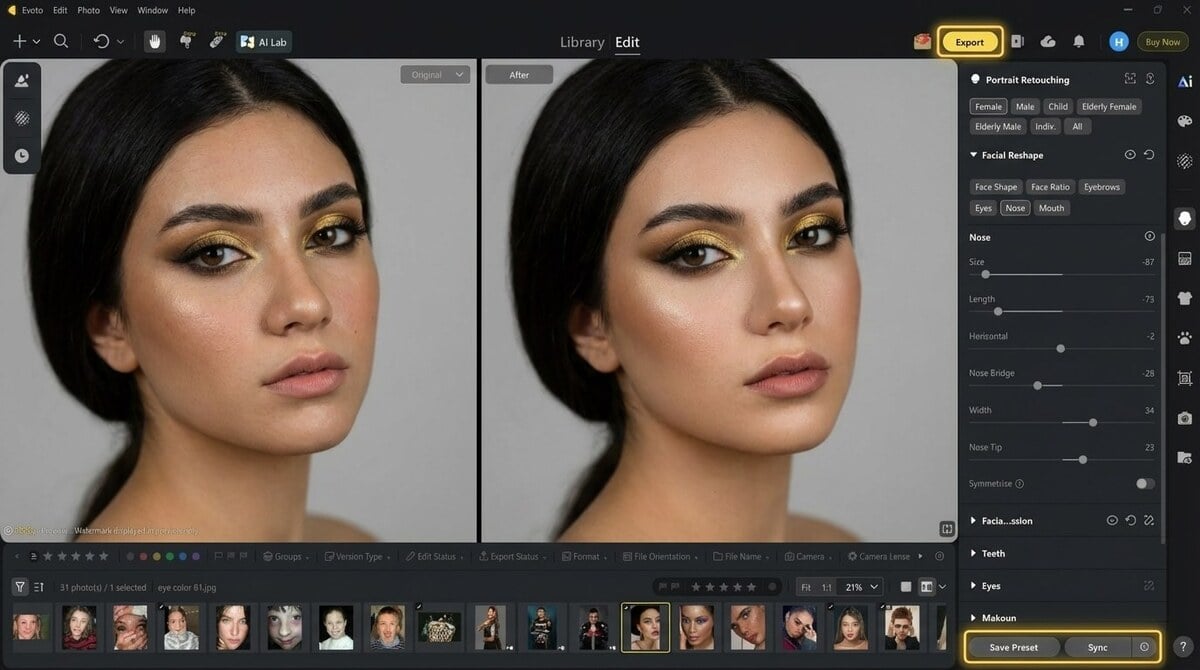
That panel is the actual working surface for shape changes. In the current desktop layout you will see:
- Size
- Length
- Horizontal
- Nose Bridge
- Width
- Nose Tip
- Symmetrize
The labels above are worth learning because they match how a retoucher thinks. You are not asking for a vague “slim nose” effect. You are deciding whether the issue is overall scale, vertical length, bridge strength, nostril span, or tip weight.
When to Use Width, Nose Tip, or Symmetrize
Here is the practical version photographers actually use:
- Size: A broad global scale control. Use it last, not first. It can help when the whole nose reads large, but it is the easiest way to overdo the edit.
- Length: Best for profile and three-quarter frames where the nose reads long rather than wide.
- Horizontal: A small alignment correction when a frontal portrait needs a subtle recentering. It is not a substitute for pose.
- Nose Bridge: Useful when hard light makes the bridge line feel too pronounced. Think bridge character, not nostril width.
- Width: The first stop for a narrow nose request in frontal beauty, headshot, and bridal work. Watch the nostril wings and alar rim while you move it.
- Nose Tip: The supporting control for lower-third weight. If the nose still feels round or bulbous after a small Width move, this is the next place to look.
- Symmetrize: Use it on straight-on frames when both sides should settle into balance. Skip it on expressive angles where asymmetry is part of the pose.
If the brief mentions a round nose tip, do not rush to overall scale reduction. A tiny Nose Tip adjustment often solves the complaint while keeping the bridge and nostril line honest.
How to Build a Narrow Nose Edit on One Hero Frame
Do the hardest crop first. That means the frame where the nose is closest to camera, the print is largest, or the client is most likely to stare.
Your evaluation routine should be just as disciplined as the slider path:
Step 1: Make the smallest move that changes the read.
Step 2: Check After for the delivered look.
Step 3: Click back to Original so you do not normalize a fake face after five minutes of staring.
Step 4: Use the small eye icon beside the Nose group to hide only the nose adjustment and judge whether the change is helping or just different.
Step 5: Zoom enough to inspect the nostril edges, bridge highlight, and upper-lip transition.
That last check is what separates a retoucher from a slider operator. The nose can look better globally but worse locally if the nostril rims stretch or the philtrum starts feeling rubbery.
Powerful AI Photo Editor
When Contouring Works Better Than More Nose Reshaping
Some portraits need geometry. Others just need better visual structure.
If the face already has good proportions, highlight and shadow control can produce a more flattering slim nose impression without pushing shape very far. That is especially true in editorial beauty, bridal portraits, and polished headshots where makeup and lighting already do half the work.
Treat geometry as the structural fix and contour as the finishing decision. When you mix both at full strength, the result stops looking photographic.
How to Sync a Narrow Nose Edit Across a Session
Once the hero frame feels right, you can scale the decision safely:
Step 1: Save the slider set as a preset if you expect to reuse it on similar sessions.
Step 2: Sync only to frames with similar focal length, pose, and head turn. A straight-on bridal portrait and a loose laughing three-quarter crop should not share the same nose numbers blindly.
Step 3: Spot-check the outliers after Sync. Pay special attention to frames where the nose crosses strong shadow or where one nostril is more visible than the other.
Step 4: Export only after those spot checks. Fast batch work is good. Fast corrections after a client notices a warped nostril are not.
That workflow is also the cleanest answer to professional nose reshaping for portrait photographers as a business problem. You want repeatability without sameness.
Common Narrow Nose Retouching Mistakes
Mistake: You start with Size because it feels powerful.
Fix: Start with Width and maybe Nose Tip. Reach for Size only if the whole structure really needs it.
Mistake: You fix the nose before judging the crop.
Fix: Reassess the framing first. A looser crop can solve more than a strong retouch.
Mistake: You sync the edit across every frame in the gallery.
Fix: Sync only across matching angles and recheck outliers manually.
Mistake: You keep moving sliders because the After version now feels normal.
Fix: Bounce between Original, After, and the group eye icon every few moves.
Mistake: You correct symmetry on a portrait with intentional head turn.
Fix: Use Symmetrize only when the pose should actually read balanced.
Related Links
For a general browser-based overview of the tool family, see AI Photo Editor.
For the desktop app discussed in this workflow, see download Evoto.
Powerful AI Photo Editor
Conclusion
A believable narrow nose retouch is rarely about making the nose tiny. It is about making the portrait read the way the subject already looked to the human eye.
Start with lens, light, and crop judgment. Then use Portrait Retouching -> Facial Reshape -> Nose with a restrained hand. In most real jobs, Width and Nose Tip do the heavy lifting, while Original, After, and the eye icon keep you honest.
FAQ
1. What is the safest first move for a narrow nose request?
Start with Width on a frontal portrait. If the lower third still feels heavy, add a small Nose Tip adjustment.
2. When should I use Size instead of Width?
Use Size only when the whole nose reads large. Most portrait complaints are narrower than that and respond better to Width, Nose Tip, or better crop judgment.
3. Is Symmetrize always a good idea?
No. It works best on straight-on portraits where both sides should match. On angled poses it can flatten natural character.
4. How do I keep the retouch believable at print size?
Judge the edit at working zoom, compare Original and After often, and inspect the nostril rims and bridge highlight before you sync or export.
5. Where can I learn more about Evoto nose tools?
Start with the Nose Editor article and the AI Nose Shaper walkthrough.



