

If you searched how to make nose look smaller, use this order:
- Start with soft front light
- Step back and use a longer focal length
- Turn the face slightly off camera
- Add contour if the shape is already close
- Use Evoto sliders only for small final corrections
That sequence keeps the result believable. It also lowers the chance of over-editing.
If you searched “how to make nose look smaller”, start before retouching. Most bad results come from light, distance, and angle. They do not come from the nose alone.
This guide gives a practical order of operations. First, fix what the camera exaggerates. Then use Evoto only for small cleanup. If you already use an AI Photo Editor, this is the safest way to keep the face natural.
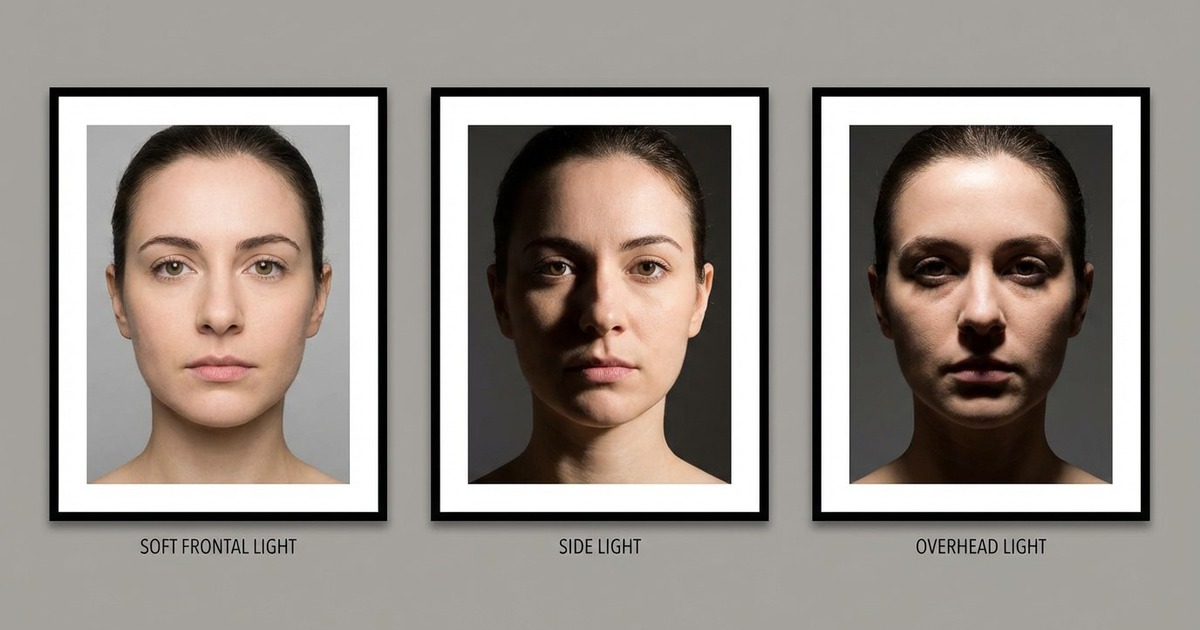
Step 1: Start With Soft Front Light
Light direction changes nose shape faster than most readers expect. Hard side light can make the bridge feel sharper. It can also pull a longer shadow across the cheek.
Start with a softer front light instead. Then add a gentle fill if the shadow still looks too heavy. This works well for headshots, beauty portraits, and clean ID-style crops.
A simple example helps. If a client says the nose looks too strong, move the light first. In many cases, the complaint drops before retouching even starts.
This is the fastest on-set fix. It also protects texture and identity.
Step 2: Step Back and Use a Longer Focal Length
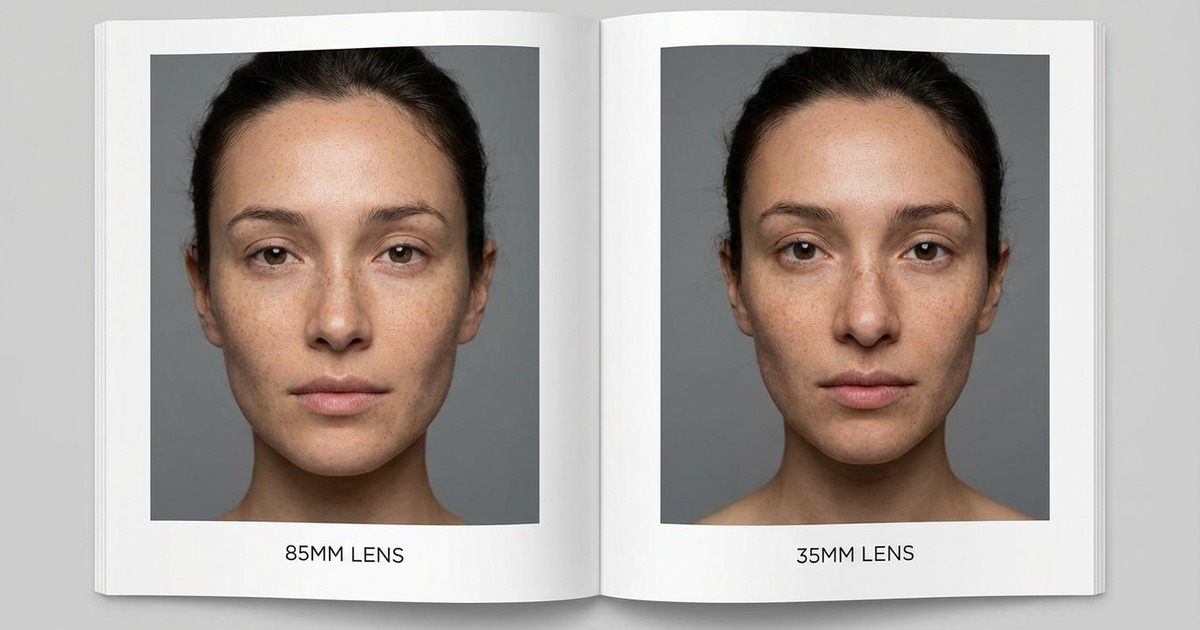
When the camera is too close, the center of the face feels larger. The nose sits at the front of that effect. This is why phone selfies often exaggerate it.
Step back when you can. Then use a longer focal length. An 85mm portrait crop usually reads more naturally than a close 35mm frame.
If you want the optics background, see perspective distortion in photography. In practical terms, the rule is simple: more distance usually helps.
This step matters because it reduces the need for later nose adjustment. A better file gives you cleaner choices downstream.
Step 3: Turn the Face Slightly Off Camera
A straight-on close crop often shows the nostrils more clearly. That makes the lower nose feel wider. A soft turn usually solves that without looking evasive.
Try a gentle three-quarter angle. Then test a small chin raise or drop. The goal is not to hide the face. The goal is to choose the angle that reads best for the crop.
This matters in real work. A LinkedIn headshot needs a different balance than a fashion portrait. In both cases, the pose should follow the use case.
Most importantly, do this after you fix the light and distance. Pose is a support move, not the whole answer.
Step 4: Use Contour before You Reshape
Contour does not need to change the real structure. It changes how the eye reads the structure. Highlighting the bridge and soft shadow on the sides can make the nose look narrower.
This works in makeup and in retouching. In Evoto, use Portrait Retouching -> Makeup -> Contour when the face already feels close and only needs better tonal separation.
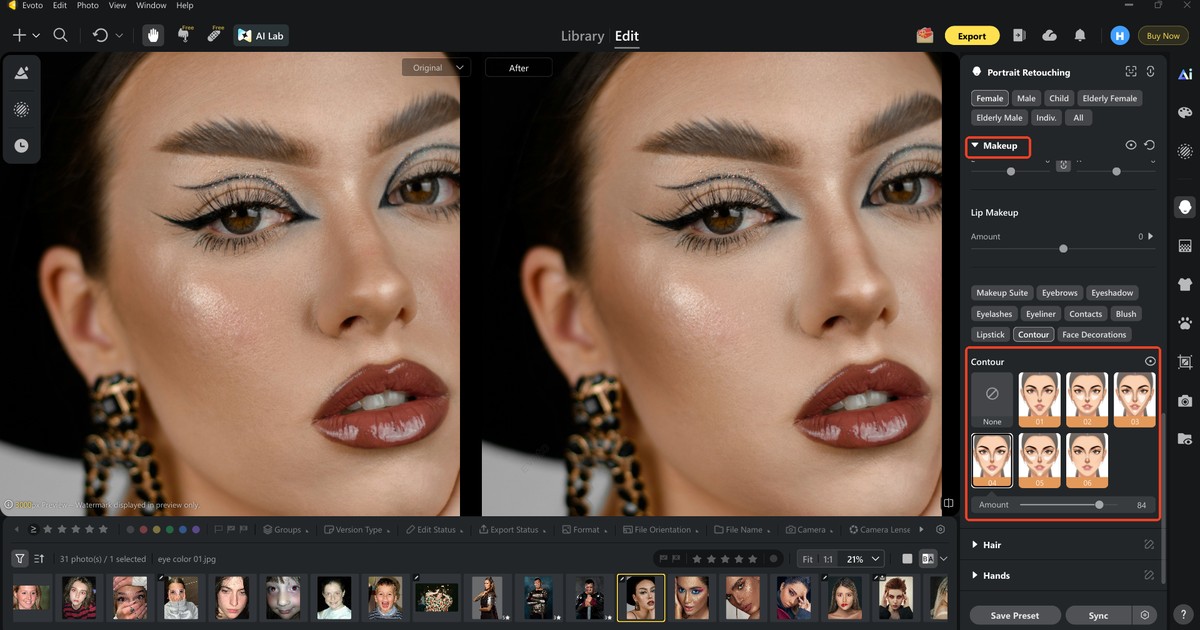
This option is often better for bridal portraits, beauty work, and polished headshots. It fits requests that sound like “slightly slimmer,” not “visibly different.”
If you want background on the concept, see contouring. In portrait work, the rule is simple: shape with light first, then shape with tone.
Step 5: Use Evoto for Final Nose Refinement
When camera and contour fixes are no longer enough, move to software carefully. At this point, the goal is not a new face. The goal is a cleaner read in the final crop.
If you want a product path after the camera fixes, this how to make nose look smaller workflow in Evoto should stay subtle and reversible.


Powerful AI Photo Editor
1. Open the Nose Panel
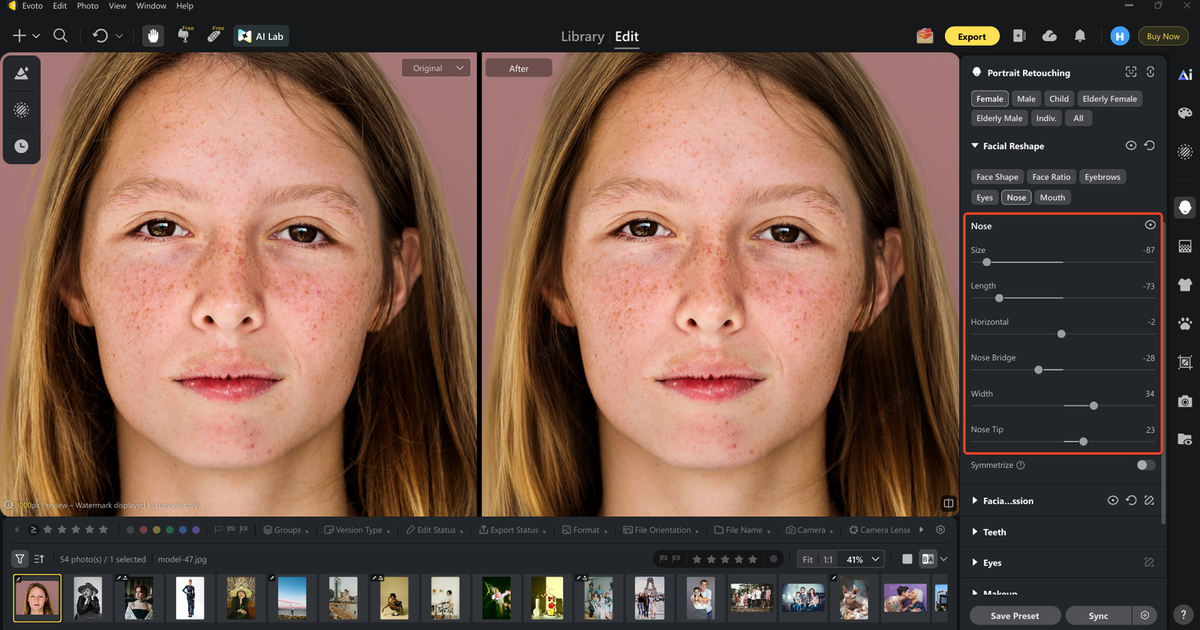
Open Evoto Desktop. Then go to Portrait Retouching -> Facial Reshape -> Nose. The panel includes Size, Length, Horizontal, Nose Bridge, Width, Nose Tip, and Symmetrize.
2. Start With Width and Nose Tip
Use Width first when the nostril span feels too broad. Use Nose Tip when the tip looks too round or heavy. These are usually the two fastest controls for a more slim nose result.
Keep the movement small. Two light edits usually read better than one aggressive edit.
3. Use the Other Controls Only for Correction
Use Size only when the whole nasal area needs to scale together. Use Length for overall length. Use Horizontal for small alignment issues. Use Nose Bridge only for bridge-width cleanup.
Switch between Original and After after each change. If the face starts to feel unfamiliar, pull the slider back.
4. Export the Final File
Once the portrait still looks like the same person, export the final image. In this copy, JPG, PNG, and TIFF are the safe formats to name. Keep the export full resolution for delivery or later retouching.
You can also pair this pass with AI Teeth Fixer or Wrinkle Remover. Keep those edits separate so the face does not drift.
Common Mistakes
- Using a wide lens too close to the face, then blaming the nose instead of the camera distance
- Turning the face too far, which hides structure instead of flattering it
- Narrowing the nose without checking the balance of the cheeks, lips, and chin
- Using contour and geometry changes at the same time, then losing track of what improved the frame
- Moving sliders without checking Original and After every few seconds
Read More:
Conclusion
The best answer to how to make nose look smaller is a stack of small choices. Light first. Lens and distance second. Pose third. Contour fourth. Software last.
That order protects realism. It also gives photographers a better file before retouching starts. If you still need software help, download Evoto and test Width and Nose Tip on one hero frame before you sync the look anywhere else.
Powerful AI Photo Editor
FAQ
Can lighting really make a nose look smaller?
Yes. Softer front light usually shortens or softens nose shadows. That changes how prominent the nose feels in the frame.
What lens makes the nose look smaller in portraits?
A longer focal length with more camera distance usually looks more natural. An 85mm portrait setup is a common starting point for headshots.
Should I contour before I reshape the nose in software?
Usually, yes. Contour is less invasive. If tonal shaping solves the problem, you may not need stronger geometry edits.
What is the safest Evoto slider to start with?
Start with Width or Nose Tip. They answer the most common visual complaints with the least collateral change.
How do I keep the edit natural?
Check Original and After constantly. If the face no longer feels like the same person, the edit has gone too far.



