

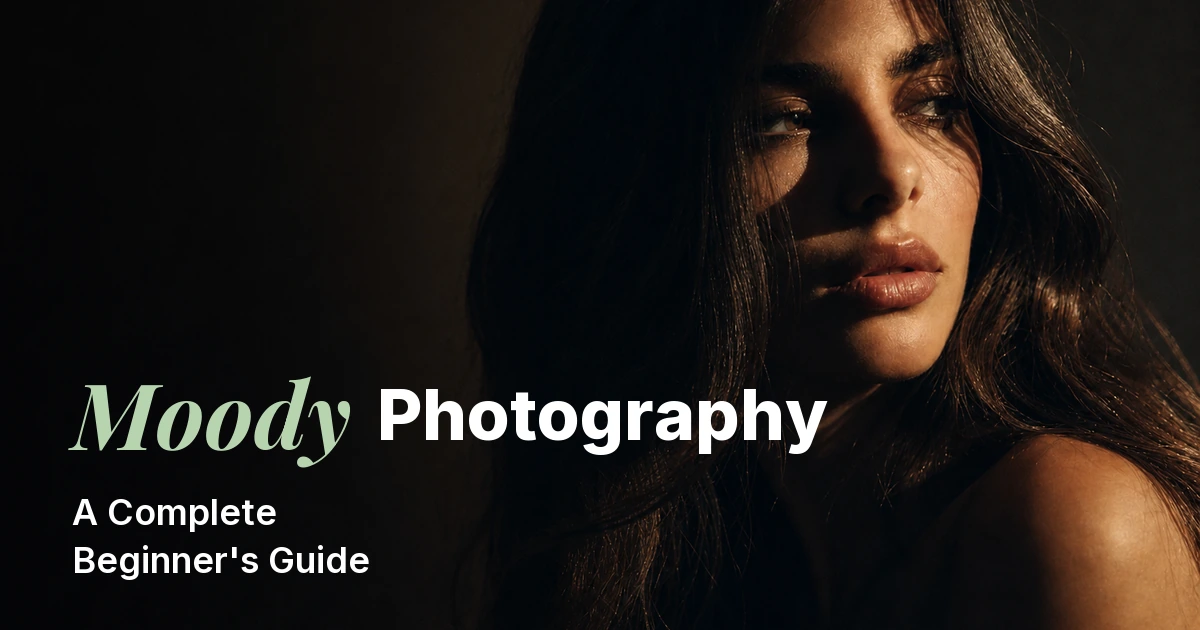
Soft window light. Deep shadows pooling in the corners. A face half-lit, half-hidden. That is the pull of moody photography — a style where what you choose to hide matters as much as what you reveal. This beginner’s guide walks you through the visual language, in-camera settings, and a clear editing workflow you can start in your browser today and finish like a pro on the desktop.
What Is Moody Photography?
Moody photography is a style built around atmosphere and emotion rather than bright, evenly lit clarity. Instead of trying to show every detail, a moody image uses selective light, intentional shadow, restrained color, and quiet composition to make the viewer feel something — calm, longing, tension, mystery, or warmth.
Most moody photos share a few visual signatures:
- Low-key lighting — more shadow area than highlight area.
- Desaturated or shifted colors — muted greens, earthy browns, teal–amber pairings.
- Deep, controlled shadows — dark, but with detail you can still see into.
- Cinematic feel — composition borrowed from film stills, not snapshots.
- Atmospheric mood — fog, rain, dust, or single-source light.
It helps to compare it with the opposite: high-key, clean, bright editing aims for airy whites, soft pastel tones, and shadow-free skin. The dark photo aesthetic of moody work does the inverse — it lets shadow do real storytelling work. Important to remember: moody is not “sad” or “underexposed.” A good moody image is intentional, balanced, and structured; the darkness is a creative choice, not an accident.
The Visual Language of Moody Photos
Before you touch a slider, learn to see moody. Four ingredients do most of the heavy lifting.
Light & Shadow
Moody images almost always use directional light from one main source — a window, a doorway, a desk lamp, a single strobe through a strip box. Side light and backlight carve out shape and shadow; front-on light tends to flatten the mood. Aim for more shadow area than highlight area in the frame. If you are indoors, draw the curtains halfway, kill any ceiling lights, and let one window do the work.
Color Palette
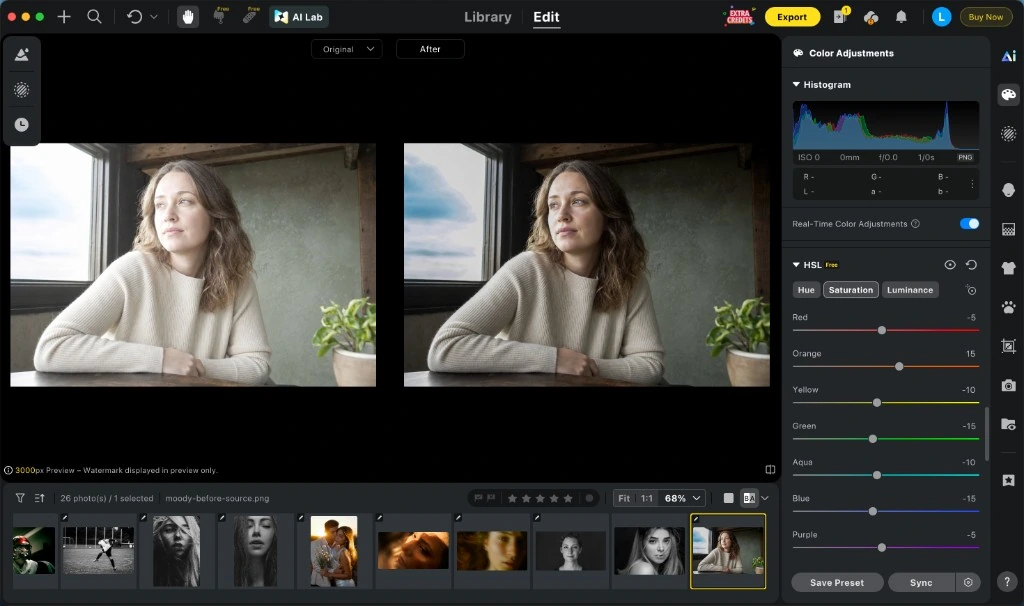
Color in dark and moody photography is restrained, not absent. Common palettes include muted earth tones (brown, ochre, forest green), monochromatic studies (one hue plus its neutrals), and the cinematic teal-and-amber split: cool blue or teal in the shadows, soft warm gold in the highlights. The concept here is split toning — assigning different colors to different tonal ranges instead of tinting the whole image one way.
Contrast & Tonality
You want deep blacks with detail, controlled highlights, and a punchy midtone. In editing, this usually means deepening the Black slider, pulling Highlight down, and shaping a gentle S-curve so darks feel rich without going completely flat. Crushed shadows that lose all detail read as “muddy,” not moody — restraint matters.
Subject & Composition
Moody compositions tend to isolate the subject. Think one face against a dark background, a single coffee cup on a black table, a lone figure in fog. Negative space matters: empty dark areas let the eye rest and the mood breathe. Weather is a free moodboard — overcast skies, rain, mist, and golden-hour-into-blue-hour transitions all bring built-in atmosphere.
Camera Settings for Moody Shots
You do not need expensive gear. A kit-lens crop sensor, a phone with manual mode, or an entry-level mirrorless body can all produce striking moody work. What matters is how you expose. Use these as starting points and adjust to taste:
- ISO 100–400 when possible. Low noise gives you cleaner shadows to push and pull in editing.
- Aperture f/1.4–f/2.8 for portraits and still life. A wide aperture both helps in low light and naturally separates subject from background.
- Shutter speed set to whatever gives you correct exposure; use a tripod once you drop below your safe handheld speed (roughly 1/focal length).
- White balance — lean cool for cinematic distance, warm for nostalgic intimacy. Shoot RAW and you can decide later, but pick a deliberate look in-camera so you compose to it.
- Exposure compensation: −0.3 to −0.7 EV. This is the moody photographer’s secret handshake. Intentionally underexpose just a little to protect your highlights and leave editing room for the shadows you want.
- Light direction: side light, window light, backlight, or silhouette. Avoid on-camera flash — it kills mood instantly.
- Shoot RAW. RAW gives you the shadow recovery and color flexibility your editing workflow needs.
A useful pre-shoot question: what should this photo make someone feel? Answer that first, then choose lens, light, and exposure to support the feeling.
How to Edit Moody Photos: A Step-by-Step Workflow
This is where the look comes together. Below is a 6-step moody photo editing workflow split into two halves. Start with the quick browser version to learn the feel, then move to the desktop version when you want full control and consistency across an entire shoot.
4.1 Quick Start: Darken the Base (Browser, ~1 minute)
If you have never edited a moody photo before, the fastest first step is to simply pull the whole image darker and see how it changes the mood. You can do this without installing anything using Evoto’s free online tool.
- Open Evoto’s Darken Image tool in your browser.
- Upload a JPG, PNG, or WebP photo.
- Drag the Darkness slider until the image starts to feel atmospheric — usually 20–40% is plenty.
- Download the result. Standard quality is free, no sign-up needed.
👉 Try the Darken Image tool free →
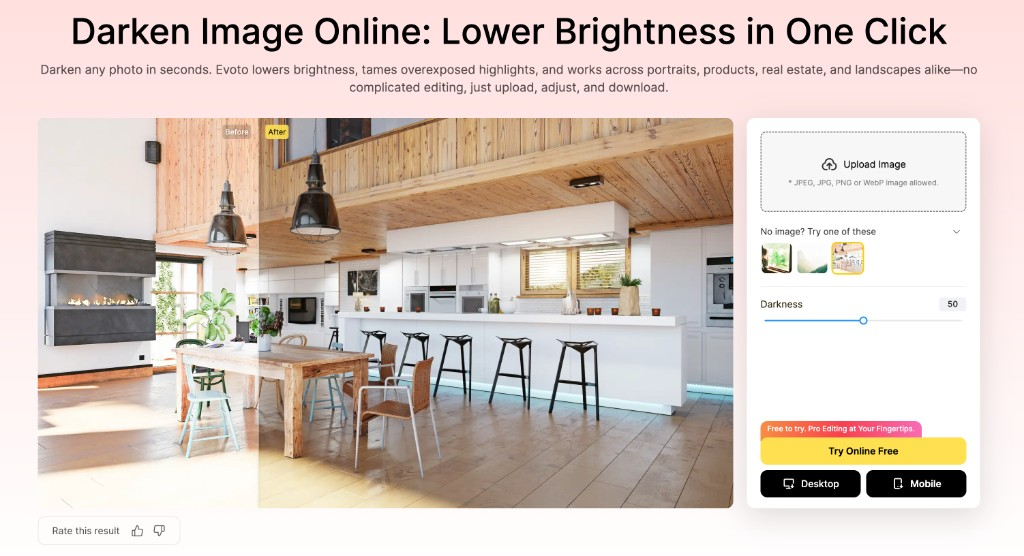
Be honest with yourself here. Darken Image gives you one global Darkness control and that is exactly its job — a fast, frictionless starting point. The full moody look still needs color grading, contrast shaping, and selective tonal control, which are covered in Step 4.2 below. Think of this as the first move, not the finished edit.
4.2 Full Workflow: Color Grade in Evoto Desktop
For the complete dark and moody photography look — cinematic color grading, S-curves, masking the subject, and saving the recipe as a preset you can sync across an entire shoot — move to Evoto Desktop. Here is the workflow.


Powerful AI Photo Editor
Step 1 — Import: Drop your RAW or JPG files into the Library Workspace. The RAW engine gives you the most editable shadow and highlight data.
Step 2 — Set the Tone: Open Color Adjustments → Basic. In the Tone group, drop Exposure by −0.3 to −0.7, pull Highlight down to tame any bright spots, and deepen Black to anchor the shadows. Watch the Histogram so you do not crush the left edge completely.
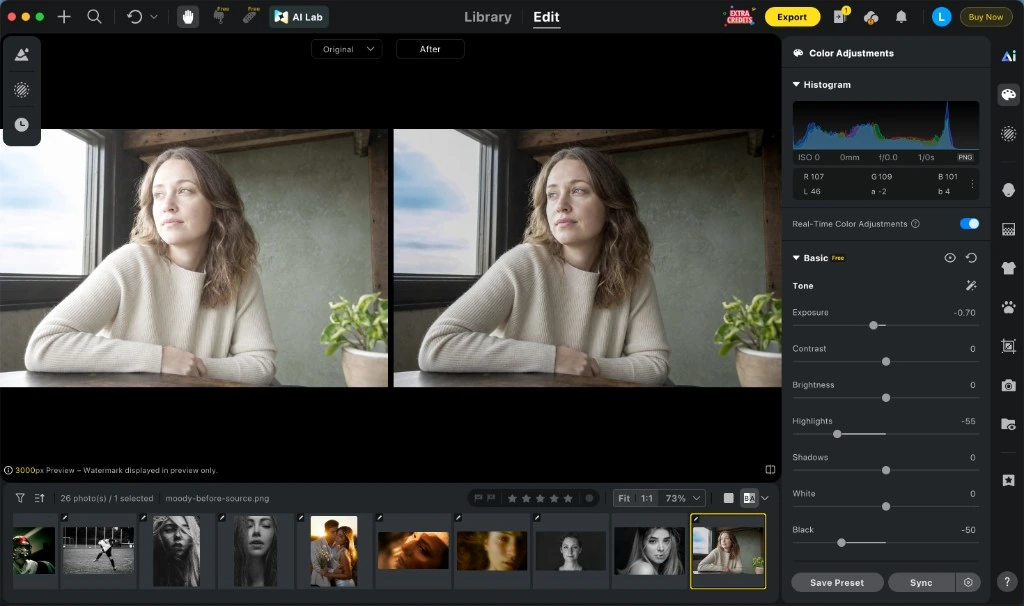
Step 3 — Shape Contrast with Curves: Open Curves (Parametric or RGB). Add a gentle S-curve to deepen shadows and add midtone snap. For a softer, filmic feel, lift the lower-left point slightly off the floor — this creates that “lifted shadow” matte look without losing structure.
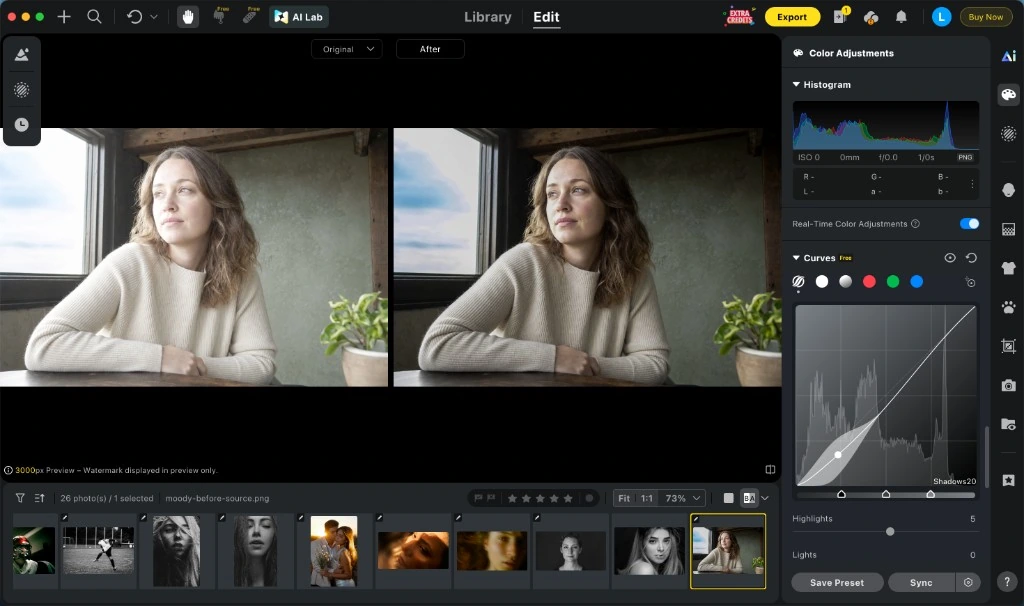
Step 4 — Color Grade with HSL: In the Color Mixer, drop overall saturation 10–20%. Push orange (skin) slightly warmer and a touch more saturated so people still feel alive against the darker background. Shift greens cooler and slightly desaturated; pull blue luminance down to deepen skies.
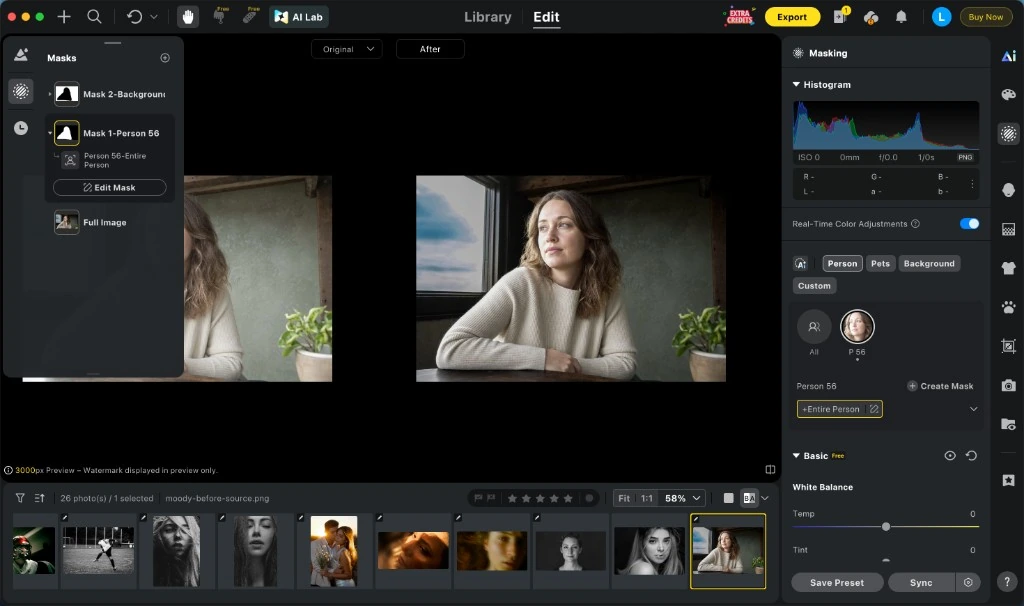
Step 5 — Selective Polish with Masking: Use Masking (Person, Background, Custom, or Luminance Range) to brighten the subject’s face a stop, or to darken corners and edges so the eye travels inward. AI White Balance Adjustment and Auto Color Corrections can help if you want a clean starting point before pushing the look.
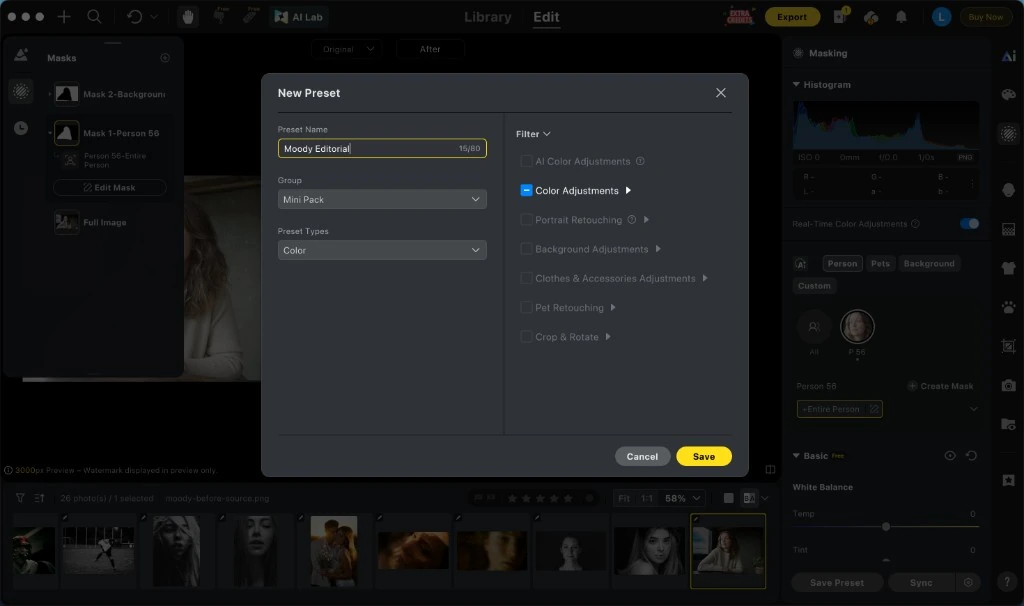
Step 6 — Save & Sync: Save the result as a Preset in My Presets. Select the rest of the shoot and apply the preset in one batch, then sync minor per-image tweaks across the group. This is the workflow professional wedding and portrait photographers use to keep an entire gallery on-brand.
10 Moody Photography Inspiration Ideas
Stuck for a subject? Steal one of these. Each comes with a quick shooting and editing note so you can go from idea to image without overthinking it.
- Rainy-window self-portrait. Sit beside a wet window after dark; have the light source behind you. Edit cool with deepened blacks.
- Single-lamp studio portrait. One desk lamp, dark backdrop, subject in 3/4 turn. Side-lit Rembrandt-style triangle on the cheek.
- Foggy forest landscape. Shoot at first light. Desaturate greens, shift them toward teal, and keep contrast soft.
- Dimly lit coffee shop. Window seat, latte, hands. Warm tones in highlights, cool tones in shadows.
- Black-and-white street. Strong directional light, hard shadows. Convert to mono and push contrast.
- Underwater or pool scene. Shoot toward the surface light; let the deep end go into shadow.
- Golden hour silhouette. Subject backlit by setting sun. Expose for sky, let subject go dark, add a tiny lift in shadows during editing.
- Vintage car interior. Half-open door, light raking across leather. Add film grain in editing.
- Candlelit still life. One candle, dark fabric, ceramic mug. ISO low, tripod, long exposure.
- Abandoned building. Broken-window light beams, dust in the air. Embrace texture and imperfection.
Common Mistakes Beginners Make
Most beginner moody photos fail in the same handful of ways. Knowing the traps lets you sidestep them.
- Over-darkening into mud. If you cannot see any detail in the shadows, you have gone too far. Pull Black back until you can just read the structure.
- Crushing the subject into the background. Moody is about contrast between subject and surroundings. Use a mask to lift the subject a touch if needed.
- Ignoring white balance. When you deepen shadows, hidden color casts surface fast. Set white balance deliberately rather than letting Auto guess.
- Over-saturating instead of desaturating. Cranking Vibrance to “make colors pop” kills mood. Moody almost always means less saturation, not more.
- Confusing underexposed with moody. An underexposed photo is a mistake. A moody photo is a decision. Structure, light direction, and intentional shadow placement separate the two.
- Trying to force bright sunny photos into a moody edit. It is possible, but you fight the source material. Start from naturally low-key scenes when you can — golden hour, overcast days, window-lit interiors.
- Stacking too many presets. One preset, lightly tweaked, beats five presets layered on top of each other. Mood comes from control, not effects.
Frequently Asked Questions
What is the difference between moody and dark photography?
Dark photography simply means an image with low overall brightness. Moody photography is broader: it is about emotional atmosphere created through light direction, controlled shadow, and restrained color. A moody image is often dark, but it can also contain bright highlights as long as the overall feeling stays intentional and quiet. In short, all moody photos use shadow deliberately, but not every dark photo is moody.
Can any photo be edited into a moody style?
Almost any, but some starting points work better than others. Photos shot in soft directional light — window light, overcast days, golden hour into blue hour — convert beautifully into a dark photo aesthetic. Brightly lit, midday, flash-flat photos are harder because there is little shadow structure to work with. If you are choosing a candidate to practice how to make moody photos, pick an image with one clear light source and visible shadow falloff.
What color palette works best for moody photography?
There is no single rule, but restrained, cohesive palettes win. Common options include muted earth tones (browns, ochres, deep greens), cool monochromes (charcoal, slate, navy), and the cinematic teal-and-amber split — cool blue shadows paired with warm gold highlights. Whatever you choose, lower overall saturation 10–20% so colors feel intentional instead of loud.
Do I need a special camera or lens for moody shots?
No. A smartphone in manual mode can produce real moody photography, and an entry-level mirrorless body with a kit lens is more than enough. A wide-aperture prime lens (f/1.8 or f/1.4) is a nice upgrade because it helps in low light and adds natural background separation, but mood comes from light direction and editing choices, not gear.
Can I make moody photos on my phone?
Yes. Use Pro or Manual mode to control exposure and lock white balance, dial exposure compensation down by −0.3 to −0.7, and shoot in good directional light. For editing, you can pull the base darker for free in the browser with Evoto’s Darken Image tool, then use a mobile editor for color grading. Once you outgrow phone editing, move to a full desktop workflow.
How do I create a moody preset I can reuse?
Once you are happy with an edit, save it as a preset so future photos start from the same recipe. In Evoto Desktop, finish an image — Tone, Curves, HSL, color grade — then save the settings to My Presets. You can then apply that preset to an entire shoot in one batch and sync per-image tweaks across the group. This is how working photographers keep an entire wedding or fashion gallery cohesive without re-editing every frame from scratch.
Conclusion
Moody photography is not a filter. It is a sequence: light → shadow → color → mood. Choose one directional light source, expose a touch darker than the meter wants, then edit with restraint — deepen the blacks, shape an S-curve, mute the colors, and grade with intention. The best moody images feel quiet and inevitable, not heavy-handed.
If you are just starting, take one photo today and run it through Evoto’s free Darken Image tool to feel how a global pull-down changes the mood. When you are ready for the full workflow — color grading, masking, preset sync across a whole shoot — download Evoto Desktop and try the 6-state process above. The fastest way to learn this style is to edit one photo all the way through, then do it again tomorrow.



