

The valley looked unforgettable in person: warm light on the ridge, fog collecting above the trees, and a soft blue distance that made every layer feel larger. Back at the computer, the same frame can look flat and milky. That gap is why photographers reach for dehaze—and why so many landscape edits end up too dark, too cyan, or stripped of their original mood.
This guide explains How to Rescue Foggy and Hazy Landscape Photos for photographers who want more depth without an artificial finish. We will start with the physics of haze, build a repeatable Evoto workflow, then cover advanced local techniques, Lightroom and Photoshop alternatives, and the mistakes worth avoiding.
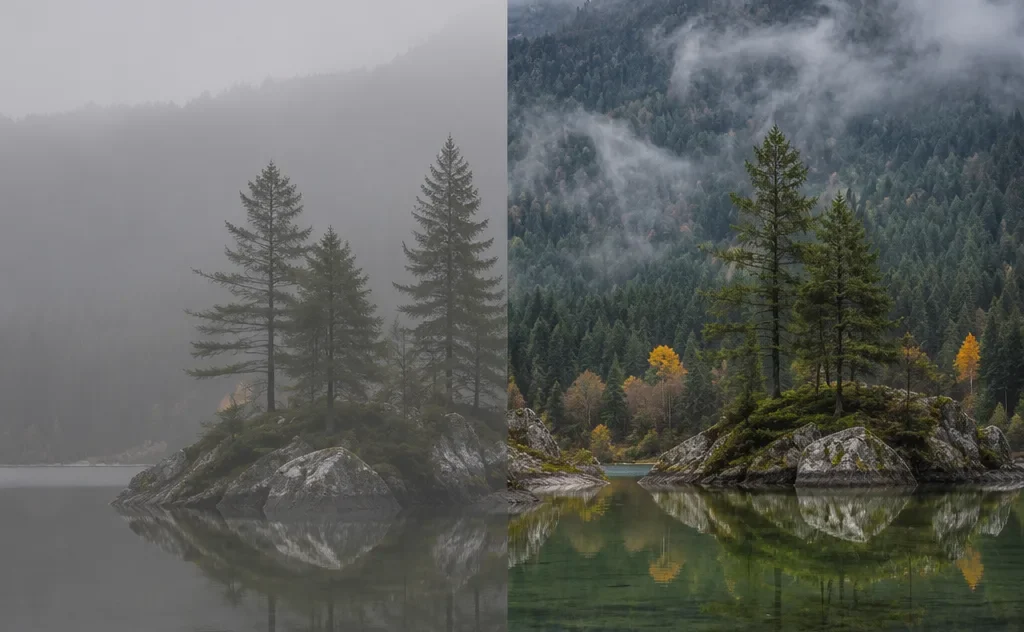
What Causes Haze in Landscape Photos?
Haze is caused by tiny particles between the lens and your subject: moisture, dust, smoke, pollution, and salt in the air all scatter light. The farther away a mountain or skyline is, the more atmosphere the light must pass through, so distant detail loses contrast first. Shooting toward a low sun makes the effect stronger because stray light enters the lens and washes across the scene.
Fog, haze, and mist are related but not interchangeable. Fog is denser and can obscure a scene almost completely; mist is lighter and often adds a delicate mood; haze is usually a broader loss of contrast and color separation. Keep them when they create depth or a sense of place. Remove them selectively when the main subject no longer reads.
How to Dehaze Photos in Evoto: Step by Step
Work from a RAW file whenever possible. RAW retains more highlight and color information, so you can restore a landscape without forcing the shadows or sky. In Evoto AI photo editor, use this order to keep the result natural and consistent.
Haven’t installed Evoto yet? Click the link below to download it for free, then follow along with the tutorial. Dehaze is completely free to use in Evoto.


Powerful AI Photo Editor
Step 1: Read the histogram before touching sliders
Check whether the image is genuinely low contrast or simply underexposed. If the histogram is pushed left, raise exposure and open shadows slightly first. If highlights are pressed against the right edge, recover them before adding dehaze. This protects the tonal information the atmosphere adjustment needs.
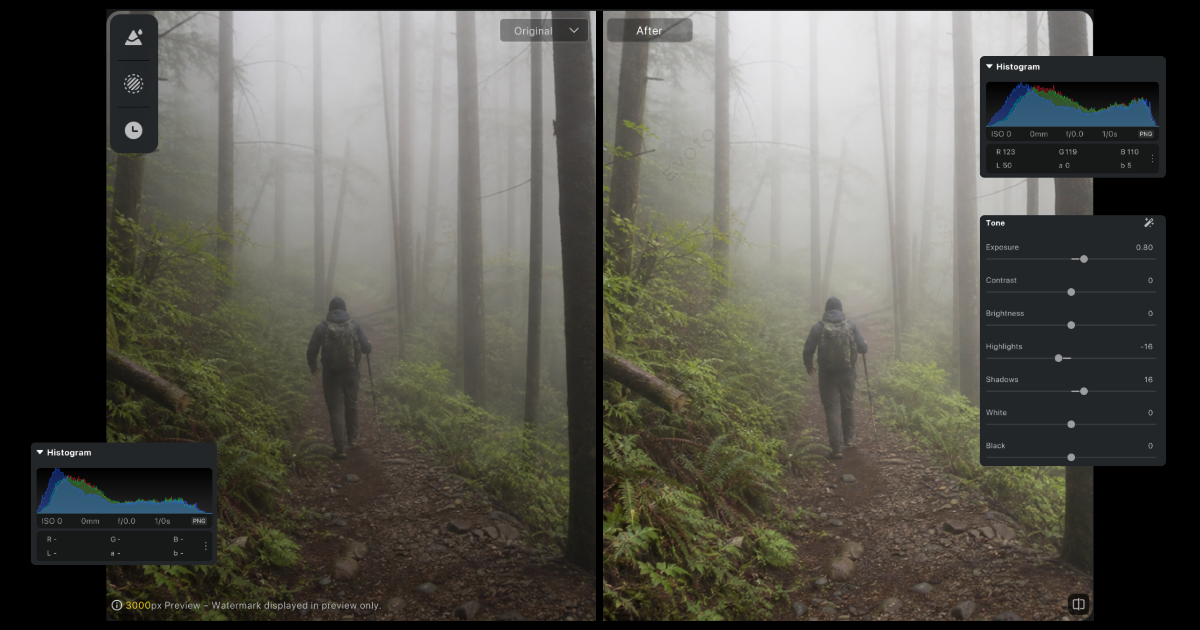
Step 2: Apply Dehaze / Atmosphere with restraint
Start with a small global adjustment and watch the distant subject, not the foreground. Stop once the ridge, trees, or shoreline separates from the background. If the whole image suddenly looks dramatic, the setting is probably doing too much.
Step 3: Rebuild contrast, blacks, and clarity
Use a modest contrast or curve adjustment to give the midtones structure. Set blacks carefully so shadowed trees still contain detail. Add clarity only where broad midtone definition is needed; it is not a substitute for dehaze and can make foliage look brittle.
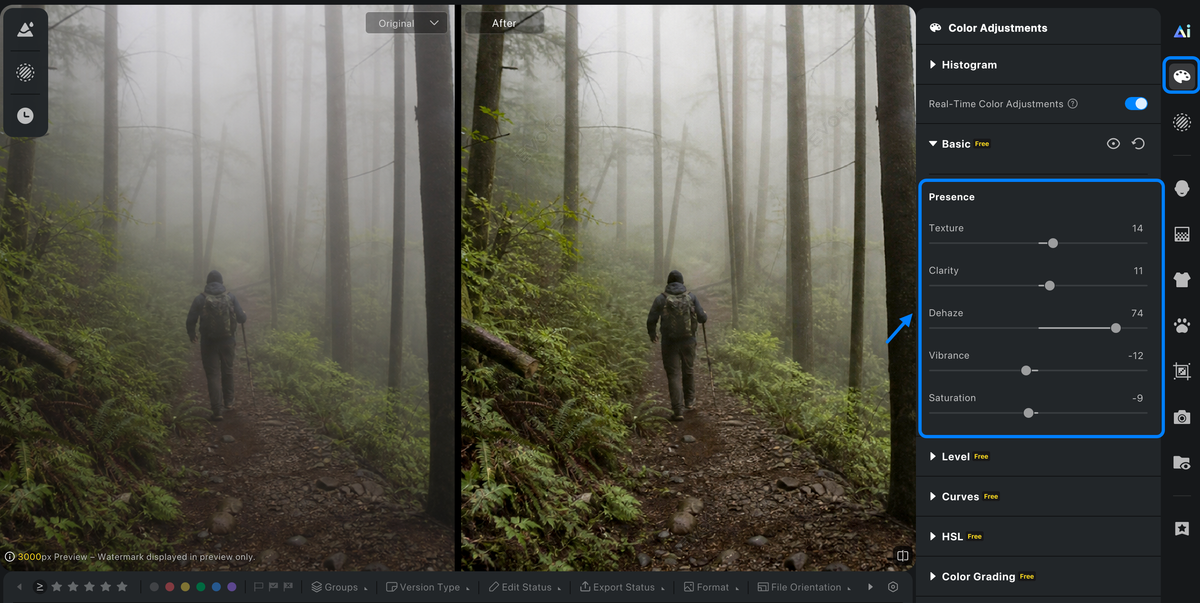
Step 4: Correct the color cast haze leaves behind
After dehazing, forest greens can turn too intense while the light stays cool and slightly blue. Make a small white-balance or color adjustment toward warm, then lower saturation rather than fighting the result with heavy vibrance. Aim for believable forest air, not oversaturated foliage.
Step 5: Use local dehaze with masks
Mask the distant tree line for a second, gentle pass while leaving the near trail and hiker mostly untouched. A soft feather prevents a dark halo at the edge of the closest trunks. This background-versus-foreground control is the difference between a quick correction and a professional finish.
Advanced Dehazing Techniques: Pro Tips
Target only the far distance with luminosity masks
In a bright, hazy scene, a luminosity-based selection can isolate the lighter distant layers more precisely than a broad gradient. Apply a low dehaze value there, then reduce the mask opacity until the transition disappears. This avoids overworking the darker foreground.
Rebuild depth with dehaze plus dodge and burn
Atmospheric depth is not only contrast. Lighten a sunlit ridge or mist channel slightly, then darken a nearby tree line just enough to create spacing. This controlled dodge-and-burn approach is more convincing than pushing global blacks.


Counter the blue cast with a subtle warm push
A restrained orange or warm adjustment in the midground can rebalance haze’s cool bias, especially near sunrise or sunset. Keep it local. If the whole frame goes orange, the correction has become a color grade rather than an atmospheric fix.
Know texture, clarity, and sharpening
Texture brings out fine detail such as rock and bark; clarity emphasizes broader midtone edges; sharpening increases edge definition. Use texture for a distant ridge that still contains detail, clarity sparingly for broader separation, and sharpening last. None of them can recover detail that fog fully concealed.
When haze is severe and you have bracketed files, blend a better-exposed foreground with a cleaner, brighter distance before fine-tuning. That is often a safer solution than attempting extreme recovery from one frame.
Use a restrained base edit for consistency, then refine atmosphere on the images that need it.
How to Dehaze in Lightroom & Photoshop
In Lightroom, start with the Dehaze slider in the Develop panel after basic exposure and white balance. A graduated filter over the distant landscape or sky can limit the adjustment to the area that needs it. Use the mask overlay to check that the horizon is clean, then revisit color and noise at 100% view.
In Photoshop, open the image through Camera Raw for the same initial control. For more manual work, use Curves with a masked adjustment layer to add contrast to the distance, then paint gently into the mask. Photoshop offers pixel-level control, but it takes longer to repeat across a gallery.
These tools are capable and familiar. The trade-off is workflow: a fast, AI-powered editor can provide a consistent base for a series, while Lightroom and Photoshop remain useful when a single hero image needs detailed manual refinements. For a streamlined starting point, download Evoto and preserve final control over every file.
Powerful AI Photo Editor
Common Dehazing Mistakes to Avoid
| Mistake | What it looks like | Better approach |
|---|---|---|
| Over-dehazing | Halos, cyan skies, crunchy shadows | Lower the global amount; use a soft local mask |
| Recovering every shadow | Noise and muddy color in dark areas | Set exposure first; reduce dehaze in shadow masks |
| Flattening atmospheric depth | Foreground and distance look equally sharp | Leave some softness in the farthest layers |
| Using sharpening as a cure | Grainy edges without real depth | Restore tonal separation before sharpening |
Always toggle the edit off and on at both full-screen and 100% view. The finished image should make the scene clearer, not make the processing obvious.
FAQ
How do you remove haze from a photo?
Correct exposure and white balance first, apply a small dehaze adjustment, then use local masks for distant areas. Finish with restrained contrast and color corrections.
Does dehazing reduce image quality?
Moderate dehazing does not inherently reduce quality, but aggressive settings can reveal noise, halos, and banding. RAW files and selective masks give you more room for a clean result.
How do you fix a hazy sky?
Mask the sky separately and use less dehaze than you use on the distant land. If it turns cyan or noisy, reduce the effect and correct tone with a subtle curve instead.
What’s the best tool to dehaze photos?
The best choice depends on the workflow. Lightroom and Photoshop offer deep manual control; an Evoto AI photo editor workflow is a practical option when you want natural, consistent edits across multiple images.
Bring Back Detail Without Losing the Landscape’s Mood
Dehaze is most effective when it is part of a sequence: read the histogram, correct the base file, restore distant separation, then shape depth locally. Keep enough mist for the scene to feel true to the conditions. For a faster, creator-friendly workflow on a full landscape series, try Evoto free.



