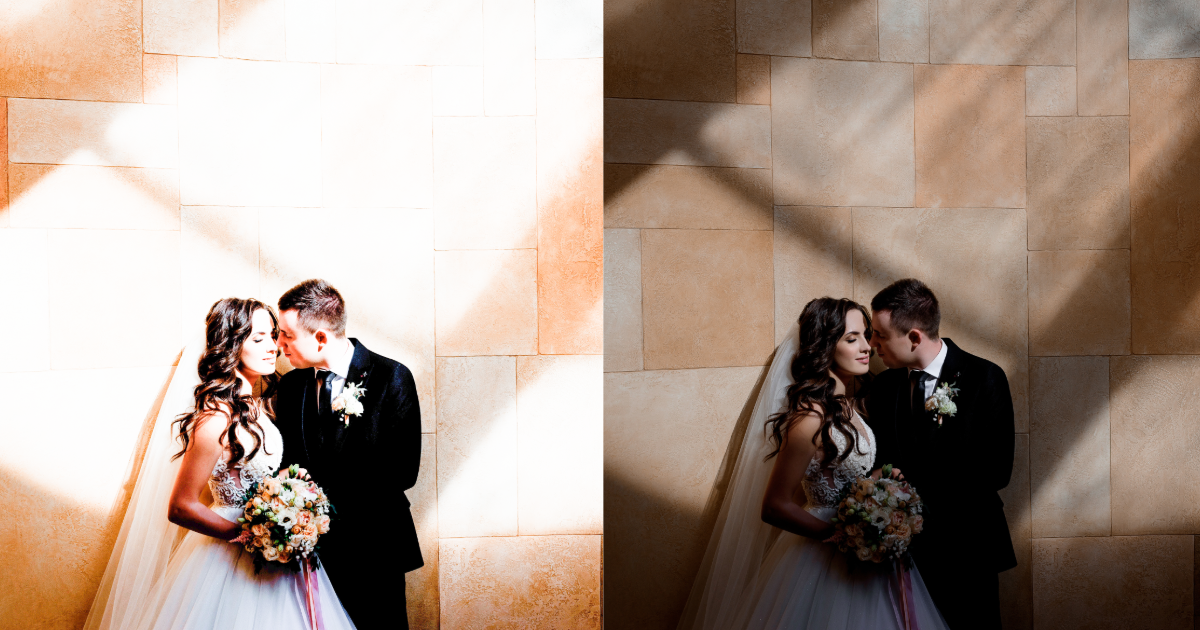
When a portrait, wedding frame, or landscape looks too bright, the first question is not “How far should I pull Exposure down?” It is whether the detail is still in the file. How to fix an overexposed photo in Lightroom starts with that distinction: bright can be recoverable, while clipped white contains no texture for Lightroom to reveal.
RAW files usually retain more highlight headroom than JPEG or HEIC files, so begin with the RAW original whenever you have it. A dependable workflow is diagnose, recover tone, rebuild contrast, fix local areas, then refine color. That order protects the parts of the image that already look right.
A successful recovery restores important bright detail without making the whole frame dark.
Check Clipping First
Open the photo in Lightroom’s Develop workspace and inspect the histogram. The right edge represents the brightest tones. Enable the highlight clipping warning with the upper-right histogram triangle or press J. Lightroom overlays clipped highlights in red, giving you a fast map of where detail may be missing.
Inspect important areas at 100%: cloud texture, white fabric, bright windows, reflective products, and facial highlights. A tiny clipped reflection may be acceptable. A large clipped area in a bride’s dress or a face deserves attention. Move Highlights and Whites gently; if texture and color return, the file has usable headroom. If the area stays solid white, stop trying to force it into a midtone.
Instead, make a creative decision. A controlled high-key finish, a monochrome conversion, or a crop can look intentional. Overworking a fully clipped area often creates gray patches, strange color, or noise without restoring information.
Recover Highlights Without Making the Photo Gray
The fastest route to a dull correction is lowering every brightening control at once. Work through the tonal range in a specific order so you protect detail and keep the photograph’s original sense of light.
Lower Highlights first. This targets bright detail in clouds, pale clothing, skin sheen, and reflective surfaces without broadly darkening midtones. Then lower Whites only enough to reset the white point. Hold Alt/Option while dragging Whites to preview clipping and avoid pushing the image too far.
Only after that should you adjust Exposure. Exposure shifts much of the tonal range, so using it first can make the subject and shadows unnecessarily dark. If recovery makes the image feel flat, set Blacks carefully, add modest Contrast, or apply a gentle S-curve. These choices restore depth more naturally than raising Whites back to the point of clipping.
Mask Local Overexposure
A bright sky, window, flash hotspot, or one side of a face is a local issue. A global adjustment will darken areas that already look correct. Lightroom’s masks let you correct only the area that needs help.
Choose the mask that matches the problem
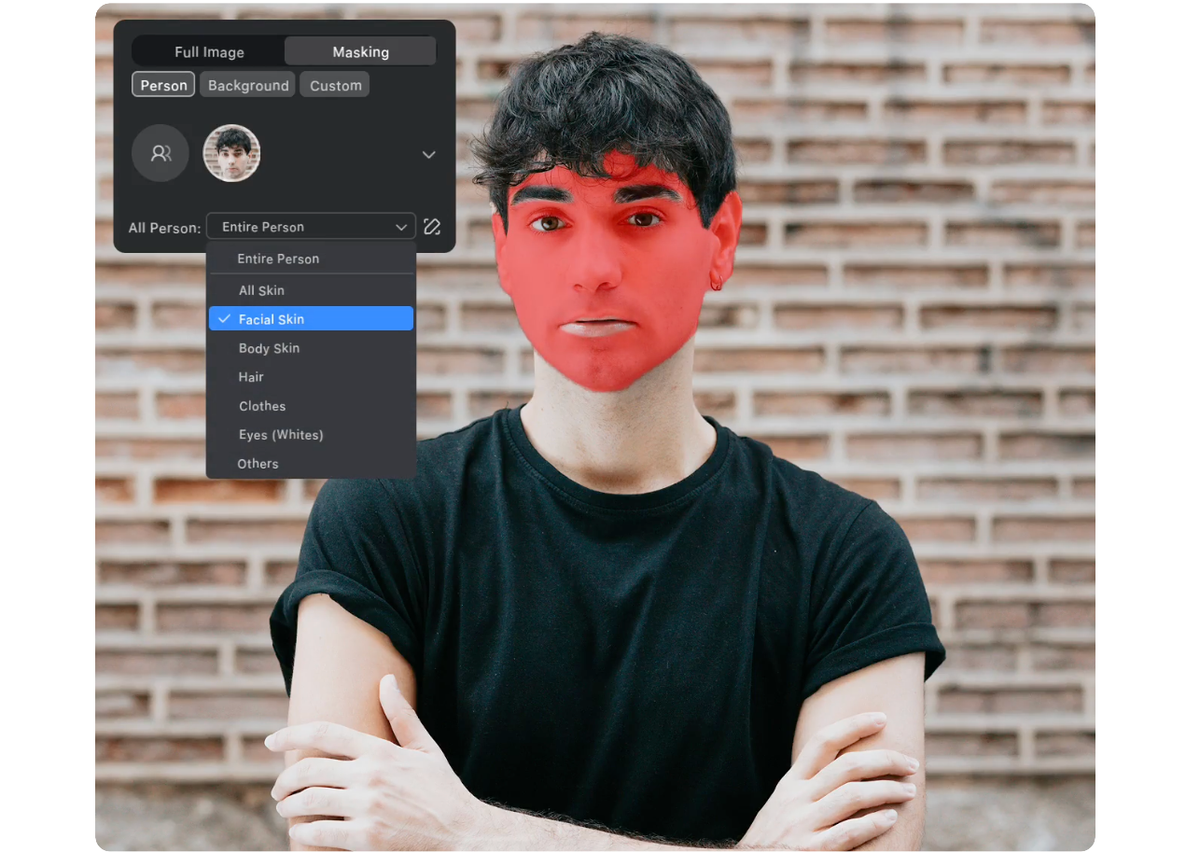
Use Select Sky for skies, People or Subject masks for a face or clothing, a Brush for a small hotspot, a Linear Gradient for a window or horizon, and a Radial Gradient for an isolated bright pool of light. Within the mask, lower Highlights first and then Whites. If needed, lower Exposure slightly after those targeted controls.
Keep facial highlights believable
Skin needs a small amount of natural shine to look alive. Do not force every forehead, cheekbone, or nose highlight into a midtone. Feather the mask and compare before and after at a useful viewing size. The objective is natural and consistent skin, not a uniformly matte face.
Restore Color After Tone
Recovered highlights can still look pale or shift hue. Correct White Balance before making any color judgment; a warm image can make white fabric look yellow, while a cool image can make skin look gray. Once temperature and tint are stable, target a sky or skin shift with the HSL/Color Mixer instead of moving global color controls aggressively.
For portraits, use Vibrance before Saturation. Vibrance tends to protect already strong colors better and gives subtle skin color a more controlled lift. Apply it after tonal recovery, not before. If a recovered blue sky looks cyan or a face looks desaturated, make a small targeted adjustment and revisit the mask edge rather than adding color everywhere.
Finish Photos With Fully Clipped Highlights
Lightroom cannot restore texture that was never recorded. If a critical highlight remains a blank patch after a reasonable Highlights and Whites adjustment, give the frame a deliberate direction. A controlled high-key treatment can preserve an airy portrait; black and white can emphasize shape and expression; a restrained grade can make a bright environment feel cohesive; and a crop can remove a distracting edge.
The important decision is to stop before artifacts become the subject. When a recoverable image needs another pass, the Evoto overexposed photo correction workflow can help refine exposure while keeping the result clean and natural.
Batch-Fix a Shoot
Group frames by matching light before you sync anything. Fully correct one representative image, including its global tonal settings, then synchronize that baseline across photographs made under the same sun angle, indoor lighting, or backdrop. Review the first, middle, and last frames after syncing.
Check changing light, reflective surfaces, close portraits, and different angles individually. Do not sync local masks blindly across different compositions: a gradient that perfectly recovers one sky can cross a person’s face in the next frame. Separating global tone from local correction protects speed and quality at the same time.
Batch work is most reliable when you group images by matching light first.


Powerful AI Photo Editor
Review a Full Shoot Faster With Evoto
For a large gallery, use AI Culling to group similar or overexposed frames before editing. Apply a baseline correction with free Color & Tone controls, then sync it across comparable images. Refine individual exceptions with local tools instead of asking one global edit to solve every frame.
Evoto AI photo editor is designed for a faster, creator-friendly workflow: review, correct, retouch, and batch-process while retaining full control over individual images. For a shoot that needs both speed and professional-level results without the complexity, download Evoto and review your exposure fixes in context.
FAQ
Can Lightroom recover completely blown-out highlights?
It can recover information that is still present, especially in a RAW file. If an important area remains solid white after sensible adjustments, the texture was not recorded and cannot be restored faithfully.
Should I lower Highlights or Exposure first?
Lower Highlights first. It targets bright detail without broadly darkening the photograph. Use Exposure afterward only if the whole image still needs to be darker.
Why does highlight recovery make a photo look gray?
Highlights or Whites may be reduced too far, or a local issue may be corrected globally. Ease the recovery back, restore depth with Blacks or the Tone Curve, and use a mask for the specific bright region.
How do I fix overexposed skin in Lightroom?
Use a People mask, lower Highlights in small increments, and preserve subtle specular highlights. Correct white balance first and favor Vibrance over broad Saturation when skin needs color refinement.
Can I batch-fix overexposed photos in Lightroom?
Yes. Correct one representative frame and sync global tone settings across images in matching light, then review exceptions individually. Avoid syncing local masks across different compositions.
A measured Highlights → Whites → Exposure workflow gives you the best chance to preserve what the camera captured. When you need to review and batch-correct a full shoot, try Evoto free for fast, accurate adjustments that stay under your control.