

Stretching a photo in Photoshop is easy. Upscaling it cleanly is harder.
If you only drag the corners bigger, the file gets larger and softer at the same time. Edges smear. Faces lose texture. Print jobs fall apart. A real upscale needs Photoshop to rebuild detail while it increases size, not just stretch the pixels you already have.
Photoshop now gives you several ways to do that: Generative Upscale, the classic Image Size dialog with Preserve Details, and Super Resolution in Camera Raw. Each one fits a different kind of file and a different level of control.
This guide walks through those three methods step by step, then shows a faster Evoto path when you mainly need a clean 2K, 4K, or 6K delivery.
What Upscaling in Photoshop Actually Does
Image enlargement and image upscaling are not the same thing.
Enlargement increases dimensions. Upscaling tries to add usable detail while those dimensions grow. In Photoshop, that can mean:
- AI reconstruction with Generative Upscale
- Resampling with Preserve Details or Bicubic Smoother
- Detail doubling with Camera Raw Super Resolution
The best method depends on the source. A detailed RAW file has more to work with than a compressed social-media JPEG. An old scan may need AI help. A print-ready portrait may need restraint more than maximum scale.
Before you upscale:
- Start from the highest-quality original you have
- Avoid enlarging a file that is already heavily compressed if a better master exists
- Decide the destination size first: web, client gallery, poster, or archive
- Expect diminishing returns if the source is tiny, blurry, or noisy
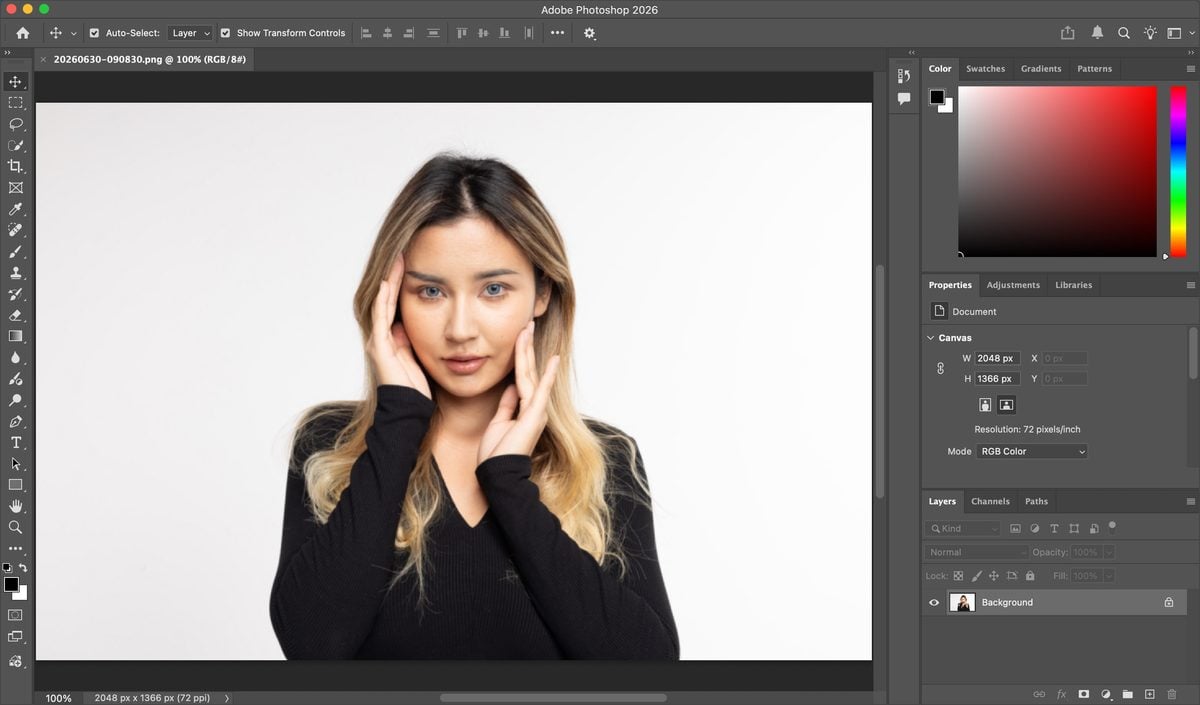
Method 1: Generative Upscale
Generative Upscale is Photoshop’s newest AI enlargement path. Instead of only interpolating pixels, it uses Firefly to invent believable detail as the image gets larger.
This is usually the best first option when you want a fast AI upscale inside Photoshop and your version supports the feature.
Steps
- Open the image in Photoshop.
- Go to Image > Generative Upscale.
- Choose a scale factor: 2x, 3x, or 4x.
- Confirm the size. Current limits may cap the long edge around 4096 px, so Photoshop may ask you to adjust if you push too far.
- Run the upscale. Photoshop creates a new document, leaving the original untouched.
- Zoom to 100% and check faces, hair, text, and fine texture before saving.
Best for
- Older scans and digital photos that need more print size
- Social or design assets that look soft at target dimensions
- Users who want AI help without leaving Photoshop
Watch-outs
- Fine textures can get smoothed or rewritten
- Backgrounds or small objects may change slightly
- Fractional scales like 2.6x are usually not available
- Very large output may hit the long-edge limit
- Some results can look plastic if the AI overworks skin or fabric
If the result looks too invented, drop to a lower scale or switch to Preserve Details for more conservative enlargement.
Method 2: Image Size with Preserve Details
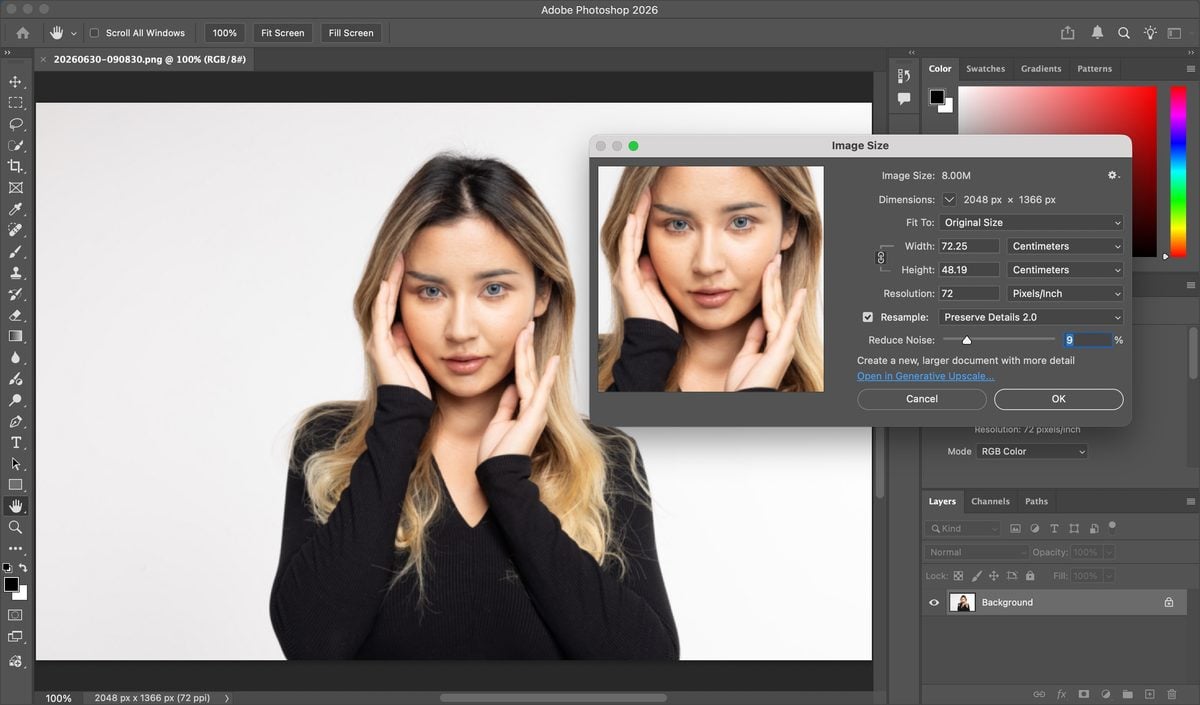
The Image Size dialog is still the most controllable built-in method.
It does not always rebuild detail as aggressively as Generative Upscale, but it gives you direct control over width, height, resolution, and resampling. For many photographic enlargements, Preserve Details (Enlargement) or Preserve Details 2.0 is the smart default.
Steps
- Open the image: File > Open or Ctrl/Cmd + O.
- Go to Image > Image Size.
- Keep the chain link on so width and height stay proportional.
- Check Resample.
- Choose a resampling method:
– Preserve Details 2.0 / Preserve Details (Enlargement) for photos
– Bicubic Smoother for gentler, more uniform enlargements - Enter the new size. For quality, start with a modest jump such as 1.5x to 2x, then evaluate.
- Zoom the preview to 100% and inspect edges.
- Click OK.
- If needed, refine with light sharpening or noise reduction after the size change.
If Preserve Details 2.0 is missing, check Edit > Preferences and enable related preview/technology options in your Photoshop version, then reopen Image Size.
Best for
- Photographers who want manual control
- Files that need a specific pixel dimension or print size
- Cases where Generative Upscale rewrites too much
Watch-outs
- You choose the resampling method, so the wrong one can soften edges
- This path improves readability, but it does not invent missing detail as aggressively as Generative Upscale
- Large jumps still look better in stages than in one extreme push
- Batch work is slower than a dedicated upscaler
Method 3: Super Resolution in Camera Raw
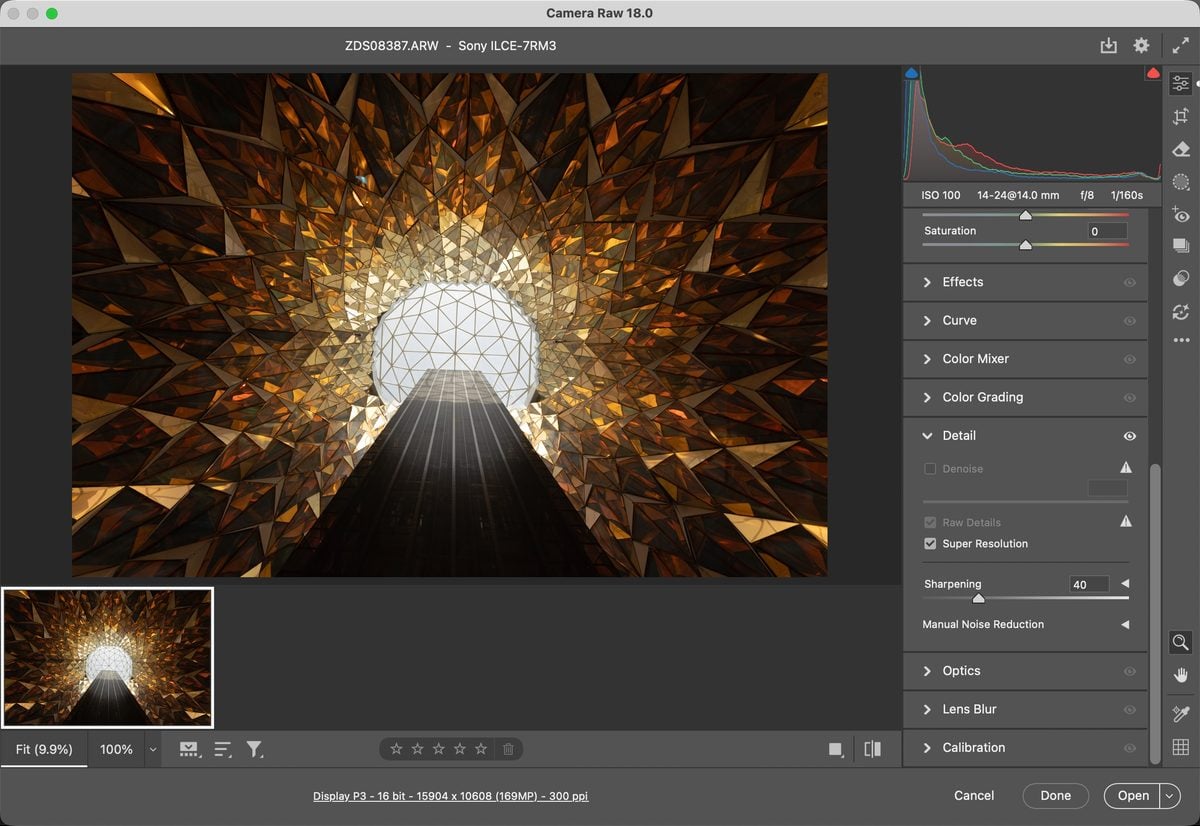
Camera Raw Super Resolution is the cleanest “double the image” option in the Adobe ecosystem.
It increases both width and height by 2x, which means about 4x total pixels. It was built with RAW files in mind, but it also works on JPEG, TIFF, and PNG through Camera Raw or Bridge.
Steps
- Open a RAW file in Photoshop so Camera Raw launches automatically.Or, in Adobe Bridge, right-click the file and choose Open in Camera Raw.
- Right-click the image preview and choose Enhance.
- In the Enhance dialog, enable Super Resolution.
- Preview the before/after comparison.
- Click Enhance.
- Photoshop creates a new higher-resolution DNG copy.
- Open that DNG, finish color and sharpening, then export.
Best for
- DSLR or mirrorless photos with real detail to recover
- Older digital files you want to reprint larger
- A simple, low-decision Adobe upscale
Watch-outs
- Scaling is fixed at 2x width and height
- It creates an extra DNG, so storage adds up in batches
- It helps sharpness and clarity, but it will not fully rescue heavy blur
- Weak JPEGs improve less than strong RAW originals
Which Photoshop Upscale Method Should You Use?
| Method | Scale control | AI strength | Best use |
| Generative Upscale | 2x / 3x / 4x | High | Fast AI enlargement inside Photoshop |
| Image Size + Preserve Details | Custom dimensions | Medium | Precise size targets and photographic control |
| Camera Raw Super Resolution | Fixed 2x per side | Medium-High | RAW-friendly doubling with simple steps |
A practical rule:
- Use Generative Upscale when you need visible AI help quickly
- Use Image Size when the delivery size is exact
- Use Super Resolution when you want a reliable Adobe double-up from a strong original
After any method, check the file at 100%. Look at eyes, hair edges, fabric, text, and shadow noise. If the image only got bigger but lost believability, the upscale failed.
When Photoshop Is Not the Fastest Path
Photoshop is excellent when you already work there and need control. It is less ideal when you only need a clean delivery size and do not want to manage beta features, DNG copies, or resampling choices.
That is where a photographer-oriented AI upscaler helps. Evoto keeps the path short: upload the image, choose 2K / 4K / 6K, generate, and export.
For a broader comparison of dedicated tools, see Best Image Upscaler in 2026.
How to Upscale Images Faster with Evoto
If your goal is a usable larger export for client delivery, web, or print prep, Evoto‘s image upscaler is built around resolution targets instead of nested Photoshop menus.


Powerful AI Photo Editor
1. Upload your image
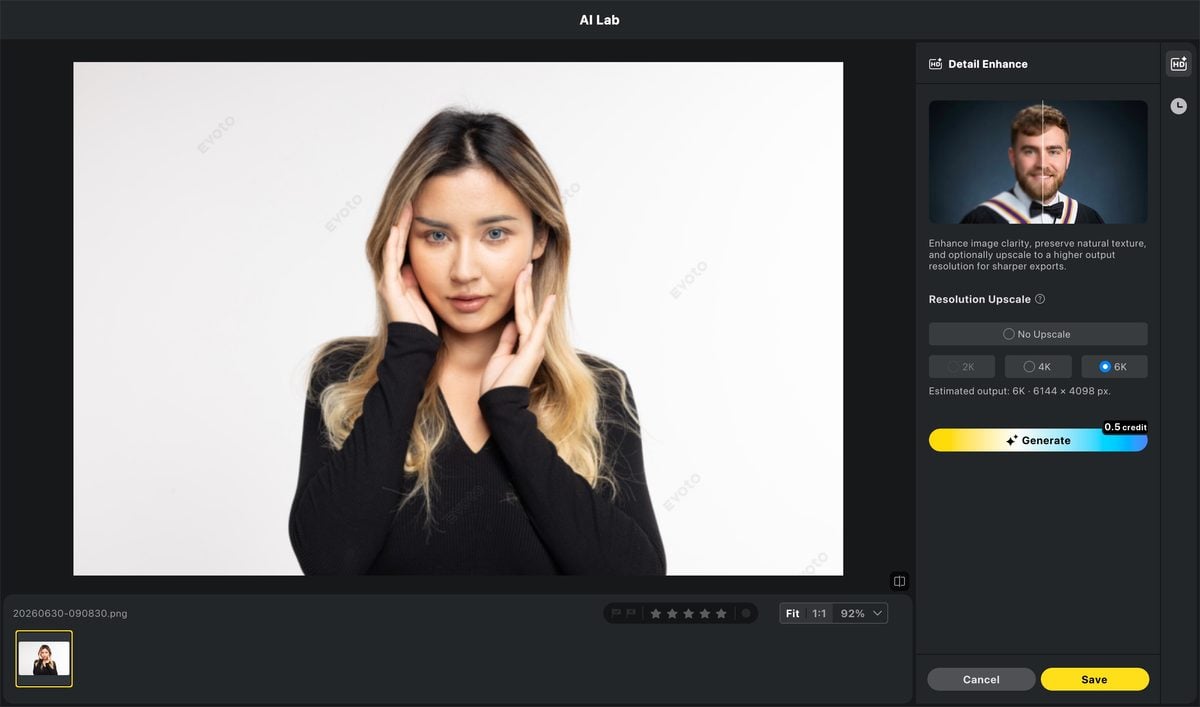
Open Evoto and bring in the photo you want to enlarge. Low-resolution exports, tighter crops, older files, and delivery images that need more size are the usual candidates. And click Al Lab.
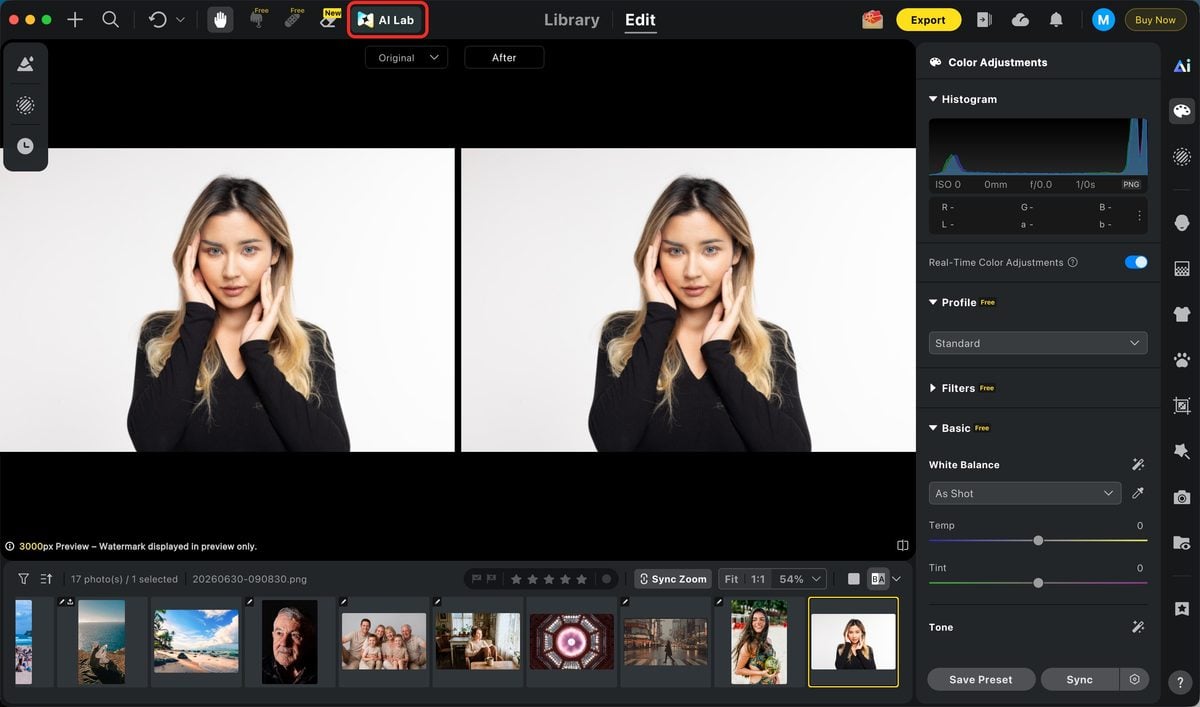
2. Choose 2K / 4K / 6K, then generate
Go to the Detail Enhance flow and pick the resolution you need:
- 2K for cleaner web or lighter delivery
- 4K for most high-quality digital and print-ready needs
- 6K when you want more room for cropping or larger output
Then generate the result and compare it against the original before you commit.
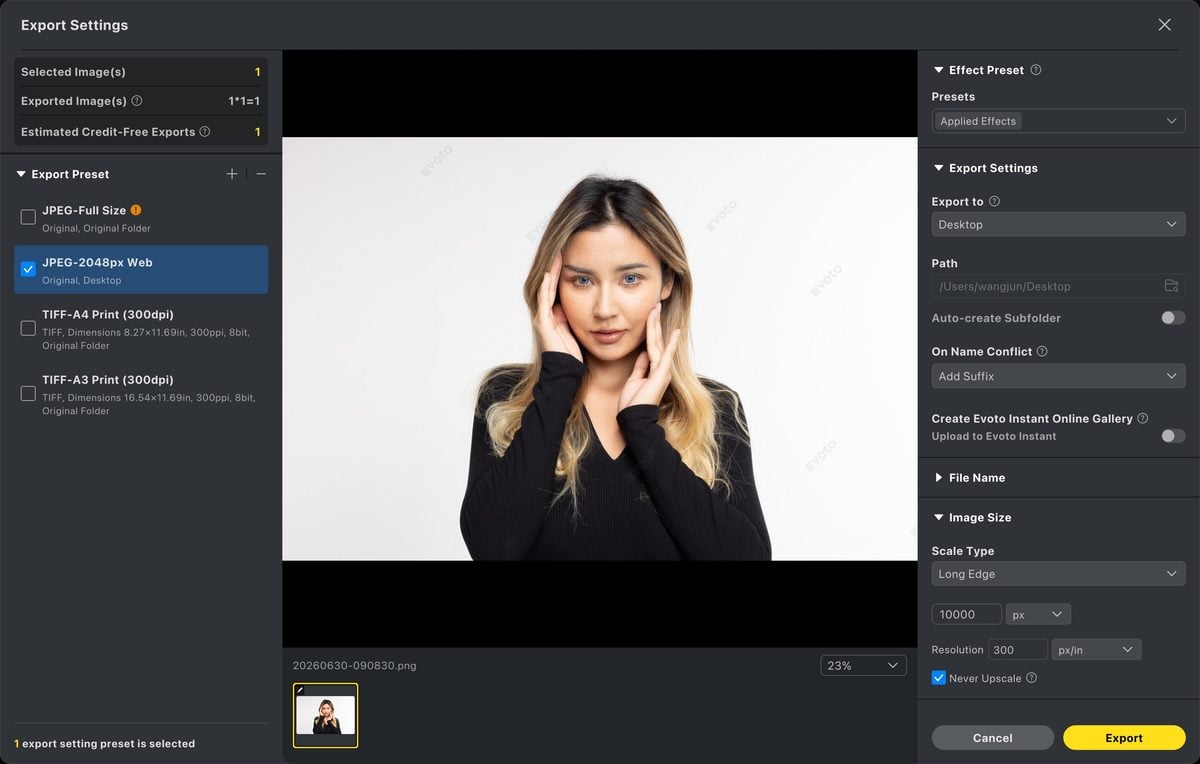
3. Export the final file
Once the upscaled version looks clean, export it. Check faces, edges, and texture at 100% before delivery. If the image also needs color consistency or light retouching, finish those steps before you send the file out.
For a direct product entry point, see Evoto’s AI Photo Enhancer.
Common Mistakes When Upscaling in Photoshop
The first mistake is enlarging a bad master. If the source is soft, noisy, or heavily compressed, Photoshop has less real detail to protect.
The second mistake is jumping too far in one step. A controlled 1.5x or 2x move often looks cleaner than an extreme push.
The third mistake is judging the result in Fit to Screen view. Softness and AI artifacts show up at 100%.
The fourth mistake is sharpening too hard after enlargement. Light cleanup helps. Aggressive sharpening creates halos.
The fifth mistake is using Generative Upscale on every file by default. Some portraits and product shots need fidelity more than invented texture.
Photoshop Upscale Checklist
Before:
- Do you have the best available original?
- What final pixel size or print size do you need?
- Is the file mostly limited by resolution, blur, or compression?
During:
- Keep aspect ratio locked unless you intentionally crop
- Choose the method that matches the job
- Preview at 100%
- Avoid extreme one-step enlargement when a smaller jump works
After:
- Check faces and edges
- Apply only light sharpening or noise reduction
- Export a new file instead of overwriting the original
- Confirm the result still looks natural at delivery size
Final Thoughts
Learning how to upscale an image in Photoshop is less about finding one magic button and more about matching the method to the file.
Use Generative Upscale when you want AI reconstruction. Use Image Size with Preserve Details when you need exact dimensions and more control. Use Camera Raw Super Resolution when a clean 2x-per-side boost is enough. Then inspect the result carefully before you call it done.
If you want a shorter photographer workflow with direct 2K / 4K / 6K targets, Evoto is the faster alternative: upload, choose the resolution, generate, and export.
Try Evoto AI Photo Editor
Retouch photos with Evoto AI and make your photos best! Available on Windows, MacOS and iPadOS.



