

How to make a transparent background in Photoshop is still a craft skill: “Pen Tool” or “Select and Mask”, then export PNG with transparency on. On delivery night, one-click “Transparent” plus “Spill Removal” protects the clock when the filmstrip is long, and the backdrop stains the subject.
It is 11:40 p.m. One bridal hero still needs a careful Pen path around flyaways. The filmstrip behind it holds a pile of catalog or yearbook frames that all need the same transparent plate by morning. That is the real tension inside how to make a transparent background in Photoshop: the craft is excellent, and the clock is finite.
Photoshop remains the right desk for hero composites. The question is whether every frame in the cull deserves the same minutes. A Fstoppers piece on hair fringing makes a useful point for delivery QC: ugly rims are often contaminated edge color, not proof that you “drew the mask wrong.” That insight matters whether you finish in Photoshop or hand the volume path to a faster transparent PNG workflow.
The pain is not “Photoshop failed.” The pain is shipping a gallery where one hero frame ate a long Pen pass while a leftover cull of a few dozen frames still glowed with old backdrop color. Those counts are an illustrative delivery-night sketch, not a studio survey. You need an honest hand path for heroes, and a second gear for everything else.
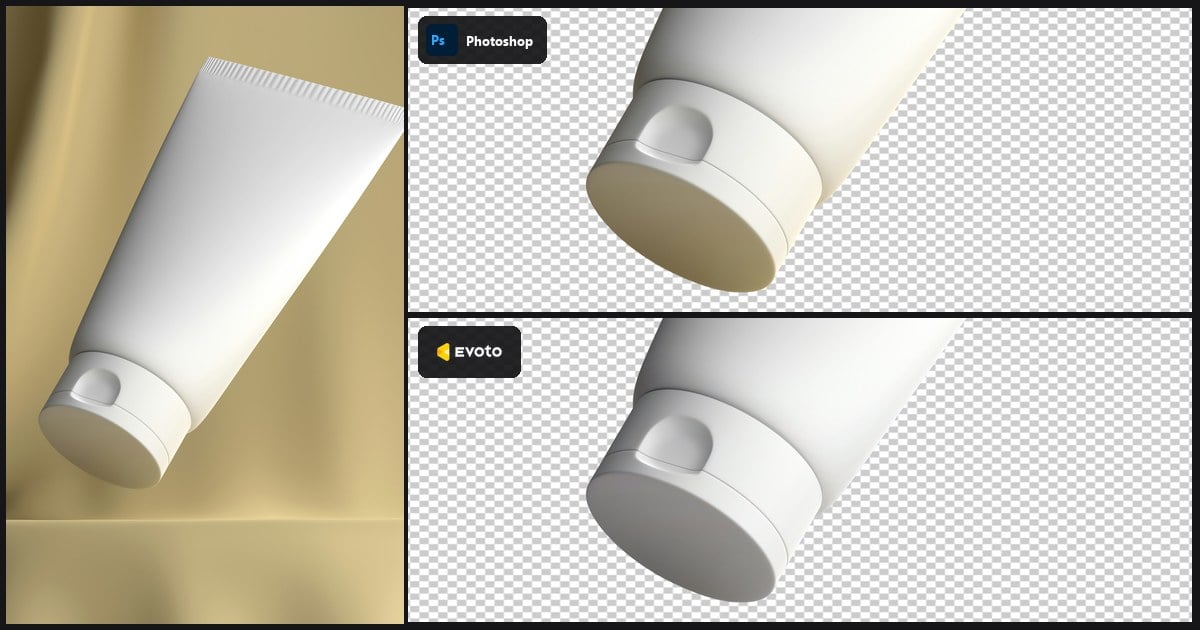
The cover is that fork in one frame: original stained JPG on the left, a Pen-path cutout on checkerboard (Photoshop), then one-click “Transparent” on the same tube (Evoto).


Powerful AI Photo Editor
How to Make a Transparent Background in Photoshop: Pen and Select and Mask
A traditional path for how to make a transparent background in Photoshop, so the later one-click comparison is fair. Messy hair or sheer fabric often takes several minutes, and a hard hero can run toward about ten to fifteen minutes per frame. That is an illustrative desk range for careful Pen work, not a claim that every catalog SKU needs that clock. That is why a full cull at hero effort breaks a delivery night.
Step 1: Unlock “Background”
In “Layers”, unlock “Background” or duplicate it. You need a layer you can mask.
Step 2: Set the “Pen Tool” to “Path”
Pick the “Pen Tool” (P). In the options bar, set the mode to “Path”, not “Shape”. Place anchors around the silhouette. For portraits, “Select” → “Subject” can start a rough selection.
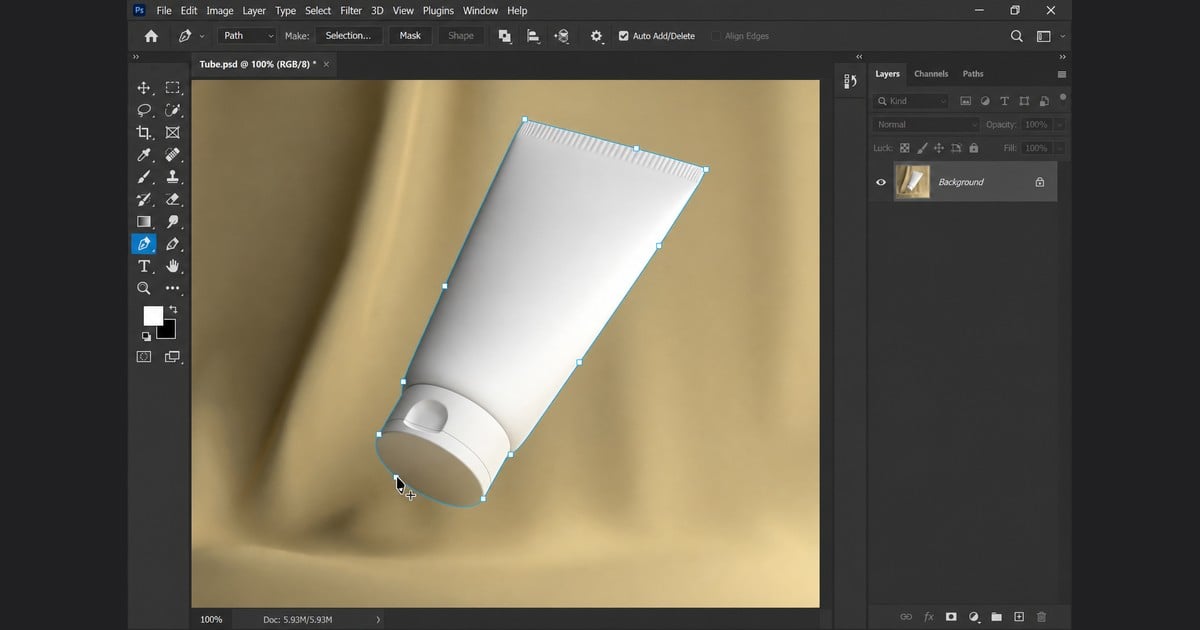
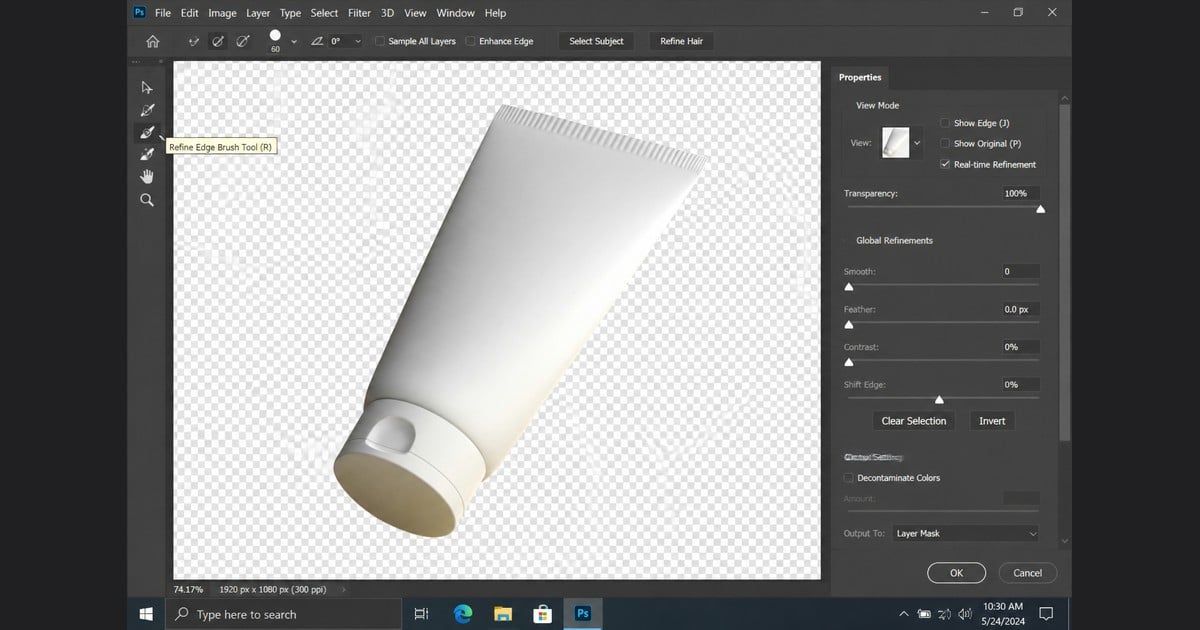
Step 3: Open “Select and Mask”
Go to “Select” → “Select and Mask”. Paint flyaways with the “Refine Edge Brush Tool”. Set “Output To” to “Layer Mask”, then click “OK”.
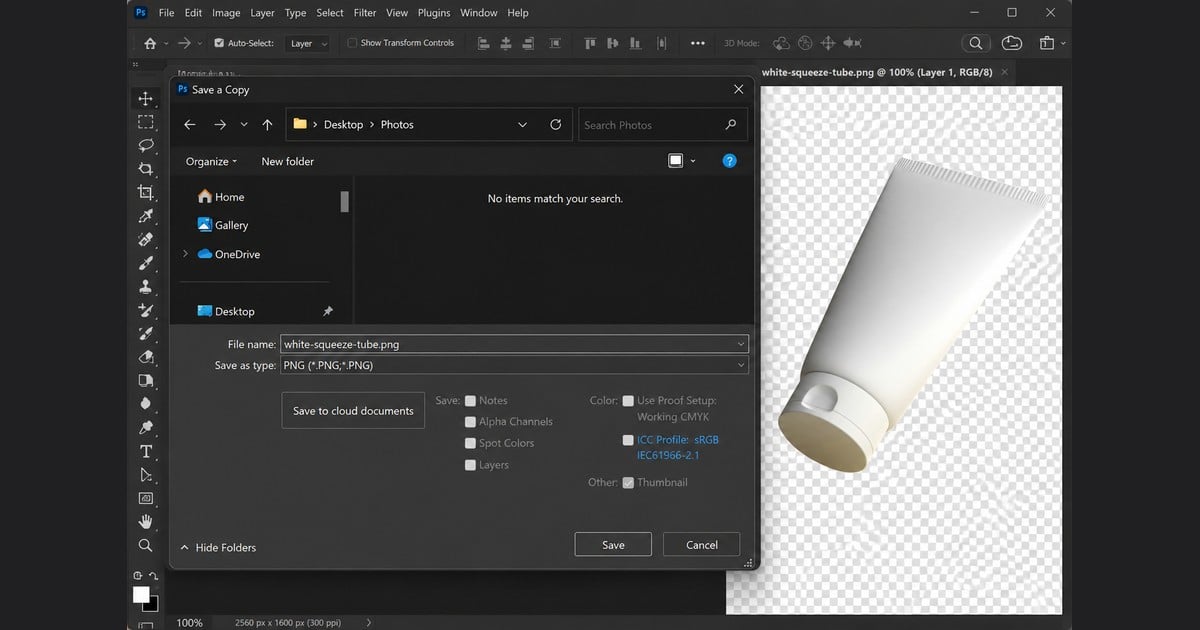
Step 4: “File” → “Save a Copy” as PNG
Set “Save as type” to “PNG”, click “Save”, then confirm “PNG Format Options”. Older builds: “Export As” with “Transparency” on. Do not flatten onto white.
How to cut out an image in Photoshop still belongs in studio teaching. Adobe’s remove a matte help is the right vocabulary when a fringe appears after the mask looks done. The next section is the clock ledger.
Pen Tool Versus One-Click Transparent PNG
When is the Pen Tool still worth it versus one-click PNG? Use the table as a decision aid for tonight’s cull, then keep reading for the spill problem that survives both good taste and fast masks.
| Situation | Lean Pen/hand path | Lean one-click PNG |
|---|---|---|
| Hero composite, extreme hair | Yes | After QC only |
| Catalog/school volume | Rarely as default | Yes, then Sync |
| Same look needed tonight across many frames | Costly in hours | Preset / Sync |
Photoshop still owns one-off craft. Evoto’s transparent PNG path owns repeatable pace: “Transparent”, optional edge tools, “Spill Removal”, export “PNG”, “Sync” when the filmstrip agrees. Traditional retouching efficiency is the comparison, not a roast of any competing brand.
If the bottleneck is frame count rather than a single Pen masterpiece, proof one file in PNG Maker: “Backdrop Changer” → “Transparent”, then “Spill Removal” on the frames that still glow. Keep the hand path for the heroes. Evoto here is the same AI Photo Editor used for the volume path, not a replacement for Photoshop taste.
Powerful AI Photo Editor
Studios that already know Photoshop select and mask do not need a lecture on taste. They need a second gear when taste is settled, and quantity is not. One-click transparent PNG is that gear. Spill cleanup is how the gear still looks expensive on a new plate, which is the next pain delivery nights actually fight.
Spill Removal When the Backdrop Stains the Subject
How do I make a transparent background in Photoshop without a white halo? Start with black and white preview habits. The sister guide on JPG versus transparent PNG shows those plates in detail. Then ask a sharper question: did the old backdrop dye the subject?
Color spill is the green, blue, or warm stain that clings to skin, hair, or fabric after the background is gone. Hardening a mask alone will not always fix it. You need a spill-aware cleanup, then a true PNG export. Otherwise the new background looks wrong even when the silhouette path was carefully drawn.
In Photoshop language, you may reach for “Decontaminate Colors”, matte commands, or clipped healing on fringe. Those methods work. They also burn minutes. Evoto’s “Spill Removal” is the volume-minded counterpart: treat the stain as a named control next to the transparent export, not as an after-hours science project on every SKU.
Here is the case from a stained original JPG. Notice how the backdrop color already kisses the subject before any cutout starts. That contamination travels with the person unless you treat it.
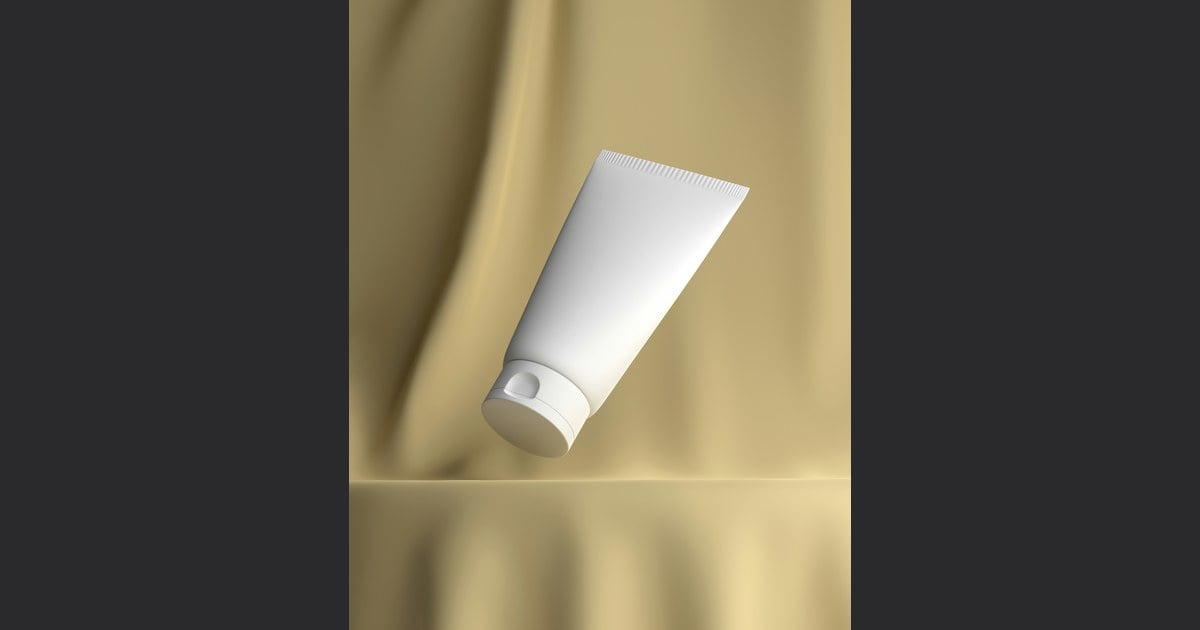
After a transparent cutout, the spill can look even louder because there is no busy backdrop to hide it. This is the moment juniors think the mask “failed,” when the real issue is color on the subject.
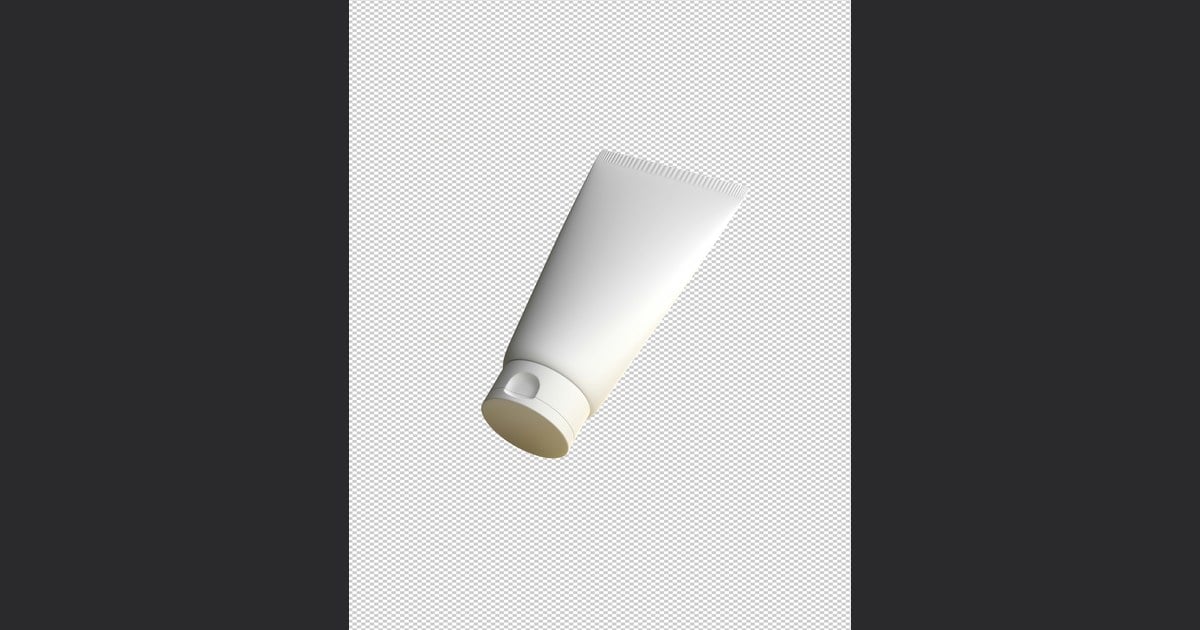
After Spill Removal, the subject reads cleaner and is ready for a new plate. Hair-level isolation plus stain cleanup is what makes one-click transparent PNG feel natural instead of stamped.
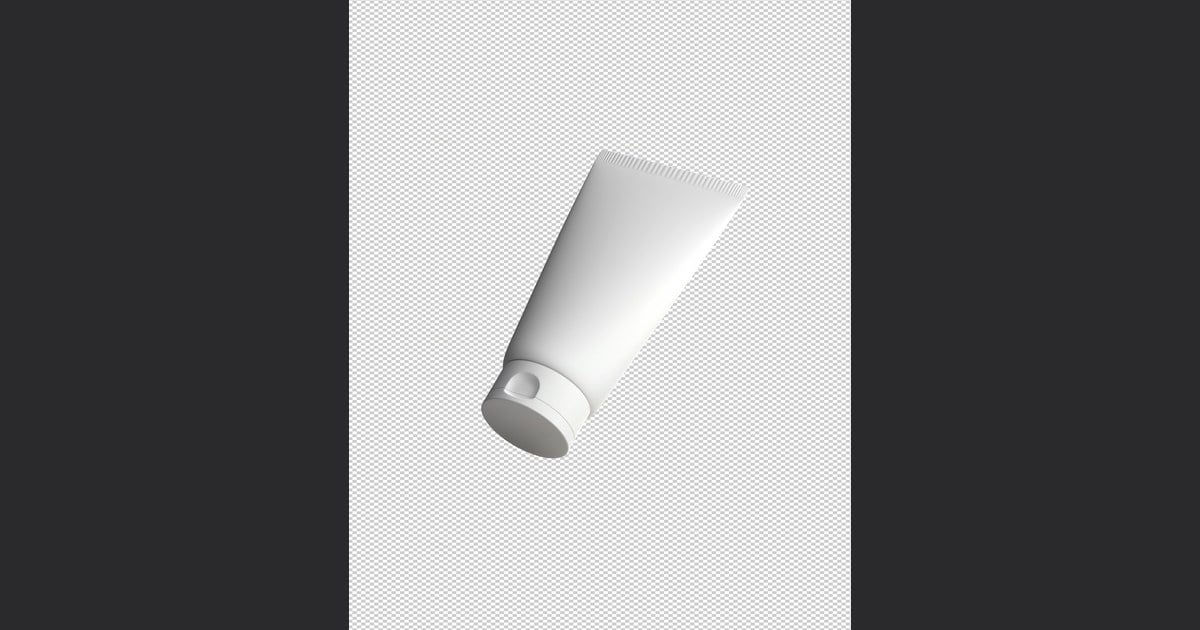
That before-and-after is the promise. The Desktop clicks below name the control so you can reproduce it without guessing slider names. Rushing step 2 into step 6 is how people export a pretty checkerboard that still carries green into a warm set.
Step 1: Import the stained JPG in “Edit”
Import an image that already shows background color reflection on the subject. Stay in “Edit” so you can see “Backdrop Changer” and “Spill Removal” in one place. If you cannot see the stain on the original, you will have a harder time judging whether the control helped.
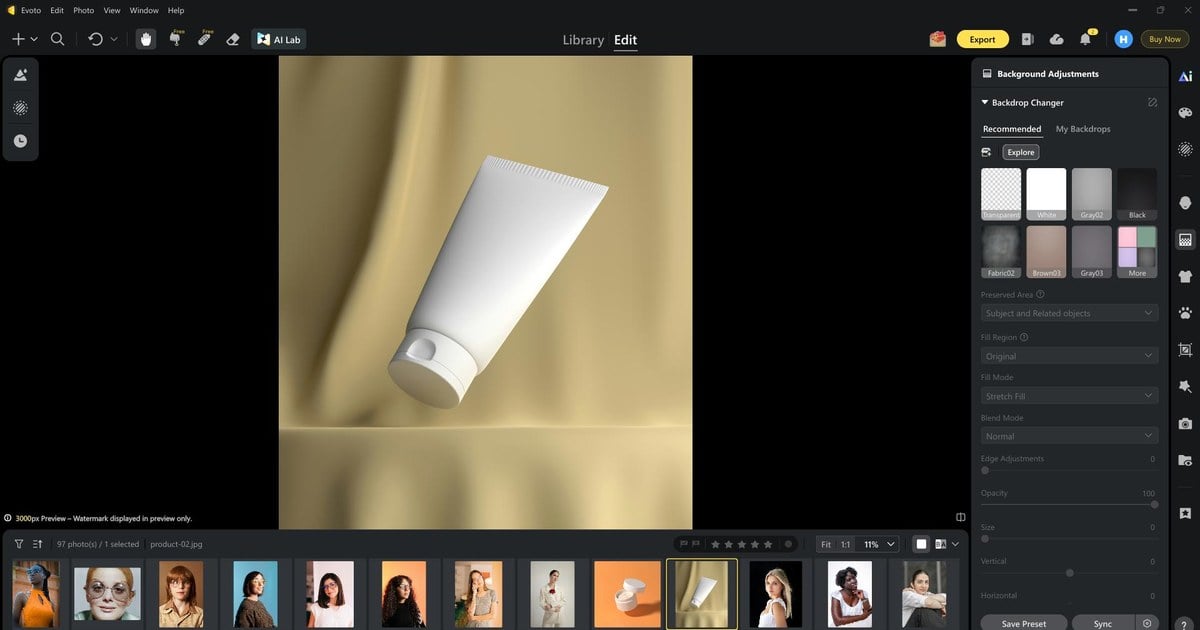
Step 2: Click “Transparent” so the spill is obvious
Open “Backdrop Changer” and click “Transparent”. The spill becomes obvious on the isolated subject. This is diagnostic as much as creative. You are making the contamination visible on purpose.
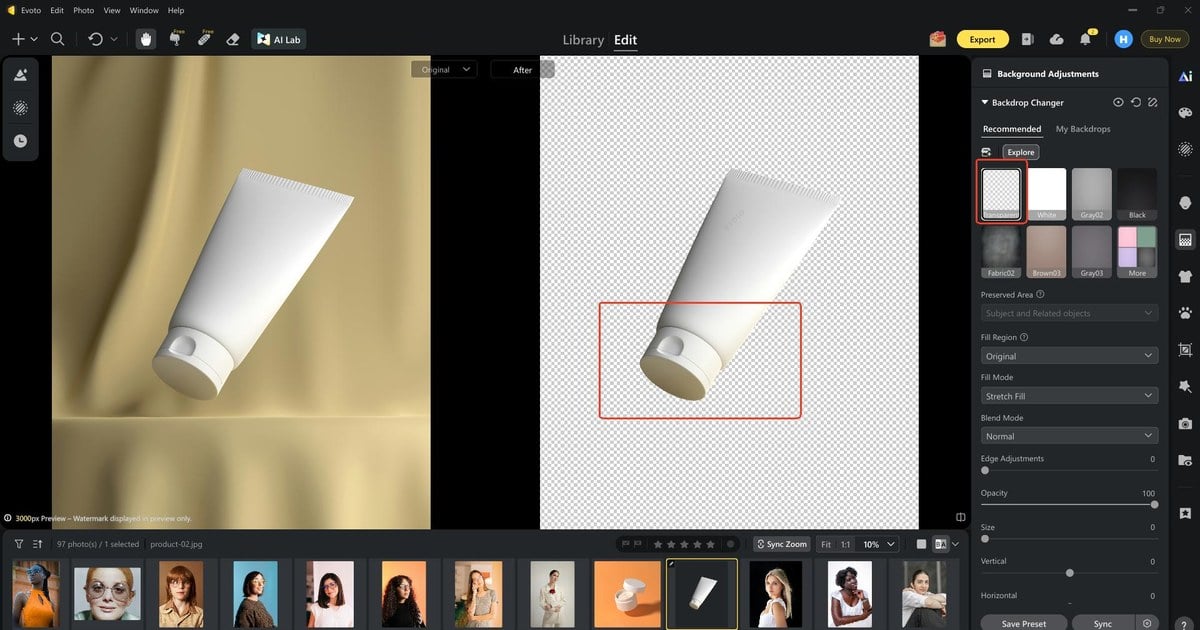
Take a breath here. If you only chase a harder edge, you may clip hair without curing the stain. Spill is a color problem riding on semi-transparent edge pixels. Mask shape and spill color are related, but they are not the same repair.
Step 3: Enable “Spill Removal”
Turn on “Spill Removal” (halo and spill controls on the subject) so the tool targets contaminated color. Watch skin and fabric while you adjust. The goal is a subject that could sit on charcoal or cream without broadcasting the old set color.
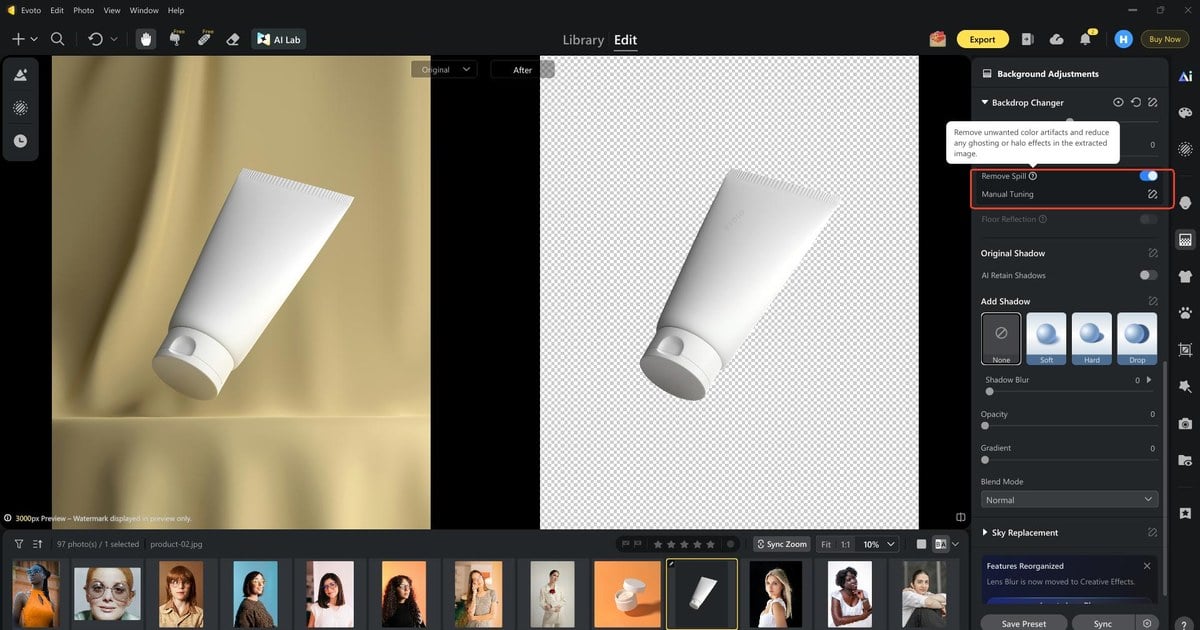
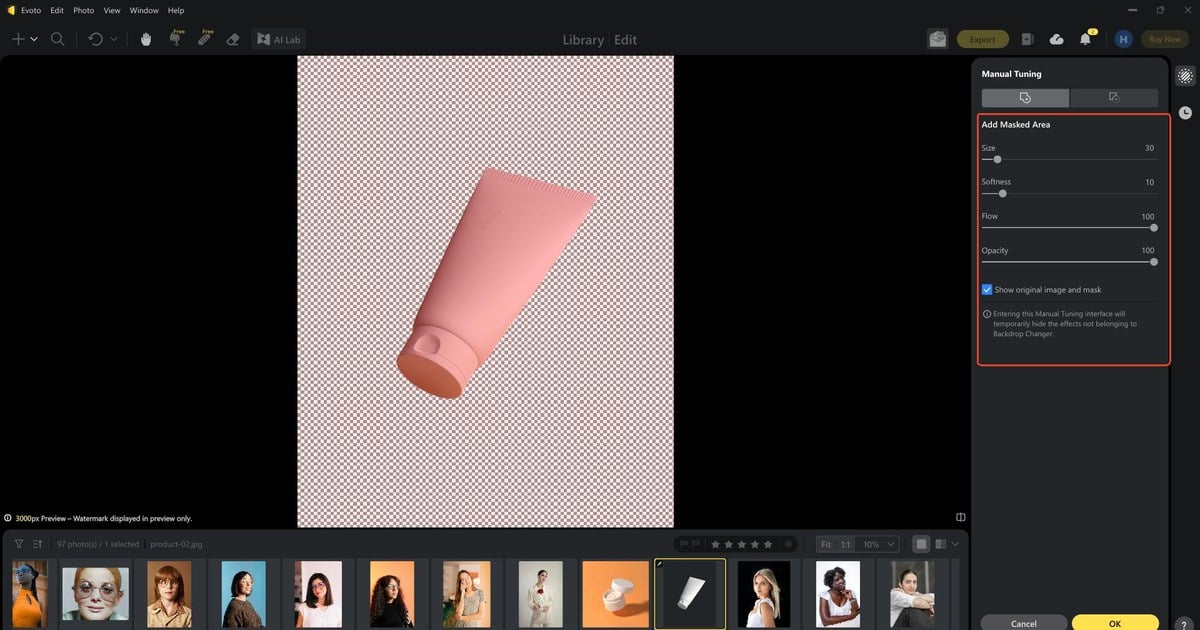
Step 4: Open “Manual Tuning” if the mask still needs a pass (Optional)
Open “Manual Tuning” if the mask still needs a local pass. “Brush” or “Smart Edge Brush” belongs here when jewelry, glasses, or flyaways need a human nudge. “Spill Removal” does not replace every edge decision; it clears the stain so your edge work is not fighting dyed pixels.
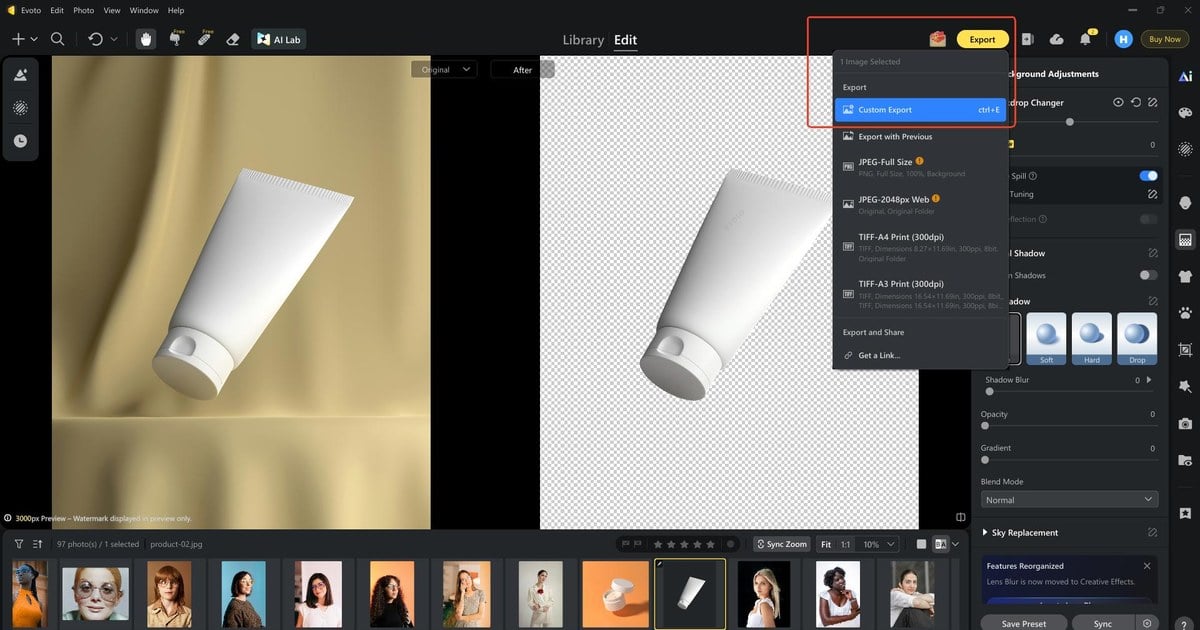
Step 5: Open “Custom Export”
Open “Custom Export” when the preview passes your QC eye. This is the quiet pause before format mistakes undo the cleanup. If the spill looks fixed on screen but you are tired, slow down for ten seconds on this panel.
Step 6: Set “Image Format” to “PNG”
Set “Image Format” to “PNG” and export. Format choice is non-negotiable if you still need alpha downstream. JPG will fill the cleared areas and make the whole “Spill Removal” conversation feel pointless by morning.
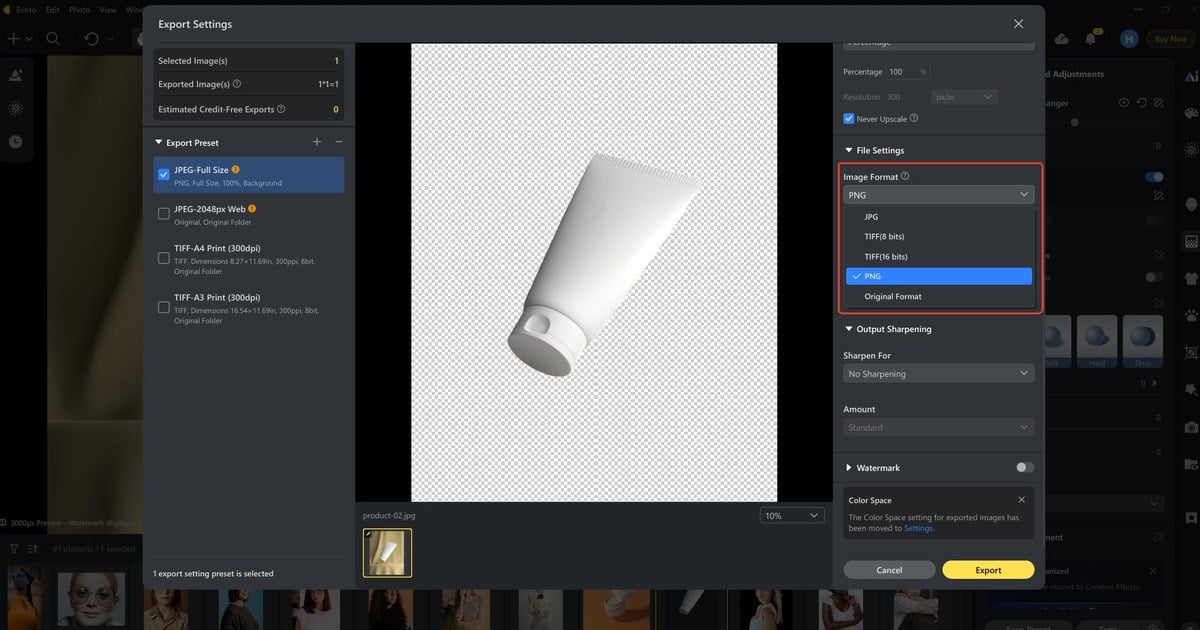
That loop is how one-click transparent PNG stays natural after a background change: hair-level masking plus Spill Removal, not a harder cookie-cutter edge. For wedding-style “new scene after cutout” storytelling, Evoto’s online background changer for wedding portraits sits in the same delivery family.
If a frame still fails after “Spill Removal”, do not escalate straight to panic. Check “Preserved Area”, brush the mask, and only then decide whether the hero deserves a full Photoshop rebuild. Most catalog misses die in QC, not in philosophy. With that finish path clear, the last section is a simple rule for noisy client nights.
Try the AI background remover:
Powerful AI Photo Editor
A Practical Decision Rule for Client Nights
Use this rule when the room gets loud, and everyone has a different favorite tool:
- Heroes with extreme hair or glass: Photoshop hand path first.
- Repeatable catalog or school volume: Transparent PNG on Evoto, Sync, spot QC.
- Any frame that fails dark or light preview, or still shows spill: local Manual Tuning, or a return to Pen.
- White-box convert myths and fringe plate examples: the sister guide on JPG versus transparent PNG.
- Pure click-along Web and Desktop export teaching: see the sister guide to making a transparent PNG.
You are not choosing a religion. You are choosing minutes. Photoshop teaches and finishes heroes. Evoto compresses the honest transparent PNG path when the cull is the villain. Pen for glory, Sync for survival, Spill for stains, PNG for alpha. Everything else is commentary.
Wrap-Up
How to make a transparent background in Photoshop still starts with selection craft and PNG export with transparency on. Delivery nights add a second standard: edges that survive a new backdrop. One-click transparent PNG plus Spill Removal exists for that standard. When the filmstrip is long, download Evoto and proof pace in PNG Maker; keep the Pen Tool warm for the frames that deserve it.
FAQ
1. When should I still use the Photoshop Pen Tool?
Use it for hero composites, hard-edged products that need surgical paths, and any frame where a client will zoom into a poster. Volume defaults can stay on a faster transparent PNG path with QC.
2. How do I spot a white halo versus a white box?
A white box is an opaque rectangle behind the whole subject (often a convert mistake). A white halo is a thin rim on the silhouette that flares on dark plates. Box problems are transparency failures. Halo problems are edge contamination.
3. What does Spill Removal fix that a harder mask edge does not?
Spill Removal targets backdrop color that dyed the subject. Tightening a mask can hide pixels, but stained hair or fabric may still look wrong on a new background until the contamination is treated.
4. Does Evoto train public models on my customer photos?
Evoto’s Privacy Policy states that Evoto never uses Your Content to train AI generative models without your explicit, proactive, opt-in consent. Read the current language on the Privacy Policy.
5. How do I keep AI-assisted cutouts ethical on paid jobs?
Keep human review on eyes, hair, jewelry, and rims. Allow a manual fallback. Treat AI as assistive infrastructure under your direction, not as unsupervised delivery.
6. Can I finish edges on Desktop after a Web proof?
Yes. Proof Transparent on Web if you like, then open Desktop for Manual Tuning, Spill Removal, Sync, and final PNG export when the cull needs more control.
Methodology & Author
Author: Evoto Editorial Team, studio retouching workflow editors
Experience basis: Photoshop Pen / Select and Mask / Save a Copy PNG path described from native Windows UI, plus Evoto Desktop Spill Removal steps from live capture. Pen timing (several minutes, occasionally toward ten to fifteen on messy hair) and “a few dozen leftover frames” are illustrative delivery-night sketches, not a census of wedding or school volume.
Sources: Adobe Help on removing a matte, Fstoppers on hair fringing as contaminated edge color, Evoto PNG Maker live UI
Limitations: Photoshop menus differ by version and OS. Spill Removal does not replace hero Pen work. Companion slugs in HTML comments stay unpublished until those URLs go live.
Last reviewed: 2026-08-14



