

Need a sticker for Discord or iMessage? A subject floating over a class slide? A product cutout for a listing? Then you are already asking “how to make a transparent PNG“. A file that merely ends in .png is not enough if the backdrop is still baked in as white pixels.
That is the everyday version of the same headache studios meet later with bigger folders. You finish what looks like a cutout, drop it into a dark chat theme or a colored Canva page, and a white rectangle travels with the subject like a shipping label. The pain is not “I picked the wrong app.” The pain is that transparency never made it into the pixels you downloaded.
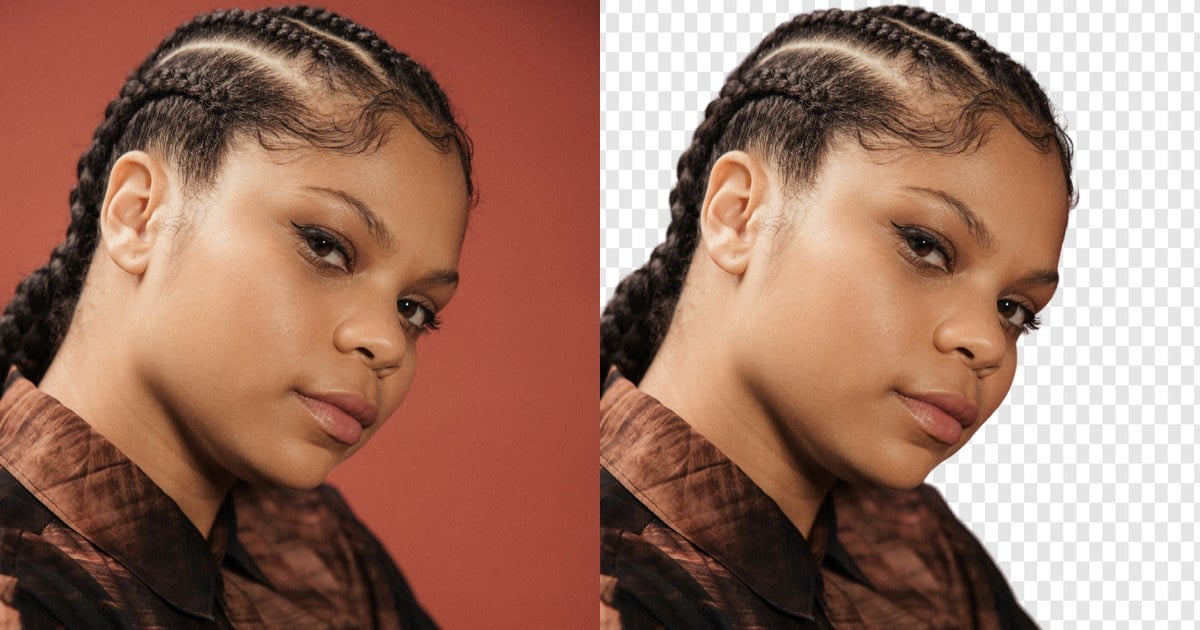
Non-designers run into this constantly. In an Adobe Community thread, someone followed YouTube tutorials, uploaded a logo, and still saw a white box on the live site. The useful reply was not “switch hosts.” It was: turn off the background layer, export PNG with transparency on, and confirm the checkerboard before you upload again. Same lesson whether you are making a pet sticker or a brand mark.
If you only wanted a general tip about hiding a backdrop, other guides cover that. This one is about how to make a transparent PNG as a reusable asset: prove it on the Web, finish it on Desktop when the folder grows, then optionally drop it into AI Background Fusion as a sticker.
What a Transparent PNG Is
Before the buttons, lock the definition. A transparent PNG stores an alpha channel: some pixels are fully or partly see-through. Most editors show that as a gray checkerboard. MDN’s image format guide is blunt that JPG does not carry this kind of transparency. If your real goal is how to make a picture transparent for overlays, PNG (or another alpha-capable format) is the container. JPG will happily throw the see-through information away and fill the hole with white or another matte.
That mismatch is why people feel gaslit by their own downloads. The on-screen preview looked open. The exported file still behaved like a postcard. So build a tiny acceptance ritual before you celebrate:
- You see a checkerboard (or your editor’s transparency preview), not a solid white slab.
- On a dark slide or dark chat theme, the subject floats with no white rectangle.
- On a light slide, you do not suddenly discover a black rim you never noticed in the soft UI chrome.
Those checks matter for stickers on screenshots, ecommerce main images, and ID-style headshot plates alike. Knowing how to make a PNG with real alpha is the shared skill. Sync and brushes are optional upgrades for bigger jobs, not a different craft.
With the definition clear, you have two places to click. Method 1 is the Web trial for one file. Method 2 is Desktop when the folder “Sync”, or “Manual Tuning” is the real job. If you want those panels in front of you while you read, Evoto keeps them in PNG Maker: the same Transparent → PNG path described below.


Powerful AI Photo Editor
Method 1: Make a Transparent PNG on the Web
How do I make a transparent PNG online then finish on Desktop? Start on the Web when the job is small: one sticker, one listing image, one “does this even work on my photo?” test. You are not committing to a whole gallery workflow yet. You are proving that “Transparent” plus PNG export solves the white-box pain on a file you recognize.
The clicks below name the control you actually press. Read the why under each one so you do not rush past the moment transparency is won or lost.
Step 1: Upload on the “PNG Maker” page
Open Evoto online, go to the “PNG Maker” page, and drop a JPG, PNG, or WebP onto the upload zone. Life shots, product frames, class-project images, and catalog pics are all fair game. You do not need a studio cull to learn how to make a transparent PNG. A messy real backdrop teaches more than a perfect white sweep, because you will see whether the mask grabs the subject instead of the wall.
Prefer a file that still has background detail you want gone. If the photo is already flattened onto pure white and saved as JPG, you can still proceed, but remember: white pixels in a JPG are opaque color, not “almost transparent.”
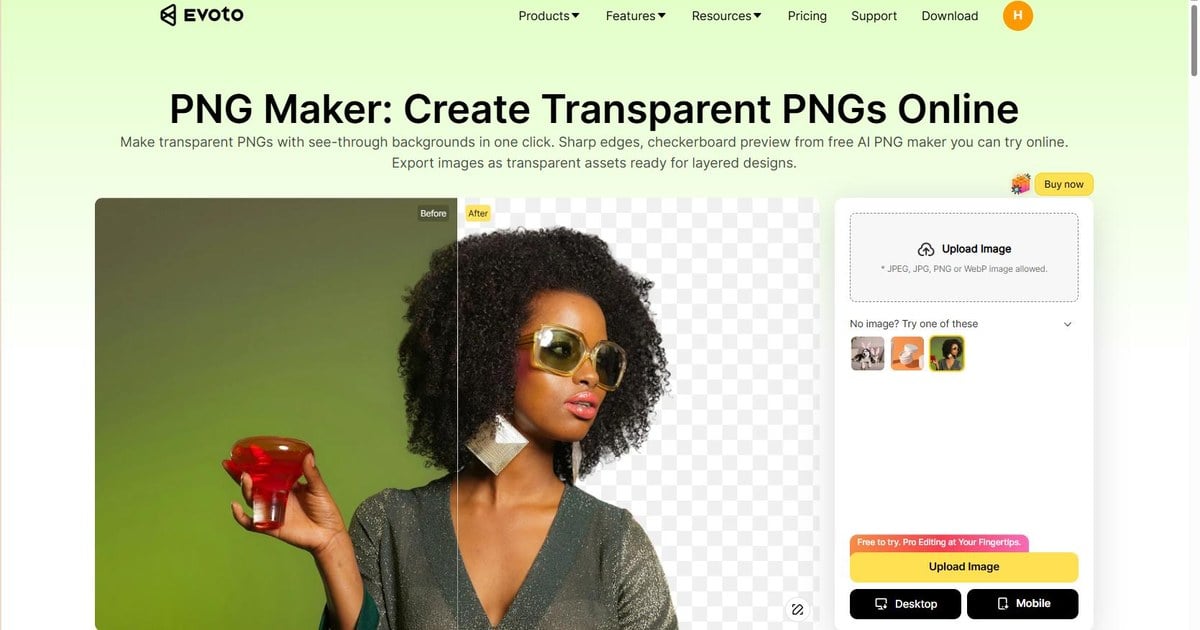
After upload, resist the urge to jump straight to download. The next panels are where the backdrop decision happens. Format choice comes later on purpose.
Step 2: Open “Backdrop Changer”
In the editor, open the background panel and click “Backdrop Changer”. You are about to replace or clear the real backdrop, not rename the file in Finder or File Explorer. This is the fork between “I changed the extension” and “I changed the pixels.”
“Backdrop Changer” is the room where the subject either keeps its environment or steps onto a see-through stage. If you skip this panel, no export setting can invent alpha that was never created.
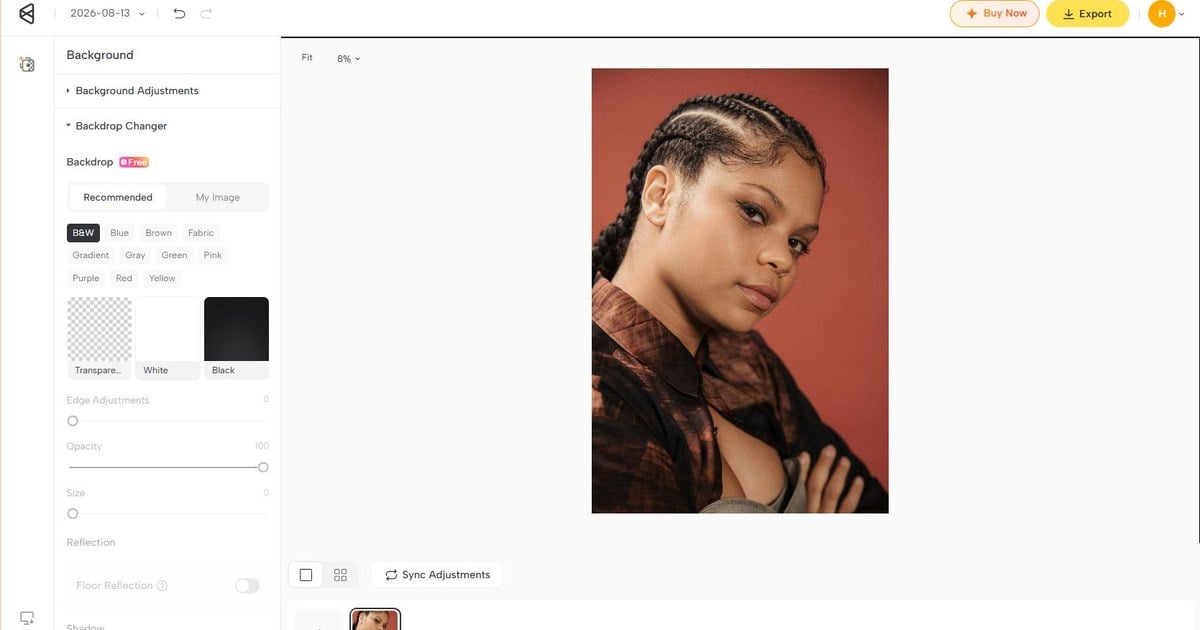
Between this panel and the next choice, keep one sentence in your head: transparency is decided when the backdrop leaves, and only confirmed when PNG leaves with it.
Step 3: Click “Transparent” in “Assets”
Inside “Backdrop Changer”, open “Assets” and click “Transparent”. Wait for the mask to settle. You should see a gray checkerboard around the subject. That pattern is the first honest signal that alpha exists. A flat white fill in the same place usually means you are still looking at opaque pixels.
If the preview needs a light pass, move “Edge Adjustments” or “Opacity” in the same panel. Zoom hair, jewelry, and pet fur once. You do not need perfection for a chat sticker, but you do need to notice if a shoulder vanished or a block of wallpaper remained.
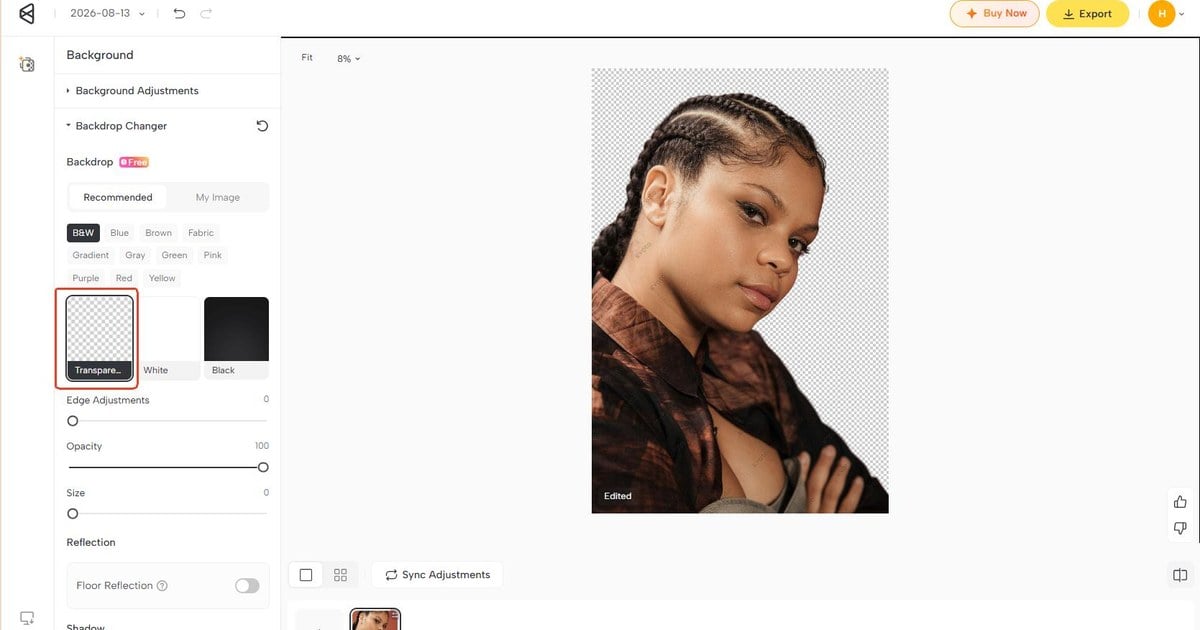
If the preview looks right, you are halfway to how to make PNG transparent for real. The remaining failure mode is almost always export. Plenty of people nail Transparent on screen, then save a format that cannot keep alpha, and blame the website when the white box returns.
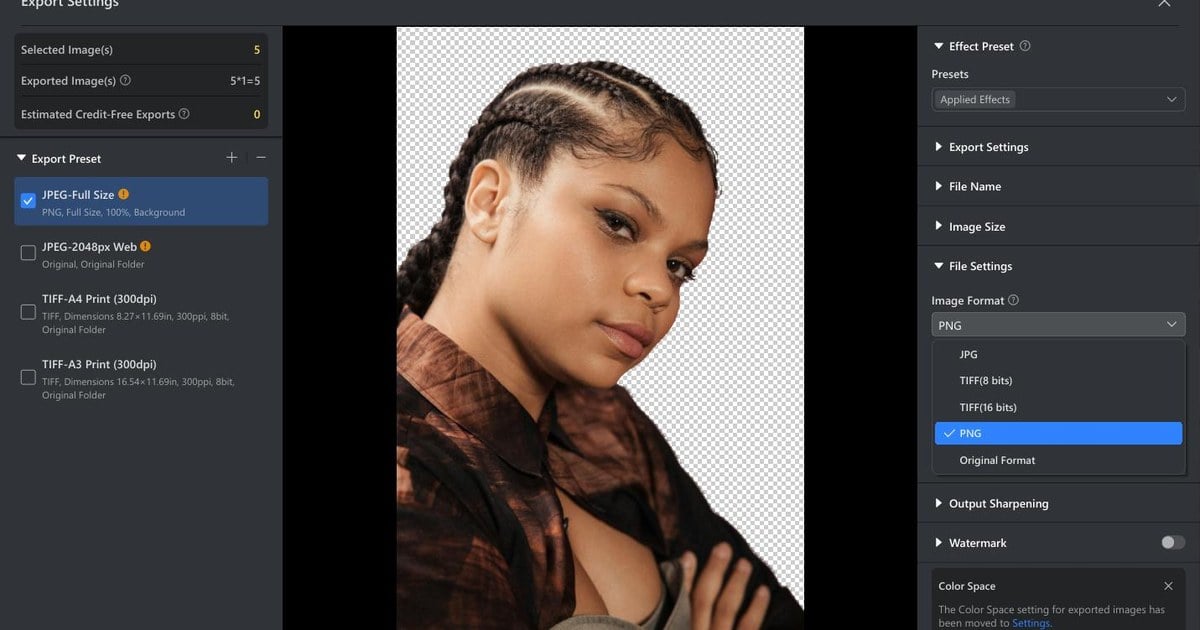
Step 4: In “Export Settings”, set format to “PNG”
Open “Export Settings” before you tap download. Set the image format to “PNG”, never JPG. This is the quiet graveyard of “I already made it transparent” stories: the canvas looked open, then JPG filled the empty pixels with white, and the sticker arrived looking like a postage stamp.
If you see “Free” versus “Max quality HD”, pick what matches the job, but do not trade away the “PNG” container to save a few kilobytes unless you no longer need see-through pixels.
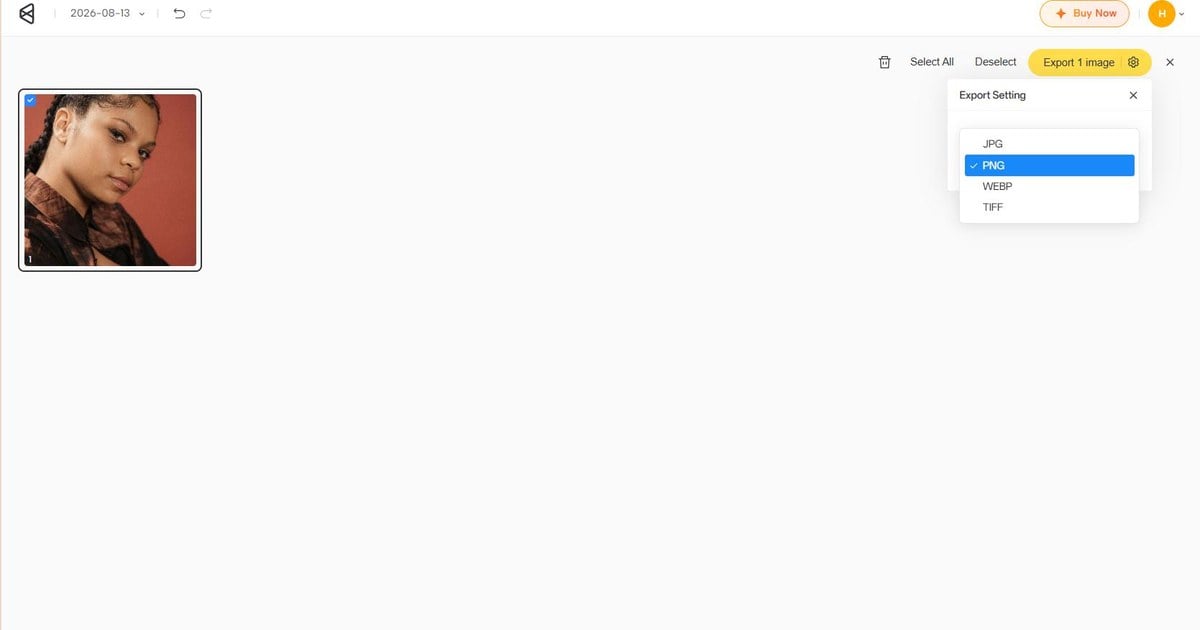
Double-check the format label one more time. It feels pedantic until the first time a client or group chat sends the file back with “why is there a box?” When PNG is selected, you are telling the tool to keep the alpha you just created instead of flattening it for a smaller lossy file.
Step 5: Click “Export”
Click “Export”. Then do the thirty-second field test: drop the PNG onto a dark slide, a dark chat wallpaper, or a navy Canva page. If the subject floats and the rectangle is gone, you practiced how to make a transparent PNG the honest way. If the white card remains, walk back through “Transparent” and “Export Settings” before you redesign the layout.
Use “Max quality HD” for print or a large crop. Casual stickers can live on “Free” as long as alpha survives.
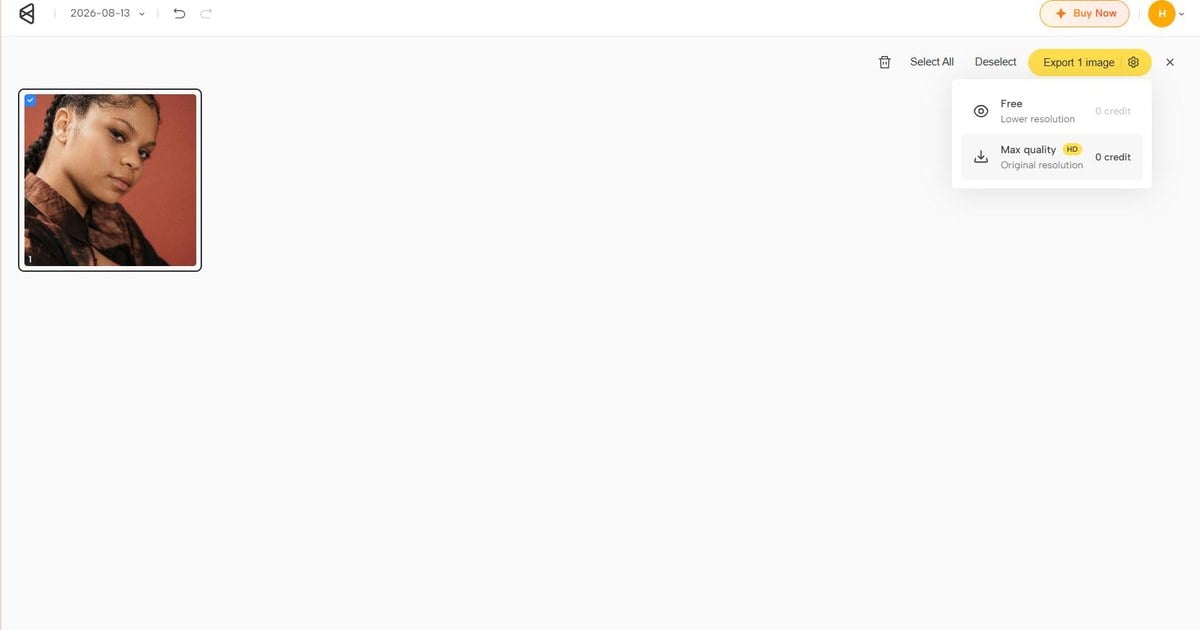
That download moment is also where everyday creators usually stop, and that is fine for one file. You are taking a finished asset, not a temporary preview still trapped in the browser.
One clean Web export covers stickers, single listings, and homework overlays. The pain shifts when the next twenty frames need the same treatment, or when flyaways need a brush. That is when Desktop stops being “extra software” and starts being the same skill with better delivery muscle.
Method 2: Finish on Desktop When You Need More Control
Desktop is not a different definition of transparency. It is the same Transparent → checkerboard → PNG promise with Sync across a filmstrip, “Manual Tuning” for stubborn edges, and explicit file settings that are harder to mis-click when you are tired.
If Method 1 answered “can I do this on one photo?”, Method 2 answers “can I still do this when the folder is the problem?” And make sure you have Evoto Desktop installed on your device before the PNG making.
Powerful AI Photo Editor
Step 1: Open the image in “Edit”
Import a single hero or a small cull, then stay in “Edit” so “Backdrop Changer”, refine tools, and export live in one place. Working from a browser download folder full of random PNGs is how people lose track of which version still has alpha.
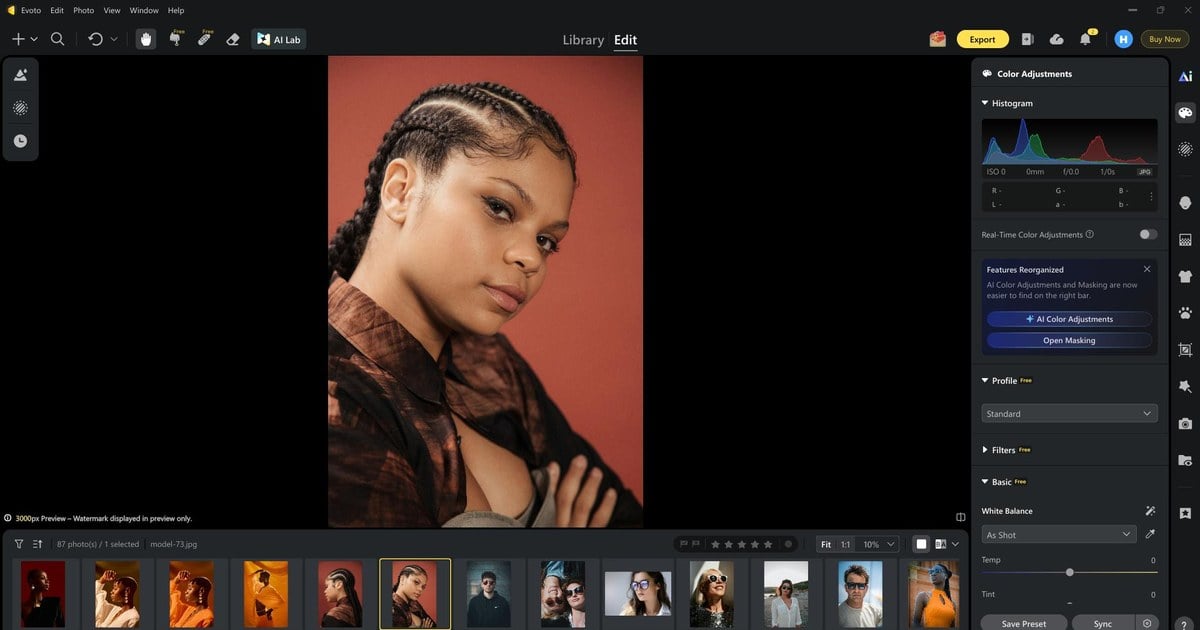
Once the image is open, treat Desktop like a delivery desk: you will set Transparent, decide whether Sync applies, optionally refine, then lock PNG on the way out.
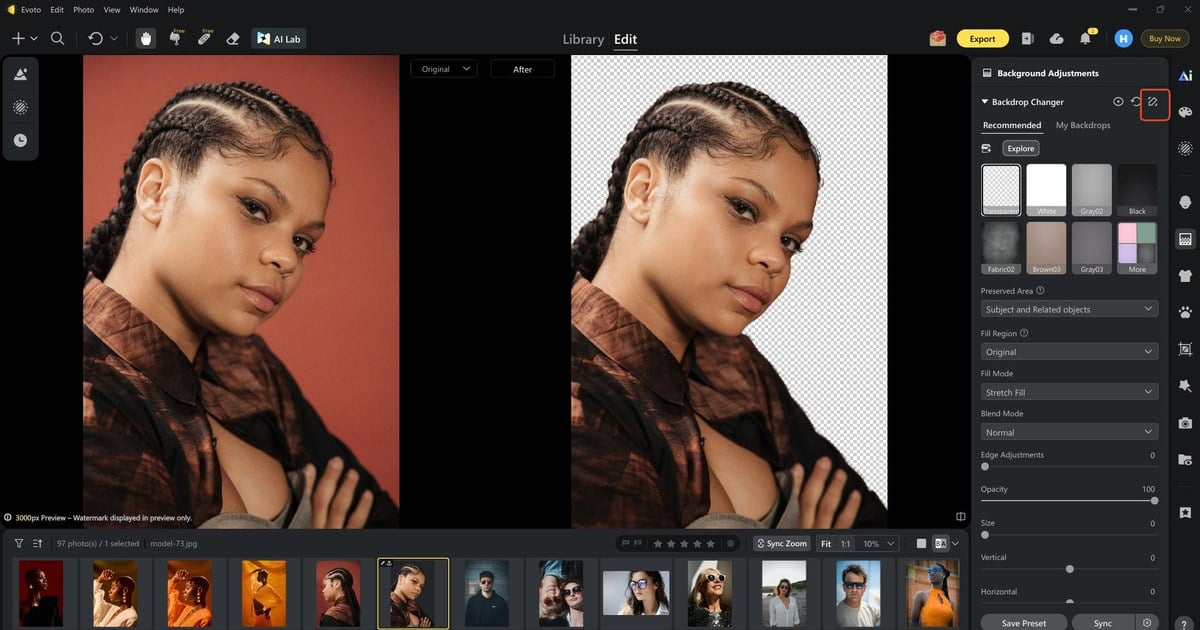
Step 2: Remove background from the photo
Open “Background Adjustments”, then “Backdrop Changer”, then click “Transparent” in “Assets”. Wait for the preview. Look at the checkerboard before you chase every flyaway. Many frames only need a light pass on “Edge Adjustments”; some need none. Burning ten minutes on a sticker nobody will zoom is how Desktop starts to feel heavier than it is.
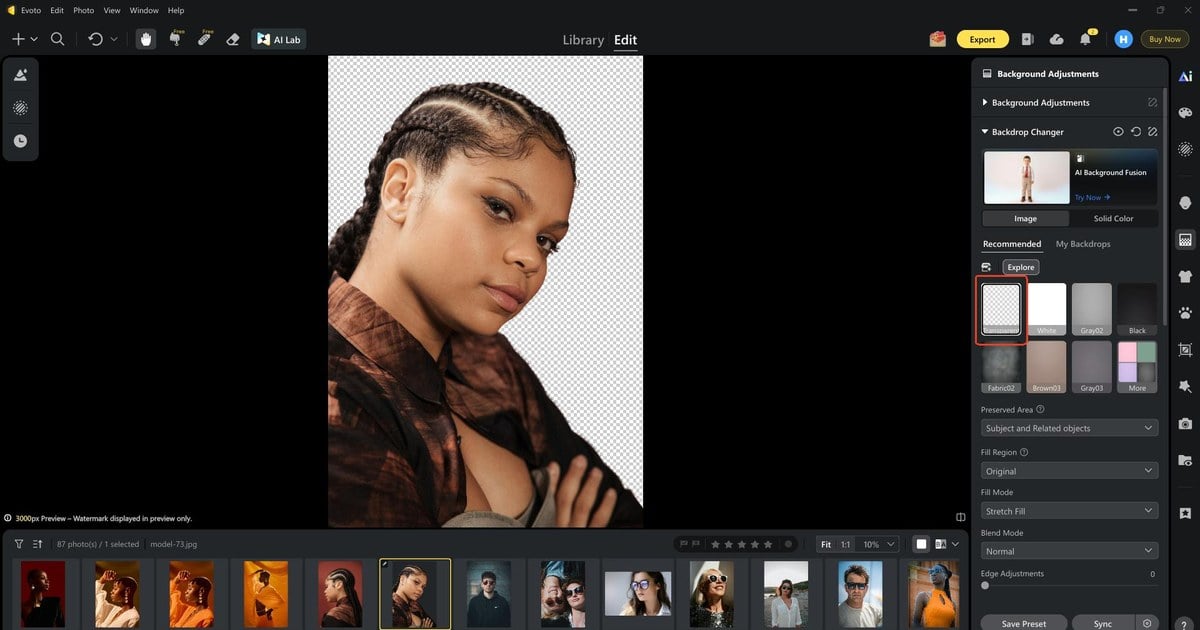
On a typical machine, getting to a usable preview is often measured in seconds to about a minute per frame once the file is loaded. That is an illustrative desk range, not a lab benchmark. Complex hair, sheer fabric, or busy jewelry may still want Manual Tuning. The point is that the first Transparent pass should be fast enough that you can afford to look at edges instead of fearing the tool.
Step 3: Click “Sync” on the filmstrip
Here is the pain Desktop solves that Web trials rarely face: twenty school portraits, a shelf of catalog SKUs, or a weekend mini-session all needing the same see-through plate. Rebuilding “Transparent” by hand on each frame invites drift. Click “Sync” so the edit pushes across the filmstrip, then spot-check the weird ones.
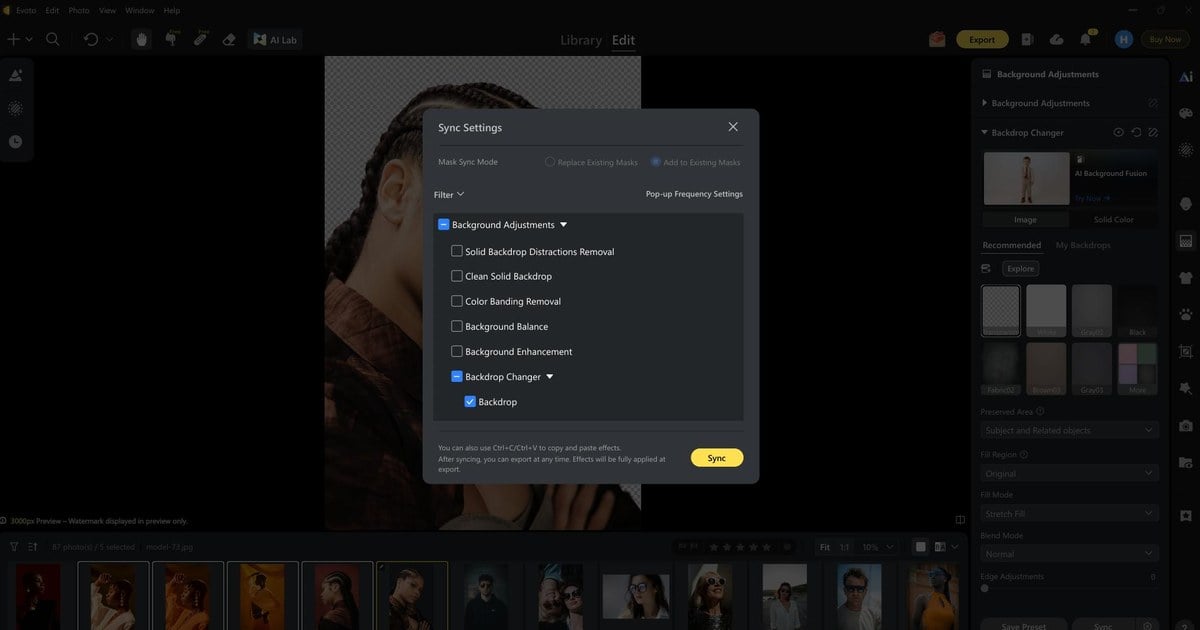
After Sync, scroll the strip. Transparency errors love to hide on the third frame you did not open. A thirty-second skim beats rediscovering a white box in a client gallery.
Optional refine: “Manual Tuning” and brushes
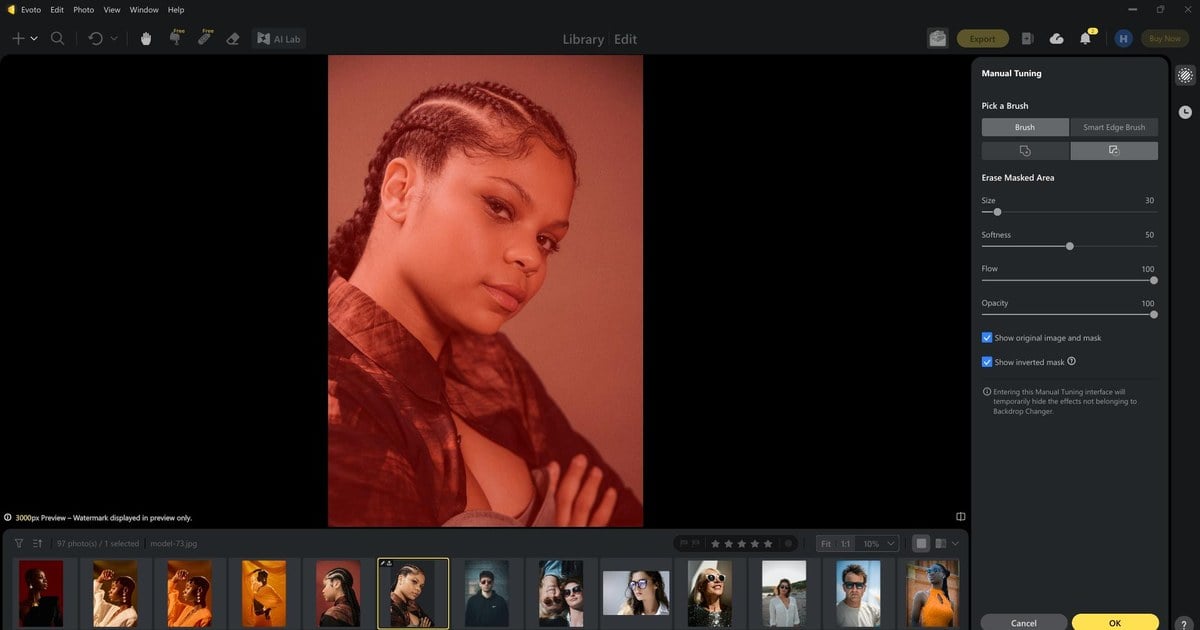
Not every sticker needs this section. Open “Manual Tuning” when something important is missing or something unwanted remains: a necklace gap, a flyaway clump, a prop the auto mask treated as background. Use “Brush” or “Smart Edge Brush” to add or erase mask. Adjust “Preserved Area” if the keep-range is too tight around jewelry or hands.
Brushes are insurance, not a tax on every casual cutout. If your dark-slide test already passes and nobody will print the file at billboard size, export and move on. If the file is a hero, spend the extra minute here before you lock the PNG.
When the edge still feels soft or hard in the wrong places, “Smart Edge Brush” plus size and softness let you paint the correction instead of restarting “Transparent” from zero.
Step 4: Open “Custom Export”
Open “Custom Export” when the preview is good enough to leave the building. This is the Desktop twin of the Web format trap.
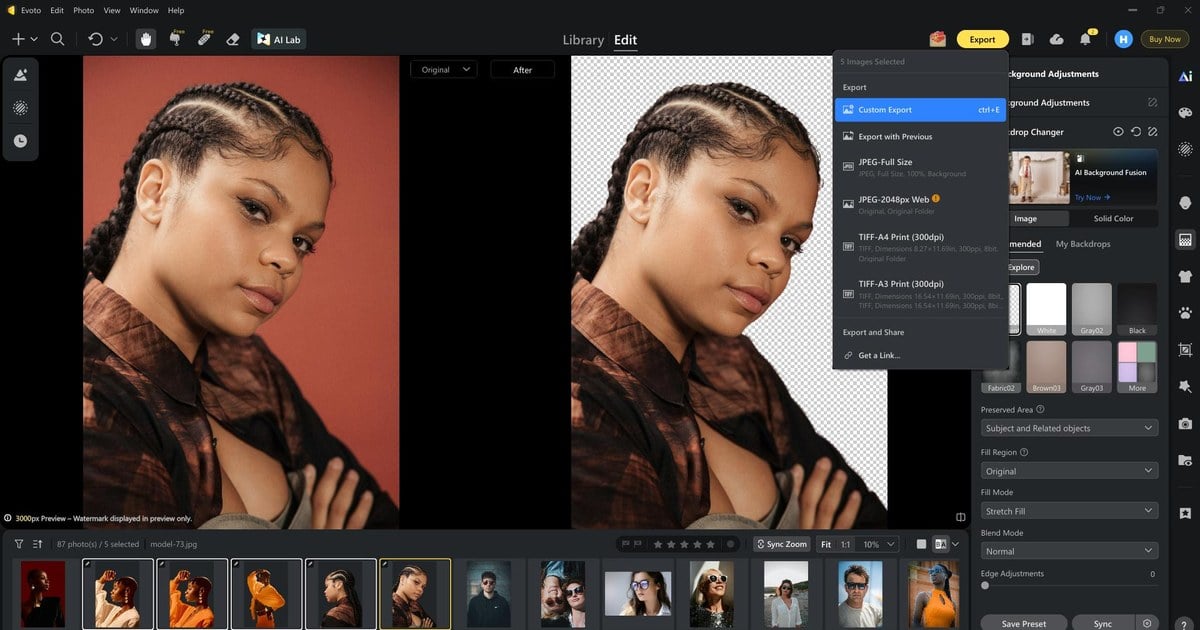
Step 5: Set “Image Format” to “PNG”
When should I export PNG instead of JPG after cutout? Whenever you still need see-through pixels downstream: stickers, overlays, new backgrounds, design comps. JPG will fill transparency with a solid color and undo the work you just inspected on the checkerboard. In file settings, set “Image Format” to “PNG”, confirm the other fields match your destination, then click export.
If you are still choosing between Web and Desktop for tonight’s job, this comparison helps. Use it as a decision aid, then go back to the path that matches your folder size.
| Need | Lean Web | Lean Desktop |
|---|---|---|
| One sticker or single proof | Yes | Optional |
| Sync across many similar frames | Limited | Yes |
| Brush / Smart Edge refine | Light | Full Manual Tuning |
| Everyday creator vs longer cull | Everyday first stop | Longer culls and QC |
Web teaches how to make a transparent PNG without ceremony. Desktop keeps the same promise when the folder grows. Either way, the definition of done stays identical: checkerboard in the editor, PNG on disk, no white rectangle on a dark page.
Creative Play: Turn Your PNG into a Fusion Sticker
Once the asset is honest, the fun question appears. Can I use my transparent PNG as a sticker on a portrait? Yes, and that reuse is often why people wanted transparency in the first place: not only “background gone,” but “subject free to travel.”
Export the clean PNG, open AI Background Fusion, and add the file as a “custom foreground” (prop or sticker layer). Scale it so it sits in the scene instead of floating like a UI icon. If you see “Character Lighting” or a similar matching control, a light nudge helps the sticker inherit the portrait’s mood instead of looking pasted from another hour of day.
Holiday minis, classroom collages, and simple prop layers all benefit. For a fuller combine-and-deliver story around seasonal portraits, see Evoto’s guide on combining images for free holiday portraits.
That sticker loop is why learning how to make a transparent PNG once pays rent twice: you deliver the cutout, then you play with placement without rebuilding the mask.
Powerful AI Photo Editor
Quick Fixes If It Still Looks Wrong
Still seeing a white rectangle after a file named PNG? You may have exported JPG by accident, skipped Transparent, or only converted the container without removing the backdrop. That white-box myth gets a full evidence walkthrough in our sister guide on JPG versus real transparent PNG.
Checkerboard is present, but edges look chalky on a dark slide? Preview on black and white, then clean fringe or spill before you blame the layout. Edge habits and Spill Removal depth live in the companion on transparent backgrounds in Photoshop versus one-click PNG.
Most “broken PNG” nights are one of those two stories. Fix the pixels, then reopen the destination app.
Wrap-Up
Learning how to make a transparent PNG is three honest moves: remove the backdrop, trust the checkerboard, export PNG. Web covers stickers and single proofs. Desktop covers Sync and careful brushes. Fusion turns the same file into a playful foreground. When you want to walk the Desktop path on a photo you already have open, download Evoto and use PNG Maker so Transparent and PNG export sit in one place. The white box then has fewer places to hide.
FAQ
1. How is this different from a generic “make background transparent” tip?
Those tips often stop at “background gone.” This guide insists on a reusable transparent PNG asset: alpha you can stack, export as PNG, and reuse as a sticker. Same family of jobs, tighter delivery standard.
2. Which export format keeps transparency?
PNG (or another alpha-capable format). JPG does not store this kind of transparency. If you need the see-through look to survive download, do not finish as JPG.
3. Is the Web path useful if I am not a professional photographer?
Yes. Chat stickers, social cutouts, school slides, and side-hustle product shots are first-class uses. Professionals simply run the same Transparent → PNG idea across more files on Desktop.
4. Can I reuse the PNG as a sticker in AI Background Fusion?
Yes. Export a clean transparent PNG, then add it as a custom foreground in AI Background Fusion. Scale and lighting tweaks help it sit naturally on the new scene.
5. Does Evoto use my photos to train AI generative models?
Evoto’s Privacy Policy states that Evoto never uses Your Content to train AI generative models without your explicit, proactive, opt-in consent. Model inference and service delivery to run the features you asked for are not the same as general model training. Read the current wording on the Privacy Policy.
6. Is Evoto safe and ethical for personal and paid portrait jobs?
Treat Evoto as an assistive tool under your direction: preview edges, keep human QC, and turn features off when a frame needs a hand path. Pair that with the privacy stance above. Ethical use means you remain accountable for what you deliver, whether the file is a personal sticker or a paid gallery.
Methodology & Author
Author: Evoto Editorial Team, portrait and catalog workflow editors
Experience basis: click-along on Evoto Web PNG Maker and Evoto Desktop Backdrop Changer, Transparent, Sync, Manual Tuning, and PNG export. Timing notes such as seconds to about a minute per loaded frame are illustrative desk ranges, not a lab benchmark or industry census.
Sources: MDN image format guide (JPG lacks this alpha), Adobe Community white-box export thread, product UI labels from live capture
Limitations: Web and Desktop control names can shift with app version; always confirm checkerboard plus PNG on your build. Companion slugs in HTML comments are unpublished until those URLs go live.
Last reviewed: 2026-08-14



