

Look at two results side by side. On the left, the glow hugs the subject outline like a neon cutout. On the right, cheek speculars and lamps feel soft and alive. If your glow hugs the cutout edge like a sticker, you used the wrong panel, not the wrong photographer.
That sticky look is the #1 beginner trap in glow effect Photoshop work, and the reason so many glow effect Photoshop searches start with Outer Glow. People open Layer Style, pick Outer Glow, and wonder why a portrait looks fake. The real goal is highlight bloom, light spilling in the image, not an outline effect.
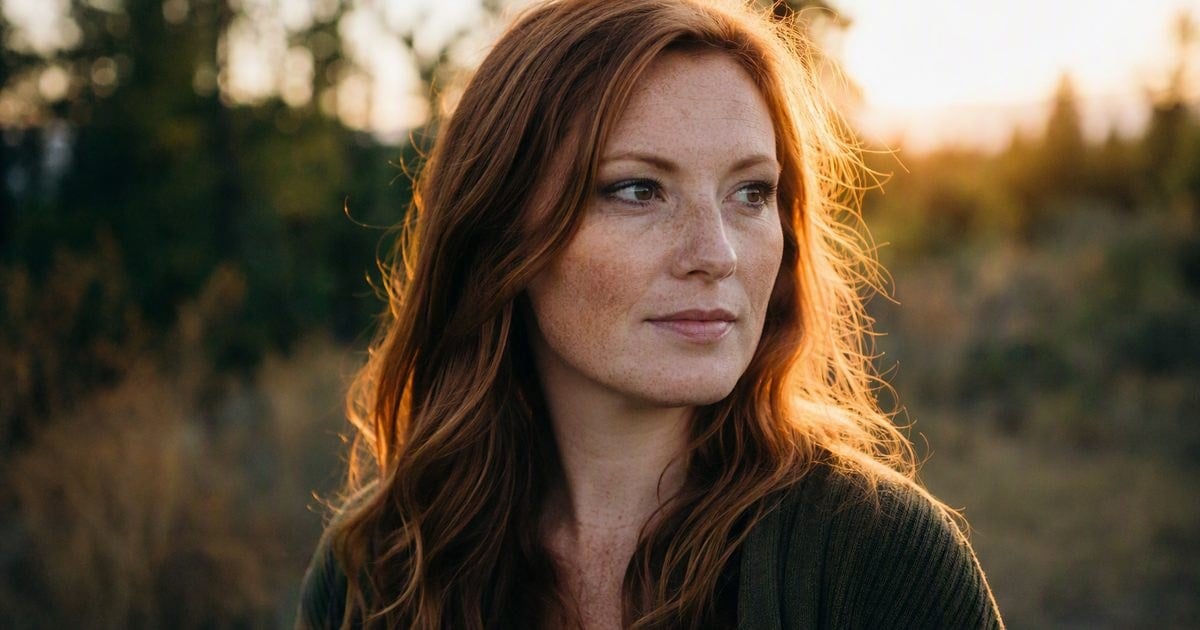
Three pains show up again and again: the wrong panel, the right recipe rebuilt on every frame, and lights that bloom while skin and lace go mushy. This guide walks the Photoshop panels first, then shows how Evoto’s Glow Effect answers the delivery gaps the stack still leaves open—without asking you to abandon what you just learned.
Spot the Wrong Glow (Outer Glow Isn’t Portrait Bloom)
How do I add a soft glow bloom to a photo in Photoshop without Outer Glow? Start by knowing what Outer Glow actually does.
Outer Glow and Inner Glow live under Layer Style. They push light around a shape’s edge. That is perfect for logos and type. On a portrait, the glow follows the silhouette, so hair and shoulders look outlined.
What’s the difference between Inner Glow and a real highlight bloom? Inner Glow still belongs to the shape. Highlight bloom belongs to bright pixels in the photo—lamps, cheek speculars, window edges.
| Method | What it does | Good for portraits? |
|---|---|---|
| Outer / Inner Glow (Layer Style) | Edge or shape glow | Rarely—logo/type territory |
| Duplicate + Gaussian Blur + Soft Light/Screen | Highlight bloom | Yes—this article |
| Physical mist filter on the lens | Optical scatter at capture | Beautiful, but hard to undo per frame |
Adobe’s own help on blur filters and blending is the right mental model: you soften bright detail, then decide how that soft layer mixes with the photo—not how a stroke glows.
Once that table is clear, open the panels that actually make light bloom. Put the Outer Glow dialog away for a moment—you only need it as a warning label.
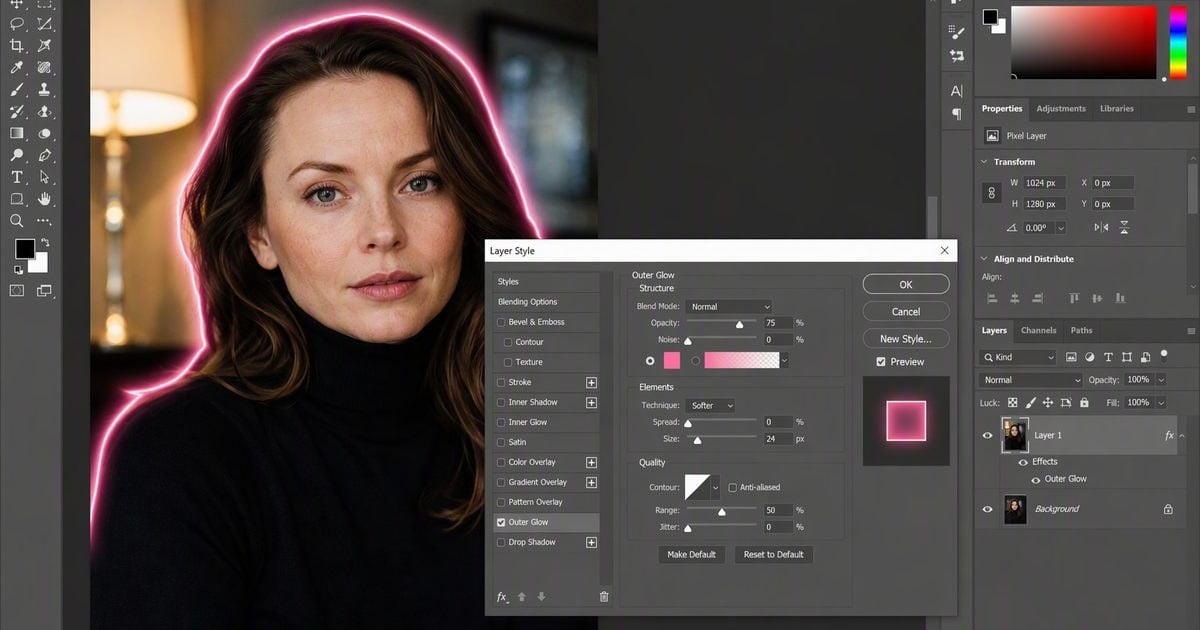
Glow Effect Photoshop — Click-Along Recipe
This is the standard glow effect Photoshop path for a bloom effect Photoshop look. Follow it once by hand so every later glow effect Photoshop shortcut still makes sense. Use a current Photoshop install and match what you see on screen. Numbers below are illustrative—raise blur radius on large files.
Step 1. Duplicate the Layer
In the “Layers” panel, duplicate your Background (or merged visible). Name it something clear like Bloom. Optional but smart: right-click the layer → “Convert to Smart Object” so Gaussian Blur stays editable later.
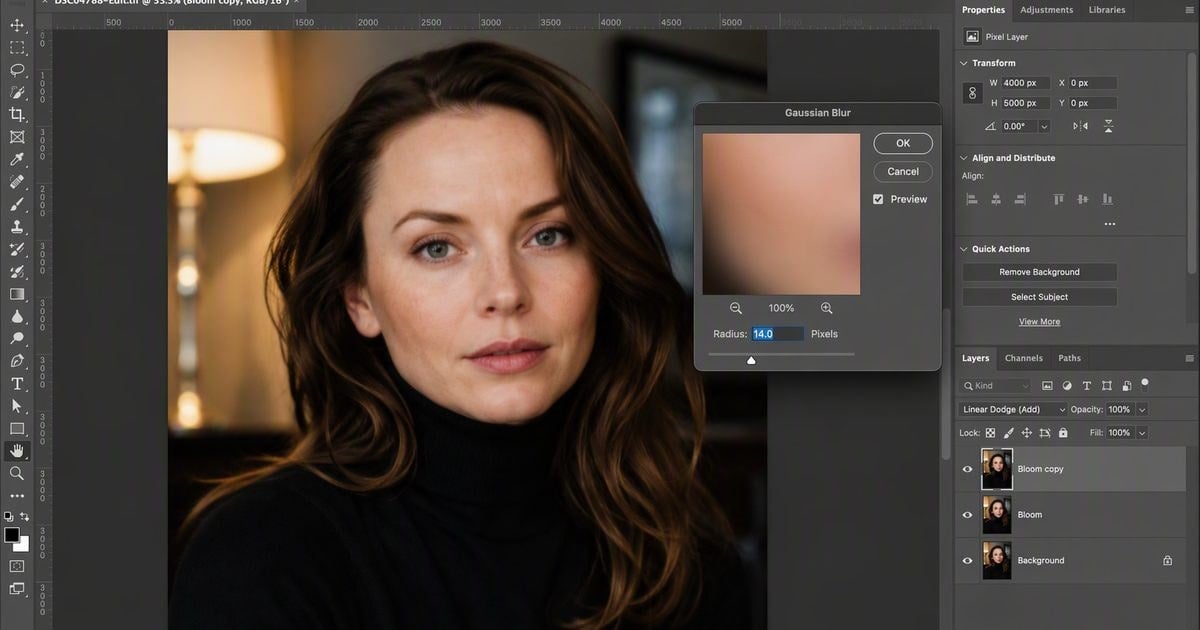
Step 2. Gaussian Blur
Go to “Filter” → “Blur” → “Gaussian Blur”. Start around 8–20 px on a typical web-sized portrait; go higher on a 40–60 MP file until highlights look softly spread—not until the whole face melts.
Step 3. Soft Light or Screen + Opacity
With the bloom layer selected, open the “Blend Mode” menu at the top of “Layers”.
- “Soft Light” — gentler contrast lift; good first try for portraits
- “Screen” — brighter, stronger glow; ease opacity down
- “Lighten” — can feel “glow-only” on some files
Drop “Opacity” to roughly 20–50% and toggle the eye icon until it feels intentional.
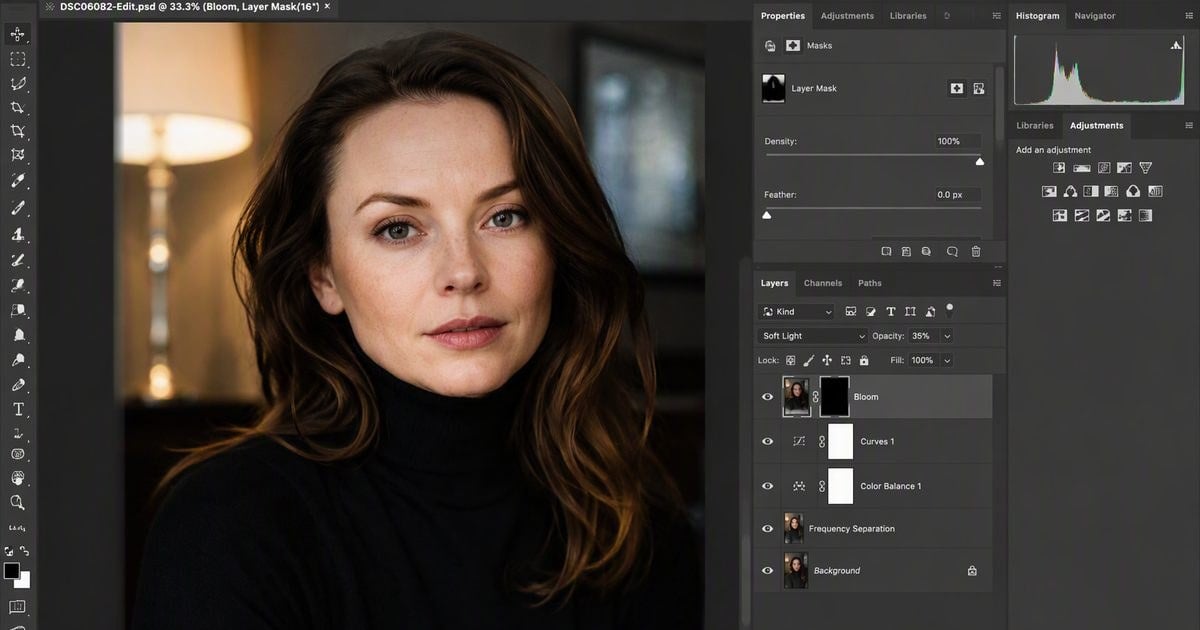
Step 4. Check Before You Batch
You now have a working glow in Photoshop recipe on one hero frame. That solves the wrong-panel pain. It does not yet solve gallery delivery: rebuilding this stack across a large wedding cull (often dozens to a couple hundred delivery selects) is slow, and parameters drift between nights. That delivery gap is where a named Glow Effect finish earns its place—after the craft, not instead of it.
Why the Usual Photoshop Fix Still Falls Short
Here is the honest gap map—not a dunk on Photoshop.
| Your pain | Usual fix | Why it still fails at delivery | What closes the gap |
|---|---|---|---|
| Sticker glow | Outer Glow | Wrong physics (edge vs highlights) | Learn the blur+blend recipe above |
| Slow rebuilds | Repeat the stack | Hard to keep identical Mist/Halation language across a gallery | “Save Preset” + “Sync” on Desktop |
| Soft faces with the lamps | Global Soft Light / huge blur | No easy “see the glow region” for beginners | “Show Glow Mask” + style strength |
| Want White/Black Mist or halation language | Random tutorials / buy glass | Glass can’t undo per scene; tutorials fragment | “White Mist” / “Black Mist” / “Halation” styles |
When should I try Evoto AI Glow Effect instead of rebuilding a Photoshop stack?
When the craft is clear but the bottleneck is the same look, many files—or you want named Mist/Halation styles instead of guessing blend modes every time.
Photoshop still teaches the recipe. Evoto closes the delivery gaps the stack leaves open. The next section is the click-along for that handoff.
From a Photoshop Glow Effect Stack to Evoto Batch Finish
You already know the manual glow effect photoshop path: blur, blend, mask. Evoto is not a second tutorial of those panels—it is the Desktop handoff when the same Mist language must land on a cull without rebuilding Soft Light opacity on every file. Open Evoto after a graded test set is ready. Product detail: AI Glow Effect. Prefer a wider desk once? Hit AI Photo Editor, then return to Desktop for Sync.
Ready to run the same Mist look on a test gallery?


Powerful AI Photo Editor
Step 1. Land in Edit and Expand Glow Effect
Bring in the stills you would have duplicated in Photoshop. Stay in “Edit”. On the right rail, open “Creative Effects” (wand/star). Expand “Glow Effect” so the style row and slider stack are visible. Treat this panel as the replacement for “new layer → blur → blend”—not as another Layer Style dialog.
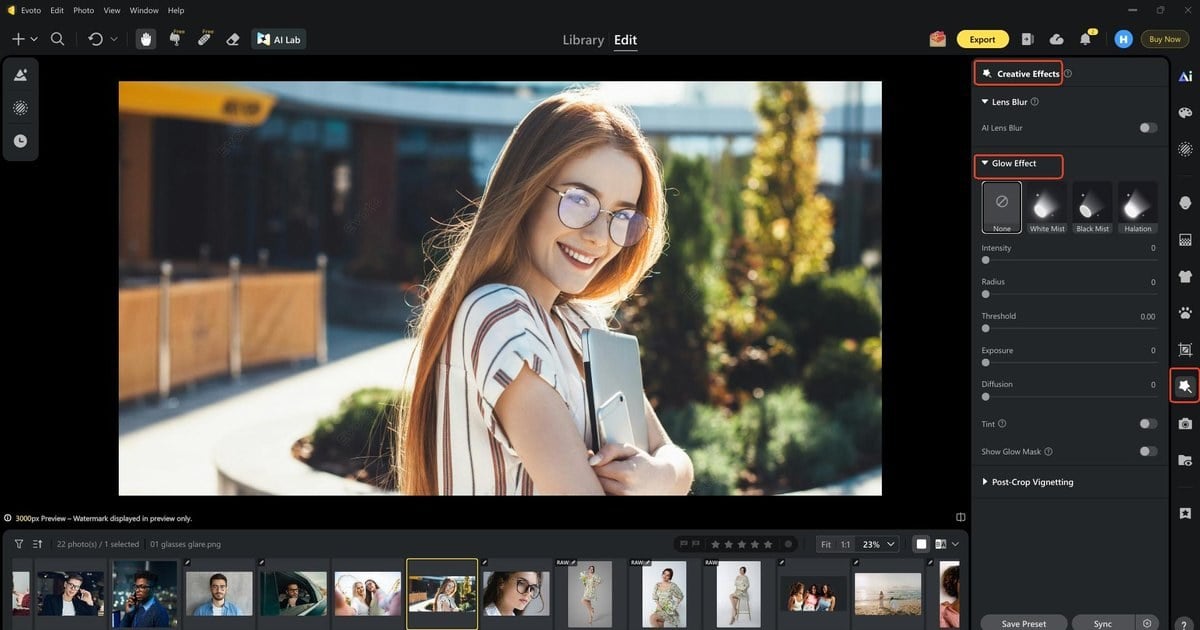
Step 2. Translate Soft Light Thinking into a Mist Chip
In Photoshop you chose Soft Light or Screen by eye. Here, pick the named look that matches the story: “White Mist” for soft window bloom (closest to a gentle Screen glow), “Black Mist” when shadows must hold while highlights breathe, “Halation” when practicals should spill. Start density at “1/8” or “1/4”—same restraint you would use on layer opacity—before climbing toward “1/2”.
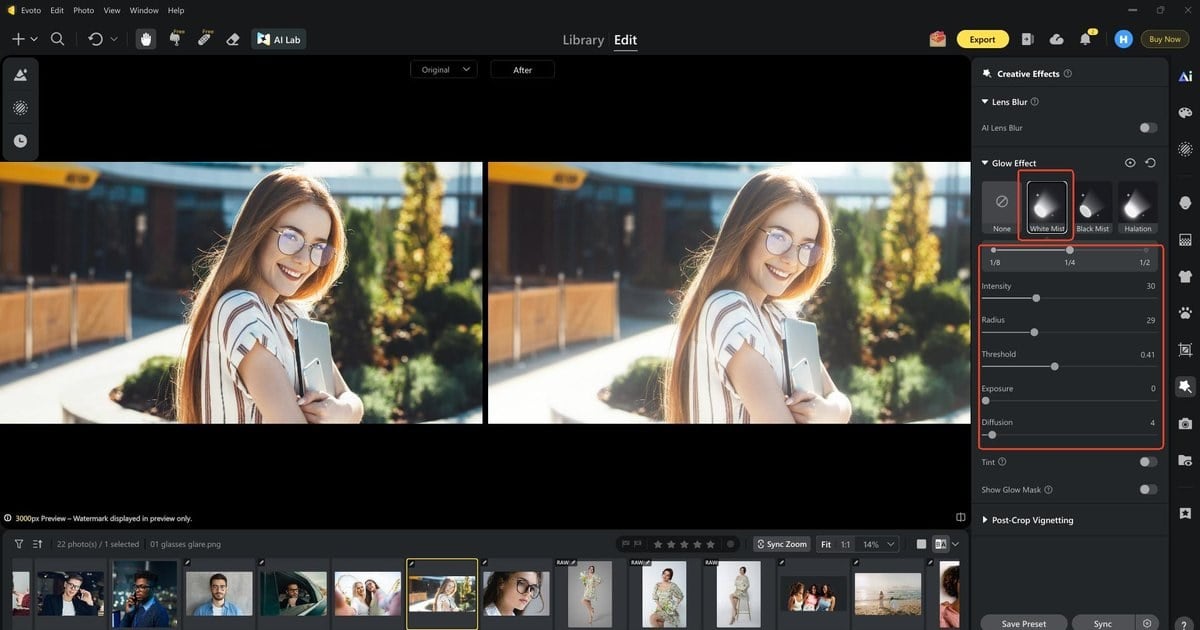
Step 3. Dial the Sliders
Use “Intensity”, “Radius”, and “Threshold” the way you would nudge opacity and blur radius on a bloom layer—bloom on speculars, not a face-wide fog. Turn on “Tint” only when the room cast (warm tungsten vs cool daylight) should tint the spill. Enable “Show Glow Mask” as your stand-in for painting a layer mask: if eyes or lace go soft, pull strength back. Leave “Exposure” and “Diffusion” for last.
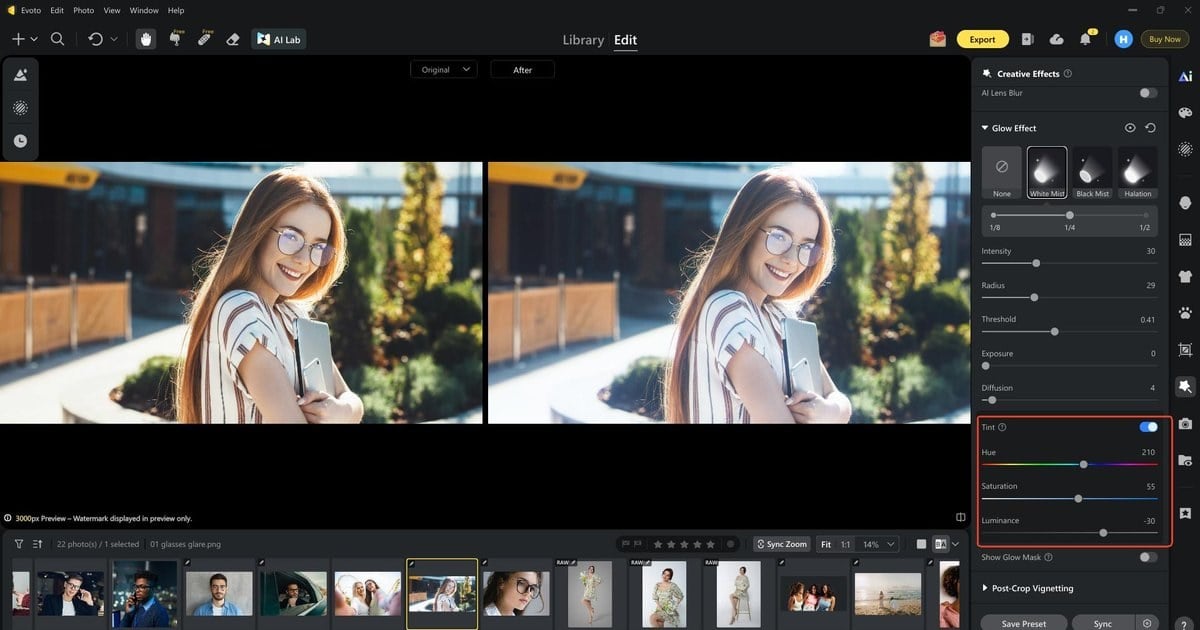
Turn “Show Glow Mask” off once the check is done. You want highlight bloom—the honest cousin of a masked Soft Light stack—not a beauty pass.
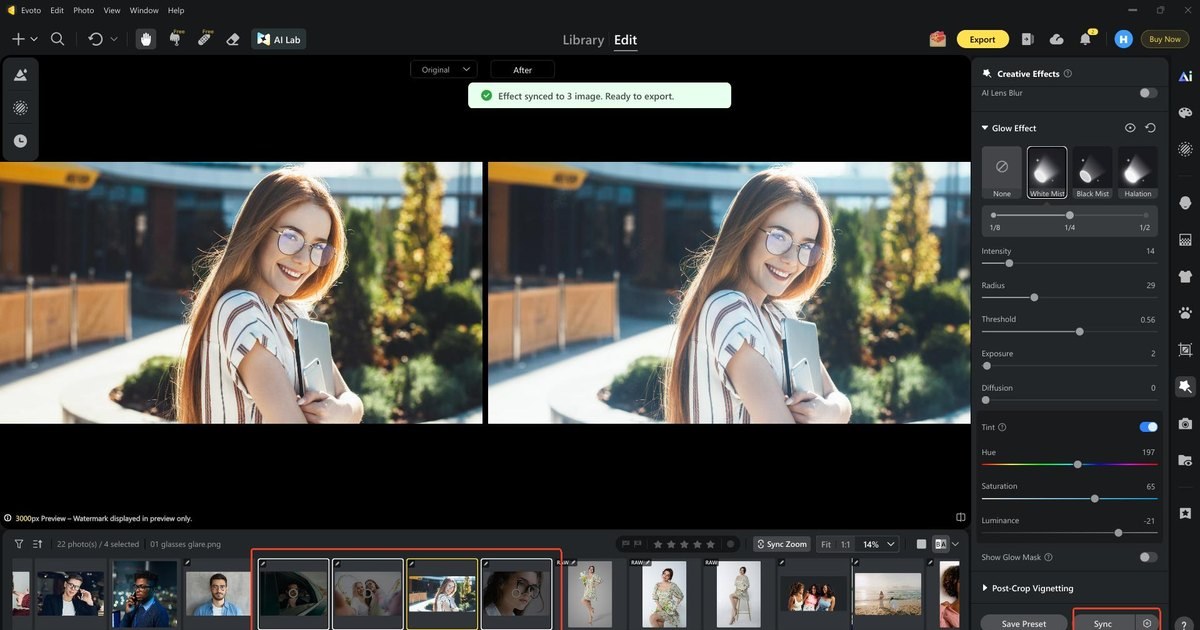
Step 4. Save Preset or Sync for Batch Edits, Export
When the hero frame matches what your Photoshop recipe would have approved, click “Save Preset” by the filmstrip. You can also “Sync” that look across matching selects on Desktop—this is the batch step action that never quite solved for glow. Export in your usual format. Optional “Post-Crop Vignetting” after crop if edges need quieting. Web can explore the controls; gallery Sync stays a Desktop habit.
Finished the hero look? Sync a small folder tonight with Evoto.
Powerful AI Photo Editor
Mask So Lights Bloom and Skin Stays Honest
How can I bloom background lights but keep skin and lace sharp? In Photoshop, masking is still the difference between expensive and greasy—even after you know Evoto’s mask preview.
On your bloom layer, add a “layer mask”. Paint black over eyes, lashes, lace edges, and clean skin you want crisp. Leave white over lamps, window rims, and strong speculars. Or start from “Select” → “Color Range” → “Highlights”, load that as a mask, then clean edges with a soft brush.
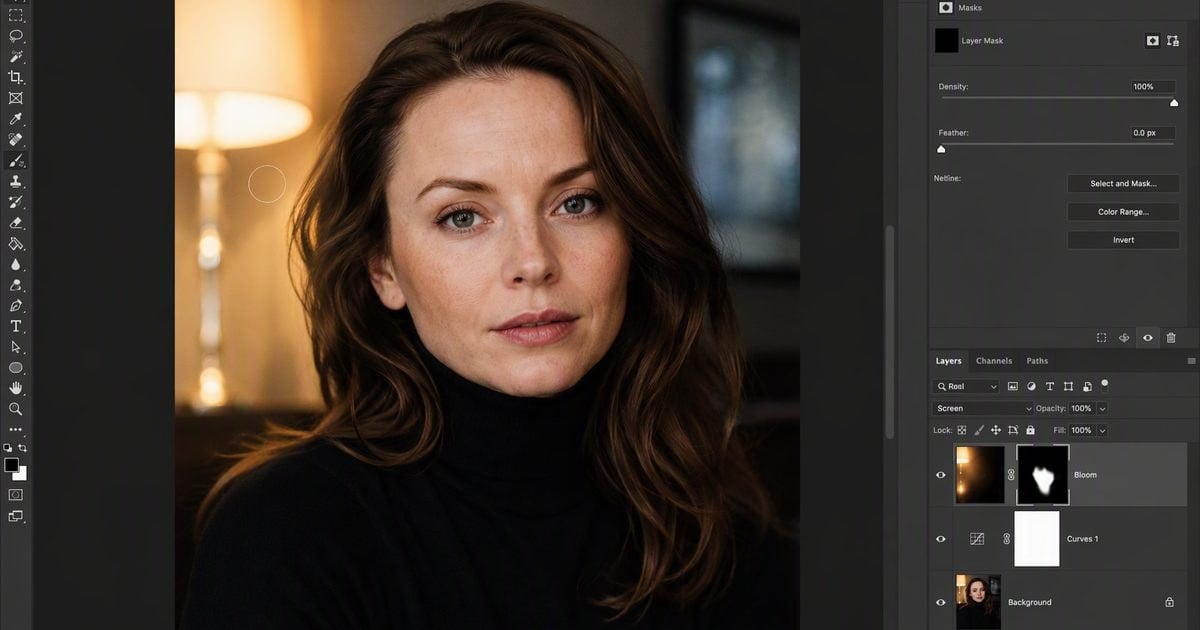
If you ever soft-focus the whole frame with haze tools, that is a different article—our blur effect guide covers global softness. This page stays on highlight bloom.
Living in Lightroom instead of Layers? Use the companion bloom-in-Lightroom guide in this Glow Effect series once it is live on the blog. Wedding gallery Sync storytelling belongs in the dreamy wedding-delivery companion in the same series.
Quick Fixes If It Looks Foggy or Fake
When the frame goes milky, resist the urge to stack another Outer Glow “fix.” Most foggy bloom comes from a blur “Radius” that is too high while “Soft Light” or “Screen” sits near 100%. Drop both until the lamps breathe and midtones stop looking rinsed. Dead-white bulbs usually mean “Screen” is carrying too much of the look—opacity first, radius second.
If the outline sticker returns, you drifted back into Layer Style territory. Close Outer Glow and return to the duplicate-blur-blend stack. When the face softens more than the lights, the mask—not the blur—is the missing piece: paint the face out of the bloom layer, or in Evoto pull strength after checking “Show Glow Mask”.
None of these are moral failures. They are the same three pains from the opening, just wearing different clothes. Fix the physics first, then decide whether tonight’s delivery needs Sync more than another Smart Object.
Powerful AI Photo Editor
Wrap-Up
A clean glow effect Photoshop workflow—your repeatable glow effect Photoshop finish—is simple: skip Outer Glow for portraits, build Gaussian bloom, blend with Soft Light or Screen, then mask. When the usual stack still leaves you rebuilding the same look across a full cull, Evoto’s Glow Effect styles and Sync are there for the gallery—not to erase what you learned in Photoshop.
FAQ
1. Soft Light or Screen for glow effect Photoshop—which should I try first?
Start with “Soft Light” and mid opacity on a portrait. Move to “Screen” only if the bloom still feels timid after a sensible blur radius. If Screen immediately chalks the highlights, you did not “fail Soft Light”—you outran opacity.
2. Why did Outer Glow look wrong in glow effect Photoshop portraits?
Because it glows the shape edge, not the bright pixels. That is why it reads like a sticker on hair and shoulders. Use blur + blend for highlight bloom instead, and keep Outer Glow for type and logos.
3. Do I need After Effects for a still photo glow?
No. After Effects glow searches are for motion graphics. For a still, Photoshop or Evoto is enough. Save After Effects for timelines, not a single bridal frame.
4. Is Evoto replacing Photoshop here?
No. Photoshop teaches the recipe and still wins for one-off hero composites. Evoto is optional when you need Mist/Halation language and Sync across many files after the craft is clear.
5. Does Evoto use my client photos to train AI?
Evoto states that it does not train public models on your customer photo data. For client work, treat that as a decision factor alongside craft: you keep creative control of Mist/Halation strength, and you can confirm current wording on the Privacy Policy before you upload a folder.
6. Is Evoto safe and ethical to use on paid portrait jobs?
For decision-making: Evoto positions Glow Effect as an editable finish that respects your grade—not an auto “replace the retoucher” pitch. Pair that with privacy (no customer photos used to train public models, per Evoto’s stated policy), review vendor terms for your region, and keep human QC on eyes, lace, and skin. Ethical AI here means assistive tools under your direction, not unsupervised delivery.



