

TL;DR
- Task: How to add bloom in Lightroom = mask lights, ease Clarity/Texture, mild negative Dehaze.
- Limit: Global Dehaze sells haze; it is not true film halation.
- Handoff: Named Mist/Halation + Sync after the Classic grade in Evoto Glow Effect.
“Can you make the string lights feel like the night we remember—not like LED dots on a phone screen?”
That note from a couple (or a second shooter Slack ping that sounds just like it) is why searches for how to add bloom in Lightroom spike after reception weekends. The grade is already close. What is missing is camera bloom: highlight spill that reads as atmosphere, not as another Clarity trick.
This is not a beginner tour of Develop. It is a lead’s scope note: what Classic can honestly own, where global Dehaze stalls into milk, and when a Glow Effect finish layer—after the grade—protects the gallery without rewriting your color work.
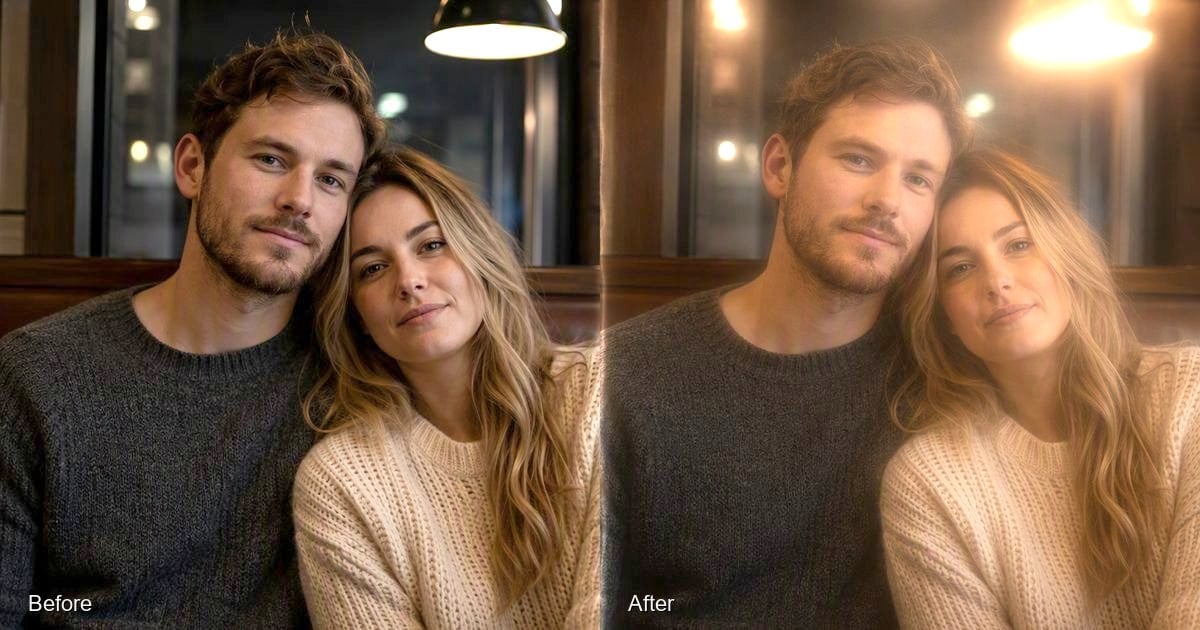
Two failure modes show up on the same desk. Drag “Dehaze” left globally and the frame goes milky before the lamps bloom. Nail one hero, then watch a full reception cull refuse to match because the “feel” was never a named style. Clarity and Dehaze can fake a mist effect; they do not lock Mist/Halation language across a gallery. That consistency gap is the handoff—not a verdict on Classic.
Draw the Boundary — Usual Fixes and Where They Stall
You already know Develop. Treat the table below as scope, then read the paragraphs that follow as the lead’s commentary—tables alone do not ship galleries.
| Pain | Usual fix | Why it stalls | What actually closes it |
|---|---|---|---|
| Hard LEDs, need camera bloom fast | Global negative Dehaze / heavy Clarity | Milky shadows; lamps still hard | Styled “Halation” / “Black Mist” bloom |
| Local mask works once, fails at scale | LR presets / limited sync | Glow “feel” drifts across sessions | “Save Preset” + “Sync” on a glow layer |
| Want black-mist glass without new threads | Buy 1/8 & 1/4 / keep faking in LR | Glass can’t undo per scene; LR ≈ haze, not shadow-hold bloom | “Black Mist” style, strength per frame |
| Client asks for film spill color | More Dehaze / plug-ins | True halation film ≠ slider haze | “Halation” look (honest: a look, not a lab scan) |
| Grade is done in Classic | Stay in LR forever | Glow edits fight the grade when you batch-change mood | Handoff: LR keeps grade; Evoto adds glow |
Can Lightroom create true film halation, or only a soft bloom? Only a soft bloom approximation. Optical glow and emulsion scatter are different physics. Be precise with clients: you can sell atmosphere; you should not sell a lab scan you did not make.
Adobe’s docs on masking remain the lawful reference for panel names—match your Classic build if menus moved. With the boundary drawn, the next question is not “more Dehaze?” It is whether tonight’s delivery needs a named glow layer after the grade.
Finish Camera Bloom in Evoto After the Lightroom Grade
When is camera bloom better finished in Evoto than Lightroom? When negative dehaze is not enough for bloom—you need named Mist/Halation language, or Sync across the gallery without re-balancing Dehaze on every file.
How do I get a Black Mist look in editing without buying another filter size? Use a post path with a Black Mist–style bloom you can reverse per scene. Physical glass still wins for capture-only diehards; editable strength wins on mixed wedding light when the DJ rig changes between first dance and cake.
Lock color and tone in Classic first. Then add glow in Evoto as a finish layer on top of that grade—not as a replacement Develop module. Product path: AI Glow Effect.
Need the wider desk once? Open the AI Photo Editor, then return to Desktop when Sync matters.
Grade locked in Classic? Add the glow layer on Desktop.


Powerful AI Photo Editor
Step 1. Import Graded Selects and Open Glow as a Finish Layer
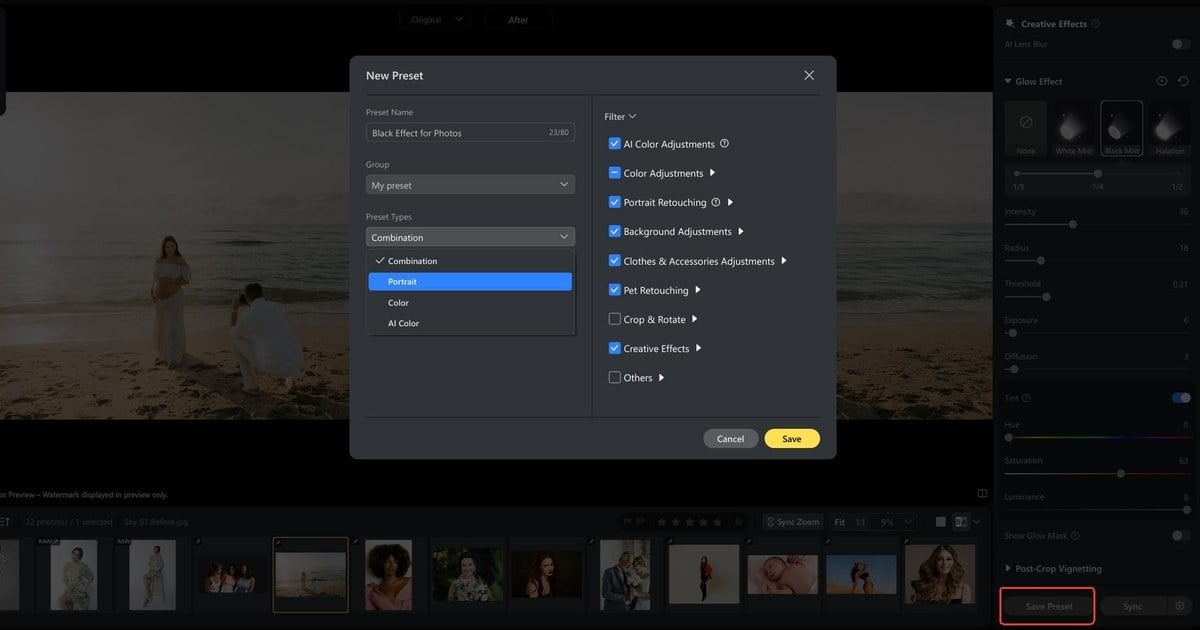
Send over the reception (or hero) selects you already finished in Develop. In Evoto “Edit”, open “Creative Effects” and expand “Glow Effect”. Confirm “None”, “White Mist”, “Black Mist”, and “Halation” are present. You are not rebuilding White Balance here—you are choosing how lamps spill after the Classic grade is done.
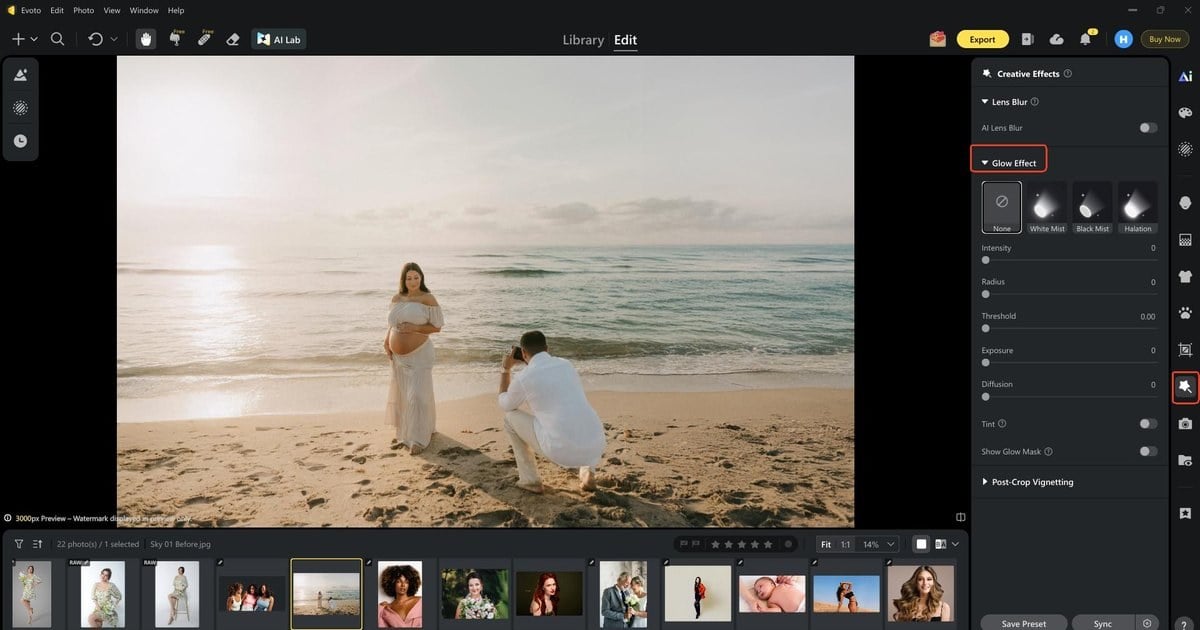
Step 2. Prefer Black Mist or Halation Over Another Global Dehaze Pass
String lights and hard practicals rarely need “more negative Dehaze.” Reach for “Black Mist” or “Halation” instead—the looks that sell camera bloom without rinsing midtones. Tap “1/8” or “1/4” and compare Before/After: lamps should breathe; cheek skin should not turn milky. If Dehaze already carried the frame halfway, keep Evoto density conservative.
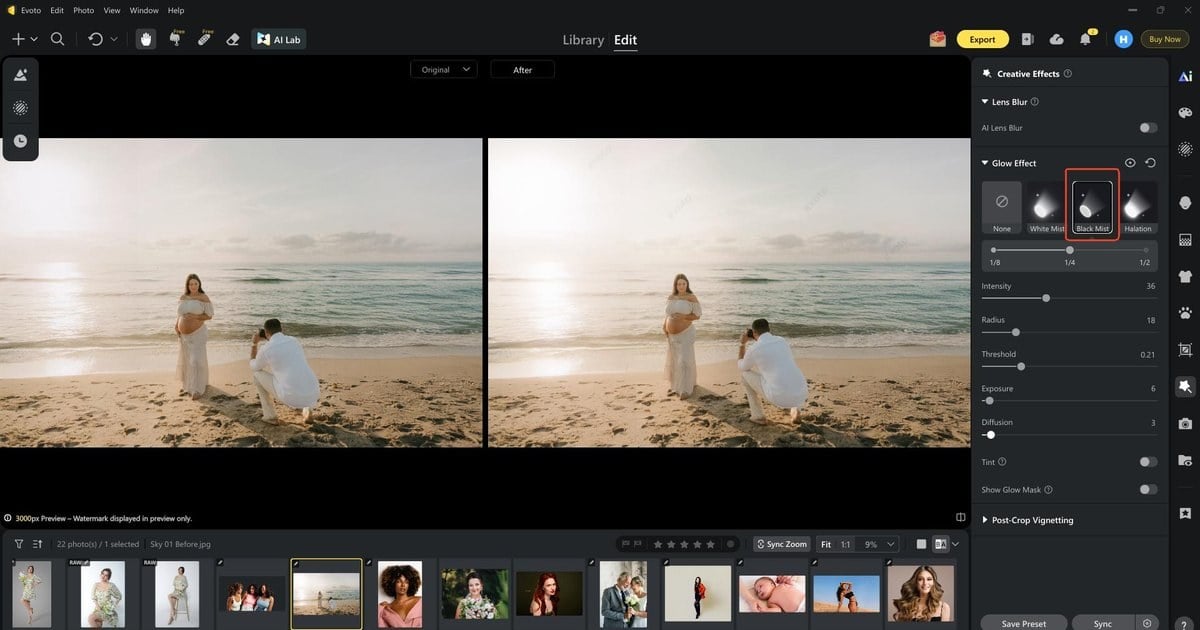
Step 3. Match Tungsten Spill with Tint, Then Verify the Glow Region
Shape “Intensity”, “Radius”, and “Threshold” so bloom hugs lights—the same goal as a Classic lights mask, without painting every bulb by hand. Enable “Tint” when tungsten receptions need warm spill instead of a phone-cool cast fighting your Lightroom white balance. Open “Show Glow Mask”; if eyes or lace soften, you overcooked Intensity—not Clarity. Touch “Exposure” and “Diffusion” only after that check.
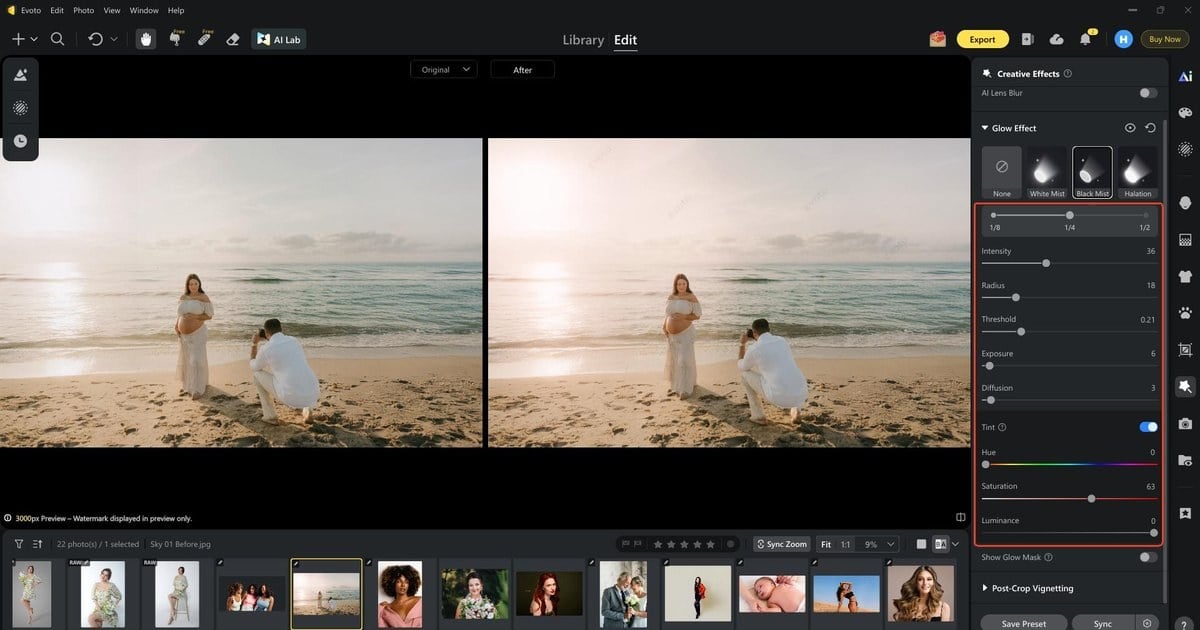
Step 4. Sync the Edits or Export the Photo
Click “Save Preset” once the hero reception frame feels right. Also, you can “Sync” across selects that share the same light chapter—not across noon portraits and midnight dance floors as one filter. Export as usual. Click “Export” button to save the edited photo to your device.
Need Sync on the full gallery tonight?
Powerful AI Photo Editor
For heroes that stay entirely in Classic—or for scouting a single frame before handoff—match the Develop path below.
How to Add Bloom in Lightroom — Panel Path
How do I add bloom in Lightroom with Clarity and Dehaze? This is the practical how to add bloom in Lightroom panel path. Follow live Lightroom Classic UI. Paths below match current Classic Develop masking; if Adobe renames a group, trust your build’s labels over any outdated blog screenshot.
Step 1. Mask the Lights First
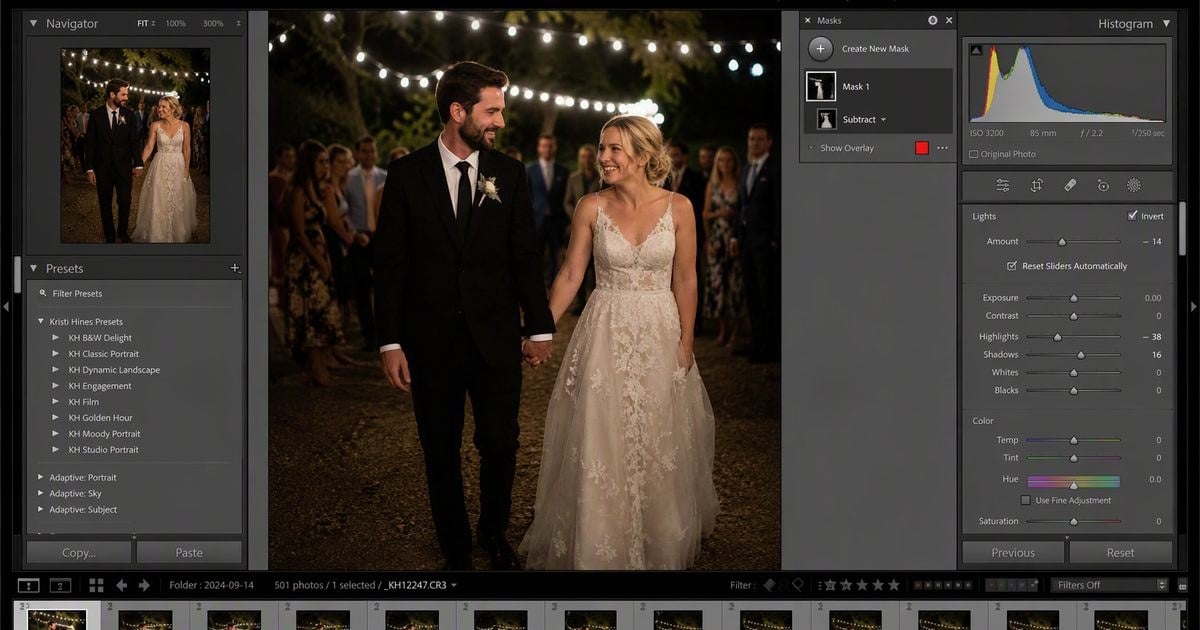
In “Develop”, open “Masking”. Use “Select Subject” and invert for background lamps, or draw a “Radial Gradient” / brush on practicals. Avoid painting soft Clarity across the whole face as your first move—that is how “bloom” becomes a beauty pass.
Step 2. Texture / Clarity Down (Small)
On the mask, ease “Texture” and “Clarity” left. Keep moves modest on skin-adjacent areas. You want edge contrast to melt on lamps—not a skin retouch disguised as atmosphere.
Step 3. Dehaze Slightly Negative
Pull “Dehaze” left a little (illustrative start: about −5 to −20, file-dependent). Stop when lamps breathe. If midtones go grey, you went too far—that is the classic trap, and it is also the moment to stop asking Classic for Mist/Halation language it does not have.
Step 4. Toggle and Decide Scale
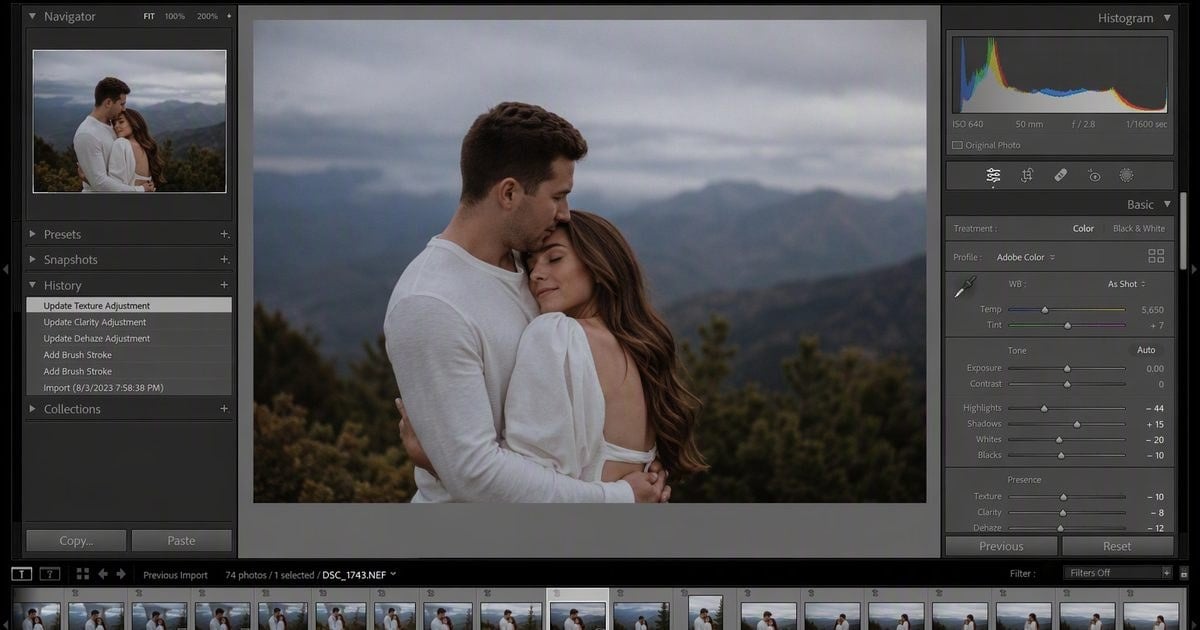
Toggle the mask. Check eyes, lace, and boutonnières. This is how to add bloom in Lightroom for a single blooming camera frame—the core how to add bloom in Lightroom craft before you decide on Sync scale. Scale is the separate problem Sync owns. Highlight bloom here is not the global soft-focus path covered in our blur effect article.
Where Classic Peaks Out — Haze, Halation Myths, Optical Glow
Once you have seen both desks, the ceiling becomes easier to name in client language.
Global negative “Dehaze” sells haze more reliably than bloom. A milky midtone with still-hard lamps is not “almost there”—it is a different effect wearing the wrong name. If the frame looks rinsed before the bulbs soften, undo Dehaze first and return to a lights-only mask, or hand the finish to Glow Effect instead of stacking another −10.
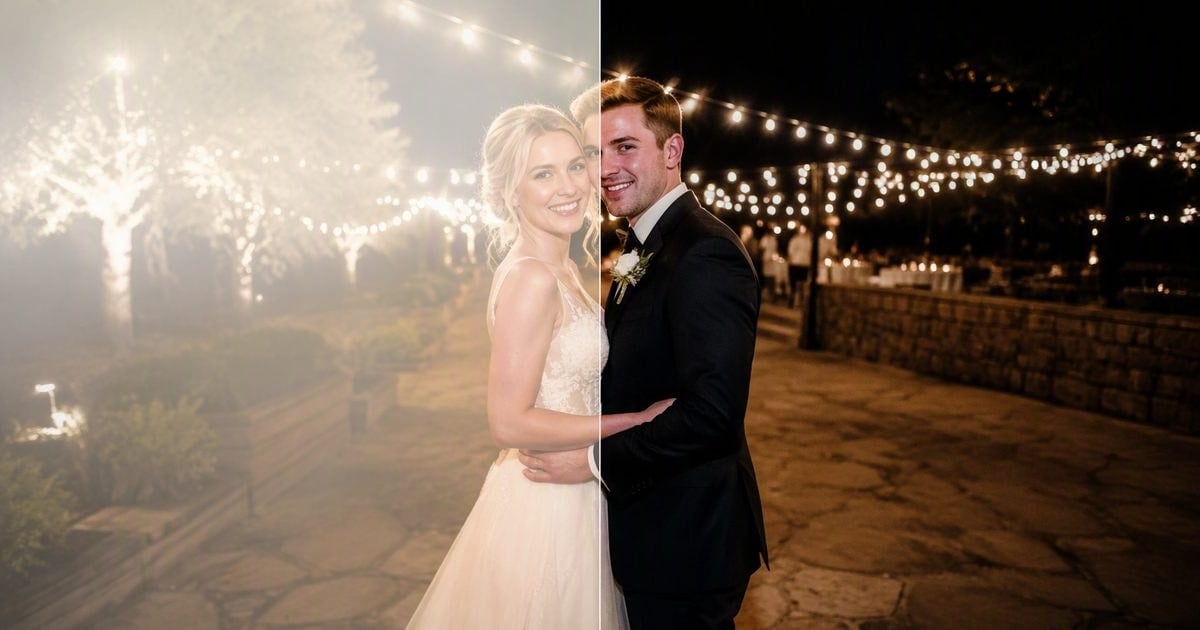
True film halation needs different tools and different honesty than a soft bloom. Emulsion scatter and digital slider haze are not the same physics. When a client says “film spill,” clarify whether they mean colored highlight bleed as a look or a lab process you cannot recreate with Develop alone. “Halation” in Evoto is look language you can Sync; it is not a scanned negative.
Optical glow at capture—mist glass on the lens—remains valid and often beautiful. It also will not undo when the DJ lights change between ceremony and reception. That is why editable strength earns a place on mixed wedding days: not because glass failed, but because the day refused to stay one filter strength.
Need a Photoshop Gaussian stack for a one-off hero instead? Use the glow-effect-Photoshop companion in this series once it is live. Full wedding Sync storytelling belongs in the dreamy wedding-delivery companion.
Powerful AI Photo Editor
Closing the Night — What We Ship After How to Add Bloom in Lightroom
By send time, the grade should still live in Classic—the colors you already fought for. Hero blooms either stay masked in Lightroom for a single frame, or ride a Glow Effect finish when the gallery must speak one Mist/Halation language. Sync checks belong on lights and speculars, not on whether every pore went soft. Before client upload, review Evoto’s Privacy Policy the same way you would any vendor handling wedding files.
That is the night’s deliverable: atmosphere that matches the brief, without pretending Dehaze was ever a film lab.
FAQ
1. Starting Clarity/Dehaze ranges?
File-dependent. Begin tiny on a lights mask—often single-digit Clarity moves and a shallow negative Dehaze—then toggle. If the frame milks, undo Dehaze first; do not “fix” milk with more Clarity. Ranges in tutorials are starting guesses, not contracts.
2. Classic vs Lightroom mobile for this?
Masking depth and gallery discipline live in Classic. Mobile is fine for scouting a look on the train home, not for syncing a full reception cull with consistent bloom language.
3. Black Mist look without new glass?
Yes—as an editable post look, you can reverse when noon sun and midnight LEDs refuse the same strength. Glass remains optional for capture purists who shoot one consistent filter all day. Mixed light chapters are where post styles earn the desk time.
4. Does handing off to Evoto mean redoing the grade?
No. Keep the LR grade. Add Glow Effect as a finish layer after color and tone are locked. If the grade is still moving, finish the grade first—glow on a moving target wastes both desks.
5. Client privacy on Evoto?
Evoto states it does not train public models on customer photos. Confirm on the Privacy Policy linked in the closing section before you upload a full wedding.
6. Is handing glow to Evoto safe and ethical for client galleries?
Yes—if you keep human direction. Evoto frames Glow Effect as an assistive finish (you choose style and strength), not a substitute for your grade or your QC. Decision checklist: (1) privacy policy reviewed, (2) no customer-photo training of public models per Evoto’s stated policy, (3) eyes/lace/skin checked before send, (4) you can turn the look off. That is ethical AI use: tools under the photographer’s control.



