

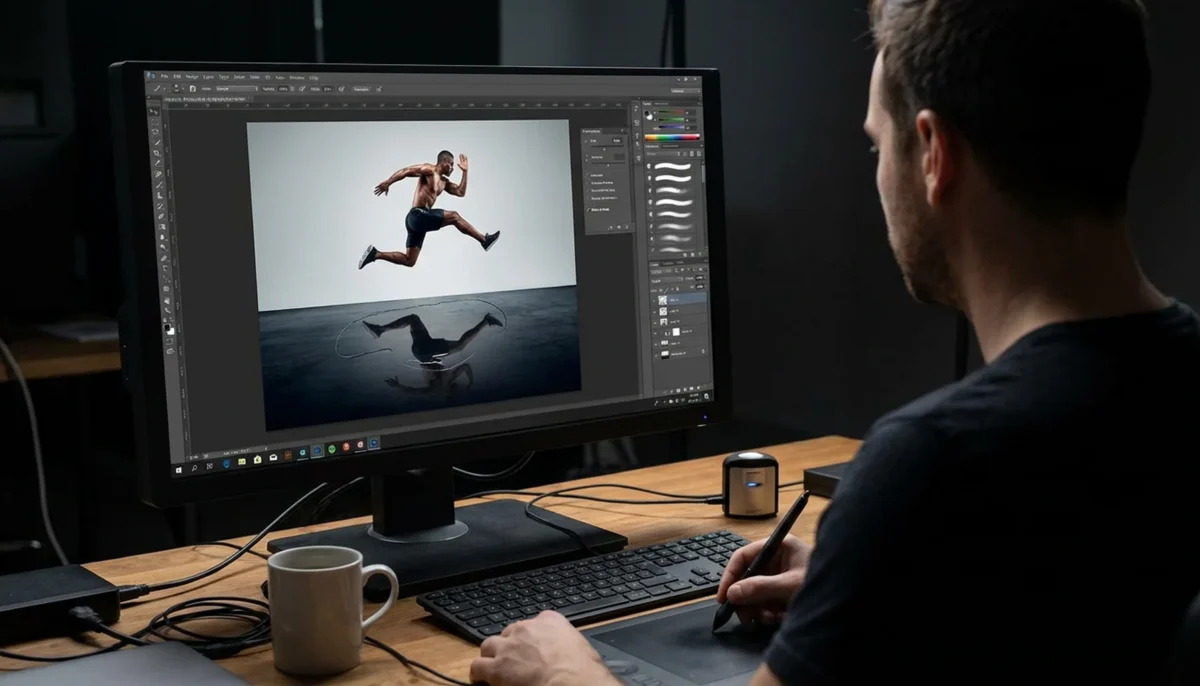
The reflective floor look can make a still image feel bigger than the frame. A dancer’s silhouette doubled beneath their feet, or a jumping athlete anchored by a mirrored shape below them, instantly adds depth and drama. The effect works especially well for standing, posed, and airborne subjects because long body lines make the reflected shape easy to read.
The good news is that you do not need a real reflective floor on set to create it.
This guide walks through the manual Photoshop route, what AI tools can realistically do, and where Evoto speeds the process up for photographers who do not want to build the same composite over and over.

TL;DR
- Photoshop gives you the most control over floor reflections, but each image still takes real time to mask, align, fade, and polish.
- AI tools can help on simple frames, but they break down faster on hair, motion, and complicated body shapes.
- For dance recitals, sports portraits, and other high-volume sessions, automation matters more than perfection on a single hero frame.
- Realistic reflections usually depend on the same few details: perspective compression, lower opacity, softer distance blur, and a clean transition at the floor line.
How to Add a Floor Reflection in Photoshop
This is the manual route. It usually takes 15 to 25 minutes per image once you know the workflow, and it is still the best option when you need maximum control over the final look.
For a faster approach, you can skip ahead to “Add Floor Reflection in One Click.”
Step 1: Extend the canvas
Go to Image > Canvas Size and add roughly 60 to 80 percent more height below the photo. Anchor the original image to the top so the new blank area appears underneath the subject. That extra space becomes the floor area where the reflection will live.
Step 2: Select and isolate the subject
Use Select > Subject, then refine the cutout in Select and Mask. Hair, loose clothing edges, and motion-softened limbs matter here. If the cutout is rough, the reflection will look rough too. Output the result to a new layer with a mask so you can keep adjusting it later.
Step 3: Duplicate and flip the subject
Duplicate the isolated layer, then go to Edit > Transform > Flip Vertical. Move that duplicate below the original image so the feet, shoes, or lowest edge of the subject meets the floor line. At this stage the result will look like a simple mirror copy, which is normal.
Step 4: Apply perspective compression
With the flipped layer selected, use Edit > Transform > Perspective and pull the far corners inward slightly. This is the step that turns the effect from mirror to floor. Real floor reflections compress as the surface recedes, so without this correction the duplicate looks like it is standing behind the subject instead of below them.
Step 5: Add a gradient mask
Add a mask to the reflection layer and use a black-to-white linear gradient so the reflection fades as it moves away from the subject. Most believable floor reflections lose strength quickly rather than remaining fully visible all the way down the canvas.
Step 6: Lower opacity and soften the reflection
Set the reflection layer somewhere around 35 to 55 percent opacity. If the surface needs more realism, add a little motion blur or directional softness. That helps the reflection feel like light landing on a floor instead of a perfect duplicate pasted underneath the body.
Step 7: Match the color
Use a clipped Hue/Saturation or Color Balance adjustment to make the reflection slightly less saturated than the original. A real reflective surface usually absorbs some floor color and light quality. If the reflection is identical in tone and saturation to the original subject, it starts to feel fake fast.
Step 8: Export the final image
Once the seam, perspective, and fade feel right, flatten or export the image. Before you call it done, zoom out and ask one simple question: does this feel like a subject standing over a reflective floor, or does it still feel like a flipped layer?
Why Photoshop Reflections Usually Fail
The common mistakes are easy to spot once you know what to look for. The first is opacity that is too high. A reflection at 80 or 100 percent strength reads like a duplicate, not a surface. The second is missing perspective compression. If the far end of the reflection stays the same width as the near end, the floor never feels real.
Uniform sharpness is another giveaway. The reflection closest to the subject can stay relatively defined, but the far end usually needs to soften. The same goes for color. Real floors do not return a perfect tonal copy of the subject. A slight desaturation or mild color shift usually improves realism. The last giveaway is the edge at the feet. If the subject meets the reflection with a hard cut line, the composite will always look assembled.
Other Tools That Can Add Reflections
Lightroom is not built for this job. You can stretch the crop a little, but real reflection compositing still has to happen somewhere else, usually in Photoshop.
Photoshop Generative Fill can produce a draft reflection if the scene is simple and the subject is cleanly separated, but it is better treated as a starting point than a finished answer. Hair, motion, and complicated poses still tend to need cleanup afterward.
Online AI tools such as Pixlr or Glima-style upload-and-apply editors can be useful for quick previews. They are less reliable when the subject has flyaway hair, complex limbs, or motion blur, which is exactly where dance and sports photographers usually care most.
Add Floor Reflection in One Click with Evoto
Evoto makes floor reflections simple. Instead of building it piece by piece, the AI handles everything in the background — subject cutout, perspective, fade, opacity, and color matching — all in one step. That does not mean every frame becomes perfect automatically, but it removes most of the repetitive layer-building that makes the Photoshop method slow.
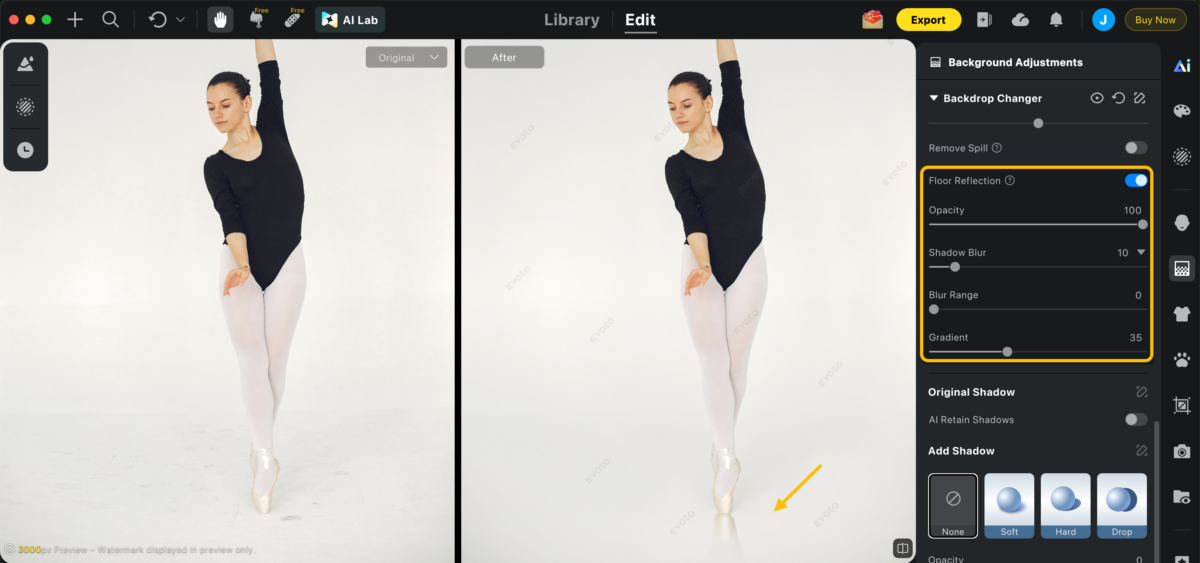
The basic flow is straightforward:
- Open the original image in Evoto.
- Clean the background if the frame needs a simpler starting point.
- If the image was shot on a solid backdrop, use backdrop cleanup tools to make the floor area easier to read.
- Enable the floor reflection effect inside the background workflow.
- Fine-tune opacity, blur, and shadow softness until the reflection matches the rest of the image.
- Export once the effect feels anchored and believable.
For photographers working dance recitals, sports portraits, or competition coverage, this matters more than it might for a single hero image. A manual Photoshop composite per frame does not scale well across hundreds of images. Evoto’s batch-friendly workflow is the real advantage: you can apply the same reflection treatment across a session instead of rebuilding it one frame at a time.
The rest of your finishing workflow stays exactly where it is. If you also need portrait or edge cleanup in the same session, Evoto’s AI skin retouching, portrait retouching, and background replacer tools make it easy to refine everything in one place.
If you want to test the speed difference on a real set rather than on a demo frame, download Evoto free and compare a small batch against your usual Photoshop workflow.


Powerful AI Photo Editor
Five Tips for Realistic Floor Reflections
Keep the opacity lower than your first instinct
Most first-pass reflections are too strong. A floor reflection should support the subject, not compete with it.
Compress the far end
If the reflection does not narrow with perspective, the scene never feels grounded on a real plane.
Let the reflection soften with distance
The farther the reflected shape moves from the body, the less perfect it should look.
Desaturate and tint slightly
A small shift away from the original subject tone usually makes the effect feel more physical.
Soften the contact line
The point where the body meets the reflection almost always needs a softer transition than beginners expect.
Conclusion
Adding a floor reflection is one of those small edits that can instantly elevate an image—from flat to polished, from simple to studio-ready. Whether you build it manually in Photoshop for full control or use a faster AI approach, the key is keeping the reflection subtle, aligned, and believable.
In the end, it’s not about the method—it’s about the result. A well-executed reflection should never distract, only enhance.
FAQs
Can I add a floor reflection to a photo taken on a normal floor?
Yes. That is exactly what this workflow is for. When perspective, opacity, blur, and color are handled well, the result can feel very close to a real reflective surface.
Does this work for jumping or airborne subjects?
Yes, and those images often benefit the most. The reflection acts like a visual anchor that tells the viewer where the floor is even when the subject is off the ground.
What is the difference between a reflection and a shadow?
A shadow moves away from the light source. A reflection mirrors the subject toward the camera plane. For this effect, you want the mirrored composite rather than a drop shadow.
Try Evoto AI Photo Editor
Retouch photos with Evoto AI and make your photos best! Available on Windows, MacOS and iPadOS.



