

You found the perfect photo—except it is too small for the print you have in mind. This happens constantly with older digital images, phone photos, crops, and files downloaded from social media. The good news is that AI photo upscaling can often turn a modest file into a more usable, print-ready image. The less-good news is that “4K” is not a magic stamp of print quality.
To upscale a photo to 4K for printing successfully, you need to understand the target pixel dimensions, choose an enlargement that suits the original image, and prepare the final file for the actual print size. This guide walks through the process without the jargon overload.
First: what does 4K mean for a photo?
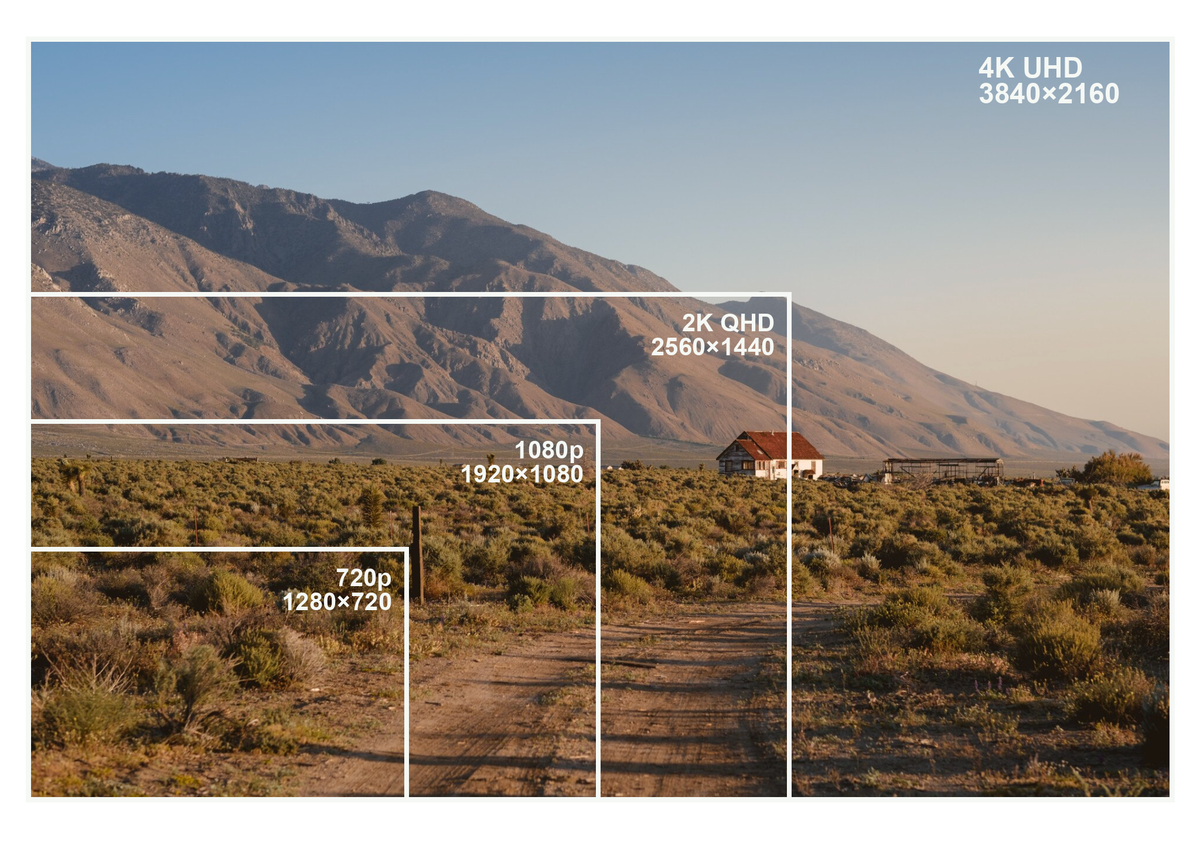
In most digital contexts, 4K refers to a 3840 × 2160 pixel frame. That is a 16:9 landscape aspect ratio and roughly 8.3 megapixels. It is common in video and screens, but a photo intended for print does not have to be 3840 by 2160 pixels. Print quality is determined by the relationship between pixels and the physical dimensions of the paper.
For example, a 3840 × 2160 image printed at 300 pixels per inch (PPI) measures about 12.8 × 7.2 inches. It can print larger at lower PPI, especially when viewers will stand farther away, but it is not naturally shaped for standard 8 × 10, 11 × 14, or 16 × 20 prints.
That is why the best first question is not “How do I make this 4K?” It is “What size and shape will I print?” Once you know that, you can calculate a useful pixel target.
Choose the right pixel dimensions for your print
A widely used benchmark for detailed photo printing is 300 PPI. Multiply each print dimension in inches by 300 to get the ideal pixel dimensions.
| Print size | Helpful target at 300 PPI |
|---|---|
| 5 × 7 inches | 1500 × 2100 pixels |
| 8 × 10 inches | 2400 × 3000 pixels |
| 11 × 14 inches | 3300 × 4200 pixels |
| 12 × 18 inches | 3600 × 5400 pixels |
| 16 × 20 inches | 4800 × 6000 pixels |
These are useful targets, not rigid laws. Canvas, posters, and images viewed from several feet away can look excellent at lower resolutions. Conversely, a close-viewed art print with fine detail may benefit from more. Your printer, paper, and viewing distance all matter.
Step 1: start with the best original you have
AI upscaling performs best when the starting image is clean. Find the original from the camera, phone, cloud library, or photographer if possible. Avoid using a screenshot or an image that has been copied from one social platform to another. Each round of compression throws away information and gives the AI less to work with.
Before you upscale, inspect the file at 100%. If faces are already severely blurred, lettering is unreadable, or JPEG artifacts are everywhere, a larger version may still be useful—but do not expect an authentic restoration of missing detail. Think of AI as a skilled reconstruction assistant, not a time machine.
Step 2: crop for the print before you enlarge
Match the photo to the final aspect ratio early. A 4K landscape image is 16:9, while an 8 × 10 print is 4:5. If you upscale first and then make a major crop, you may waste pixels and accidentally cut off an important subject.
Duplicate the image, choose the intended crop, and make sure the subject has room around it. Portraits usually benefit from a little breathing room above the head and around the shoulders. For family or event photos, check hands and feet before committing to the crop. A professional editor such as Evoto can make this prep stage more efficient because you can crop, refine, and prepare the final image within the same workflow.
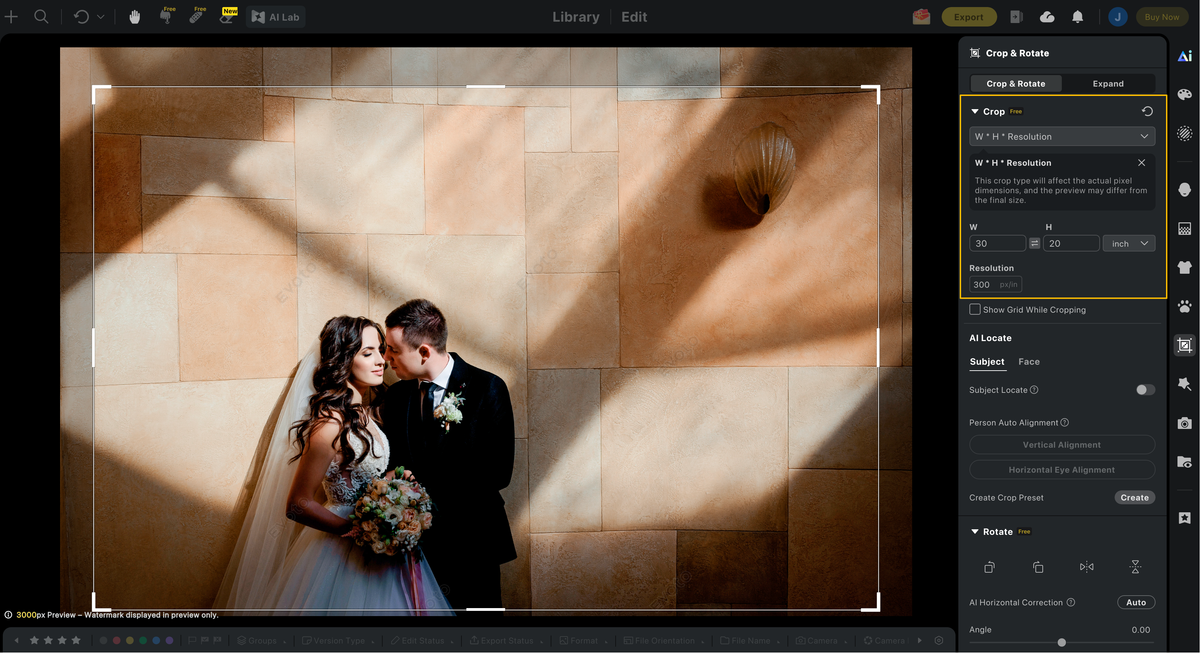
Step 3: correct obvious issues before upscaling
Make modest global adjustments first: correct white balance, exposure, and distracting color casts. If the photo needs retouching, cleanup, or background refinement, do that thoughtfully. An upscaler may amplify visual issues, so it is often easier to address them before enlargement.
Do not over-sharpen before sending the photo through AI. Strong sharpening creates halos and crunchy edges that may become more obvious once the image is enlarged. Keep your edits natural, then evaluate whether a very light finishing sharpen is needed after upscaling.
Step 4: use an AI upscaler at a sensible scale
Open your chosen image upscaler and select the output scale that gets you close to your needed dimensions. If your image is 1800 × 1200 pixels and your target is 3600 × 2400 pixels, 2x is a logical choice. If it is only 700 pixels wide and you need 5400 pixels, test the result carefully: a large jump is possible, but artifacts are more likely.
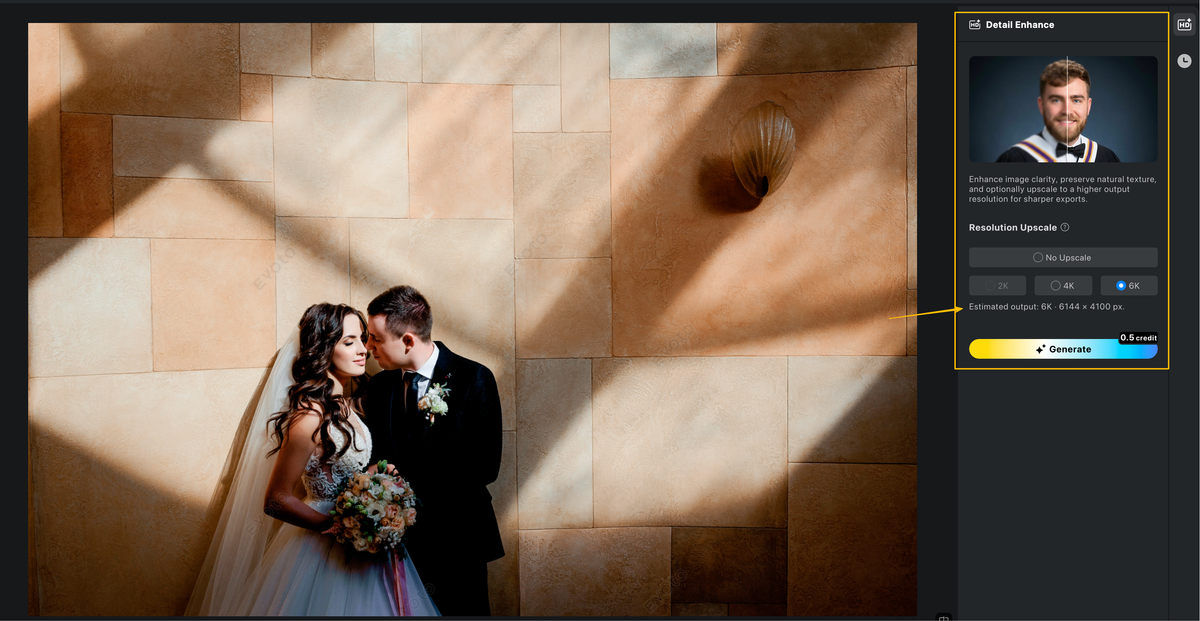
Evoto is useful when the photo needs a complete professional finish rather than a single automated enlargement. Its AI editing tools allow photographers and visual teams to work through image refinement as part of the delivery process. Whichever tool you use, make a duplicate and preserve the original file unchanged.
When choosing settings, favor natural detail over the sharpest preview. Too much generated texture can make skin look plastic, fabric look painted, and architecture look wavy. A slightly softer but believable image almost always produces a more pleasing print.
Step 5: inspect the 4K image at 100%
Do not judge quality only from a fit-to-screen view. Zoom in and inspect important areas: eyes, hair, teeth, logos, jewelry, text, foliage, and high-contrast edges. Look for repeating patterns, odd facial features, halos, and fake-looking texture. Also zoom back out. A print is experienced as a whole image first, so the overall tone and composition matter as much as microscopic detail.
If the result looks artificial, try a lower enlargement factor, a different model, or a less aggressive detail setting. Sometimes the best workflow is two gentle improvements rather than one dramatic increase. Other times, a smaller print is the honest and visually superior decision.
Step 6: export for the printer
For a photo lab, JPEG is often accepted and keeps file sizes manageable; choose the highest-quality JPEG setting available. For a print shop or a workflow that needs additional editing, TIFF may be preferred because it is less compressed. Ask the printer for its specifications before ordering, especially for a large-format or fine-art project.
Use the color space your print provider requests. sRGB is a safe default for many consumer labs and online printers. If the lab supplies an ICC profile and instructions, follow them. Changing a PPI metadata field does not create new detail by itself; the actual pixel dimensions are what determine how much information the image contains.
Step 7: order a proof when quality matters
For a gift, gallery piece, client order, or expensive frame, print a small proof or test section first. Screen brightness can hide problems, and different papers change perceived contrast and sharpness. Matte paper tends to look softer than glossy paper, while textured fine-art paper can beautifully suit some images but is less forgiving of weak detail.
This final check is where a careful editing workflow pays off. If a proof feels too dark, too warm, or overly sharp, return to your edited master—not a repeatedly saved JPEG—and make a measured adjustment. Evoto can help keep that process organized when you are finishing a set of photos with a consistent look.


Powerful AI Photo Editor
Common mistakes when upscaling photos for print
The first mistake is confusing 4K with universal print readiness. A 3840 × 2160 image can be great for a 16:9 print, but it may not have enough pixels or the right ratio for another format. The second is stretching a photo to fit rather than cropping it. Stretching changes faces, products, and straight lines.
Another common error is using a heavily compressed source. A 4K output made from a tiny social-media image may have more pixels, but it will not have the integrity of a real high-resolution original. Finally, do not assume the most intense AI setting is best. Natural results, accurate color, and a thoughtful crop beat exaggerated “detail” every time.
FAQ: upscaling a photo to 4K for printing
Is 4K enough to print a photo?
For a 16:9 image, 4K (3840 × 2160) can produce a detailed print around 12.8 × 7.2 inches at 300 PPI. It can work for larger prints at a lower PPI or longer viewing distance. The best answer depends on the image, paper, and intended print size.
Can AI upscale a photo without losing quality?
AI can improve a photo’s perceived detail and make enlargement more attractive than standard resizing. It cannot guarantee perfect recovery of information missing from the original. Always compare the output at full size and print a proof for important work.
What is the best format for print?
High-quality JPEG is common for consumer photo labs. TIFF is useful when your printer requests it or when you need a high-quality editing master. Follow the print provider’s file and color-profile guidelines.
A better way to think about 4K printing
Upscaling a photo to 4K is a helpful goal when it matches your output, but print success comes from the entire process: a clean original, the correct crop, sensible AI enhancement, a realistic pixel target, and a proof. Use an AI editor like Evoto when you need to bring those steps together in a refined, repeatable workflow. Your print will look better because you designed it for the paper, not simply because its file name says “4K.”



