
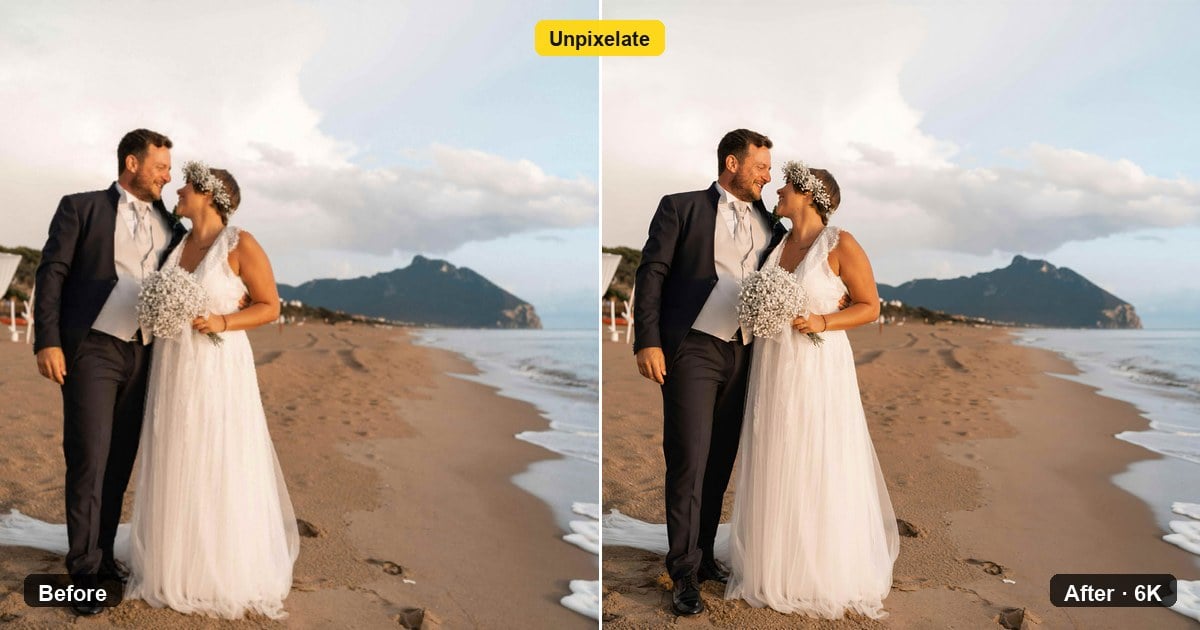
A wedding week retouch often starts with the wrong file. The client sends one JPEG from group chat. You pull Clarity. Hair edges turn into sugar frosting. People who search how to unpixelate an image need the grid taken apart. They do not need a harder sharpen.
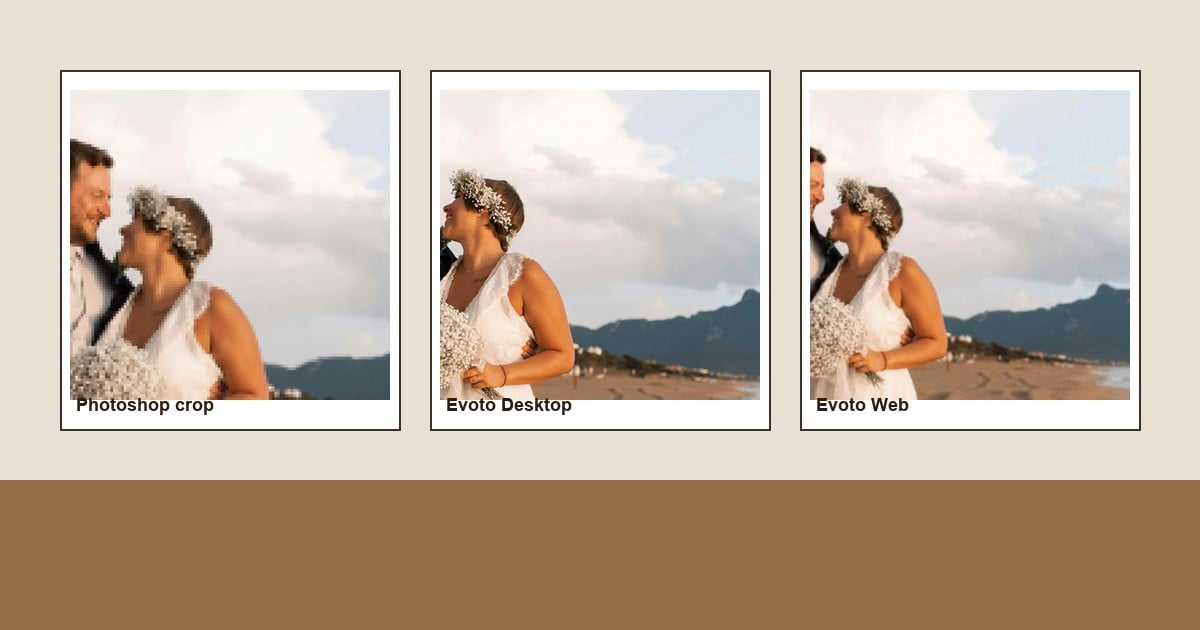
This guide shows how to make a picture less pixelated with three methods. Method 1 stays in Photoshop. Method 2 uses Evoto Desktop when a folder needs the same repair. Method 3 uses Evoto Web as the online Unpixelate Image tool for one still.
TL;DR
- Confirm countable squares at 100% crop before you touch a slider.
- Re-export a master if it still exists. Chat apps compress again.
- Then pick Photoshop, Evoto Desktop (Detail Enhance, a size pick, plus Batch), or Evoto Web. Finish with a delivery check.
If the crop is a soft smear, not a grid, stop here. Read how to make a pixelated image clear first. That post splits blocks, blur, tiny files, and grain.
Photographers on Photo Stack Exchange make the same point. When block structure is visible, sharpening often adds halos. It does not bring lost samples back.
How to Unpixelate an Image without Oversharpening
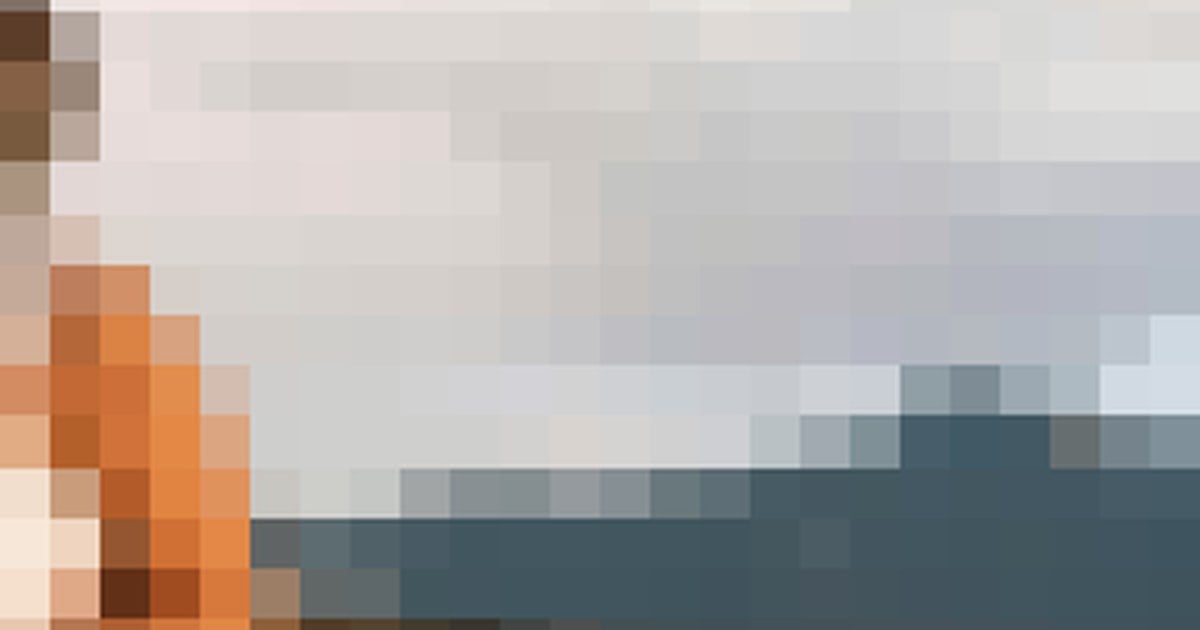
Hotel Wi-Fi and a WhatsApp file can fool you. On a phone, the frame looks “soft.” On a desktop at 100% you see 8×8 tiles. That is compression, not missed focus.
How to unpixelate an image in this article means rebuilding those tiles. It is not Unsharp Mask. Adobe’s note on how to fix a pixelated image also starts with diagnosis, not a Clarity slam.
Use this short read, not a four-column chart:
- Countable squares on cheeks, type, or sky: stay here and run the three methods.
- Streaks or a soft disk with no grid: that is blur. Park this tutorial.
- White rings on old block edges: you already oversharpened. Method 1 Step 3 is the brake.
Chat apps create a common WhatsApp-size image problem. The file is a JPEG that got saved again. Do not quote a kilobyte cap you have not checked. Just treat the download as a compressed copy.
JPEG stores color in 8×8 blocks. You can count those blocks at full view. That is a format fact, not a marketing claim. For the same 8×8 story, see the Photo Stack Exchange thread linked above.
Get the Master File If It Still Exists
Repair is slower than a clean export. A storefront JPEG can look tiled while the brand drive still holds RAW or TIFF. Ask before you spend a night on the chat copy.
Adobe and working photographers agree on the same habit. Prevention beats repair. Edit from RAW when the camera file is still in reach.
Keep the ask simple:
- Request the camera original or the design master. Do not use the chat download if a better file exists.
- Export once from that master. Do not bounce JPEG to JPEG.
- If tiles remain after a clean export, then open Method 1, 2, or 3.
A concert JPEG from the artist’s phone is the same trap. Ask if a RAW still sits on the card. Ask if a TIFF still sits in the designer’s folder. One clean export beats a night of deblock.
Skip this section only when the compressed JPEG is truly the last file. Then pick a method by where you already work.
Method 1: Calm the JPEG in Photoshop without a Clarity Slam
You already have the invite graphic open in Photoshop. Tonight you only need one print file. This path is how to unpixelate an image in Photoshop with layers, not a global slam.
Adobe documents the Neural Filter family in Photoshop Neural Filters help. Use JPEG Artifacts Removal when the crop shows tiles. If you need a longer tool shortlist, that belongs in the companion tools review after this method. This method stays on one Photoshop path.
Step 1: Duplicate the Layer and Lock the Compressed Original
Duplicate the Background. Leave the original layer untouched. You need a toggle later. Name the copy so you do not sharpen the base by accident.
Step 2: Run JPEG Artifacts Removal at 100% Crop
Open Filter, then Neural Filters, then JPEG Artifacts Removal. Zoom to hair, jewelry, or type. Raise strength slowly. Watch tiles open, not skin turning to porcelain.
This is the core of how to fix pixelated image in Photoshop work. The filter is for blocks. It is not a portrait beauty pass.
Move around the crop while the filter is live. Check a sky, a jacket weave, and a logo if the frame has one. Strength that looks fine on skin can still smear type. If type falls apart, lower the filter. Do not rescue letters with extra sharpening.
Step 3: Keep Sharpening Off the Whole Frame
If you still need bite, mask a small-radius sharpen onto edges only. Do not run global Clarity. Do not run Unsharp Mask on the whole frame.
Photo Stack Exchange readers see the same fail. Sharpening a tiled JPEG makes halos brighter. The grid does not disappear. It just gains a white rim.
Step 4: Save a Copy and Toggle Before You Call It Done
Optional light denoise can help if chroma noise rides the tiles. Stop before pores look plastic. Toggle the original layer on and off. Save a copy. Do not flatten over the only original.
Use Method 1 when the file is already in Photoshop, and you want layer control. Skip it when a folder needs the same repair and later retouch. That is Method 2. Skip it when you only have a browser and one JPEG. That is Method 3.
Method 2: Detail Enhance and Batch in Evoto Desktop
A second shooter sent a folder of tiled JPEGs. You want the same deblock on every matching angle, then skin work in the same app. You can keep the current size, or you can pick 2K, 4K, or 6K if delivery still needs more pixels. This is the Desktop path for how to unpixelate an image when workflow matters.
Evoto is an AI Photo Editor built for portrait delivery. Desktop does not replace a master file. It makes a repaired set you can keep working on. Download Evoto, then stay inside “AI Lab”.


Powerful AI Photo Editor
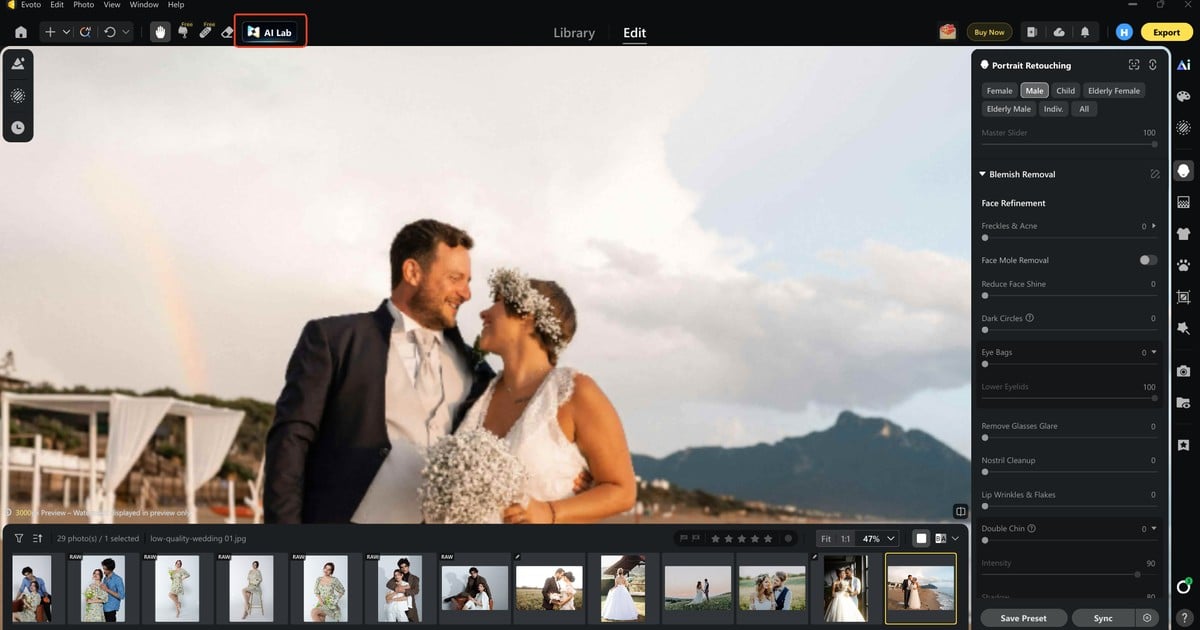
Step 1: Open the Folder in AI Lab
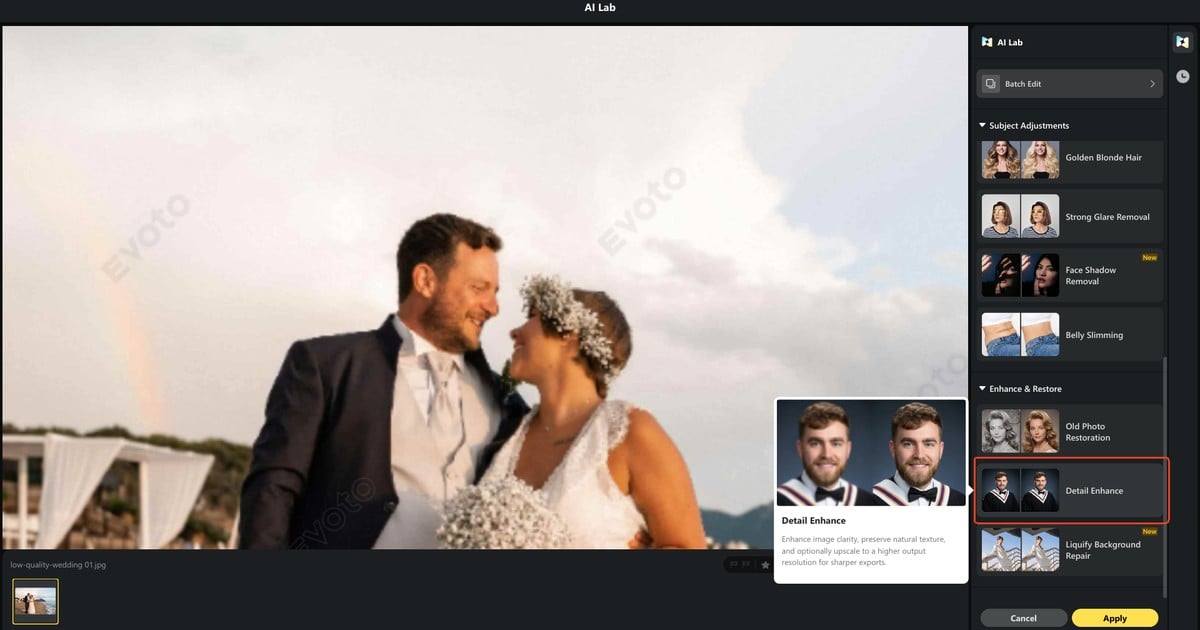
Import the set, not a screenshot of one JPEG. Open “AI Lab”, then “Enhance & Restore”. You are lining up a repair that can travel with the rest of the edit, not a one-off web download.
Step 2: Choose No Upscale or 2K, 4K, or 6K
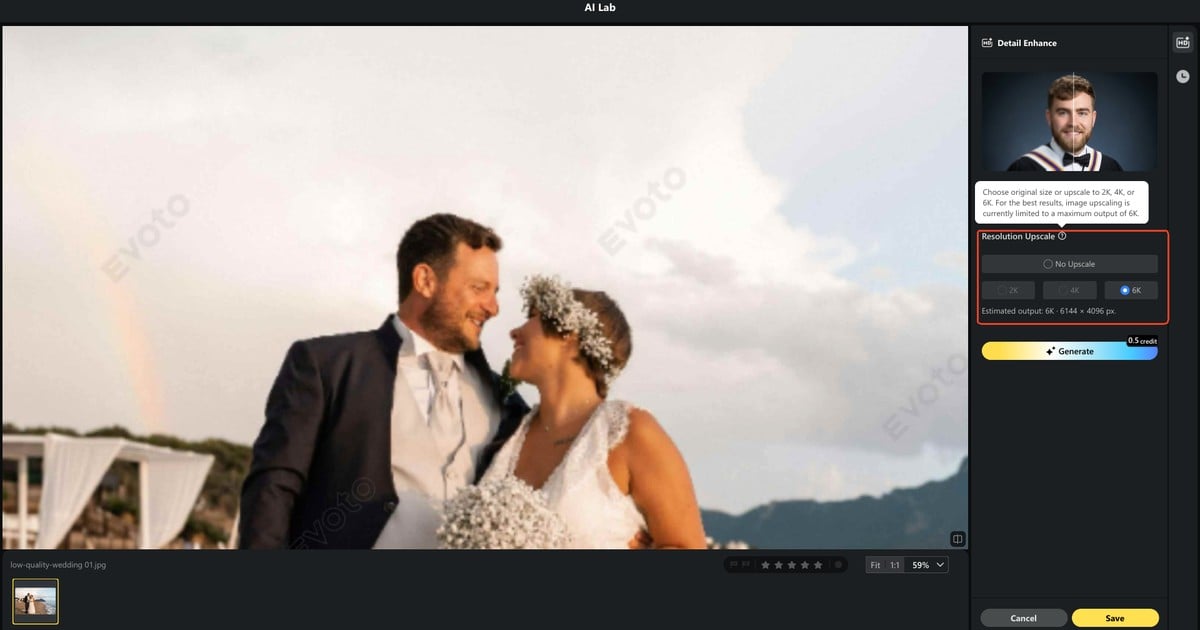
Open “Detail Enhance”. Under “Resolution Upscale,” you can keep the size or grow it. Pick “No Upscale” when the long edge is already enough. Pick “2K”, “4K”, or “6K” when the gallery still needs a larger delivery file. Match the job, not the largest badge. You are clearing tiles first. Size follows the delivery.
Step 3: Batch the Angles That Share the Same Compression
Use Batch on the group that failed the same way. A chat-compressed sneak peek set should share one pass. Do not mix a camera original into that stack. Sync is the workflow win. Web cannot do this.
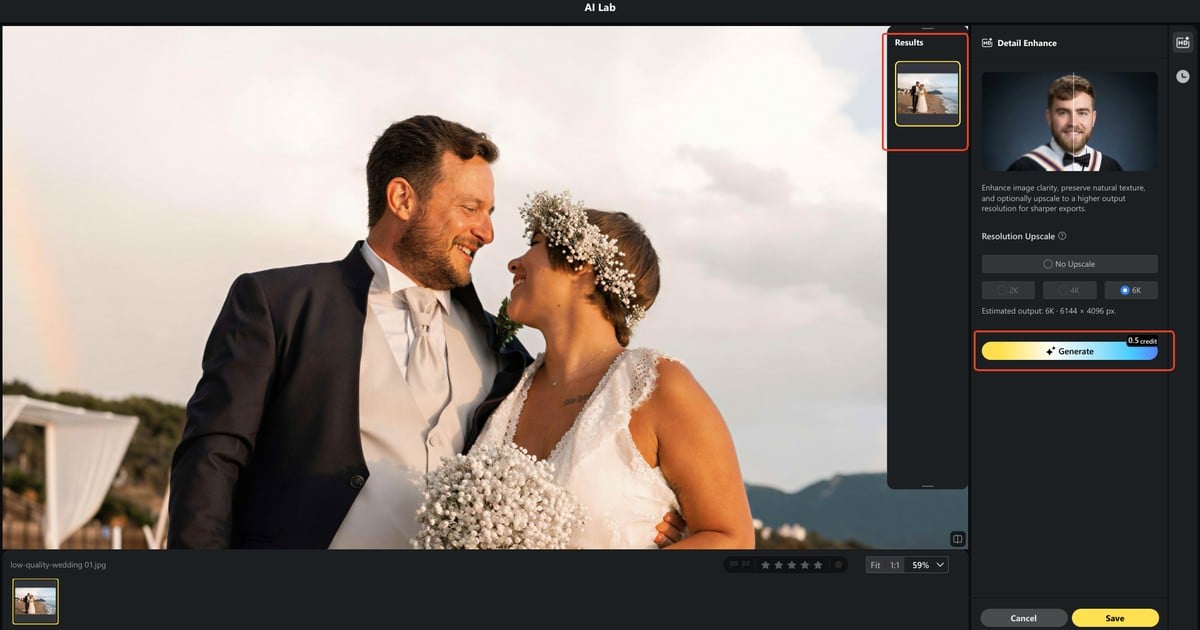
Step 4: Proof One Crop, Then Keep Retouching in Desktop
Check hair, type, neck, and ears at 100%. If identity holds, stay in Desktop for portrait finishing. That is the workflow. You do not export, reopen, and lose the set. If the face changes, stop. Ask for the master.
Use Method 2 for a billed gallery and a folder you will keep retouching. Skip it when you only have a browser and one still. That is Method 3.
Powerful AI Photo Editor
Need the same repair on a folder? Open Desktop Detail Enhance, pick No Upscale or 2K, 4K, or 6K, Batch the matching angles, then proof one crop before you retouch the rest.
Method 3: Unpixelate Online with an Online Unpixelate Image Tool
A concert banner needs type tonight. You are not at the Desktop machine. Evoto Web is the online Unpixelate Image tool for that one JPEG. New users can try it with 3 free generations. Downloads have no watermark. Follow the how to unpixelate an image web flow. Use the button names you see on screen.
Web is built for a single still. You pick an output size, generate once, and download. You do not Batch. You do not keep the folder moving into skin work in the same app. That difference is the Method 2 versus Method 3 split.
Step 1: Upload the Blocky JPEG
Click “Upload Image”. Drop the tiled photo. JPG, PNG, and WebP work. Longest edge can go to 6K. Do not upload a screenshot of the JPEG. A screenshot adds another generation of blocks. Upload a crop that still shows the squares, such as banner type or an LED edge.
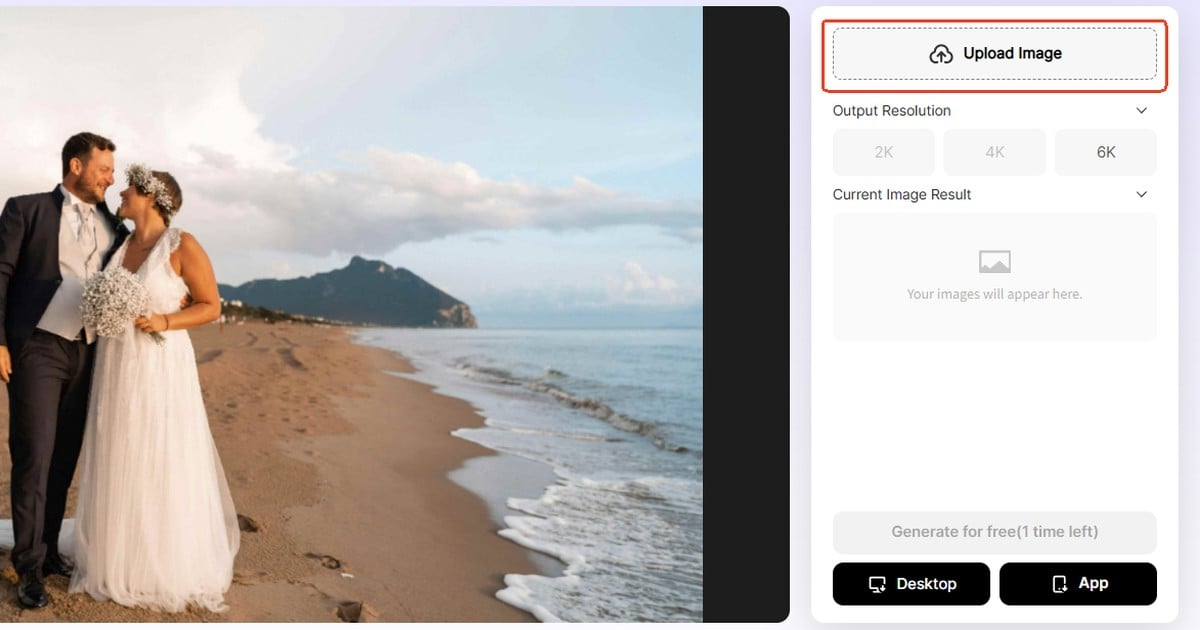
Step 2: Choose 2K, 4K, or 6K for the Job
Under “Output Resolution” pick “2K”, “4K”, or “6K”. Read the estimated output. Screen delivery often wants 2K. A crop or print file may need 4K or 6K. Match the job, not the largest badge. If you must not change size at all, stop here and use Method 2 “No Upscale” instead.
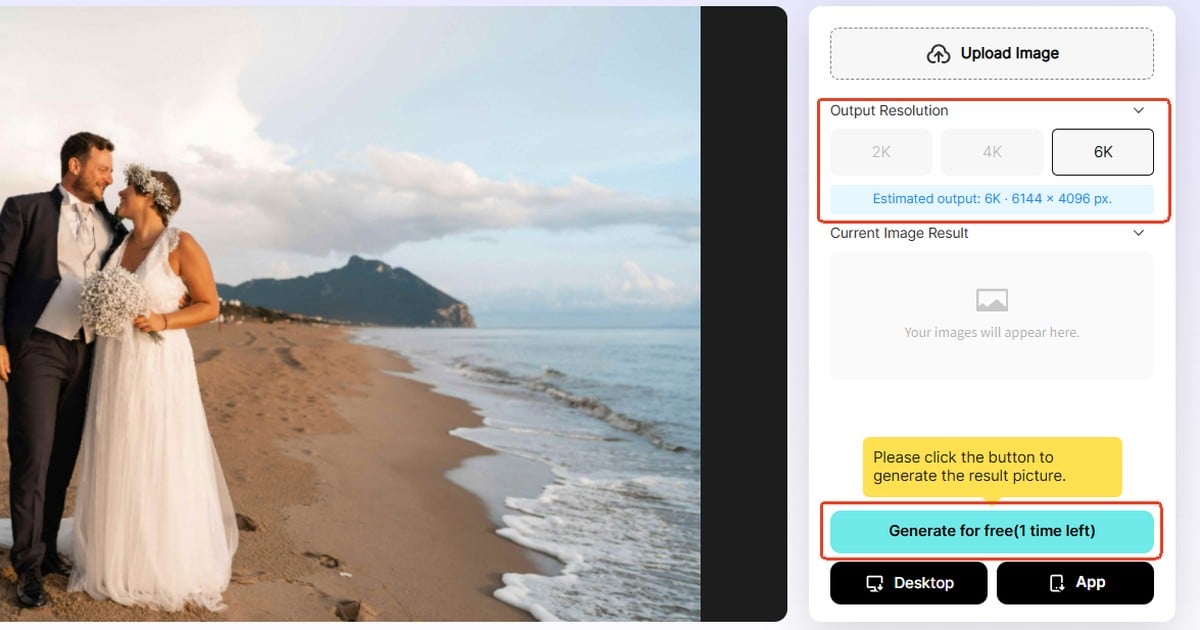
Step 3: Generate Once, Then Judge Hair and Type
Click “Generate”. Switch Before/After. Check the hairline, lashes, and any type in the frame. Use “free download” when edges read clean. There is no watermark on that download. If the face changes, stop. Do not stack another enhance pass. Look at the neck and the ears. A rebuilt cheek with a waxy neck is a fail.
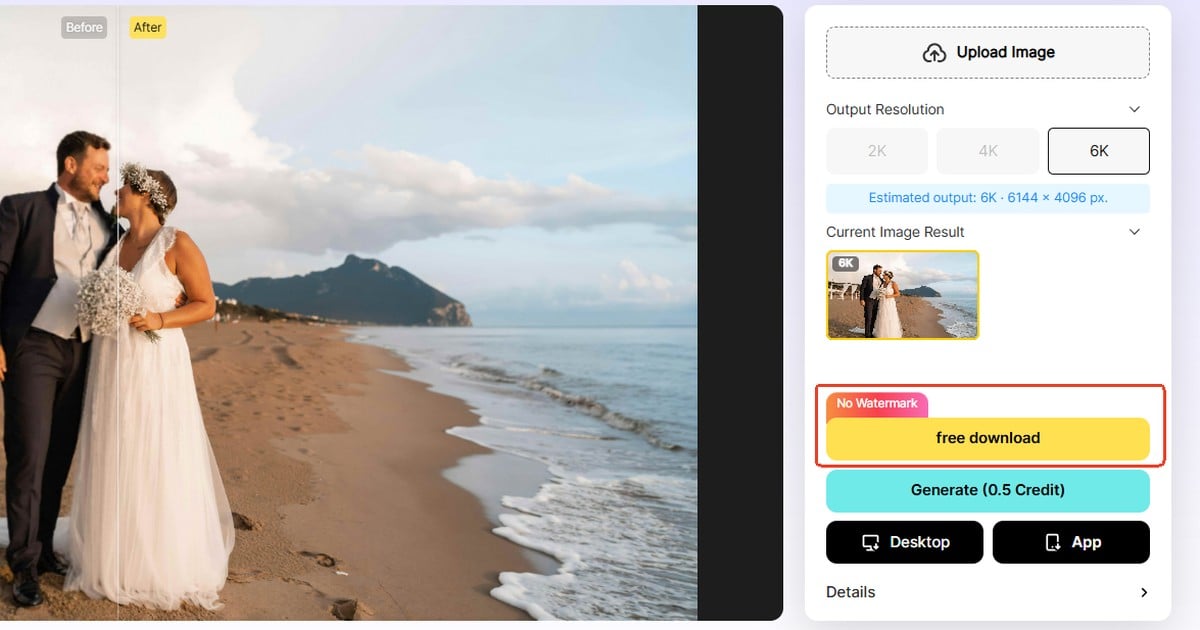
Use Method 3 for one browser still when you need a 2K, 4K, or 6K delivery file. Skip it for a full gallery. That folder belongs in Method 2.
Which Method Wins for Which Job
The three methods are not a contest. They are three workflows. Pick the one you already work in, then check texture.
| Method | Best fit | Weak spot | Size behavior | Workflow |
|---|---|---|---|---|
| Method 1 Photoshop | One file already in PS, layer control | Heavy compression still fails; easy to oversharpen | Stays the Photoshop document | Weak batch |
| Method 2 Evoto Desktop | Folder, later retouch | Needs the Desktop app | “No Upscale”, or “2K”, “4K”, “6K” | Batch, then keep editing |
| Method 3 Evoto Web | One still in a browser | No folder Batch | You pick 2K, 4K, or 6K | Upload, Generate, download |
Re-export the master if it exists. Stay in Photoshop for a single-layer job. Use Evoto Desktop when a folder needs the same repair. Use Evoto Web when you have one JPEG and a browser. That last path is still how to unpixelate an image. It is just the online workflow.
Need a longer shopping list after this tutorial? The companion 2026 unpixelate tools review scores Photoshop, Evoto, and other repair apps on texture and batch.
Common Mistakes When the Deadline Is Mean
Most failures are rushed habits, not missing software. Watch for these four.
- You sharpened first. A tiled crop plus Clarity makes white rims. Undo. Go back to JPEG Artifacts Removal or Evoto. Then proof hair.
- You mixed blur with tiles. A slow-shutter dance frame has streaks, not squares. Deblock will invent fabric. Send that file to the diagnosis companion.
- You stacked three enhance buttons. Each pass paints new skin. One repair. One 100% check. Then stop.
- You called the export the original. Clients hear “restored RAW” and believe it. Say repaired delivery file. Keep the compressed JPEG in an archive folder so you can show the before.
If two of those mistakes already happened, start over from the master. Do not keep stacking.
A fifth fail is quieter. You repaired one hero and left matching angles untouched. The gallery then shows one clean face and five tiled cousins. Repair the set with the same method, or hold the hero back until the others catch up. Clients notice the mismatch in the proof gallery first.
Delivery Checklist Before You Send the Gallery
A repaired file can still fail in the gallery. Slow down for one 100% pass before you upload. This is how you make a picture less pixelated without lying about the original capture.
Work through the list in order:
- Hair and fabric still look like that person at 100%.
- Type and logos read as letters, not mush.
- Matching angles in the set share the same repair strength.
- You did not treat motion blur as tiles. If unsure, open the diagnosis post.
- You did not sharpen instead of switching methods.
- The client knows this is a repaired delivery file.
Only edit files you have the right to edit. Do not try to reverse a censored mosaic. That is not retouching. That is a hard no.
Powerful AI Photo Editor
Bottom Line: Pick a Path, Then Proof the Crop
How to unpixelate an image is a routing problem once the crop shows squares. Photoshop calms a file you already have open. Evoto Desktop batches the set and lets you keep the size or pick 2K, 4K, or 6K. Evoto Web is the online Unpixelate Image tool for one still, with a free trial for new users. In every path, how to make a picture less pixelated still ends at the same check: hair, type, and an honest label on the export.
Ready to rebuild a blocky client JPEG? Use Evoto Web for one still, or Desktop Detail Enhance when a folder needs the same repair.
If the next file is blurry rather than tiled, jump to the diagnosis guide. If you already know it is tiles and you want a shortlist, jump to the tools review.
FAQ
1. How to Unpixelate an Image Without Oversharpening It?
Confirm squares at 100% first. Then use JPEG Artifacts Removal, Evoto Desktop Detail Enhance, or Evoto Web. Keep global Clarity off. Sharpening a grid usually makes halos worse.
2. Which Method Should I Use First: Photoshop, Evoto Desktop, or Evoto Web?
Stay in Photoshop if the file is already there. Use Evoto Desktop when a folder needs the same repair and later retouching. Use Evoto Web for one still in the browser. New users can try the web tool with 3 free generations.
3. When Should I Skip Repair and Ask the Client for the Original File?
Ask whenever a RAW, TIFF, or design master might still exist. A chat JPEG is a copy of a copy. Repair cannot invent samples the camera never saved.
4. Evoto Web or Desktop for a Full Gallery?
Web is one-time, with a 2K, 4K, or 6K pick. Desktop “Detail Enhance” with Batch is the gallery path. Use “No Upscale” when the files are already large enough, or pick “2K”, “4K”, or “6K” when delivery still needs more pixels.
5. Are Uploads Handled Securely, and Does Evoto Train AI on My Photos?
Uploads are processed on encrypted servers. Evoto does not use your photos to train AI models. Running a repair is not the same as training.
6. How Should I Use AI Repair Ethically on Client Files?
Edit files you have the right to edit. Tell the client the export is a repaired delivery version. Do not call it the camera original. Proof faces at 100% before you send.
7. Can I Reverse a Censored Mosaic Face?
No. These methods repair compression tiles on files you own. They are not for undoing privacy blur, license plates, or censored mosaics.
8. How Do I Make a Picture Less Pixelated if Photoshop Sharpening Made It Worse?
Undo the global sharpening. Go back to JPEG Artifacts Removal at low strength. If the file is still tiled, switch to Evoto Desktop or Evoto Web instead of stacking Clarity.
9. WhatsApp and Chat JPEGs: Repair or Re-Export?
Re-export from the master if it exists. Repair the chat JPEG only when that copy is the last file. Chat apps compress again. They are a bad archive.
Methodology & Author
Author: Evoto Editorial Team, portrait and event workflow editors
Experience basis: Checked Evoto Web Unpixelate Image (Upload, 2K/4K/6K, Generate, free download) and Desktop AI Lab Detail Enhance (Resolution Upscale including No Upscale, 2K, 4K, or 6K, plus Batch). Photoshop JPEG Artifacts Removal path checked against Adobe Help. No invented timing or volume claims.
Sources: Adobe Fix a pixelated image, Adobe Neural Filters Help, Photo Stack Exchange JPEG artifacts thread (19270), Evoto How-to for Unpixelate Image and Detail Enhance
Limitations: Photoshop and Evoto control names can shift with version. This article does not teach reversal of censored mosaics.
Last reviewed: 2026-10-29