

TL;DR
- To even out a farmer tan in a photo, reduce the visible clothing edge first—do not globally recolor all skin.
- Use Remove Tan Lines for the hard transition, then Skin Tone Unify to balance face and body from a sampled target tone.
- Inspect full-frame, album, and social crops; a repaired edge can reappear after cropping or compression.
“The search results tell you to exfoliate. The portrait file is due tonight.”
If you searched how to even out a farmer tan, most pages teach real-skin routines. Photographers need a different answer: how to even out a farmer tan in photos so sleeve and collar edges do not distract in the gallery.
We run this pass in Evoto Desktop when the delivery is portrait-scale and the edge follows clothing geometry—not when someone needs medical advice for sunburn.
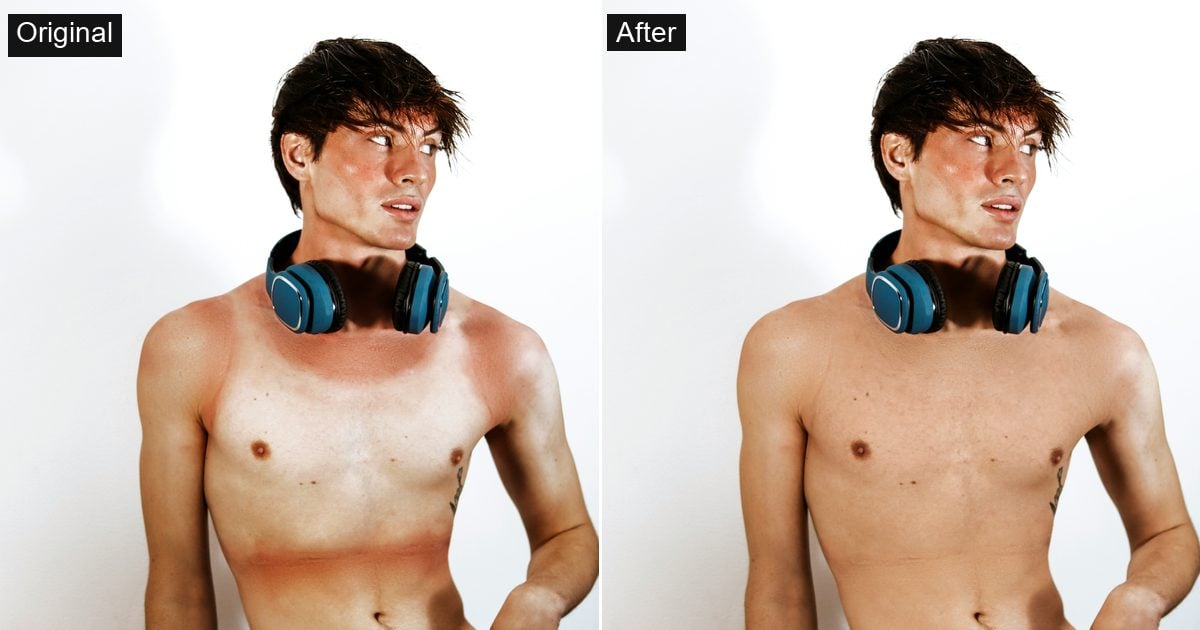
In a portrait file, a farmer tan is a tonal break along a sleeve, collar, strap, or swimwear edge. It is not a diagnosis. Mark where the garment edge starts and where a natural tonal ramp should end before you touch a slider.
For every tan-line type and fix-versus-reshoot calls, use our hub on how to get rid of tan lines in pictures. This article stays on farmer tan edges and the two-pass recipe that ships them.
Before touching a slider, mark where the garment edge starts and where the natural tonal ramp should end.
What a Farmer Tan Looks Like in a Portrait File
Read the file like a map, not like a skincare article.
- Sleeve edge — A hard horizontal break across the upper arm, often wrapping around the cylinder of the arm. This is the classic place people mean when they ask how to fix a farmer tan or how to get rid of arm tan lines.
- Collar/neckline edge — Bright-to-dark shift on the neck and shoulder that can be confused with clothing shadow. Shoulder tan lines often live here.
- Strap/swimwear edge — Narrow or wide clothing boundaries; separate the local line from a whole-body color shift.
- Back/open-back edge — Larger zones that look worse after album or social crops.
Diagnose in three moves. First, check whether the tonal step follows garment geometry. Second, check texture—redness, peeling, or injury is outside a normal tan-line promise. Third, mark a target zone and a keep zone so you do not flood the whole body with one correction.
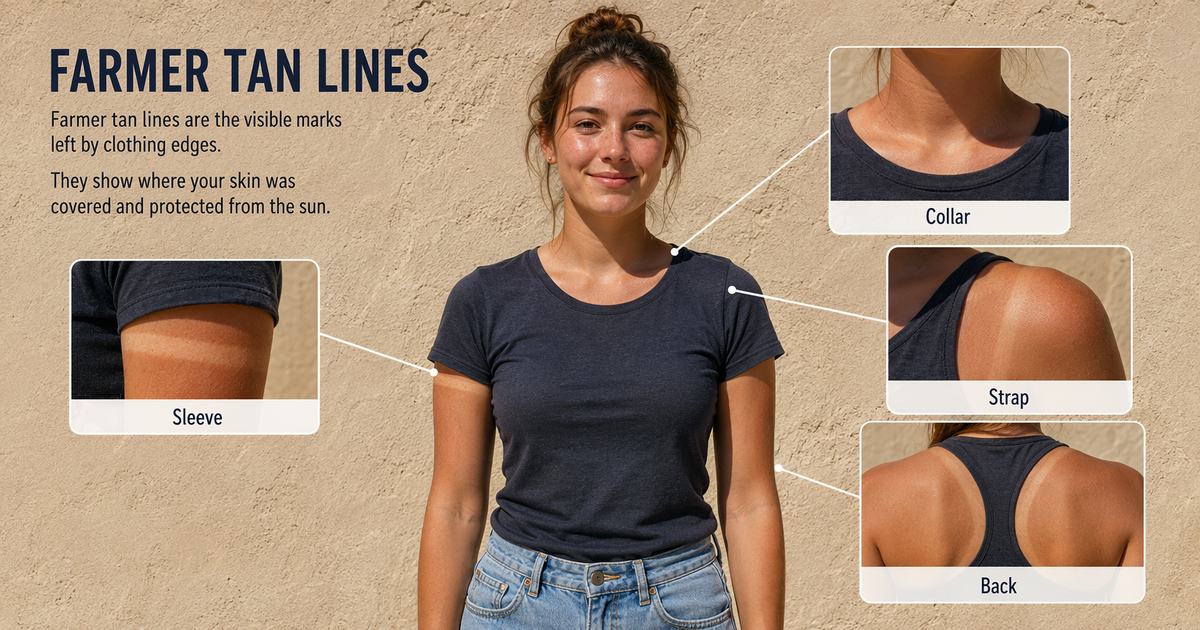
If the break does not follow clothing geometry, pause. You may be looking at makeup, a shadow from a hat brim, or a color cast that needs grading instead of Remove Tan Lines. Farmer tan work is geometric: the line tracks fabric, then softens into skin.
The map separates a hard edge from a whole-body color shift, which is why the edit needs two passes.
How to Even Out a Farmer Tan in Evoto
This is the core answer to how to even out farmer tan on a portrait file. It is not the generic blemish → tan → grade stack from the hub article. It is a two-pass recipe: reduce the clothing edge, then rebuild face-to-body tone.
Before the editing, make sure you have Evoto installed on your device. You can also try the online tool to remove farmer tan in photos.


Powerful AI Photo Editor
Pass 1 — Reduce the clothing edge
Step 1: Choose a representative frame
Pick a hero that shows the dark zone, the light zone, and a natural midtone reference in the same light. Do not start on the most occluded frame in the set.
Step 2: Open Remove Tan Lines
Go to Portrait Retouching → Skin Retouching → Remove Tan Lines and turn the switch on. Use Original / After to see whether the edge softens before you chase perfection.
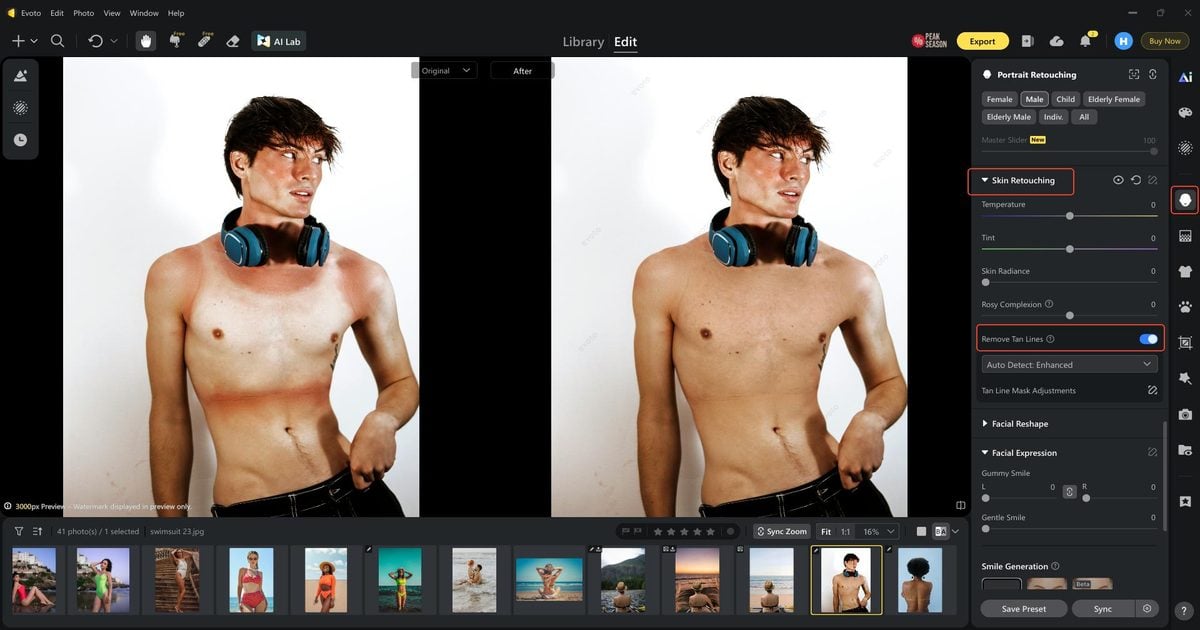
Step 3: Start with automatic detection
Use Auto Detect → Standard for most sleeve and collar edges when you need speed (faster processing for most needs). Use Enhanced when contrast is high or Standard leaves a visible band (more thorough tan line detection and removal). Sync only across frames that share pose and lighting—not across mismatched skin or color temperature.
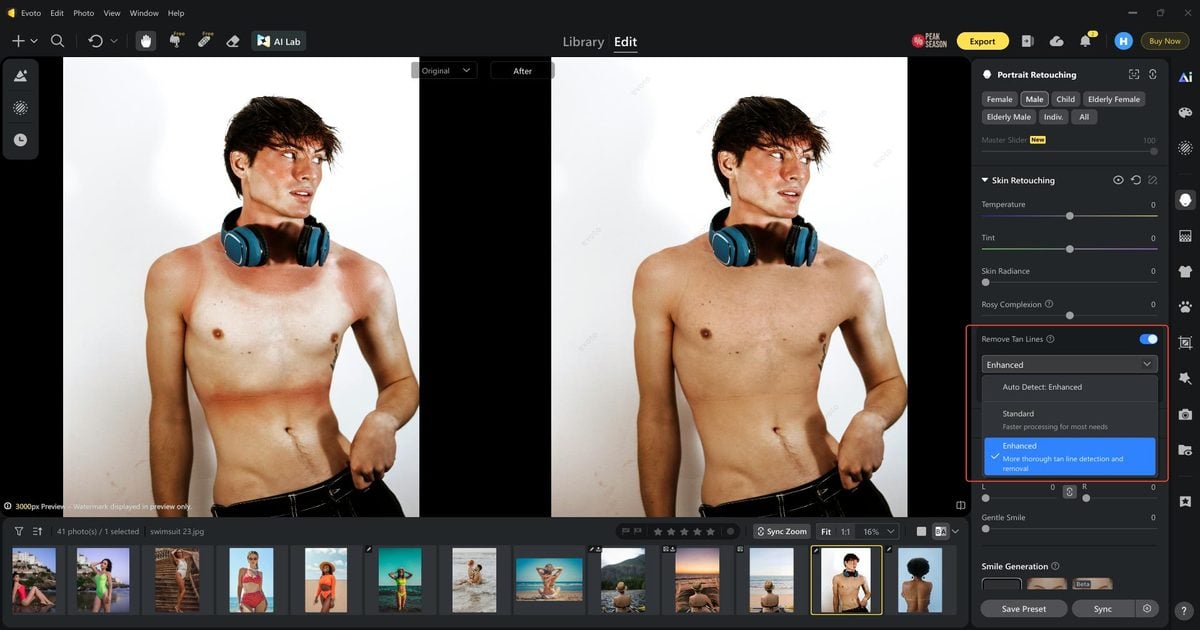
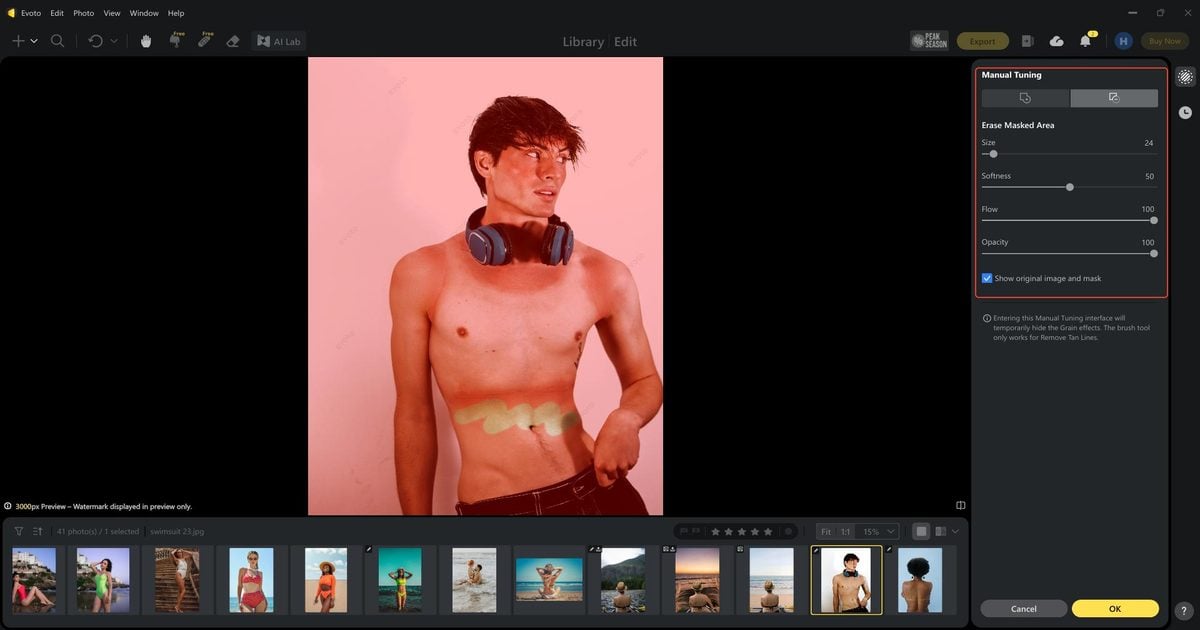
Step 4: Fine-tune with Tan Line Mask Adjustments
Open Tan Line Mask Adjustments → Manual Tuning. Enable Show original image and mask. Use Add Mask for missed skin and Erase Mask for fabric, background, and hair. Adjust Size, Softness, Flow, and Opacity. At 100%, check pores, body hair, fabric edges, and banding. Manual Tuning temporarily hides Grain effects, and the brush applies only to Remove Tan Lines. Confirm with OK.
Pass 2 — Balance face and body
Step 5: Sample a natural target tone
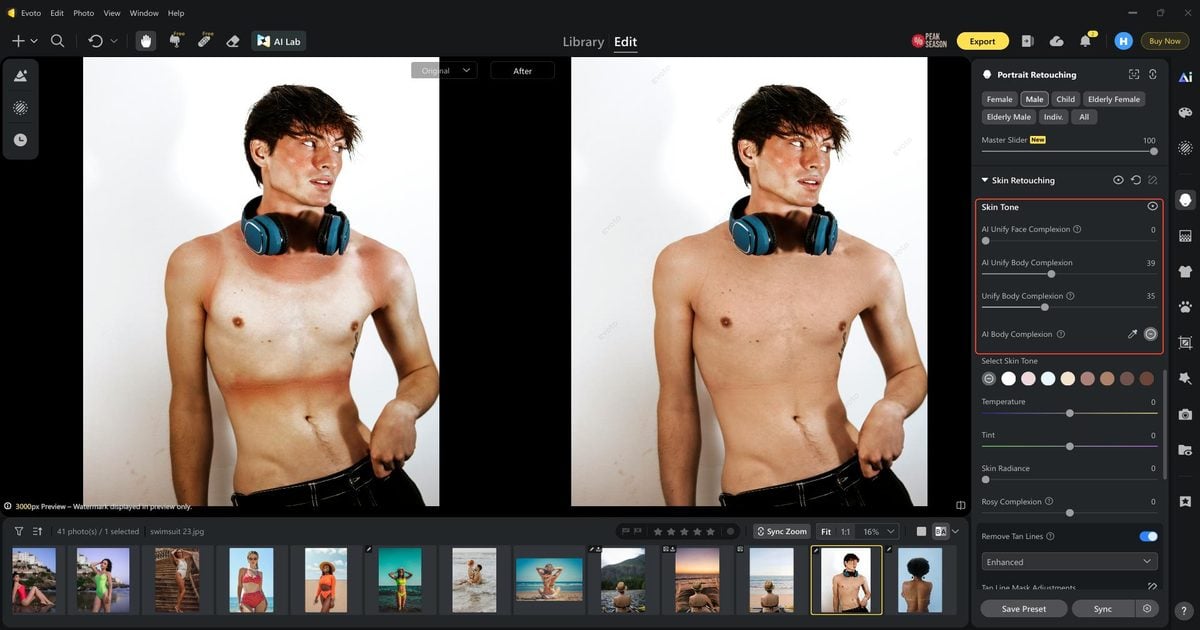
On the same Skin Retouching panel, use AI Unify. Sample healthy midtone skin under the same light. Avoid highlights, deep shadows, makeup, or oversaturated patches.
Step 6: Apply and recheck the full figure
Unify face and body while keeping natural light falloff and the subject’s skin character. Leave the tight crop. Recheck at full figure and at thumbnail size.
Do not sync the pass across a whole gallery until the hero survives that full-figure check. A sleeve that looks finished at 200% can still leave face and chest in different rooms when you zoom out—exactly the failure that shows up later on album spreads.
The two passes stay the same; only the size and direction of the garment edge change by session type.
When you want the dedicated product path for that edge pass, use Remove Tan Lines to even out a farmer tan edge before you rebuild tone.
Powerful AI Photo Editor
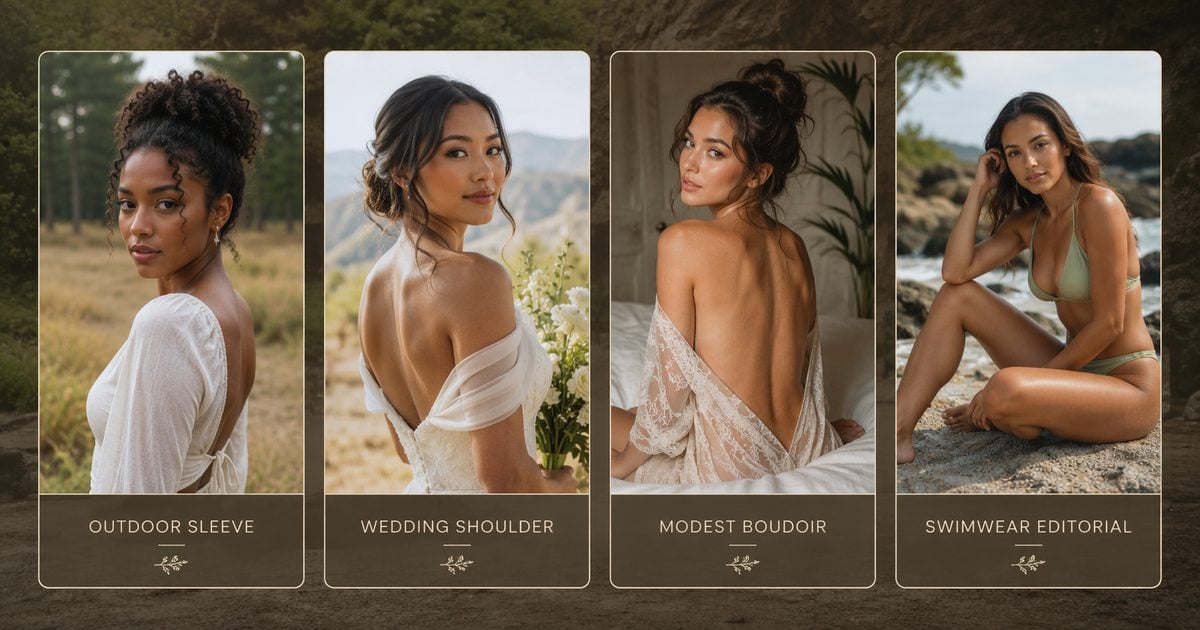
Four Session Cards for Sleeve, Shoulder, Back, and Swimwear Lines
Same recipe, different edges.
Outdoor headshot — sleeve line
Focus on how to get rid of arm tan lines without flattening the arm into a painted tube. Keep the cylindrical turn of the limb.
Wedding or senior portrait — shoulder and neckline
Shoulder tan lines and strap lines sit next to formal fabric. Protect dress edges, hair, and shoulder highlights while you soften the skin transition.
Boudoir portrait — back and lingerie edge
Boudoir tan lines and tan lines on back need a clean edge first, then face-to-body balance. Keep language professional; protect privacy and consent scope.
Swimwear editorial — high-contrast body line
Swimsuit tan lines often need Enhanced, then Erase Mask to protect the garment boundary. Do not promise a one-click finish on every high-contrast edge.
Mentions of tan lines on women belong only as ordinary portrait context—never as the ranking promise of this page.
The same four session types, with an Original / After strip so the clothing-edge cleanup is visible at a glance:
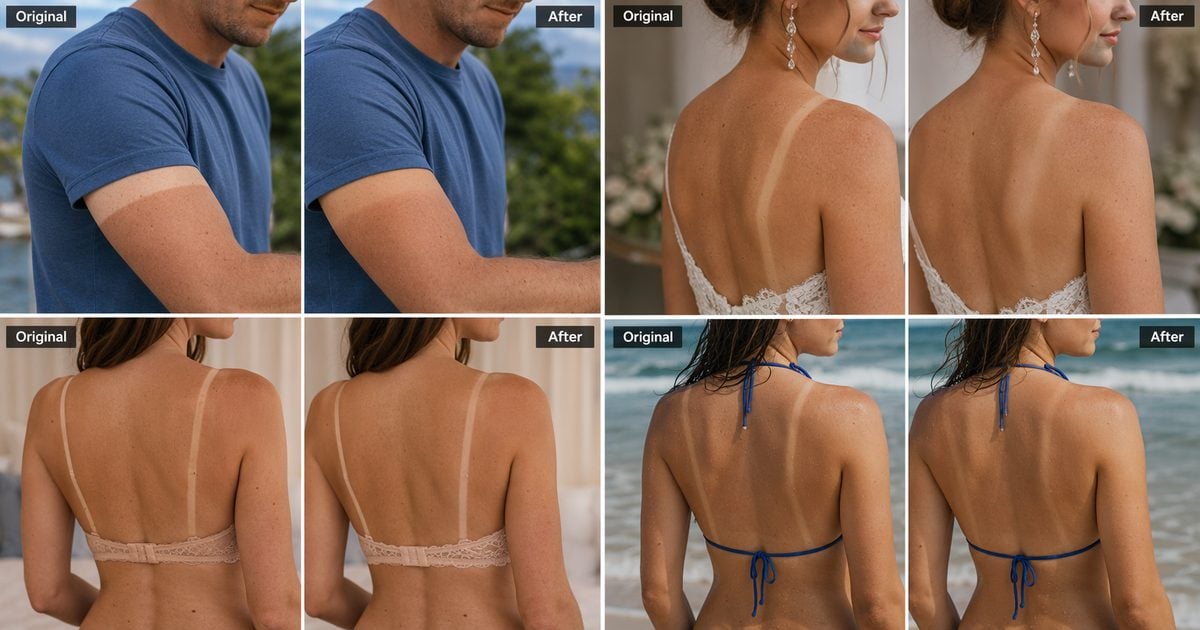
A clean local edge is not enough if the face and body still read as two unrelated color environments.
Keep Face and Body Tone Natural After the Tan-Line Pass
Sample a natural target from nearby skin under the same light. Apply only enough Unify to repair an obvious face/body disconnect—not a flat body fill. Preserve shadow shape, natural flush, deeper skin depth, and texture.
Risk flags: sampling highlights can gray the body; sampling deep shadows can crush it; syncing across mixed color temperatures can split the set.
If you still need a tool deep-dive after this tone pass, return to the Remove Tan Lines feature page linked in the recipe above—do not open a second product CTA here.
Powerful AI Photo Editor
Tone is now coherent in the hero frame; delivery crops are where a hidden edge often returns.
The Three-Crop Check Before Client Delivery
Run the same hero through three crops before you call how to even out a farmer tan in photos finished.
- Full frame — Face and body should feel related; overall light should hold.
- Album crop — Sleeve, neckline, and back edges should not land on the visual center as hard bands.
- Social crop — Compression and tight crops should not revive a faint color ridge.
Pass when texture stays continuous, light falloff remains, and clothing edges stay clean. Revise when you see gray patches, plastic skin, halos, or color that crossed into fabric or background.
Keep the three crops open side by side on a second display if you can. Delivery mistakes usually appear when you approve only the full-frame hero and never see the social crop the client will actually post.
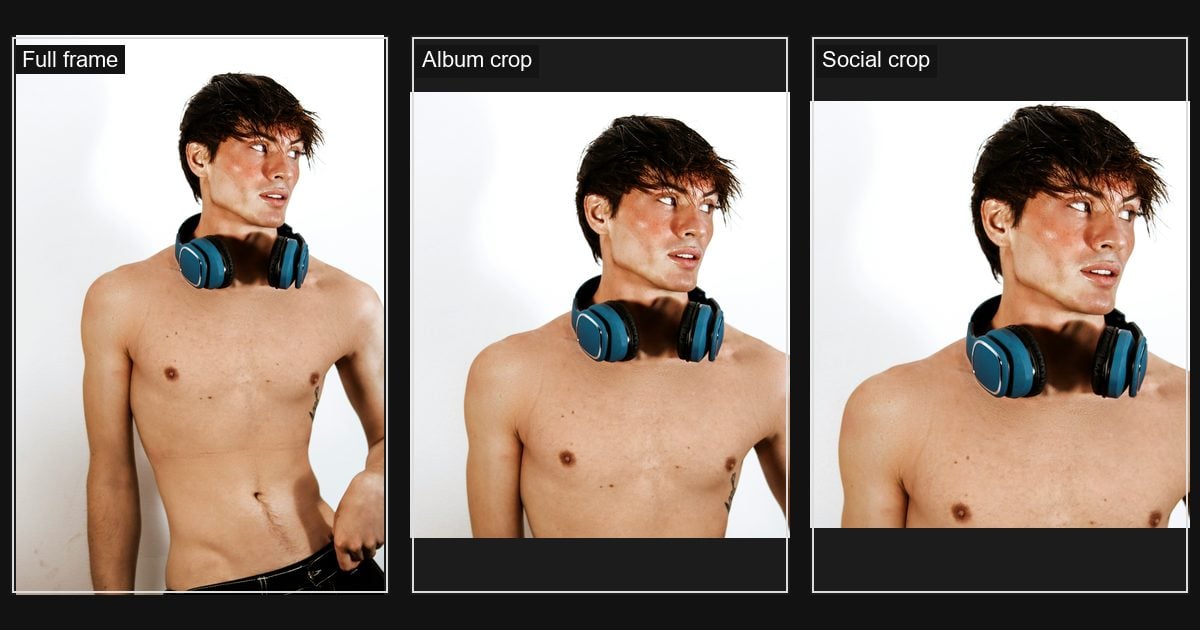
If any crop fails, correct the local cause instead of increasing the global skin adjustment.
Troubleshooting a Farmer Tan Retouch
- Plastic arm — Strength or range too high → ease the pass and restore texture.
- Gray transition band — Bad target sample → resample a natural midtone.
- Shirt color shifts — Mask entered fabric → Erase Mask back to the keep zone.
- Face and body still split — Edge reduced but Unify skipped → run the second pass.
- Edge returns after crop — Transition unfinished under the delivery crop → refine at that crop.
- Red or peeling skin — Outside ordinary tan-line scope → do not promise an automatic fix; renegotiate the job if needed.
Stay corrective, not identity-changing. Complex body work follows studio contracts and client consent. For processing and training claims, quote only verified language from Evoto’s Privacy Policy after editorial review.
If the next job is a gray-seamless frame that must become a beach gallery after skin is clean, continue with our beach background portrait workflow.
Fix the Edge, Then Rebuild the Tone
How to even out a farmer tan in a delivery file is a short chain: map the garment edge → Remove Tan Lines → sample → Skin Tone Unify → crop check. Use the tan-lines hub for other types. For the tool itself—modes, mask adjustments, and current Desktop placement—open Remove Tan Lines and finish the edge before the client sees the crop.
Powerful AI Photo Editor
FAQ
1. What is the best way to even out a farmer tan in a photo?
Reduce the hard clothing edge with Remove Tan Lines first, balance face and body with Skin Tone Unify second, then check full-frame, album, and social crops. That is usually the best way to even out farmer tan for portrait delivery—not a global recolor.
2. Can Evoto fix sleeve and arm tan lines?
Open Remove Tan Lines. Use Standard for ordinary edges and Enhanced for high contrast. If detection misses skin or selects fabric, refine with Tan Line Mask Adjustments using Add Mask and Erase Mask.
3. Should I use Remove Tan Lines or Skin Tone Unify first?
Remove Tan Lines first for the edge. Skin Tone Unify second for face-to-body balance. Reversing the order often smears tone before the hard line is gone.
4. When should I use Standard vs Enhanced Auto Detect?
Choose Standard for speed and common sleeve or collar edges. Choose Enhanced for thorough detection and removal. If either mode still fails the crop check, finish in Manual Tuning.
5. Is photo retouching a treatment for sunburn or skin damage?
No. This article only changes how the image looks. For real-skin sun questions, follow medical guidance such as the AAD sun protection pages.
Methodology & Author
Author: Evoto Editorial Team — portrait QC and farmer-tan retouch editors
Experience basis: Remove Tan Lines Standard / Enhanced + Manual Tuning · Skin Tone Unify face-to-body · July 2026 delivery crop QC log
Market context: AAD sun protection as the clinical boundary (photo retouch ≠ skincare)
Trust / privacy: Evoto Privacy Policy — session processing · not used to train public AI models without opt-in
Limitations: Image retouching only—not sunburn treatment; demo scope is sleeve / collar / strap / swimwear / back clothing edges
Last reviewed: 2026-07-22



