

A color splash effect looks simple: most of the photo goes black and white, and one subject, object, or color stays vivid. In Photoshop, that simplicity is also the trap.
If the mask is rough, color leaks into hair edges, pavement, or skin. If you keep too many accents, the image looks noisy instead of intentional. If the remaining color is oversaturated, the splash reads like a filter, not a photograph.
This guide shows how to create a color splash effect in Photoshop with a clean black-and-white base and a controlled mask. Then it covers where Photoshop slows you down, and how Evoto shortens the same selective-color job when you need faster delivery.
What Is a Color Splash Effect?
A color splash effect—also called selective color or a color pop—keeps selected color in an otherwise monochrome image.
There are two common versions:
- Object splash: one dress, flower, car, or prop stays in color
- Hue splash: one color family stays, such as all reds, while everything else turns gray
Photoshop is strong at both. The object method usually looks more intentional for portraits and product shots because you choose a subject, not just a hue that also lives in skin, lips, and background clutter.
A good color splash needs three things:
- A strong subject that deserves attention
- A believable black-and-white conversion with real contrast
- A clean edge between color and monochrome
If the original photo is flat, busy, or weakly composed, the splash will not invent a better subject. It will only isolate the problem.
How to Create a Color Splash Effect in Photoshop (Step-by-Step)
Use an adjustment layer and a mask. That keeps the edit reversible and cleaner than permanently desaturating a duplicate layer.
1. Open a strong source photo
Choose an image with one clear accent already in the frame: a red jacket, yellow umbrella, blue product, green plant, or similar. Avoid files where the accent color also covers skin, signs, and half the background. Those need much more cleanup.
Work on a high-quality original when you can. Heavy JPEG compression makes color edges harder to mask.
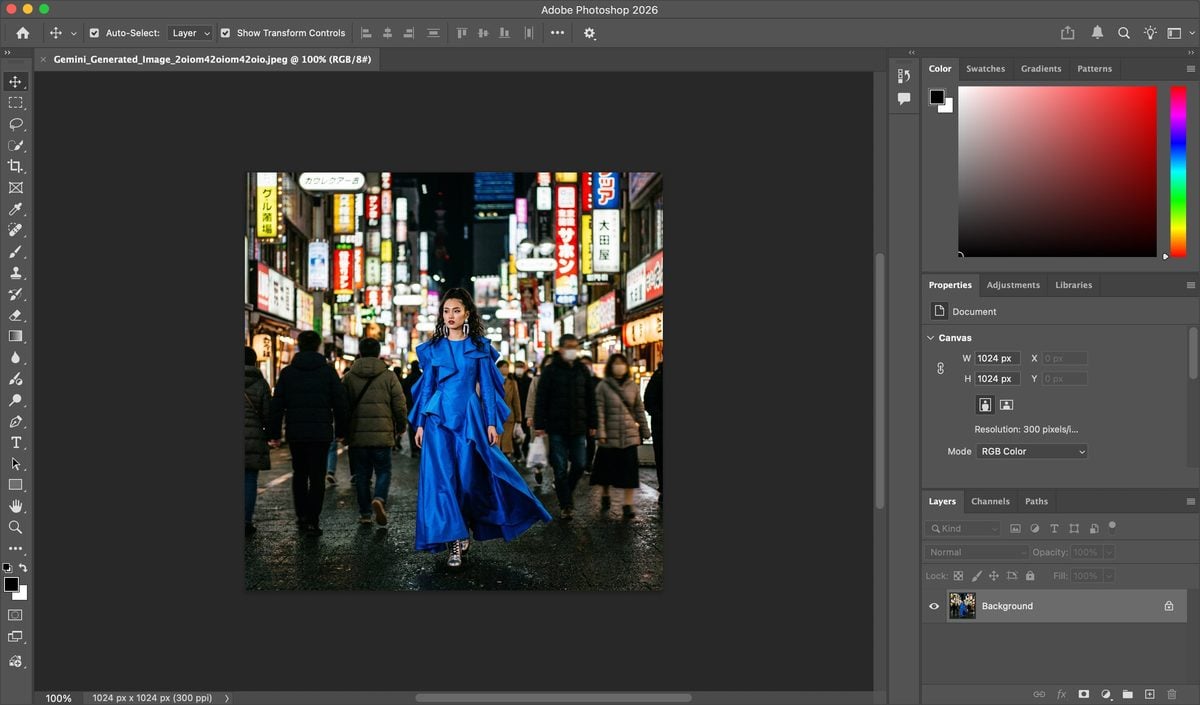
2. Add a black-and-white conversion
- Go to Layer > New Adjustment Layer > Black & White.
- Adjust the Black & White sliders so the grayscale version still has depth. Lift important midtones. Darken distractions if needed.
- Leave the adjustment layer above the photo. Do not flatten yet.
A Black & White adjustment layer is usually better than a simple desaturate command because you can control how reds, yellows, and blues turn into gray. That matters later when the restored color has to sit on a believable monochrome base.
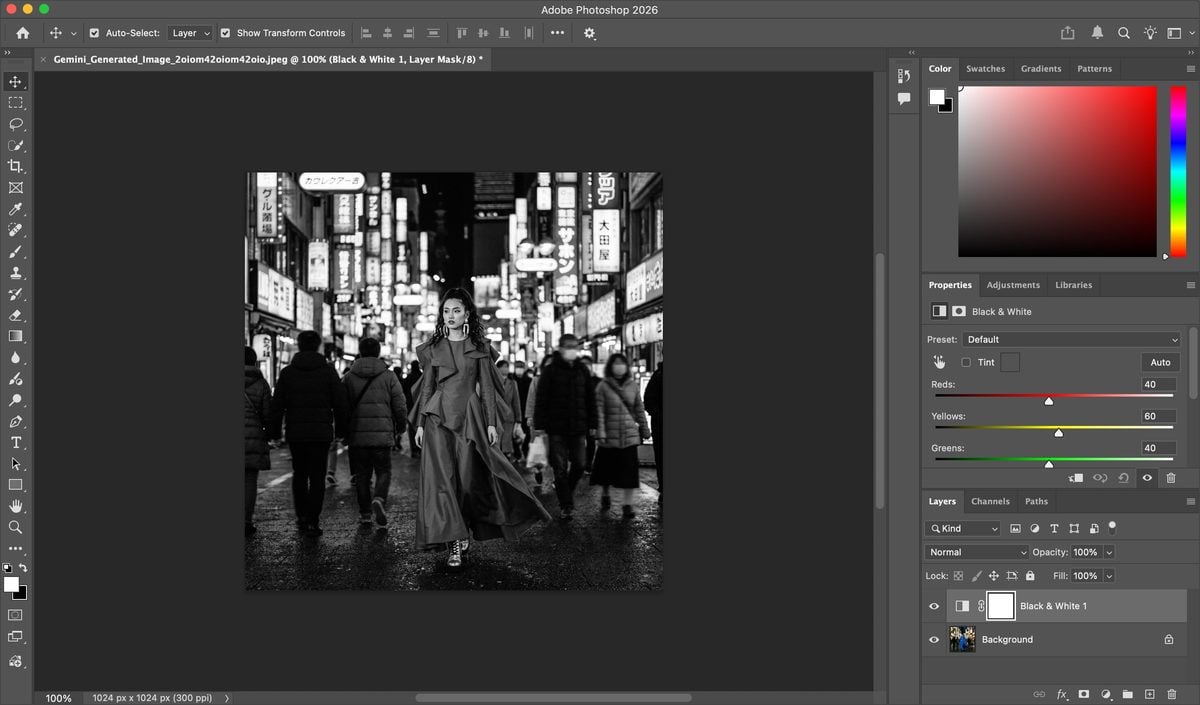
Alternative: Layer > New Adjustment Layer > Gradient Map with a black-to-white gradient also works as a fast mono conversion. Use it if you already prefer that method. The masking steps below stay the same.
3. Restore color with the layer mask
The Black & White layer comes with a white mask. White means the monochrome effect is visible. Black means the original color shows through.
- Select the Black & White layer mask.
- Press D to reset colors, then X until black is the foreground color.
- Choose the Brush Tool (B).
- Set hardness low for soft subjects, higher for hard product edges.
- Paint over the area that should stay in color.
As you paint black on the mask, the original color returns. Stay on the accent only. Do not restore the whole scene and then try to remove color later if you can avoid it.
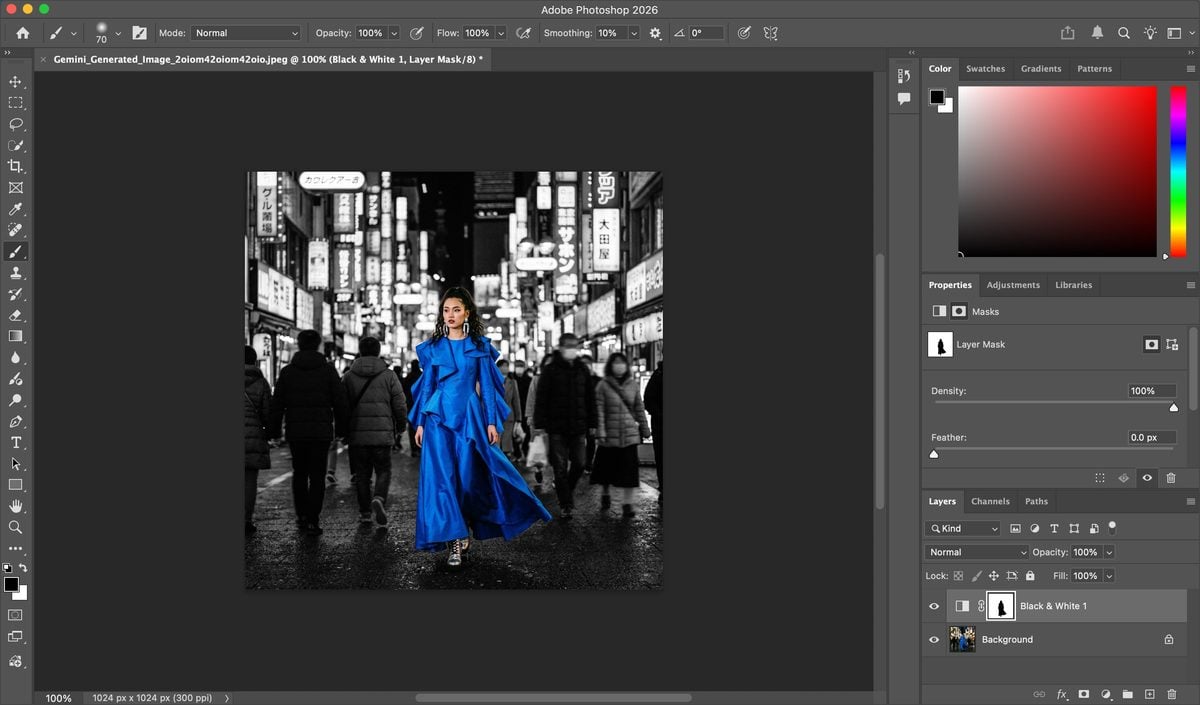
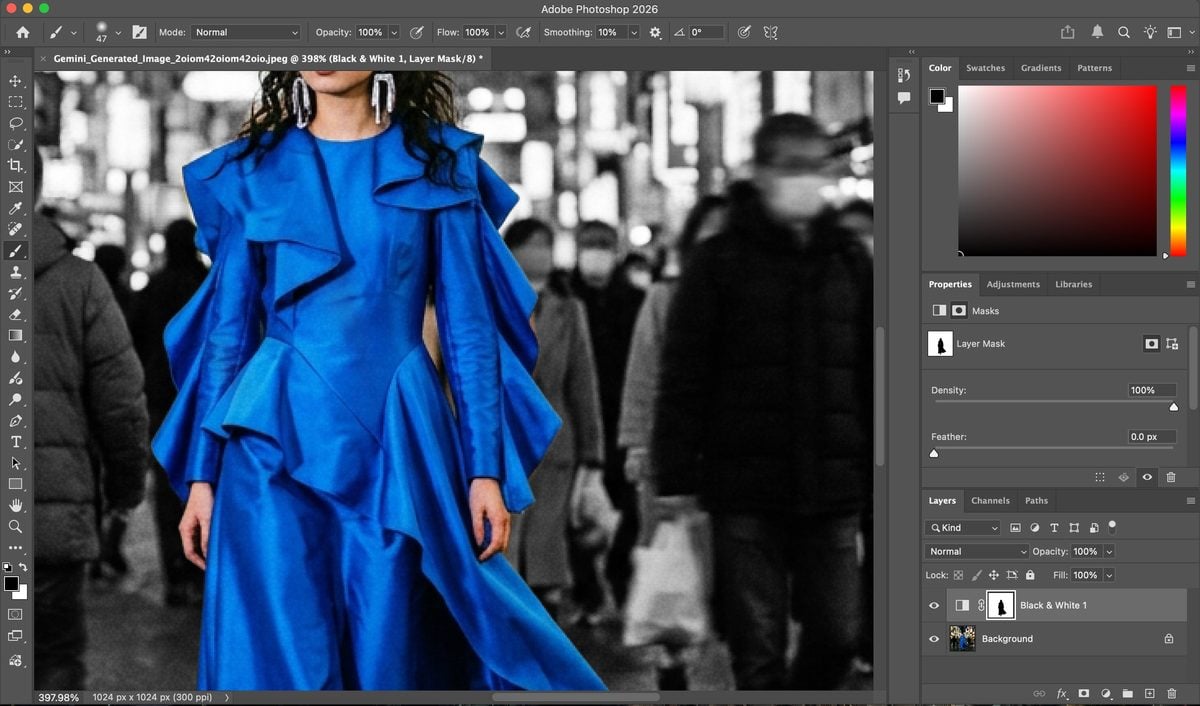
4. Clean the edges at 100%
Zoom in. This is where most color splash edits fail.
Check:
- Hair strands and fabric fray
- Transparent edges, veils, glass, and water
- Shadows that picked up leftover color
- Nearby objects that share the same hue
Switch the brush to white to hide color again where you overpainted. Toggle the mask view if needed. A slightly soft edge often looks more photographic than a razor cut, but the color should not smear into gray areas.
If the subject is complex, make a selection first with Select Subject, Object Selection, or Color Range, then paint or fill the mask more precisely and refine from there.
5. Control the strength of the splash
A full-strength restore is not always best.
Useful finishing moves:
- Lower the Black & White adjustment opacity slightly if the mono side feels too graphic
- Add a Hue/Saturation adjustment clipped to the color area if the splash is too loud
- Dodge and burn the grayscale side so the subject still has contrast support
- Crop tighter if leftover color accents are fighting the main splash
The finished file should feel directed. One accent is usually enough. Two can work. Five usually looks accidental.
6. Optional method: keep one hue with Select Color Range
If you want every red flower or every yellow taxi to stay, not one object:
- Create the Black & White adjustment layer.
- Use Select > Color Range on the original color layer or a temporary duplicate.
- Sample the hue you want to keep.
- Fill that selection with black on the Black & White mask.
- Clean false selections by hand.
This is faster for repeating colors. It is also easier to break, because skin, signs, and reflections often contain the same hue.
Limitations of Color Splash Edits in Photoshop
Photoshop gives excellent control. That control is also the cost.
Masking takes time. Hair, lace, trees, and product edges need inspection at 100%. A “two-minute effect” becomes twenty minutes once the edge work starts.
Shared colors cause leaks. Keep a red dress and the subject’s lips may return too. Keep green leaves and a green jacket in the background may return with them. Hue-based selections rarely finish the job alone.
The effect dates quickly when overused. Neon saturation, random multi-color pops, and weak subjects make the edit feel like an old social filter. Restraint matters more than another technique.
It is slow in batches. If you need the same splash treatment across a set—product variants, event highlights, social crops—Photoshop still asks for per-file mask work. Actions help only when the subject shape stays almost identical.
For related mono conversion basics, see How to Make a Photo Black and White. For object-level color control beyond splash effects, see How to Change Color of an Object in a Photo.
How Evoto Simplifies Color Splash Editing
The Photoshop method is right when one hero image needs a perfect edge. It gets expensive when the job is “make this accent read clearly, keep it natural, and move on.”
That is the pressure point where Evoto fits. Once you already know what should stay in color, you do not need a full Black & White adjustment stack. Isolate the accent, invert to target everything else, and remove saturation from the surrounding frame.


Powerful AI Photo Editor
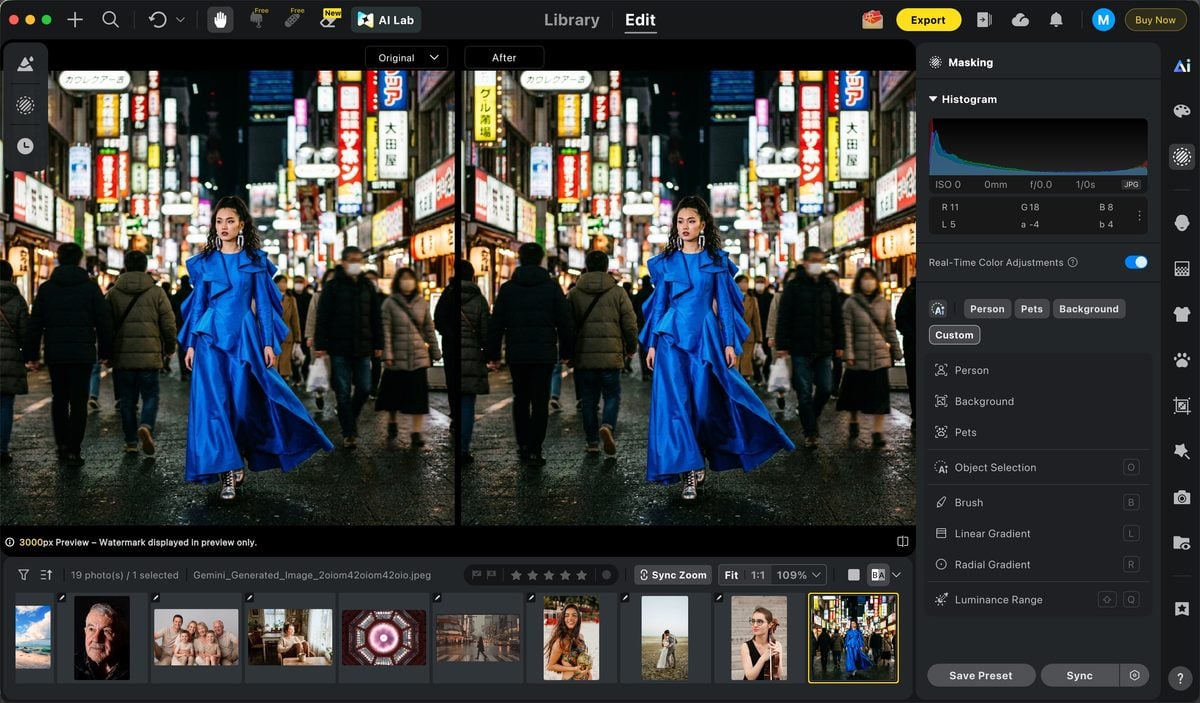
1. Upload the photo to Evoto
Open Evoto and upload the image. Confirm the splash target before you edit: one jacket, product, umbrella, or prop. If the photo has no clear accent, no tool will invent one.
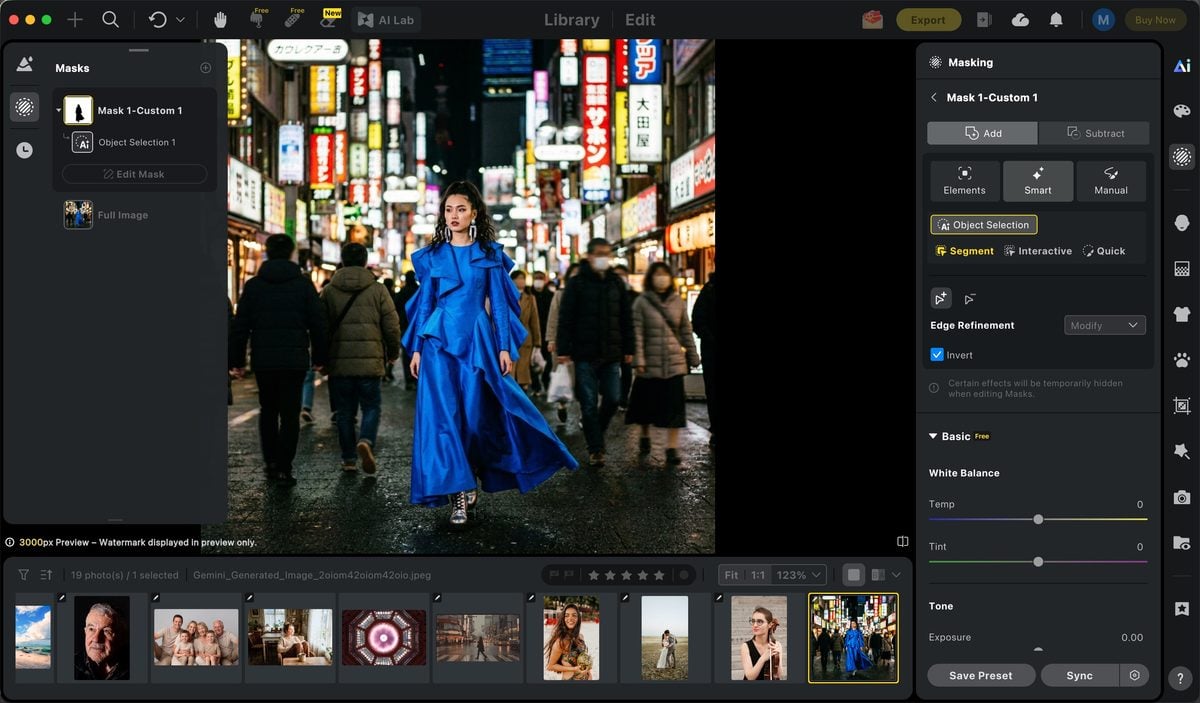
2. Open Mask, select the object, then invert
Open the mask tools and select the object that should remain in color. Then invert the selection so the edit targets the rest of the image—the areas that should go black and white.
This is the key shortcut. Instead of painting color back onto the subject after a global mono conversion, you protect the accent first and work on everything around it.
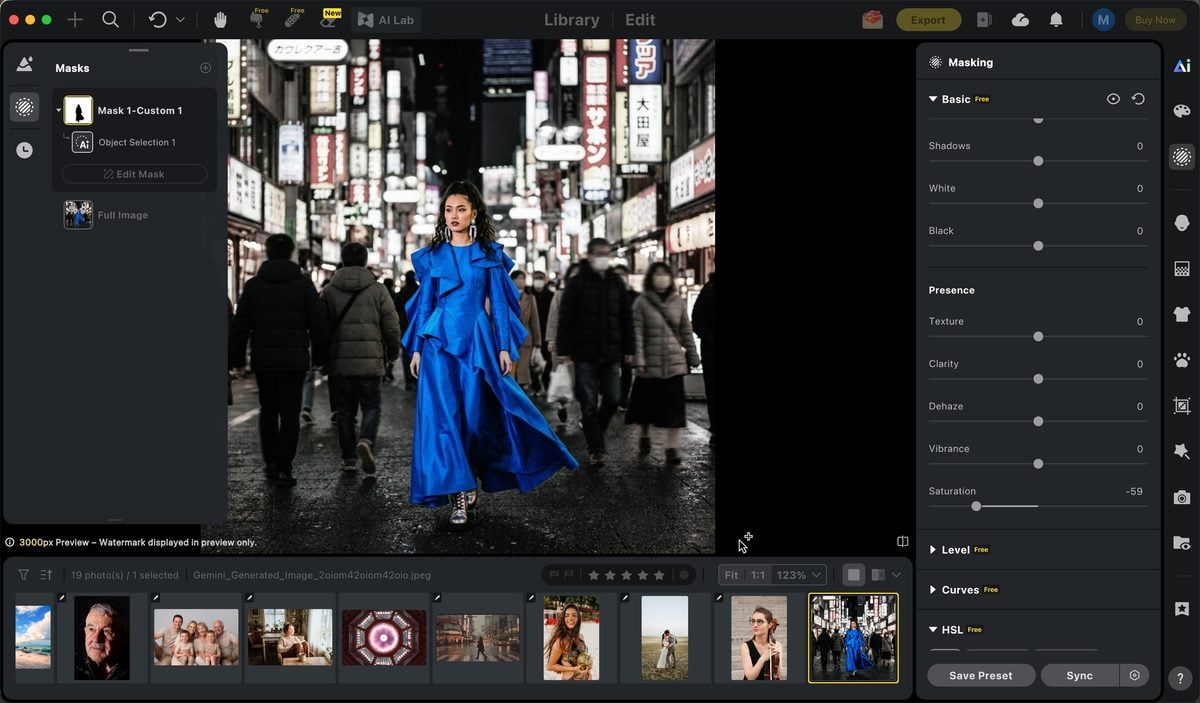
3. Adjust saturation
With the inverted selection active, lower saturation until the surrounding frame turns cleanly monochrome. Keep the accent object untouched so its original color stays. If a little color still leaks near edges, refine the mask and check the result at 100%.
Do not push the remaining accent into neon. The splash should still look photographed, not pasted.
If you later need a stronger local color push on the kept object itself, Evoto’s color tools can refine that accent after the mono split is set. See AI Change Image Color when the job moves from isolation into controlled recolor.
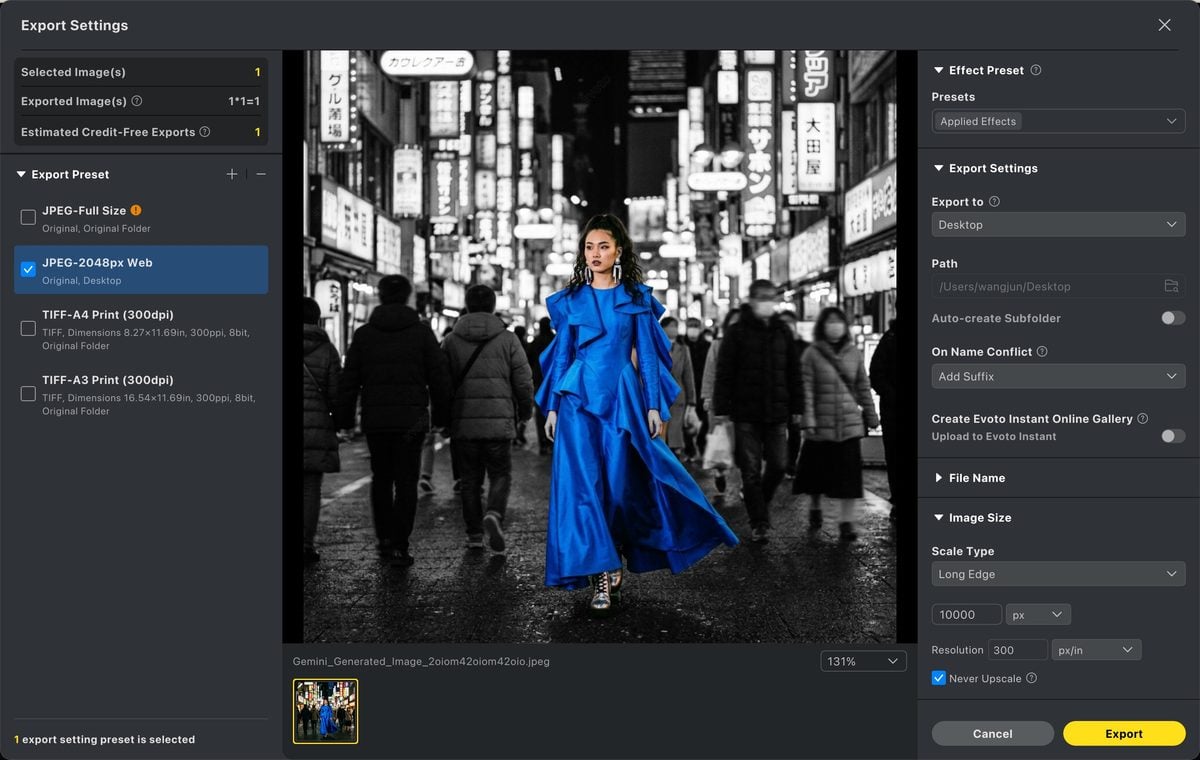
4. Export
Zoom in, confirm the edges around the accent still look clean, then export. For similar crops or product variants, repeat the same mask-and-invert logic instead of rebuilding a Photoshop layer stack each time. When several frames share the same treatment, Batch Edits help keep the finishing pass consistent once the first splash is right.
The point is not to replace Photoshop’s precision on a single composite. The point is to shorten the path when the color splash is a delivery effect, not a retouching marathon.
If you want to achieve the effect quickly, you can use Evoto’s online Color Splash tool to create the effect directly in your browser, without having to build the selection and masking process from scratch.
Photoshop vs Evoto: Which Is Better for Color Splash?
Photoshop is better when the edge is difficult and the file is a one-off hero: flyaway hair against a busy street, sheer fabric, glass, or a product cutout that needs pixel-level mask work.
Evoto is better when the accent is clear, the treatment is repeatable, and speed matters. Studio products, simple clothing pops, and social crops usually fit that profile.
| Need | Better fit |
| Complex hair/edge masking on one image | Photoshop |
| Fast mask → invert → desaturate splash | Evoto |
| Full composite control with many layers | Photoshop |
| Repeating the same splash across similar frames | Evoto |
Use Photoshop if you are already finishing the image there and the mask has to be perfect. Use Evoto if you want the same visual idea with less layer management.
Final Thoughts
Learning how to create a color splash effect in Photoshop is mostly a masking problem, not a filter problem.
Build a strong black-and-white base. Restore one intentional accent. Clean the edges. Stop before the color gets loud enough to look fake.
If you need that look more often, Evoto keeps the same idea with a shorter path: upload, select the accent and invert, lower saturation on the rest, and export. Photoshop remains the precision tool. Evoto is the faster way to get a clean splash out the door.
Try Evoto AI Photo Editor
Retouch photos with Evoto AI and make your photos best! Available on Windows, MacOS and iPadOS.



