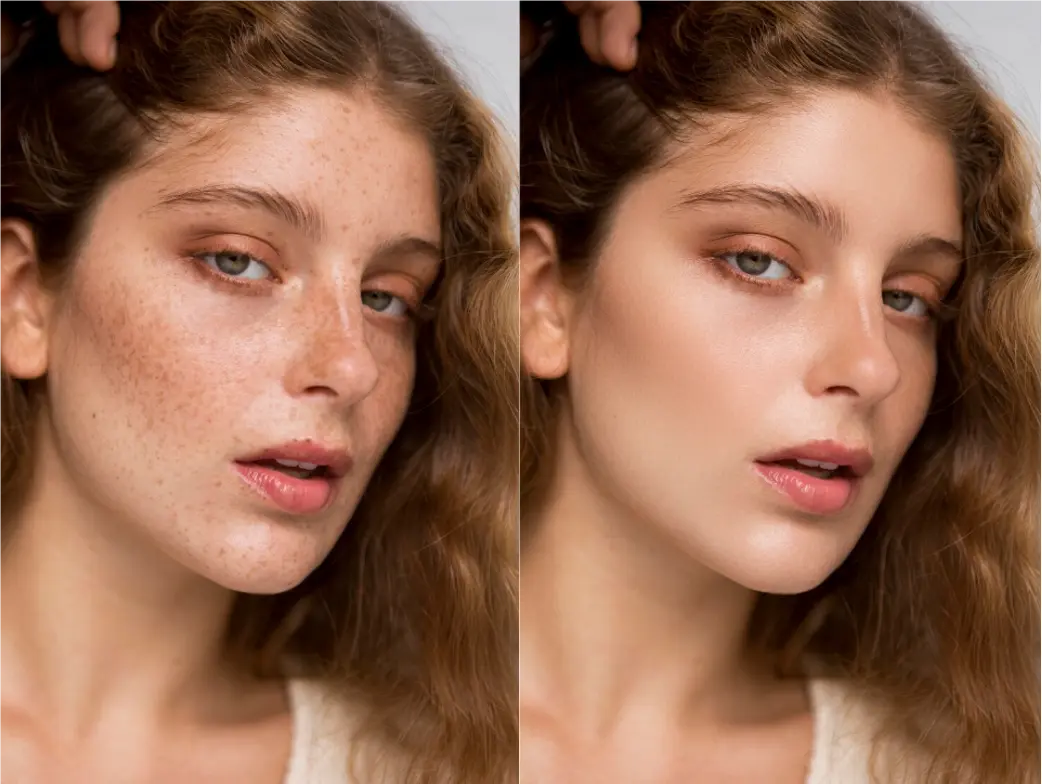
Frequency separation is a powerful photo editing technique widely used by professional retouchers to achieve flawless images. By separating details and tones into different layers, Frequency Separation Photoshop allows for precise skin smoothing while preserving natural textures. It’s a favorite among photographers and photo retouchers for achieving professional-quality results.
The tech allows editors to separate an image into high and low-frequency layers, providing precise control over the details and tones. While commonly applied to skin retouching, this method is also effective in refining other image elements.
In this guide, we’ll explore the concept of frequency separation, its application in Photoshop, and how it compares with other common skin retouching methods, and even a modern AI Frequency Separation solution.
What is Frequency Separation?
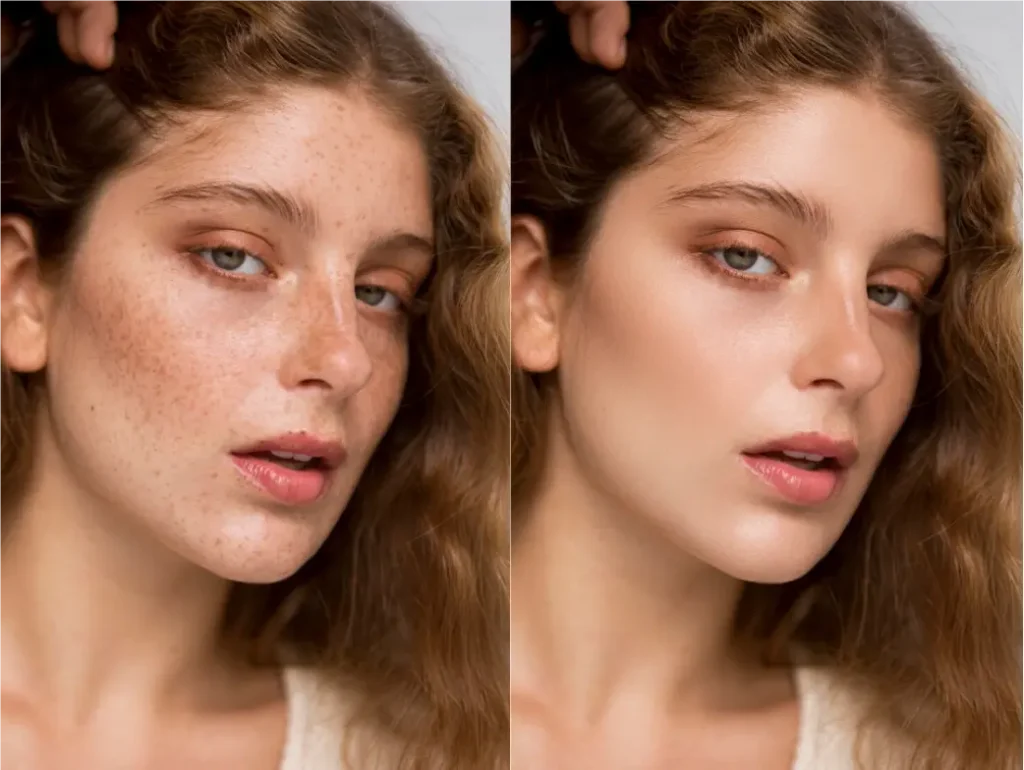
Frequency Separation is a popular skin retouching technique that separates an image into two layers: high frequency and low frequency.
- High-Frequency Layer: It captures fine details, such as skin texture, pores, and hair.
- Low-Frequency Layer: It handles colors, tones, and general shapes without the finer details.
This separation allows photo editors to smooth skin while preserving natural details, making it a go-to method for professional photographers and retouchers.For instance, when working on skin, the technique allows you to smooth out imperfections on the low-frequency layer without losing the natural texture preserved in the high-frequency layer.
Advantages of using Frequency Separation are
- Precision in Retouching: Offers the ability to fine-tune details separately from color and tone.
- Preservation of Natural Texture: Allows for smooth skin edits without making the subject look overly airbrushed.
- Versatility: While mainly used for skin retouching, it can also be applied to other image aspects, such as fabric or background details.
Frequency Separation Photoshop
Photoshop has long been the industry standard for professional photo editing, offering a wide range of tools and features that empower users to achieve stunning visual results. Among these tools, frequency separation stands out as a powerful technique that allows for precise retouching, particularly in skin editing. This feature in Photoshop enables people to break down an image into separate layers for detailed control over texture and tone, making it an essential tool for any serious retoucher.
Benefits of Using Frequency Separation Photoshop
Photoshop’s advanced capabilities make it the go-to tool for frequency separation. This technique is particularly beneficial because it:
- Maintains Image Quality: Unlike some retouching methods that can degrade image quality, frequency separation allows for high-quality edits.
- Offers Flexibility: Provides the flexibility to edit both fine details and broader color tones independently.
- Non-Destructive Editing: Frequency separation in Photoshop enables non-destructive editing, allowing you to make changes to specific parts of the image without permanently altering the original layers. This makes it easier to revert or adjust edits as needed.
- Customizable Workflow: The process can be tailored to fit various editing styles and requirements, making it suitable for a wide range of retouching tasks, from subtle enhancements to more dramatic modifications.
Step-by-Step Instructions for Frequency Separation in Photoshop:
Follow the steps below to use the frequency separation feature in Photoshop to refine your image:
Step 1. Open the photo
Launch Photoshop and go to File > Open to import your photo.
Step 2. Duplicate the Layer
Start by duplicating your background layer twice.
Step 3. Create the Low-Frequency Layer
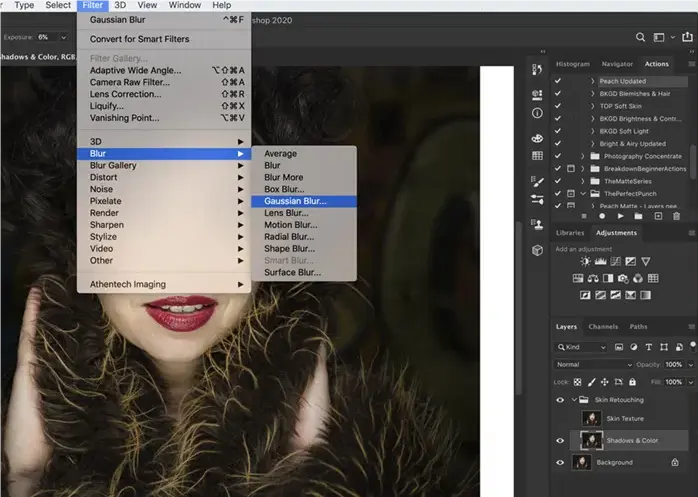
On the first duplicate, go to Filter > Blur > Gaussian Blur to soften the image, removing fine details but keeping the color and tone intact.
Step 4. Create the High-Frequency Layer
On the second duplicate, apply the High Pass filter to emphasize the image’s fine details.
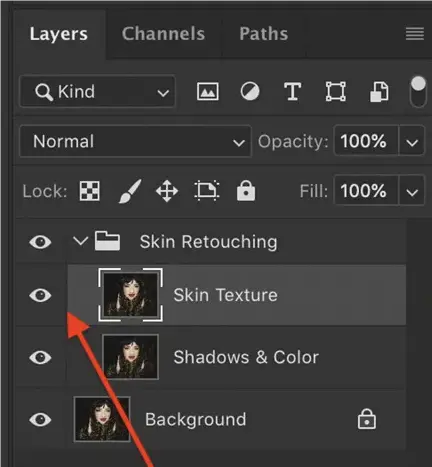
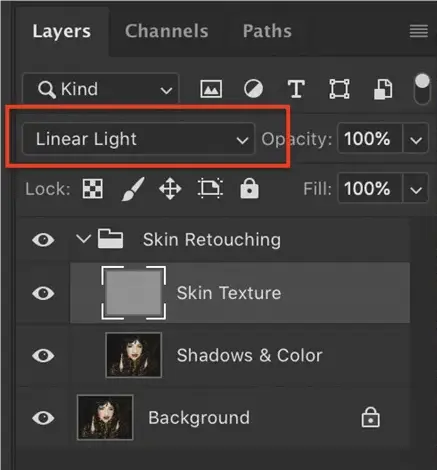
Step 5. Set Layer Blending Modes
Set the High-Frequency layer to “Linear Light” to combine it with the Low-Frequency layer effectively.
Step 6. Edit Separately
Now, you can edit the low-frequency layer to smooth out skin tones or color inconsistencies and the high-frequency layer to enhance textures and sharpness.
Advanced Tips for Mastering Frequency Separation
- Use Frequency Separation Actions: Utilize frequency separation actions for Photoshop to automate the process and save time.
- Adjust Layer Opacity: Modify the opacity of your layers to control the intensity of your edits.
- Combine with Other Techniques: Integrate frequency separation with dodge and burn for even more refined results.
Frequency Separation Photoshop is a great retouching method. However, with the development of image AI, tools like AI Photo Editor have become popular alternatives for photo retouching. These tools, for example, Evoto AI, offer automated Frequency Separation solutions that can match and sometimes surpass, traditional Frequency Separation Photoshop techniques in certain aspects.
AI Frequency Separation Retouching with Evoto AI
Evoto AI is an advanced photo editing software designed to simplify the process of achieving results similar to Frequency Separation Photoshop. It uses AI to automate complex retouching workflows while delivering professional-grade quality. Now, this magical AI Photo Editor includes an updated Frequency Separation in its Evoto AI version 4.0.
Features of Frequency Separation in Evoto AI
- Automatic Layer Analysis:
Evoto AI automatically separates high and low-frequency elements of an image, saving time and effort for retouchers. - Skin Texture Refinement:
The AI enhances and smoothens skin while retaining intricate details like pores and fine lines, ensuring a realistic look. - Tone Balancing:
Evoto AI changes skin tones seamlessly, eliminating blotches or discoloration while maintaining the natural gradient. - Blemish Removal:
Using an advanced frequency splitter, Evoto AI detects and removes imperfections like blemishes, wrinkles, and scars without disturbing the texture. - Dynamic Customization:
Adjust the intensity of texture and tone corrections with simple sliders, allowing users to control the final output to match their vision. - Batch Processing:
Batch edits multiple images simultaneously with consistent frequency separation features, which is ideal for professionals handling bulk projects.
Why Do People Choose Evoto AI Now?
- Time Efficiency: Automated processes cut editing time dramatically.
- Cost-Effective and Free Options: Free features for users exploring basic retouching capabilities.
- Ease of Use: The intuitive interface is beginner-friendly yet versatile for professionals.
- Precision Results: Customizable features ensure that edits meet the highest professional standards.
What Are the Differences between Photoshop and Evoto AI in Frequency Separation?
While frequency separation in Photoshop remains a favorite for professionals seeking complete control, Evoto AI offers an excellent alternative for those looking to save time without compromising quality. If you’re eager to explore AI portrait retouching, try Evoto AI and experience a new level of convenience.
| Feature | Frequency Separation Photoshop | Evoto AI |
| Workflow Complexity | High | Low |
| Editing Time | Longer | Faster |
| Automation | Manual | Fully Automated |
| Skill Level Required | Advanced | Beginner-Friendly |
| Bulk Editing | Limited | Available |
| Cost | Photoshop Subscription | Evoto AI Subscription |
Step-by-Step Frequency Separation Guide with Evoto AI
Step 1. Upload Your Image
Download and open Evoto AI on your computer. Upload your photo to the AI Photo Editor.
Evoto – The Most Efficient AI Photo Editor
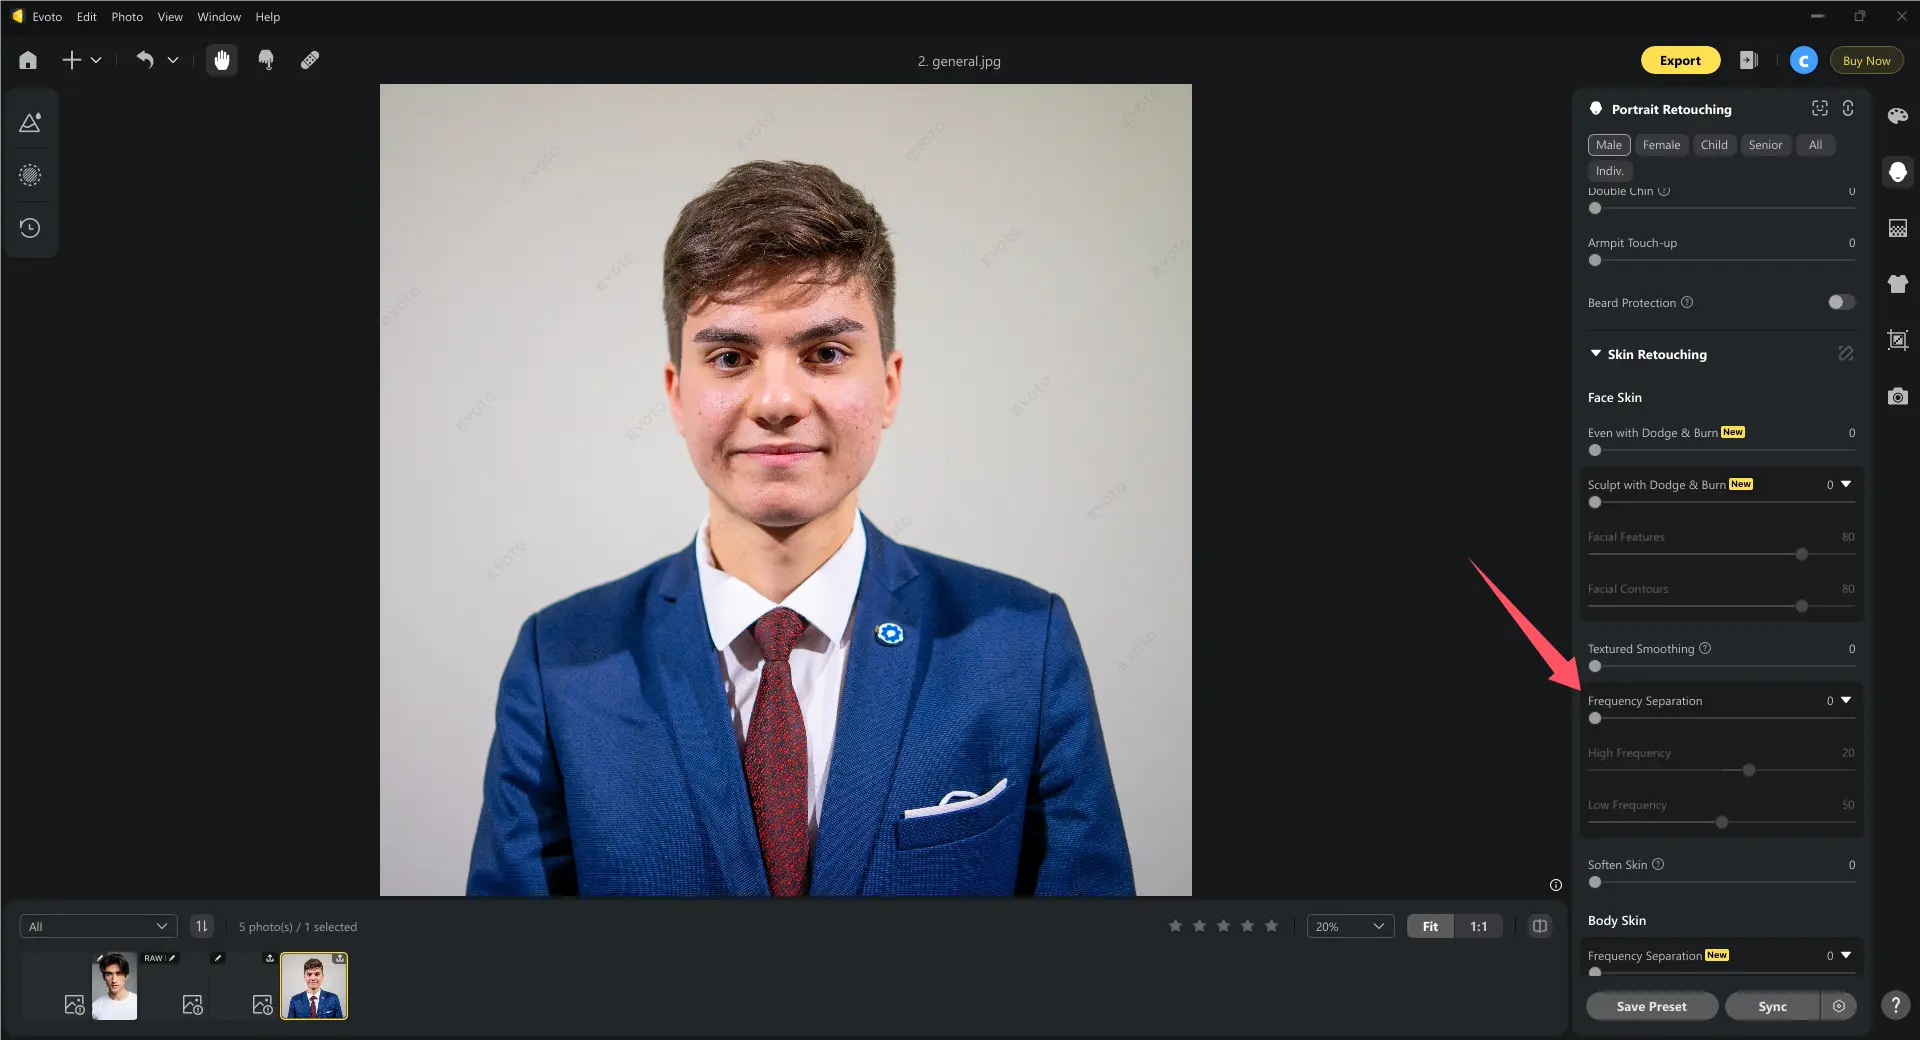
Step 2. Select Frequency Separation Mode
Go to Portrait Retouching > Skin Retouching > Face Skin. Then, find the “Frequency Separation” tool.
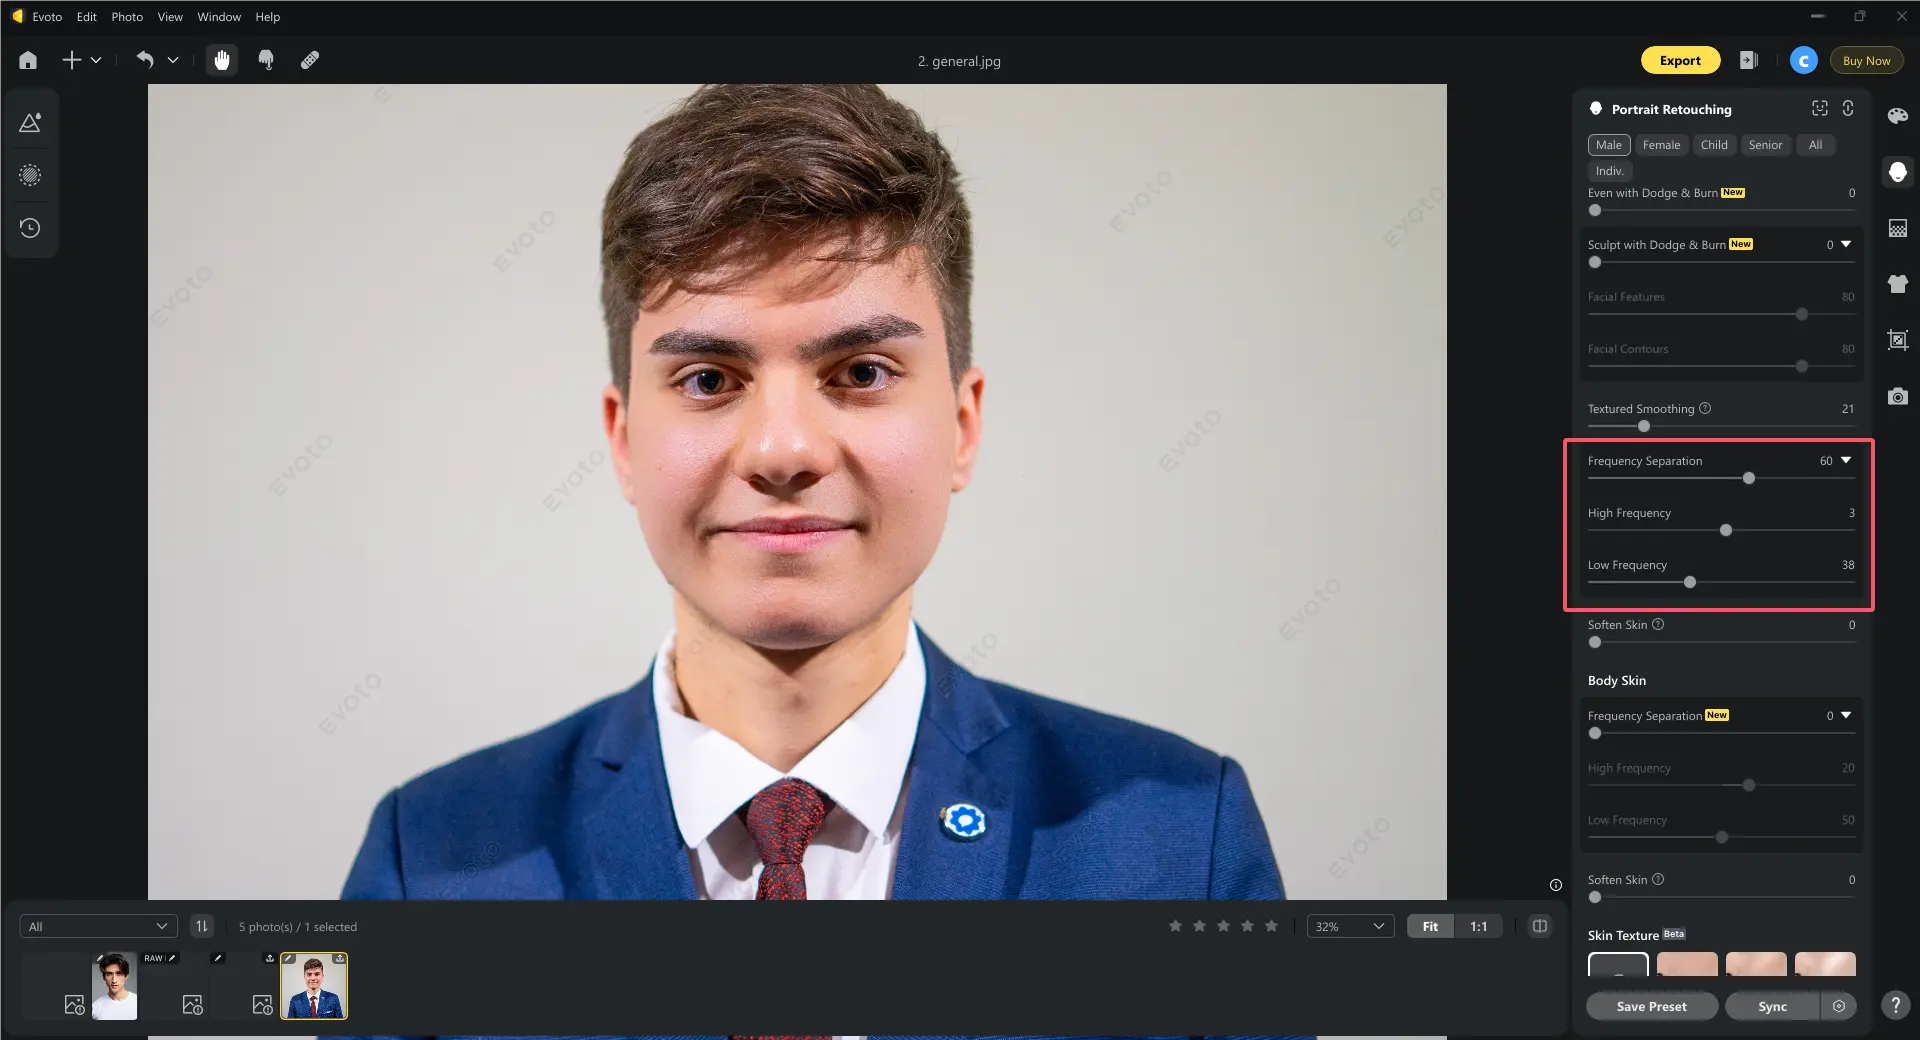
Step 3. Customize Edits
Use sliders to fine-tune textures and tones, balancing skin perfection with natural aesthetics. Review real-time edits for accuracy. You can also use other features like blemish removal, softening skin, etc. to polish the photo. Then export the retouched image in your preferred format.
Step 4. Export the Final Image
Once satisfied with the results, press Sync to save the changes and export your retouched image.
Here is the photo retouching result by Evoto AI:

Alt= Photo Retouching Result by Evoto
[Bonus] Comparisons of Different Skin Retouching Techs
Various skin retouching techniques exist, but how does Photoshop frequency separation compare with them?
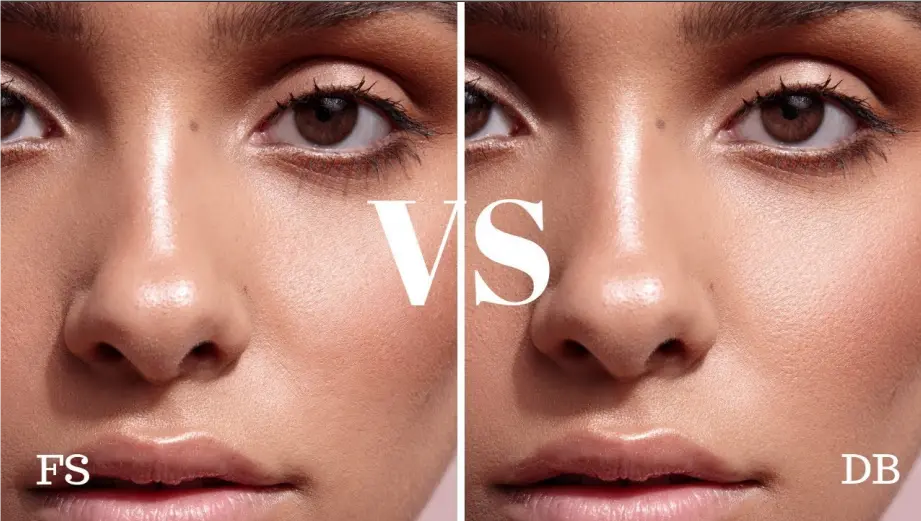
1. Frequency Separation vs. Dodge & Burn
Dodge & Burn manipulates light and shadow to enhance facial contours and smooth imperfections. While Frequency Separation Photoshop focuses on separating texture from color and targeting specific layers.
- Similarities: Both techniques preserve skin details.
- Differences: Dodge & Burn requires meticulous manual adjustments, while frequency separation offers targeted layer-based edits, making it faster for many tasks.
Read More: Step-by-Step Guide to Dodge and Burn in Photoshop, Lightroom, and AI Tools
2. Frequency Separation vs. byRo
byRo actions automate common retouching tasks like smoothing and sharpening, while Frequency Separation in Photoshop offers greater manual control over each layer.
- Similarities: Both ensure skin texture retention.
- Differences: byRo is ideal for quick edits, while frequency separation action caters to precise, professional retouching needs.
3. Frequency Separation vs. Touch-Up Layer
A touch-up layer involves non-destructive adjustments with clone or healing tools. While Frequency Separation splits the image into texture and color layers for advanced retouching.
- Similarities: Both focus on maintaining photo quality.
- Differences: Frequency separation provides more in-depth control, while touch-up layers are simpler but less flexible.
4. Frequency Separation vs. Spot Healing Brush/ Content-Aware
Spot Healing Brush/ Content-Aware automates blemish removal by sampling nearby pixels. While Frequency Separation action allows precise adjustments by working on separated layers.
- Similarities: Both remove imperfections.
- Differences: Frequency separation retains natural details better, while the Spot Healing Brush may blur textures.
5. Frequency Separation Photoshop vs. Evoto AI Skin Retouching
Evoto AI offers a robust set of skin retouching features that streamline complex editing processes traditionally handled in Photoshop. Here’s a feature-by-feature comparison:
#1. Blemish and Spot Removal
- Evoto AI: Automatically detects and removes blemishes, acne, and scars with AI-powered precision. This process is quick, intuitive, and requires no manual input.
- Photoshop: Relies on tools like the Healing Brush and Spot Healing Brush, which demand manual selection and adjustments. While effective, these tools require time and expertise for seamless results.
#2. Advanced Smooth Skin Technology
- Evoto AI: Smooths skin while preserving natural details like pores and fine lines using AI algorithms. Adjustments can be made with simple sliders for perfect control.
- Photoshop: Achieving smooth skin involves multiple steps, including frequency separation or manual use of the Blur and Clone tools. The process can be time-consuming and requires advanced skills.
#3. Dynamic Skin Tone Balancing
- Evoto AI: Automatically corrects uneven skin tones and discoloration, delivering natural results in just a few clicks.
- Photoshop: Adjusting skin tones involves using tools like Hue/Saturation, Curves, and Adjustment Layers. While powerful, these methods can be challenging for beginners.
#4. Wrinkle Reduction
- Evoto AI: Reduces fine lines and remove wrinkles effectively while maintaining natural textures, making edits subtle yet impactful.
- Photoshop: Requires manual use of tools like the Clone Stamp or Healing Brush, often combined with frequency separation. This approach offers more control but is labor-intensive.
#5. Makeup Retouching
- Evoto AI: Offers AI-powered makeup retouching, including lipstick enhancement and eyeshadow corrections, with adjustable intensity.
- Photoshop: Requires manual use of tools like Brushes, Layers, and Blending Modes. While powerful, achieving professional results demands significant expertise.
Body and Skin Retouching Tools You May Need
Face Skin Editing
- How to Remove Face Freckles and Acne
- How to Remove Face Shine from Photo
- Face Slimming App: Best AI Skinny Face Photo Editor
- Step-by-Step Guide to Dodge and Burn in Photoshop, Lightroom, and AI Tools
- Skin Soften: Top Tools and Tech to Achieve Flawless Photos
- Non-Destructive Dodge and Burn Techniques in Photoshop: A Step-by-Step Guide
- How Does the AI Skin Retouching Assist Your Editing Workflow in 2024
Body Editing
- Top 6 Free Change Skin Color Online Photo Editors
- How to Achieve Leg Slimming in Photoshop: A Step-by-Step Guide
- Enhancing Eye Reflections: A Guide with Evoto AI
Blemish and Wrinkle Removal
- AI Braces Remover to Remove Braces
- How to Remove Red Veins Eyes Photo [PC, Online, iPhone Tool]
- Ultimate Guide: How to Use AI Pimple Remover
- How to Remove Eye Bags: Look Refreshed and Radiant in Every Photo
- How to Remove Eye Wrinkles from Photos
- How to Remove Wrinkles in Neck
Mouth, Lip and Teeth Retouching
- Add Smile to Photo in Seconds with AI
- How to Perfect a Lip Touch-Up: Tips and Tools
- [Online & Offline] Photo Editor for Teeth Whitening
- How to Remove Lip Lines & Chapped Lip from Photos: The Ultimate Guide
- How to Fix a Crooked Mouth/ Crooked Smile and Sideways Mouth
Hair Retouching
- Add Hair to Photo AI: How to Fill Hair Gaps Naturally
- AI Hair Color Filter: Transform Your Look Instantly
- How to Edit Flyaway Hair to Remove Flyaway Hair 2024
FAQ
Evoto – The Most Efficient AI Photo Editor
Conclusion
Frequency separation Photoshop remains a benchmark for professional skin retouching, offering unmatched control over textures and tones. However, Evoto AI Frequency Separation Editor redefines the process by automating these features while retaining professional-grade quality. Whether you’re a seasoned editor or a novice, combining traditional and AI-based methods will elevate your photo editing game. Try Evoto AI today for a faster, smarter retouching experience!

